HP ProLiant Onboard Administrator Powered by Lights-Out 100 User Guide For HP ProLiant ML150 G6, DL160 G6, and DL180 G6 Servers
12 août 2009 — admin
Operational overview
Overview
This guide discusses the standard and optional operational features of the HP Onboard Administrator
Powered by Lights-Out 100 (LO100) available in HP ProLiant ML150 G6, DL160 G6, and DL180 G6
Servers.
New features
This release of LO100 adds support for the following:
• HP ProLiant ML150 G6 Server
• HP ProLiant DL160 G6 Server
• HP ProLiant DL180 G6 Server
Server management
LO100 delivers basic remote control of vital server resources, supports IPMI 2.0, DCMI 1.0, and provides
system administrators with access to the server at any time, even before an operating system is installed
on the server.
LO100 provides text mode console redirection, DMTF SMASH compliant command line interface, and
browser access to many of the same system management functions. You can access LO100 through a
dedicated Ethernet port or through the server serial port.
Server management features
With LO100, you can perform the following tasks:
• Access a remote graphic console (Virtual KVM)
• Access the serial console of the host operating system over the network using standards-based client
utilities
• Switch between serial console redirection or the LO100 command line interface
• Communicate securely using SSL and SSH
• Remotely control the power button of the server (power on and off the server), or perform warm or
cold server reboots
• Remotely monitor fan speed and system power state (S0 or S5)
• Access the system event log
• Access virtual media
• Configure TCP/IP settings for the LO100 NIC
• Control user access
• Discover, identify, and launch LO100 from HP SIM
• Access LO100 and server controls using a standard browser or new industry-standard SMASH CLP
command line interface
• Access command line help
• Manage the server with IPMI 2.0 and DCMI 1.0 compliant applications
• Access Telnet
Not all of the features displayed and described in the guide are available on all systems. To verify which
features are supported on your system, see "LO100 standard features (on page 6)" and "LO100 optional
(licensed) features (on page 6)" for more information.
LO100 standard features
For HP ProLiant ML150 G6, DL160 G6, and DL180 G6 Servers, LO100 standard features include:
• IPMI 2.0 and DCMI 1.0 elements available through the operating system
• IPMI-over-LAN support
• Web browser access (HTTP) to power control, system event log, hardware status, and license key
activation of optional features
• SMASH CLP interface access to remote power control, system event log, hardware status, and
operating system serial console
• Support for SSL, SSH, and IPMI 2.0 security with factory-default self-signed certificates and keys
LO100 optional (licensed) features
LO100 optional features are activated with the purchase of the Lights-Out 100i Advanced Pack package.
The Lights-Out 100i Advanced Pack includes:
• Virtual media access
• Virtual KVM
Configuration 7
Configuration
Configuring network access
Through your server network connection, you can access the remote management CLP, verify POST
(power-on self test) remotely, access the server through a Web browser, and access the BIOS Setup Utility
remotely.
To configure network access:
1. Connect a standard Ethernet cable from the LO100 to a network jack.
2. Obtain the DHCP IP address, by using either of the following methods:
o Look at the DHCP clients table.
o Look at the DNS client records for an entry of LO100. (The default DNS
host name for each LO100 is unique.)
o Press the F10 key during POST, and then obtain the IP address from BIOS Setup Utility under
Advanced/IPMI/LAN Setting. For more information, see "Obtaining a DHCP IP address from the
BIOS Setup Utility (on page 9)".
By default, LO100 has DHCP enabled and automatically negotiates an IP address.
3. With the DHCP IP address, use Telnet to log in to the remote management CLP, or use a web
browser to access the HTML interface.
To set up a static IP address, see "Setting up a static IP address from the BIOS Setup Utility (on page 10)".
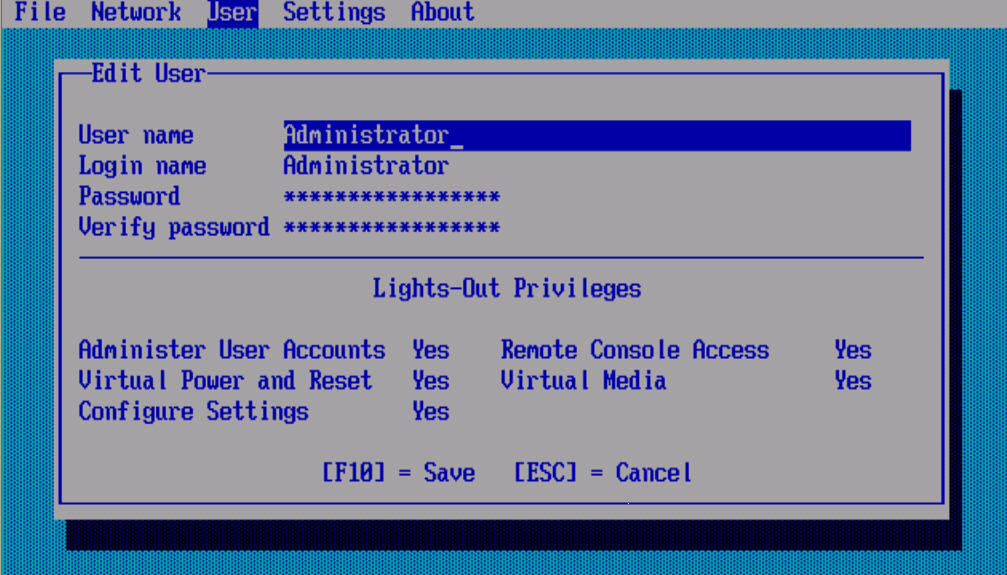
Configuring user accounts
LO100 supports four accounts types, with varying levels of permissions to view and control features. For
more information on user accounts, see the "User administration (on page 44)" section. Two accounts are
available by default, one of type administrator and one of type operator.
The administrator account enables the user to execute the full set of CLP commands and change
management processor configuration. The default administrator account user name is admin, and the
default password is admin.
The operator account enables the user to execute common commands and functions but restricts access to
specific functions, such as adding and changing user account information and changing the configuration
of the management processor. HP recommends logging in with the operator account to perform common
functions. The default user name is Operator, and the default password is Operator.
For more information on how to log in to LO100, see the "Logging in to LO100 (on page 22)" section.
Accessing BIOS Setup Utility and using function keys
Throughout the document, the F10 key is listed as the standard method of accessing the BIOS Setup
Utility, saving changes, and exiting the utility. In some cases, the function keys (F keys) might not pass
Configuration 8
through the telnet client correctly to the remote system. If this occurs, use the following ESC key
equivalents:
• F8—ESC+8
• F10—ESC+0
• F12—ESC+@
Using the serial port
The server serial port provides basic serial port functionality and serves as an interface to LO100. You
can configure the system serial port for exclusive use with LO100.
CAUTION: After enabling the serial port for use with LO100, legacy serial devices might not
function correctly if attached to the serial port.
You must configure the LO100 serial port hardware parameters to work with your respective serial port
communications software. LO100 serial port configuration is controlled through the BIOS Setup Utility.
Enabling serial access
1. Power up the server.
2. When POST displays the message, ROM-Based Setup, press the F10 key. If the server has an
administrator password configured, the system prompts you to enter the password. If the server does
not have a password configured, the main screen of the BIOS Setup Utility appears.
3. Press the right arrow (→) key to navigate to the Advanced menu.
4. Choose one of these options:
NOTE: If you change the Serial Port Assignment, the BMC IP Address resets. The BMC IP
address might not be the same after reboot.
o On ML150 G6 servers:
i. Press the down arrow (↓) key to scroll to IPMI Configuration. Press the Enter key.
ii. Set Serial Port Assignment to BMC.
iii. Set Serial Port Switching to Enabled.
iv. Set Serial Port Connection Mode to Direct.
o On DL160 G6 and DL180 G6 servers:
i. Press the down arrow (↓) key to scroll to IPMI Configuration. Press the Enter key.
ii. Set Serial Port Assignment to BMC.
iii. Set Serial Port Connection Mode to Direct.
5. Press the F10 key to save and exit.
Configuring serial port
1. Power on the server by pressing the Power On/Off button on the front panel.
Configuration 9
2. When POST displays the message, ROM-Based Setup, press the F10 key. If the server has an
administrator password configured, the system prompts you to enter the password. If the server does
not have a password configured, the main screen of the BIOS Setup Utility appears.
3. Press the right arrow (→) key to navigate to the Advanced menu.
4. Press the down arrow (↓) key to scroll to IO Device Configuration. Press the Enter key.
5. Set Embedded Serial Port to 3F8/IRQ4.
6. Review the serial port settings, and make sure the settings match the serial port communications
software settings used to connect to LO100.
7. To return to the previous screen, press the Esc key, or to save the changes and exit Setup, press the
F10 key.
Using TCP/IP over Ethernet management port
You can configure LO100 LAN port access using two different Ethernet ports: the dedicated 10/100
LO100 management port or through a side-band connection using the server embedded NIC. The sideband,
shared, or UMP options utilize one server Ethernet port for both server network traffic and LO100
network traffic reducing the number of network cables that you must attach to the server.
Selecting a shared Ethernet management port
1. Power on the server by pressing the Power On/Off button on the front panel.
2. When POST displays the message, ROM-Based Setup, press the F10 key. If the server has an
administrator password configured, the system prompts you to enter the password. If the server does
not have a password configured, the main screen of the BIOS Setup Utility appears.
3. Press the right arrow (→) key to navigate to the Advanced menu.
NOTE: On the ML150 G6 system, the Virtual KVM and Virtual Media functions are not
available when used with the Shared NIC function. If you want LO100 Advanced Pack
features on the ML150 G6, use the dedicated NIC mode.
4. Press the down arrow (↓) key to scroll to IPMI Configuration. Press the Enter key.
5. Scroll to the LAN Configuration menu by pressing the down arrow (↓) key. Press the Enter key.
6. Choose one of these options:
i. On DL160 G6 and DL180 G6, set Share NIC Mode to Enabled.
ii. On ML150 G6, set BMC NIC Mode to Shared.
7. To return to the previous screen, press the Esc key, or to save the changes and exit Setup, press the
F10 key.
The TCP/IP over Ethernet management port, whether dedicated or shared, is a standard Ethernet
10/100Mb interface that connects to the network using a standard Ethernet cable. Before using the
dedicated management port, you must determine the DHCP IP address or, set a static IP address.
Obtaining a DHCP IP address from the BIOS Setup Utility
By default, LO100 has DHCP enabled and automatically negotiates an IP address. To view the DHCP IP
address, run the BIOS Setup Utility, or retrieve the DHCP IP address using CLP through the serial port
connection. To view the DHCP IP address using the BIOS Setup Utility:
Configuration 10
1. Power on the server by pressing the Power On/Off button on the front panel.
2. When POST displays the message, ROM-Based Setup, press the F10 key. If the server has an
administrator password configured, the system prompts you to enter the password. If the server does
not have a password configured, the main screen of the BIOS Setup Utility appears.
3. Press the right arrow (→) key to navigate to the Advanced menu.
4. Press the down arrow (↓) key to scroll to IPMI. Press the Enter key.
5. To obtain the DHCP IP address, choose one of these options:
o On ML150 G6 servers:
i. Press the down arrow (↓) key to scroll to the end of the menu to display the DHCP IP address.
ii. Note the DHCP assigned IP address for future reference.
o On DL160 G6 and DL180 G6 servers:
i. Press the down arrow (↓) key to scroll to the LAN Configuration menu. Press the Enter key.
ii. Note the DHCP assigned IP address for future reference.
6. To return to the previous screen, press the Esc key, or to save the changes and exit Setup, press the
F10 key.
To configure or change your network settings, see "Network settings (on page 46)".
Setting up a static IP address from the BIOS Setup Utility
By default, LO100 has DHCP enabled and automatically negotiates an IP address. To disable DHCP and
enable a static IP address:
1. Press the F10 key during POST to enter the BIOS Setup Utility.
2. Press the right arrow (→) key to navigate to the Advanced menu.
3. Press the down arrow (↓) key to scroll to IPMI. Press the Enter key.
4. To set your network BIOS settings, choose one of these options:
o On ML150 G6 servers:
i. Press the down arrow (↓) key to scroll to the end, and then select BMC LAN Configuration.
ii. On BMC LAN Configuration, select Static.
iii. Press the down arrow (↓) key to scroll down and enter a valid IP address, subnet mask, and
gateway address (press the Tab key to move between address fields).
o On DL160 G6 and ProLiant DL180 G6 servers:
i. Press the down arrow (↓) key to scroll to the LAN Configuration menu. Press the Enter key.
ii. On DHCP IP Source, select Disabled.
iii. Press the down arrow (↓) key to scroll down and enter a valid IP address, subnet mask, and
gateway address (press the Tab or period (.) key to move between address fields).
5. Press the F10 key to save and exit.
To restore DHCP, see "Configuring network settings using the BIOS Setup Utility (on page 47)."
Enabling Telnet and HTTP services
On DL160 G6 servers, HTTP and Telnet are enabled by default.
Reference: http://www.infradiscount.fr/blog/2009/08/hp-proliant-onboard-administrator-powered-by-lights-out-100-user-guide-for-hp-proliant-ml150-g6-dl160-g6-and-dl180-g6-servers/