Wednesday, December 2, 2009

Eight Ways to Blacklist with Apache’s mod_rewrite

— SkyHi @ Wednesday, December 02, 2009
With the imminent release of the next series of (4G) blacklist articles here at Perishable Press, now is the perfect time to examine eight of the most commonly employed blacklisting methods achieved with Apache’s incredible rewrite module, mod_rewrite. In addition to facilitating site security, the techniques presented in this article will improve your understanding of the different rewrite methods available with mod_rewrite.
Blacklist via Request Method

[ #1 ] This first blacklisting method evaluates the client’s request method. Every time a client attempts to connect to your server, it sends a message indicating the type of connection it wishes to make. There are many different types of request methods recognized by Apache. The two most common methods are GET and POST requests, which are required for “getting” and “posting” data to and from the server. In most cases, these are the only request methods required to operate a dynamic website. Allowing more request methods than are necessary increases your site’s vulnerability. Thus, to restrict the types of request methods available to clients, we use this block of Apache directives:


RewriteEngine On
ServerSignature Off
Options +FollowSymLinks
RewriteCond %{REQUEST_METHOD} ^(delete|head|trace|track) [NC]
RewriteRule ^(.*)$ - [F,L]


The key to this rewrite method is the REQUEST_METHOD in the rewrite condition. First we invoke some precautionary security measures, and then we evaluate the request method against our list of prohibited types. Apache will then compare each client request method against the blacklisted expressions and subsequently deny access to any forbidden requests. Here we are blocking delete and head because they are unecessary, and also blocking trace and track because they violate the same-origin rules for clients. Of course, I encourage you to do your own research and establish your own request-method security policy.
Blacklist via the Request

[ #2 ] The next blacklisting method is based on the client’s request. When a client attempts to connect to the server, it sends a full HTTP request string that specifies the request method, request URI, and transfer-protocol version. Note that additional headers sent by the browser are not included in the request string. Here is a typical example:

GET blog/index.html HTTP/1.1

This long request string may be checked against a list of prohibited characters to protect against malicious requests and other exploitative behavior. Here is an example of sanitizing client requests by way of Apache’s THE_REQUEST variable:


RewriteEngine On
RewriteCond %{THE_REQUEST} ^.*(\\r|\\n|%0A|%0D).* [NC]
RewriteRule ^(.*)$ - [F,L]


Here we are evaluating the entire client-request string against a list of prohibited entities. While there are many character strings common to malicious requests, this example focuses on the prevention of HTTP response splitting, cross-site scripting attacks, cache poisoning, and similar dual-header exploits. Although these are some of the most common types of attacks, there are many others. I encourage you to check your server logs, do some research, and sanitize accordingly.
Blacklist via the Referrer

[ #3 ] Blacklisting via the HTTP referrer is an excellent way to block referrer spam, defend against penetration tests, and protect against other malicious activity. The HTTP referrer is identified as the source of an incoming link to a web page. For example, if a visitor arrives at your site through a link they found in the Google search results, the referrer would be the Google page from whence the visitor came. Sounds straightforward, and it is.

Unfortantely, one of the biggest spam problems on the Web involves the abuse of HTTP referrer data. In order to improve search-engine rank, spambots will repeatedly visit your site using their spam domain as the referrer. The referrer is generally faked, and the bots frequently visit via HEAD requests for the sake of efficiency. If the target site publicizes their access logs, the spam sites will receive a search-engine boost from links in the referrer statistics.

Fortunately, by taking advantage of mod_rewrite’s HTTP_REFERER variable, we can forge a powerful, customized referrer blacklist. Here’s our example:


RewriteEngine On
RewriteCond %{HTTP_REFERER} ^(.*)(<|>|'|%0A|%0D|%27|%3C|%3E|).* [NC,OR]
RewriteCond %{HTTP_REFERER} ^http://(www\.)?.*(-|.)?adult(-|.).*$ [NC,OR]
RewriteCond %{HTTP_REFERER} ^http://(www\.)?.*(-|.)?poker(-|.).*$ [NC,OR]
RewriteCond %{HTTP_REFERER} ^http://(www\.)?.*(-|.)?drugs(-|.).*$ [NC]
RewriteRule ^(.*)$ - [F,L]


Same basic pattern as before: check for the availability of the rewrite module, enable the rewrite engine, and then specify the prohibited character strings using the HTTP_REFERER variable and as many rewrite conditions as necessary. In this case, we are blocking a series of potentially malicious characters in the first condition, and then blacklisting any referrer containing the terms “adult”, “poker”, or “drugs”. Of course, we may blacklist as many referrer strings as needed by simply emulating the exisiting rewrite conditions. Just don’t get carried away — I have seen some referrer blacklists that are over 4000 lines long!
Blacklist via Cookies

[ #4 ] Protecting your site against malicious cookie exploits is greatly facilitated by using Apache’s HTTP_COOKIE variable. HTTP cookies are chunks of data sent by the server to the web client upon initialization. The browser then sends the cookie information back to the server for each subsequent visit. This enables the server to authenticate users, track sessions, and store preferences. A common example of the type of functionality enabled by cookies is the shopping cart. Information about the items placed in a user’s shopping cart may be stored in a cookie, thereby enabling server scripts to respond accordingly.

Generally, a cookie consists of a unique string of alphanumeric text and persists for the duration of a user’s session. Apache’s mod_cookie module generates cookie values randomly and upon request. Once a cookie has been set, it may be used as a database key for further processing, behavior logging, session tracking, and much more. Unfortunately, this useful technology may be abused by attackers to penetrate and infiltrate your server’s defenses. Cookie-based protocols are vulnerable to a variety of exploits, including cookie poisoning, cross-site scripting, and cross-site cooking. By adding malicious characters, scripts, and other content to cookies, attackers may find and exploit sensitive vulnerabilities.

The good news is that we may defend against most of this nonsense by using Apache’s HTTP_COOKIE variable to blacklist characters known to be associated with malicious cookie exploits. Here is an example that does the job:


RewriteEngine On
RewriteCond %{HTTP_COOKIE} ^.*(<|>|'|%0A|%0D|%27|%3C|%3E|).* [NC]
RewriteRule ^(.*)$ - [F,L]


This is as straightforward as it looks. Check for the required rewrite module, enable the rewrite engine, and deny requests for any HTTP_COOKIEs containing the specified list of prohibited characters. In this list you will see characters generally required to execute any sort of scripted attack: opening and closing angle brackets, single quotation marks, and a variety of hexadecimal equivalents. Feel free to expand this list with additional characters as you see fit. As always, recommendations are most welcome.
Blacklist via Request URI

[ #5 ] Use of Apache’s REQUEST_URI variable is frequently seen in conjunction with URL canonicalization. The REQUEST_URI variable targets the requested resource specified in the full HTTP request string. Thus, we may use Apache’s THE_REQUEST variable to target the entire request string (as discussed above), while using the REQUEST_URI variable to target the actual request URI. For example, the REQUEST_URI variable refers to the “blog/index.html” portion of the following, full HTTP request line:

GET blog/index.html HTTP/1.1

For canonicalization purposes, this is exactly the type of information that must be focused on and manipulated in order to achieve precise, uniform URLs. Likewise, for blacklisting malicious request activity such as the kind of nonsense usually exposed in your server’s access and error logs, targeting, evaluating, and denying malicious URL requests is easily accomplished by taking advantage of Apache’s REQUEST_URI variable.

As you can imagine, blacklisting via REQUEST_URI is an excellent way to eliminate scores of malicious behavior. Here is an example that includes some of the same characters and strings that are blocked in the upcoming 4G Blacklist:


RewriteEngine On
RewriteCond %{REQUEST_URI} ^.*(,|;|:|<|>|">|"<|/|\\\.\.\\).* [NC,OR]
RewriteCond %{REQUEST_URI} ^.*(\=|\@|\[|\]|\^|\`|\{|\}|\~).* [NC,OR]
RewriteCond %{REQUEST_URI} ^.*(\'|%0A|%0D|%27|%3C|%3E|).* [NC]
RewriteRule ^(.*)$ - [F,L]


Again, same general pattern of directives as before, only this time we are specifying forbidden characters via the REQUEST_URI variable. Here we are denying any URL requests containing invalid characters, including different types of brackets, various punctuational characters, and some key hexadecimal equivalents. Of course, the possibilities are endless, and the blacklist should be customized according to your specific security strategy and unfolding blacklisting needs.
Blacklist via the User Agent

[ #6 ] Blacklisting via user-agent is a commonly seen strategy that yields questionable results. The concept of blacklisting user-agents revolves around the idea that every browser, bot, and spider that visits your server identifies itself with a specific user-agent character string. Thus, user-agents associated with malicious, unfriendly, or otherwise unwanted behavior may be identified and blacklisted in order to prevent against future access. This is a well-known blacklisting strategy that has resulted in some extensive and effective user-agent blacklists.

Of course, the downside to this method involves the fact that user-agent information is easily forged, making it difficult to know for certain the true identity of blacklisted clients. By simply changing their user-agent to an unknown identity, malicious bots may bypass every blacklist on the Internet. Many evil “scumbots” indeed do this very thing, which explains the incredibly vast number of blacklisted user-agents. Even so, there are certain limits to the extent to which certain user-agent strings may be changed. For example, GNU’s Wget and the cURL command-line tool are difficult to forge, and many other clients have hard-coded user-agent strings that are difficult to change.

On Apache servers, user-agents are easily identified and blacklisted via the HTTP_USER_AGENT variable. Here is an example:


RewriteEngine On
RewriteCond %{HTTP_USER_AGENT} ^$ [OR]
RewriteCond %{HTTP_USER_AGENT} ^.*(<|>|'|%0A|%0D|%27|%3C|%3E|).* [NC,OR]
RewriteCond %{HTTP_USER_AGENT} ^.*(HTTrack|clshttp|archiver|loader|email|nikto|miner|python).* [NC,OR]
RewriteCond %{HTTP_USER_AGENT} ^.*(winhttp|libwww\-perl|curl|wget|harvest|scan|grab|extract).* [NC]
RewriteRule ^(.*)$ - [F,L]


This method works just like the others: check for the mod_rewrite module, enable the rewrite engine, and proceed to deny access to any user-agent that includes any of the blacklisted character strings in its name. As with our previous blacklisting techniques, here we are prohibiting angle brackets, single quotation marks, and various hexadecimal equivalents. Additionally, we include a handful of user-agent strings commonly associated with server attacks and other malicious behavior. We certainly don’t need anything associated with libwww-perl hitting our server, and many of the others are included in just about every user-agent blacklist that you can find. There are tons of other nasty user-agent scumbots out there, so feel free to beef things up with a few of your own.
Blacklist via the Query String

[ #7 ] Protecting your server against malicious query-string activity is extremely important. Whereas static URLs summon pages, their appended query strings transmit data and pass variables throughout the domain. Query-string information interacts with scripts and databases, influencing behavior and determining results. This relatively open channel of communication is easily accessible and prone to external manipulation. By altering data and inserting malicious code, attackers may penetrate and exploit your sever directly through the query string.

Fortunately, we can protect our server against malicious query-string exploits with the help of Apache’s invaluable QUERY_STRING variable. By taking advantage of this variable, we can ensure the legitimacy and quality of query-string input by screening out and denying access to a known collection of potentially harmful character strings. Here is an example that will keep our query strings squeaky clean:


RewriteEngine On
RewriteCond %{QUERY_STRING} ^.*(localhost|loopback|127\.0\.0\.1).* [NC,OR]
RewriteCond %{QUERY_STRING} ^.*(\.|\*|;|<|>|'|"|\)|%0A|%0D|%22|%27|%3C|%3E|).* [NC,OR]
RewriteCond %{QUERY_STRING} ^.*(md5|benchmark|union|select|insert|cast|set|declare|drop|update).* [NC]
RewriteRule ^(.*)$ - [F,L]


As you can see, here we are using the QUERY_STRING variable to check all query-string input against a list of prohibited alphanumeric characters strings. This strategy will deny access to any URL-request that includes a query-string containing localhost references, invalid punctuation, hexadecimal equivalents, and various SQL commands. Blacklisting these enitities protects us from common cross-site scripting (XSS), remote shell attacks, and SQL injection. And, while this a good start, it pales in comparison to the new query-string directives of the upcoming 4G Blacklist. ;)
Blacklist via IP Address

[ #8 ] Last but certainly not least, we can blacklist according to IP address. Blacklisting sites based on IP is probably the oldest method in the book and works great for denying site access to stalkers, scrapers, spammers, trolls, and many other types of troublesome morons. The catch is that the method only works when the perpetrators are coming from the same location. An easy way to bypass any IP blacklist is to simply use a different ISP or visit via proxy server. Even so, there is no lack of mindless creeps out there roaming the Internet, who sit there, using the same machine, day after day, relentlessly harassing innocent websites. For these types of lazy, no-life losers, blacklisting via IP address is the perfect solution. Here is a hypothetical example demonstrating several ways to blacklist IPs:

# block individual IPs

RewriteEngine On
RewriteCond %{REMOTE_ADDR} ^123\.456\.789\.1$ [OR]
RewriteCond %{REMOTE_ADDR} ^456\.789\.123\.2$ [OR]
RewriteCond %{REMOTE_ADDR} ^789\.123\.456\.3$ [OR]
RewriteRule ^(.*)$ - [F,L]


# block ranges of IPs

RewriteEngine On
RewriteCond %{REMOTE_ADDR} ^123\.$ [OR]
RewriteCond %{REMOTE_ADDR} ^456\.789\.$ [OR]
RewriteCond %{REMOTE_ADDR} ^789\.123\.456\.$ [OR]
RewriteRule ^(.*)$ - [F,L]


# alt block IP method

order allow,deny
allow from all
deny from 123.
deny from 123.456.
deny from 123.456.789.0


In the first block, we are blacklisting three specific IP addresses using Apache’s mod_rewrite and its associated REMOTE_ADDR variable. Each of the hypothetical IPs listed represent a specific, individual address. Then, in the next code block, we are blocking three different ranges of IPs by omitting numerical data from the targeted IP string. In the first line we target any IP beginning with “123.”, which is an enormous number of addresses. In the second line, we block a different, more restrictive range by including the second portion of the address. Finally, in the third line, we block a different, much smaller range of IPs by including a third portion of the address.

Then, just for kicks, I threw in an alternate method of blocking IPs. This is an equally effective method that enables you to block IP addresses and ranges as specifically as necessary. Each deny line pattern-matches according to the specified IP string.
Dealing with Blacklisted Visitors

In each of these eight blacklisting techniques, we respond to all blacklisted visitors with the server’s default “403 Forbidden” error. This page serves its purpose and requires very little to deliver in terms of system resources, however there is much more that you can do with blacklisted traffic. Here are a few ideas:

Redirect to home page
More subtle than the 403 error, this redirect strategy routes blocked traffic directly to the home page. To use, replace the RewriteRule directive (i.e., the entire line) with the following code:

RewriteRule ^(.*)$ http://your-domain.tld/ [F,L]

Redirect to external site
The possibilities here are endless. Just make sure you think twice about the destination, as any scum that you redirect to another site will be seen as coming from your own. Even so, here is the code that you would use to replace the RewriteRule directive in any of the examples above:

RewriteRule ^(.*)$ http://external-domain.tld/some-target/page.html [F,L]

Redirect them back to their own site
This is one of my favorites. It’s like having a magic shield that reflects attacks back at the attacker. Send a clear message by using this code as the RewriteRule directive in any of our blacklisting methods:

RewriteRule ^(.*)$ http://%{REMOTE_ADDR}/ [F,L]

Custom processing
For those of you with a little skill, it is possible to redirect your unwelcome guests to a fail-safe page that explains the situation to the client while logging all of the information behind the scenes. This is perhaps the most useful approach for understanding your traffic and developing an optimal security strategy. The code would look something like this, depending on your file name and its location:

RewriteRule ^(.*)$ /home/path/blacklisting-script.php [F,L]
Closure

This article presents eight effective techniques for protecting your server and preventing malicious behavior. While each of these methods may be used individually, they are designed to secure different aspects of your environment and thus provide a more complete type of firewall protection when combined into a synergized whole. Even when combining these techniques, however, keep in mind that blacklisting various protocols serves to complement a more robust and comprehensive security strategy. Once understood, these methods provide the average webmaster an easy, effective way of defending against unwanted behavior and enhancing the overall security of their sites.


[ Gravatar Icon ]

rc phelps – #18

hi jeff,

is the following httpd log file entry indicative of mischievous behavior:

[Thu Apr 09 08:22:24 2009] [error] [client 204.234.223.2] Request exceeded the limit of 10 internal redirects due to probable configuration error. Use 'LimitInternalRecursion' to increase the limit if necessary. Use 'LogLevel debug' to get a backtrace.

Curous that the state of nebraska would be banging on my lowly webserver.

thanks for any insight.

rc phelps
[ Gravatar Icon ]

Jeff Starr – #19

@rc phelps: That error message is telling you that the URL request resulted in too many redirects, as specified by your server. This means that something requested a web page that was redirected by your server. That redirect was then redirected to another resource, and then that redirect was redirected, and so on until the maximum number was reached. This is probably due to some unruly HTAccesss directives or something script-related. I.e., most likely not the result of mischievous behavior.
[ Gravatar Icon ]

kg – #20

I also had trouble with the first REQUEST_URI line

RewriteCond %{REQUEST_URI} ^.*(,|;|:|<|>|">|"<|/|\\\.\.\\).* [NC,OR]

I had to remove the forward slash from the list, like so

RewriteCond %{REQUEST_URI} ^.*(,|;|:|<|>|">|"<|\\\.\.\\).* [NC,OR]
[ Gravatar Icon ]

Jeff Starr – #21

@kg: Thanks for the information. Escaping the character may also have worked ( \/ ):

RewriteCond %{REQUEST_URI} ^.*(,|;|:|<|>|">|"<|\/|\\\.\.\\).* [NC,OR]

Although I haven’t tested it..
[ Gravatar Icon ]

Vladimir – #22

Here’s another rule set that blocks many HTTP-scanners, maybe someone will find it useful:

RewriteEngine On

RewriteCond %{QUERY_STRING} [^?]*\? [OR]
RewriteCond %{QUERY_STRING} (\.\./|\.\.\\) [OR]
RewriteCond %{QUERY_STRING} (///) [OR]
RewriteCond %{THE_REQUEST} "^(GET|POST) /?https?:" [OR]
RewriteCond %{THE_REQUEST} "^(GET|POST|HEAD) //"
RewriteRule (.*) $1 [F]

The first RewriteCond checks if the query string has more than one question mark (this pattern is used in some attacks; moreover, extra question marks should be encoded tp %3F), the second one tries to prevent directory traversal attacks (for both Windows and Linux hosts), the third one disallows three or more slashes in the query string (common pattern in many attacks), the fourth and the fifth ones stops proxy checkers.
[ Gravatar Icon ]

Jeff Starr – #23

Another excellent post, Vladimir — thanks for sharing with us. This is a great set of HTAccess security directives, some of which are already included in my 4G Blacklist in the “Query String Exploits” section. I like the check for double question marks, and the proxy-checking directives are just plain sexy. A couple of questions for you:

1. What are your thoughts on simply blocking any instances of two periods (i.e., \.\. )?
2. What exactly is going on in the RewriteRule? Seems like a possible typo?

Thanks again for the comment :)
[ Gravatar Icon ]

Vladimir – #24

What are your thoughts on simply blocking any instances of two periods

Well, maybe… This depends upon what comes in GET and what in POST. For example, when you search for something in WordPress, the string is passed in GET request. A visitor could make a typo and by accident put two periods and it would not be user-friendly to show a 403 page.

And, if you try a directory traversal attack, you still need to use either forward or backward slash — cf. ..etc/password and ../etc/password. So it looks like a slash is a must in this type of attacks.

What exactly is going on in the RewriteRule? Seems like a possible typo?

RewriteRule (.*) $1 [F]

That is, anything that matches RewriteCond’s gets banned ([F])

Well, maybe

RewriteRule .* - [F]

is better, but both worked for me.

Would you mind if I scan your site with Nessus and Nikto? This can give you more attack patterns. I will launch the scanner from 195.10.218.132, please do not ban me :-)
[ Gravatar Icon ]

Jeff Starr – #25

I am on the fence about blocking any instance of two simultaneous periods in the query string. Then the presence of a forward-vs-backslash along with the request is also an interesting dilemma. Currently, I only block the case when \.\.\/ is present in the query string, but I am thinking that blocking the backslash case is also a good idea. I almost blocked backslashes (either one or two) via mod_alias as well. I just can’t imagine why they would be needed unless encoded. Anyway, food for thought.

I assumed that your RewriteRule was blocking any matching requests, but I had never seen that particular flavour before, so I thought I would ask. Very interesting.

Go ahead and scan my site using the specified IP. I am currently running a series of tests myself, so it will be interesting to see the results given the current conditions. I won’t ban you ;)
[ Gravatar Icon ]

Rima – #26

Hi
I have Wordpress blog and I’d like to hide the login URL totally.. or to be honest I do want visitors to know that I’m using wordpress because it’s not the only thing running the website.

I have tried a wordpress plug-in that generates this for example

RewriteRule ^logout wp-login.php?action=logout&_wpnonce=b4318ad0cd&stealth_out_key=cbmfojbhqsdaxjem1q0jyzyivq [L]

well that’s nice, but when you go to /login it redirects and shows in the address bar wp-login?action=……. etc.

I don’t want that to happen, I want the whole thing to be totally masked.

Any advices ?
[ Gravatar Icon ]

Jeff Starr – #27

Hi Rima, the URL of any webpage will always be available to the visitor. There is no way (of which I am aware) to completely hide it. Fascinating that you actually would want to deprive users of that information.


Reference: http://perishablepress.com/press/2009/02/03/eight-ways-to-blacklist-with-apaches-mod_rewrite/
Tuesday, December 1, 2009

Vim setup explained

— SkyHi @ Tuesday, December 01, 2009

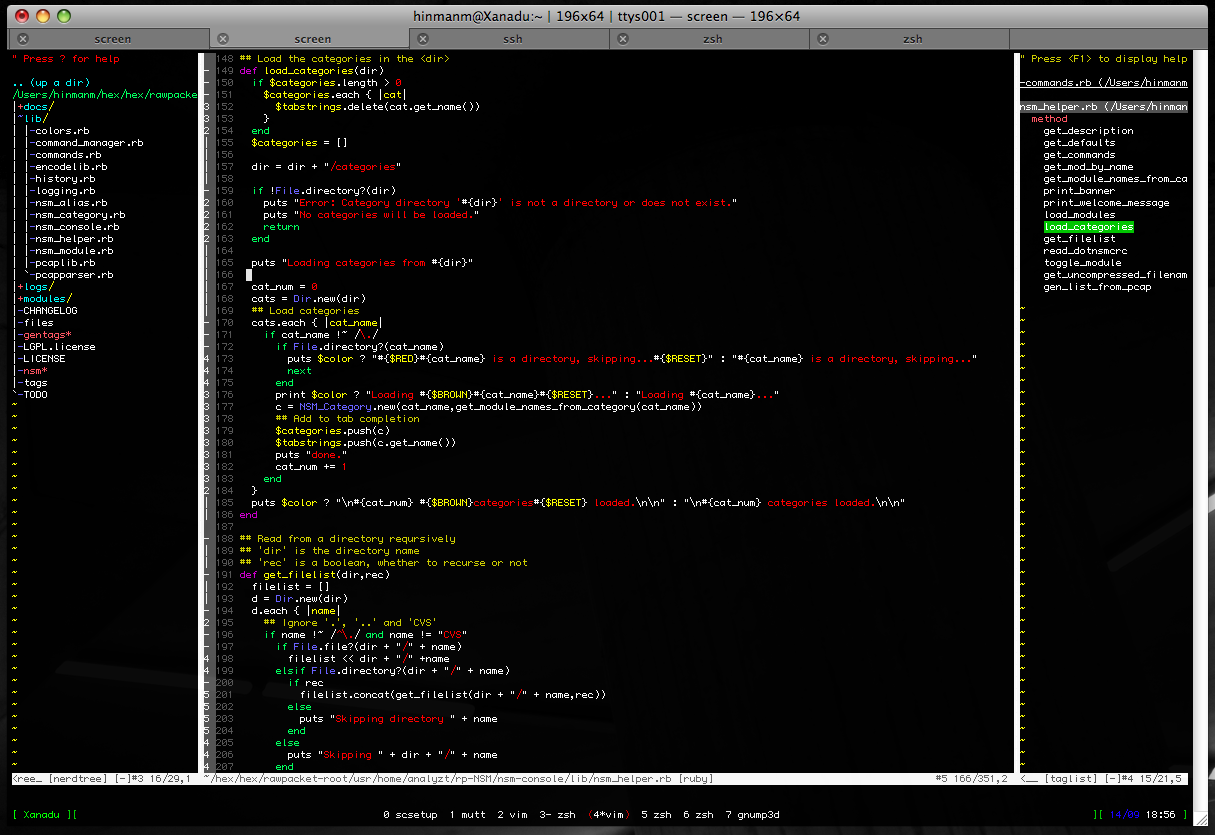
Since my site is named after a Vim command. I figured that I should eventually write something talking about my favorite text editor, and how I like it configured. What follows is the explanation of my .vimrc, as well as a description of the plugins that I use. A lot of the credit for this configuration goes to Bart Trojanowski, who has an excellent Vim configuration. At the bottom I’ll have a link to download any of the files themselves if you so desire. I hope you find it useful (everything in fixed-width font is the actual text, everything else is comments about it):

My ~/.vimrc:

Modelines have been abused in the past, and while I haven’t heard of anything lately that would abuse them, it’s always better safe than sorry. This requires the securemodelines vim script

" ---------------------------------------------------------------------------
" first the disabled features due to security concerns
set modelines=0 " no modelines [http://www.guninski.com/vim1.html]
let g:secure_modelines_verbose=0 " securemodelines vimscript
let g:secure_modelines_modelines = 15 " 15 available modelines

Since these are all simple features, I won’t bother to explain them besides the inline comments:

" ---------------------------------------------------------------------------
" operational settings
syntax on
set ruler " show the line number on the bar
set more " use more prompt
set autoread " watch for file changes
set number " line numbers
set hidden
set noautowrite " don't automagically write on :next
set lazyredraw " don't redraw when don't have to
set showmode
set showcmd
set nocompatible " vim, not vi
set autoindent smartindent " auto/smart indent
set expandtab " expand tabs to spaces
set smarttab " tab and backspace are smart
set tabstop=6 " 6 spaces
set shiftwidth=6
set scrolloff=5 " keep at least 5 lines above/below
set sidescrolloff=5 " keep at least 5 lines left/right
set backspace=indent,eol,start
set showfulltag " show full completion tags
set noerrorbells " no error bells please
set linebreak
set cmdheight=2 " command line two lines high
set undolevels=1000 " 1000 undos
set updatecount=100 " switch every 100 chars
set complete=.,w,b,u,U,t,i,d " do lots of scanning on tab completion
set ttyfast " we have a fast terminal
filetype on " Enable filetype detection
filetype indent on " Enable filetype-specific indenting
filetype plugin on " Enable filetype-specific plugins
compiler ruby " Enable compiler support for ruby
set wildmode=longest:full
set wildignore+=*.o,*~,.lo " ignore object files
set wildmenu " menu has tab completion
let maplocalleader=',' " all my macros start with ,
set foldmethod=syntax " fold on syntax automagically, always
set foldcolumn=2 " 2 lines of column for fold showing, always

set dictionary=/usr/share/dict/words " more words!

I do like candycode for my terminals (which tend to be black) and I like macvim for my GUI, so I change schemes depending on which I’m using.

if !has("gui_running")
colorscheme candycode " yum candy
end
if has("gui_running")
colorscheme macvim " macvim == win
set guioptions-=T " no toolbar
set cursorline " show the cursor line
end

For the taglist plugin, I want it to appear on the right and to quick vim as soon as I close the last file I’m working on.

" Settings for taglist.vim
let Tlist_Use_Right_Window=1
let Tlist_Auto_Open=0
let Tlist_Enable_Fold_Column=0
let Tlist_Compact_Format=0
let Tlist_WinWidth=28
let Tlist_Exit_OnlyWindow=1
let Tlist_File_Fold_Auto_Close = 1

Misc TOhtml settings

" Settings for :TOhtml
let html_number_lines=1
let html_use_css=1
let use_xhtml=1

My status line is basically [] [+] # /,

" ---------------------------------------------------------------------------
" status line
set laststatus=2
if has('statusline')
function! SetStatusLineStyle()
let &stl="%f %y " .
\"%([%R%M]%)" .
\"%#StatusLineNC#%{&ff=='unix'?'':&ff.'\ format'}%*" .
\"%{'$'[!&list]}" .
\"%{'~'[&pm=='']}" .
\"%=" .
\"#%n %l/%L,%c%V " .
\""
endfunc
call SetStatusLineStyle()

if has('title')
set titlestring=%t%(\ [%R%M]%)
endif

endif

More simple search options, see inline comments

" ---------------------------------------------------------------------------
" searching
set incsearch " incremental search
set ignorecase " search ignoring case
set hlsearch " highlight the search
set showmatch " show matching bracket
set diffopt=filler,iwhite " ignore all whitespace and sync

I *occasionally* use the mouse. If I have to.

" ---------------------------------------------------------------------------
" mouse stuffs
set mouse=a " mouse support in all modes
set mousehide " hide the mouse when typing
" this makes the mouse paste a block of text without formatting it
" (good for code)
map "*p

I prefer not to litter my current directory with backup files, so I put them all in ~/.backup. I also save a lot of line positions in the viminfo file.

" ---------------------------------------------------------------------------
" backup options
set backup
set backupdir=~/.backup
set viminfo=%100,'100,/100,h,\"500,:100,n~/.viminfo
set history=200
"set viminfo='100,f1

I use ,ss to toggle between spellcheck on and spellcheck off.

" ---------------------------------------------------------------------------
" spelling...
if v:version >= 700

setlocal spell spelllang=en
nmap ss :set spell!

endif

Here are all the keyboard shortcuts I use most often:

" ---------------------------------------------------------------------------
" some useful mappings
" Y yanks from cursor to $
map Y y$
" for yankring to work with previous mapping:
function! YRRunAfterMaps()
nnoremap Y :YRYankCount 'y$'
endfunction
" toggle list mode
nmap tl :set list!
" toggle paste mode
nmap pp :set paste!
" change directory to that of current file
nmap cd :cd%:p:h
" change local directory to that of current file
nmap lcd :lcd%:p:h
" correct type-o's on exit
nmap q: :q
" save and build
nmap wm :w:make
" open all folds
nmap fo :%foldopen!
" close all folds
nmap fc :%foldclose!
" ,tt will toggle taglist on and off
nmap tt :Tlist
" ,nn will toggle NERDTree on and off
nmap nn :NERDTreeToggle
" When I'm pretty sure that the first suggestion is correct
map r 1z=

I use this one quite often, as I often forget to do “sudo vim file” in the first case, now I don’t have to exit vim to write the file with sudo.

" If I forgot to sudo vim a file, do that with :w!!
cmap w!! %!sudo tee > /dev/null %
" ruby helpers
iab rbang #!/usr/bin/env ruby
iab idef def initialize

I think candycode looks good in all the color modes, but it’s still nice to set it up for different terms.

" ---------------------------------------------------------------------------
" setup for the visual environment
if $TERM =~ '^xterm'
set t_Co=256
elseif $TERM =~ '^screen-bce'
set t_Co=256 " just guessing
elseif $TERM =~ '^rxvt'
set t_Co=88
elseif $TERM =~ '^linux'
set t_Co=8
else
set t_Co=16
endif

Switch between tabs with ,tn and ,tp

" ---------------------------------------------------------------------------
" tabs
" (LocalLeader is ",")
map tc :tabnew % " create a new tab
map td :tabclose " close a tab
map tn :tabnext " next tab
map tp :tabprev " previous tab
map tm :tabmove " move a tab to a new location

Load extensions we need and change some format options for markdown files.

" ---------------------------------------------------------------------------
" auto load extensions for different file types
if has('autocmd')
filetype plugin indent on
syntax on

autocmd BufReadPost *
\ if line("'\"") > 0|
\ if line("'\"") <= line("$")|
\ exe("norm '\"")|
\ else|
\ exe "norm $"|
\ endif|
\ endif

" improve legibility
au BufRead quickfix setlocal nobuflisted wrap number

" improved formatting for markdown
" http://plasticboy.com/markdown-vim-mode/
autocmd BufRead *.mkd set ai formatoptions=tcroqn2 comments=n:>
autocmd BufRead ~/.blog/entries/* set ai formatoptions=tcroqn2 comments=n:>
endif
And that’s the .vimrc
Here are some of the plugins that I used:
  • NERD Commenter – auto comment sections of code
  • NERD Tree – display file tree for directories, like a project view
  • Alternate – Alternate between implementation and header files
  • Compview – Search for a word and display a window with results
  • GetLatestVimScript – Get the latest version of scripts
  • Matchit – Extended % matching
  • Rails – Tons of RoR stuff
  • Securemodelines – Secure modeline support
  • Taglist – display a list of tags from the file
  • VCScommand – help with files under revision control
  • Vimball – install vimball plugins
  • Yankring – have a ring of copy/paste buffers for history pasting
  • C – A collection of helpful things for C (Although mine is heavily customized)
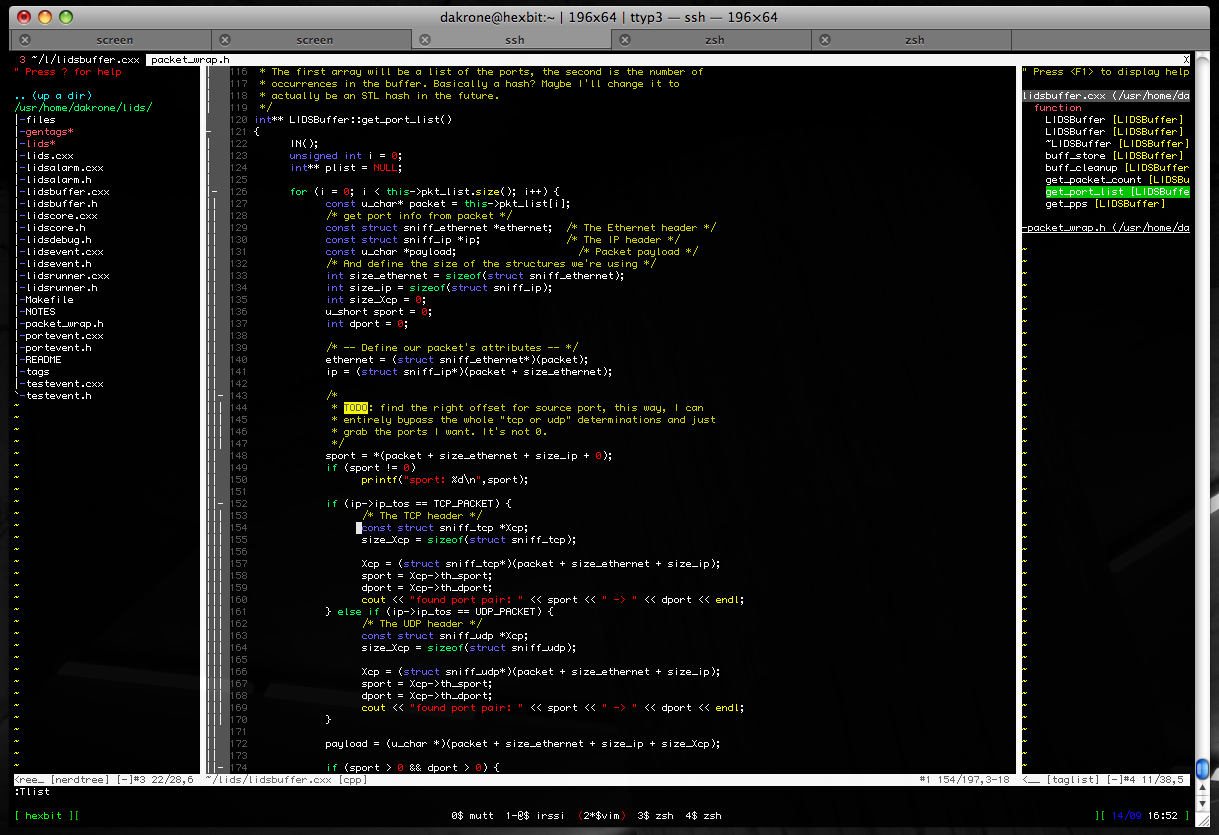
Enough with text, here’s a couple of screenshots of how it looks:


I maintain a pretty-up-to-date copy of most of my configuration files in my github dotfile repository, that’s the best way to get this configuration as well as all the plugins that I use, you can download a tarball of all the files from the github (direct link: here) page as well.

Well, hope someone out there finds these configuration files useful. I welcome any feedback :)

Soon to come: an explanation of the project that I’ve been working on that has taken me away from blogging for so long, an Intrusion Detection System based on Locality events.

Update 10/23/08: After some theme changes, updated screenshot (no NERDtree or taglist shown in the image):

Update 12/9/09: Been over a year, just for a teaser of what it looks like now:

cljjava

Configure Cisco switch telnet login and password

— SkyHi @ Tuesday, December 01, 2009
  • madcow
    think that service password encryption should be enabled. (even if its low end security) u do not want save the passwords in clear text. and you probably want to create an access to block off access from the entire world (you only want to connect to it from within your own network) so:

    !enter configuration mode
    conf t

    !enable service password encryption
    service password encryption

    !password for privilaged acccess
    enable password keepout

    !access list for whatever you netblock is
    access-list 1 permit 192.168.0.0 0.0.0.255

    !enter telnet config mode
    line vty 0 4
    password keepout
    login
    access-class 1 in
Reference: http://www.tech-recipes.com/rx/460/configure_cisco_switch_telnet_login_password/


Example of Restricting Telnet access with an Access-list

Quickly, let me provide another example of using an ACL. Say that you are still on the Chicago router. You want to only allow your PC’s IP address (on the Chicago LAN) access to TELNET, to the router. Yes, you could do this with an ACL on the Interface but, instead, let’s do it by using the access-class statement on the vty lines. To do this, you only need a standard access-list. Say that your PC’s IP address is 10.10.2.100. First, create an access-list to specify traffic with that source, like this:

Next, apply this ACL to all 5 VTY lines using the vty range configuration, using the access-class statement, like this: By creating this ACL and applying it to all 5 VTY lines, we are saying that only IP address 10.10.2.100 can TELNET to this Cisco router. This is just another example of the many uses of an ACL.


Reference: http://www.petri.co.il/csc_how_to_use_cisco_ios_access_lists_02.htm

Monday, November 30, 2009

Cisco 877W and SNMP

— SkyHi @ Monday, November 30, 2009
User #250122 48 posts
Craig-H
Forum Regular


Hi everyone

Im not a Cisco expert and was wondering if anyone could help me with configuring SNMP on this device. Looking for the specific commands to enable SNMP on the Cisco 877W.

I would have a target server of 192.168.21. Guess I'll load up MRTG, add to cacti or something like this...

Thanks for your help

Craig

anchor
posted 2008-Oct-20, 5pm AEST
User #9611 76 posts
Jebeem
Forum Regular


snmp-server community ro/rw

ro = read only
rw = read/write

If you want to only limit that server to talk SNMP to the router, use this ACL:

access-list 10 permit 192.168.21.x
!

snmp-server community ro/rw 10

anchor
posted 2008-Oct-20, 5pm AEST
User #140520 1475 posts
FormerBOFH
Whirlpool Enthusiast


Jebeem writes...

If you want to only limit that server to talk SNMP to the router, use this ACL...

I strongly recommend that you apply an access list and use a difficult to guess/crack SNMP community string – especially if you are using a RW configuration.

Treat the community string like a password. Use SNMP v3 if possible as it has additional security.

Believe it or not I have found Cisco devices on the Internet using no ACL and a default RW string of private – very easy to obtain configuration and decrypt the password (note: not secret).

anchor
posted 2008-Oct-20, 5pm AEST
User #250122 48 posts
Craig-H
Forum Regular


Thanks to you both for the info.

I have added the commands, including the ACL to the config. However only did RO as don't think I need RW at this stage to produce MRTG graphs?

As below, is there anything else I require to get this up and running? Or can I now focus on the MRTG side?

thanks

#show snmp
Chassis: **********
0 SNMP packets input
0 Bad SNMP version errors
0 Unknown community name
0 Illegal operation for community name supplied
0 Encoding errors
0 Number of requested variables
0 Number of altered variables
0 Get-request PDUs
0 Get-next PDUs
0 Set-request PDUs
0 Input queue packet drops (Maximum queue size 1000)
0 SNMP packets output
0 Too big errors (Maximum packet size 1500)
0 No such name errors
0 Bad values errors
0 General errors
0 Response PDUs
0 Trap PDUs

SNMP logging: disabled

anchor
posted 2008-Oct-20, 8pm AEST
edited 2008-Oct-20, 8pm AEST
User #40586 21624 posts
Thor
Whirlpool Alumni


To get polling working, a read only community string with an ACL will work just fine.

anchor
posted 2008-Oct-20, 8pm AEST
User #140520 1475 posts
FormerBOFH
Whirlpool Enthusiast


Craig Howe writes...

However only did RO as don't think I need RW at this stage to produce MRTG graphs?

RO is all you need to produce graphs.

is there anything else I require to get this up and running? Or can I now focus on the MRTG side?

As long as you have something like:

snmp-server community ro 10
access-list 10 permit 192.168.21.x

you can focus on the MRTG side.

anchor
posted 2008-Oct-20, 9pm AEST
edited 2008-Oct-20, 9pm AEST
User #250122 48 posts
Craig-H
Forum Regular


Thanks all got it working well!

cheers

Reference: http://forums.whirlpool.net.au/forum-replies-archive.cfm/1072997.html

SNMP configuration on Cisco IOS for routers and switches

— SkyHi @ Monday, November 30, 2009

SNMP helps monitoring your network devices wherein it can help a Monitoring System to query the device about various system health and/or modify configurations based on the permission it has on the device or on the other hand, allow the device itself to send alerts (known as trap in SNMP) to the management system of any system issues like a PSU failure.

The SNMP versions available are v1,v2 and v3 with SNMP v3 being the most secure than the formers. Most of todays SNMP configurations use V2 or the secure V3.

To do a basic SNMP configuration on a Cisco device, please do the following in the global config mode:

Setup the SNMP Community

MyRouter(config)#snmp-server community COMMUNITYNAME RW 10

MyRouter(config)#access-list 10 permit 192.168.0.1

Where

COMMUNITYNAME (default is public) is like a password shared between the SNMP Management system and the device. With the above any SNMP Manager system can query the device for various health monitoring or can write device config changes

RW is the permission. R implies a READ permission, W implies a WRITE permission.

NOTE: Write permissions need care as can allow the monitoring system to make config changes. It can also cause a security issue where the management system be compromised, you gave away the access to your cisco device.

10 in the end specifies the Access-Control List which here only allows Managament station 192.168.0.1 alone query/write to the device. This adds a layer of security to the SNMP config.

Setup Chasssis-id,location and contact details (Optional)

MyRouter(config)# snmp-server chassis-id Cisco2821
MyRouter(config)# snmp-server location London,UK
MyRouter(config)# snmp-server contact NetworkAdmin-123456789

Setup the SNMP Trap

Now that SNMP is enabled. It is important and more proactive to send alert messages also known as SNMP traps to the manager so the Network manager can be alerted. This is mostly the case of most of the SNMP Management/Monitoring system.

MyRouter(config)# snmp-server host 192.168.0.1 version 2c COMMUNITYNAME

sets up the Management server to which the trap messages needs to be sent.

MyRouter(config)# snmp-server enable traps snmp linkup linkdown coldstart warmstart

sets up the traps and the type of traps to be sent. Here Link up/down status and system reboot traps are sent to the management server.


CISCO IOS commands

— SkyHi @ Monday, November 30, 2009
General commands

Here are some general and simple commands shown

* How do I telnet to the router?
* How to enable telnet from the outside
* How to go into Privileged (Enable) mode
* How to go into Configuration mode
* How to restart the router
* How to view the configuration
* How to configure timeout
* How to change password
* How to see the actual line speed
* How to see the external IP-adresse
* How to set the time
* How to run a HotLine server

NAT Entries

Network Address Translation (NAT) entries is used for translating the where traffic a specific port should be sent. I.e. traffic from the outside WAN on port 21 should go to the FTP server and traffic on port 80 should end up at the WWW server. This is accomplished using NAT.

* How to view the NAT entries
* How to add NAT entries
* How to remove NAT entries
* How to disable NAT and use multiple external addresses
* How to change where the external traffic is routed to

Uploading and downloading configurations and IOS to the router

The FLASH memory is the memory area that contains the IOS. NVRAM is the memory that holds the configuration.

* How to copy configuration to a TFTP server
* How to copy configuration from a TFTP server
* How to remove a configuration
* How to back up the Cisco IOS to a TFTP server
* How to upgrade or restore Cisco IOS

Monitoring of router and swiche

To monitor IOS equipment using Simple Network Management Protocol (SNMP) require that community stings are defined

* How to set community strings
* How to delete community strings

DHCP

* How to limit the DHCP scope
* How to disable the DHCP scope

In case you did not finde what you where looking for try this page
How do I telnet to the router
Choose "Start" -> "Run" and type:

telnet 192.168.1.1

Where 192.168.1.1 is the IP-adresse of the router


How to enable telnet from the outside
By default routers are configured to accept telnet on port 23 from the inside. In order to get telnet access from the outside, you need to create a NAT entry for this popores.

Connect to the router -> enable -> config. Type:

ip nat ins sou sta tcp 192.168.1.1 23 int dialer0 23000

Now you have outside telnet access on port 23000. NB. This also makes your router more open for hacker attack.


How to go into privileged (enable) mode
Connect to the router. After the initial password you are in user mode. The prompt will like Router>. This mode is mostly used to view statistics, though it is also a stepping-stone for logging into more privileged mode. You can only view and change the configuration of a Cisco router in privileged mode, which you enter by typing:

enable or en

After a succesfull login the prompt will have changed to Router#

To end Priviliged mode type:

disable


How to go into configuration mode
Connect to the router -> enable and type:

configure terminal or conf t

To end the config mode press +Z (^Z).

Remember to save any changes that are made by typing: write


How to restart the router

Connect to the router, go to enable mode and type:
reload

Press enter when prompted to confirm.


How to view the configuration
In enable mode type:

sh run or wr t


How to configure timeout
Connect to the router -> enable -> Config mode, type:


int dialer0
time abs


How to change password
Connect to the router -> enable -> Config mode, type:

line vty 0 4
password
line con 0
password

To change the Enable password:

no enable secret
enable secret

How to see the actual line speed
Connect to the router and type:

sh dsl int atm0


How to see the external IP adresse
Connect to the router and type:

sh ip in br dial0


How to set the time
Connect to the router -> enable mode and type:

clock set 10:17:00 14 june 2001

The format is "hh:mm:ss day month year". NB. clock set ? does not show the correct format.


How to run a HotLine server
In config mode type :

ip nat ins sou sta tcp w.x.y.z 5500 int dialer0 5500
ip nat ins sou sta tcp w.x.y.z 5501 int dialer0 5501
ip nat ins sou sta tcp w.x.y.z 5502 int dialer0 5502
ip nat ins sou sta tcp w.x.y.z 5503 int dialer0 5503

Hvor w.x.y.z is the internal IP.


How to view the NAT entries
Connect to the router and type:

sh ip nat trans


How to add NAT entries
Connect to the router -> enable -> Config mode. The format is:

ip nat inside source static interface dialer0

Protocol is either tcp or udp. I.e. a NAT entry for port 4000 to 192.168.1.10 is done by typing:

ip nat inside source static tcp 192.168.1.10 4000 interface dialer0 4000


How to remove NAT entries?
Connect to the router -> enable mode -> Config mode. The format is:

no ip nat inside source static interface dialer0

I.e. the NAT entry for port 4000 to 192.168.1.10 removed by:

no ip nat inside source static tcp 192.168.1.10 4000 interface dialer0 4000

In some cases the command above will not be succesfull, because the entry is in use. If this is the case type the following before going into config mode.

clear ip nat translation *

How to disable NAT and use multible external addresses
To enable an external ip range - i.e. 212.52.72.184 - 191. Connect to the router -> enable mode -> Config mode and type:

int eth0
ip address 212.52.72.185 255.255.255.248

(Change the ip number to the external numbers that is desired)

end
write
reload

Login again and delete the access list that controls the access inside out
(decide what IP's that is given access through the router), in config mode:

no access-list 1
access-list 1 permit 212.52.72.184 0.0.0.255

Notice the subnet mask 0.0.0.255 is opposite and equals 255.255.255.0

To disable NAT completely on the inside

no ip nat inside
end
write
reload


This satisfy the requirement from some firewalls that the routers ip address have to be on the same network as the wan link on the firewall. Trafic to DMZ and firewall is now going directly through the router to the firewall.


How to change the address where external traffic is routed to
By default most routers will route all external traffic to 192.168.1.2. If this is needs to be change to somethin else i.e. a firewall address. Connect to the router - > enable mode and type:

clear ip nat translation *
configure terminal
no ip nat inside source static 192.168.1.2
ip nat inside source static 192.168.0.2
write
reload

How to copy configuration to a TFTP server

Connect to the router -> enable mode

copy nvram tftp://xx.xx.xx.xx/config.cfg

This saves a configuration file to the TFTP server at ip xx.xx.xx.xx


How to copy configuration from a TFTP server

Connect to the router -> enable mode

copy tftp://xx.xx.xx.xx/config.cfg nvram

This loads a configuration file to the TFTP server at ip xx.xx.xx.xx


How to remove a configuration

Connect to the router -> enable mode

delete nvram

This removes all configuration parameters and returns the router/switch to factory default settings.


How to back up the Cisco IOS

Connect to the router -> enable mode and type :

sh flash

This will show the files stored in the flash memory.

System flash directory:
File Length Name/status
1 3641684 soho70-y1-mz.123-6.bin
[3641748 bytes used, 4746860 available, 8388608 total]
8192K bytes of processor board System flash (Read/Write)

In this case an image called soho70-y1-mz.123-6.bin

To back up this file type:

copy flash tftp://192.168.1.2/xxxxx.bin
Source filename [soho70-y1-mz.123-6.bin]?
Address or name of remote host [192.168.1.2]?
Destination filename [xxxxx.bin]?

Where 192.168.1.2 is the ip-address of the tftp server. When prompted for the source file name type the file name found using the sh flash command. xxxxxx.bin will be the file name the IOS is stored under on the server.


How to restore or upgrade the Cisco Router IOS

Connect to the router -> enable mode and type :

copy tftp://192.168.1.2/xxxxx.bin flash
Destination filename [xxxxx.bin]?
Accessing tftp://192.168.1.2/xxxxx.bin...

Where 192.168.1.2 is the ip-address of the tftp server and xxxxx.bin is the image in the tftp root. If you do not have enough room in the flash memory to store both copies the router will ask to erase the contents of the flash before writing the new file to the memory.


How to set community strings

Connect to the router -> enable mode - config mode and type:

snmp-server community XXXXX RO
snmp-server location YYYY
snmp-server contact ZZZZ
snmp-server enable traps tty

Where XXXXX is the community name that the software which is collecting the SNMP trap must use. YYYY and ZZZZ are optional.


How to delete community strings

Connect to the router -> enable mode - config mode and type:

no snmp-server community XXXXX RO


How to limit the DHCP scope
There are 2 ways to do this. The first and most difficult is done by connecting to the router -> enable mode - config mode and type:

ip dhcp pool
network
default-router
dns-server 212.54.64.170 212.54.64.171
lease 0 1

Default the routers IP is 192.168.1.1.

I.e. you only want to use the following address pool 192.168.1.32-192.168.1.63 (Not include).
The you have to change to 192.168.1.32 and tol 255.255.255.224.

This page can used to help you calculating the subnet for you address pool: Subnet calculator.

The second and much easier way is just to reserve some address in the existing DHCP scope. I.e. you don't want to use the IP from 192.168.1.40 tol 192.168.1.72. In config mode type :

ip dhcp exclude 192.168.1.40 192.168.1.72
How to disable DHCP

Connect to the router -> enable mode - config mode and type:
no service dhcp


Reference: http://www.loeppenthien.dk/Network_IOS.asp#How_to_back_up_the_Cisco_IOS_

Sunday, November 29, 2009

What are the best practices configurations to secure a router

— SkyHi @ Sunday, November 29, 2009
some important general principles for maintaining good router security.

1. Create and maintain a written router security policy. The policy
should identify who is allowed to log in to the router, who is allowed
to configure and update it, and should outline the logging and
management practices


2. Have offline master copies of your router configuration files!

3. Implement access control lists (ACL) that allow only those protocols, ports and IP addresses that deny everything else

MyRouter(config)# no access-list 49
MyRouter(config)# access-list 49 permit host <IP address of host>
MyRouter(config)# access-list 49deny any log


General best practice rules:

MyRouter(config)# no access-list 107
MyRouter(config)# ! block our internal addresses on External Interfaces

MyRouter(config)# access-list 107 deny ip
<intrernal ip Network1> <Internal Subnet mask> any log

MyRouter(config)# access-list 107 deny ip
<intrernal ip Network2> <Internal Subnet mask> any log

MyRouter(config)# ! block special/reserved addresses
MyRouter(config)# access-list 107 deny ip
127.0.0.0 0.255.255.255 any log

MyRouter(config)# access-list 107 deny ip
0.0.0.0    0.255.255.255 any log

MyRouter(config)# access-list 107 deny ip
10.0.0.0 0.255.255.255 any log

MyRouter(config)# access-list 107 deny ip
169.168.0 0.255.255 any log

MyRouter(config)# access-list 107 deny ip
172.16.0.0 0.15.255.255 any log

MyRouter(config)# access-list 107 deny ip
192.168.0.0 0.0.255.255 any log

MyRouter(config)# ! block multicast (if not used)
MyRouter(config)# access-list 107 deny ip
224.0.0.0 15.255.255.255 any

MyRouter(config)# ! block some ICMP message types
MyRouter(config)# access-list 107 deny icmp
any any redirect log

MyRouter(config)# access-list 107 deny icmp
any any echo log

MyRouter(config)# access-list 107 deny icmp
any any mask-request log

MyRouter(config)# access-list 107 permit ip
any <internal Network 1> 0.0.255.255

MyRouter(config)# access-list 107 permit ip
Any  <internal Network 2> 0.0.255.255

MyRouter(config)# interface Eth 0/0
MyRouter(config-if)# description External interface
MyRouter(config-if)# ip access-group 107 in


4. Block incoming packets that claim to have the same destination and
source address (i.e. a ‘Land’ attack on the router itself).

access-list 102 deny ip host <ipaddress3>
host <ipaddress3>log

interface Eth 0/1
ip address <ipaddress3> 255.255.0.0
ip access-group 102 in

5. Configure an access list for the virtual terminal lines to control Telnet
access.

MyRouter(config)# no access-list 92
MyRouter(config)# access-list 92 permit <ipaddress4>
MyRouter(config)# access-list 92 permit <ipaddress5>
MyRouter(config)# access-list 92 permit <ipaddress6>

MyRouter(config)# line vty 0 4
MyRouter(config-line)# access-class 92 in


6. Turn on the router’s logging capability, and use it to log errors and
blocked packets to an internal (trusted) syslog host. Make sure that the
router blocks syslog traffic from untrusted networks.

MyRouter(config)# logging on
MyRouter(config)# logging <Syslog IP address>
MyRouter(config)# logging buffered
MyRouter(config)# logging console critical
MyRouter(config)# logging trap informational
MyRouter(config)# logging facility local1


7. Configure the router to include time information in the logging.

MyRouter(config)# service timestamps log datetime
localtime show-timezone msec
MyRouter(config)# clock timezone GMT 0
MyRouter(config)# ntp server <ntp server1>
MyRouter(config)# ntp server <ntp server2>

3. If your network requires SNMP, then configure an SNMP ACL and
hard-to-guess SNMP community strings.

MyRouter(config)# no snmp community public ro
MyRouter(config)# no snmp community private rw
MyRouter(config)# no access-list 51
MyRouter(config)# access-list 51 permit < authorised snmp requester>
MyRouter(config)# snmp community neither+never ro 51


On a border router, allow only internal addresses to enter the router from the
internal interfaces, and allow only traffic destined for internal
addresses to enter the router from the outside (external interfaces).
Block illegal addresses at the outgoing interfaces. Besides preventing
an attacker from using the router to attack other sites, it helps identify
poorly configured internal hosts or networks

MyRouter(config)# no access-list 101
MyRouter(config)# access-list 101 permit ip
<internal Network> 0.0.0.255 any
MyRouter(config)# access-list 101 deny ip any any log

MyRouter(config)# no access-list 102
MyRouter(config)# access-list 102 permit ip
any <internal Network> 0.0.0.255
MyRouter(config)# access-list 102 deny ip any any log

MyRouter(config)# interface eth 1
MyRouter(config-if)# ip access-group 101 in
MyRouter(config-if)# exit

MyRouter(config)# interface eth 0
MyRouter(config-if)# ip access-group 101 out
MyRouter(config-if)# ip access-group 102 in


4. Shut down unneeded services on the router.

Small services (echo, discard, chargen, etc.)
- no service tcp-small-servers

- no service udp-small-servers

 BOOTP - no ip bootp server

Finger - no service finger

HTTP - no ip http server

 SNMP - no snmp-server


5. Shut down unneeded services on the routers. These services allow
certain packets to pass through the router, or send special packets, or
are used for remote router configuration.

CDP - no cdp run

Remote config. - no service config

Source routing - no ip source-route

6. Secure the all the interfaces in turn on the router

Unused interfaces – shutdown

No Smurf attacks - no ip directed-broadcast

Mask replies - no ip mask-reply
 Ad-hoc routing - no ip proxy-arp

7. Secure the console line, auxiliary line and the virtual terminal lines on
the router

Console Line - line con 0
exec-timeout 5 0
login

Auxiliary Line - line aux 0
no exec
exec-timeout 0 10
transport input none

VTY lines - line vty 0 4
exec-timeout 5 0
login
transport input telnet ssh

8. Use more secure passwords
Enable Secret password, is protected with an MD5-based algorithm. Also, the configure passwords for the console line, the
auxiliary line and the virtual terminal lines. Provide basic protection
service passwordencryption

Enable secret - enable secret 0 *******

Console Line - line con 0
password *******

Auxiliary Line - line aux 0
password ********

 VTY Lines - line vty 0 4
password ********

Reference: http://www.tek-tips.com/faqs.cfm?fid=6616