Thursday, May 27, 2010

ESX NAT (Or How do the VMs get Internet Access)

— SkyHi @ Thursday, May 27, 2010

ESX NAT (Or How do the VMs get Internet Access) posted: May 5, 2008 7:04 PM

Click to view mikhaill's  profile Novice 11 posts since
Feb 6, 2008

In the next few days I will be setting up an ESX server with numerous VMs all of which need internet access (nothing major, just pull down some web pages). Until now I've been using Workstation which took care of the whole NAT issue for the VMs. Now, I can be totally missing something but I'm reading the ESX config file and I can't seem to figure out how to provide outside internet access to the VMs. I see the following line in the docs: A vSwitch can route traffic internally between virtual machines and link to external networks. So that means that I create a vSwitch and link all the VMs to it, but if it acts as a swtich in normal understanding, how will it know which VM to route return traffic back to? Does it in fact act as a router then?

I haven't been able to find much documentation in terms of figuring out how to get all the VMs on a host access to the internet via NAT or another method that doesn't require a separate outside IP per VM.

Can anyone clarify? Thank you in advance!


Click to view  Gerrit.Lehr's profile Master 827 posts since
Nov 9, 2005

For easier understanding, you should think of the ESX network in terms of a physical network. You can create vSwitches which act like physical switches. They can either be VM only switches, which means only VMs on the ESX are connected and there is no uplink to the physical LAN. Or they can have an uplink to the physical Network thru a physical ESX NIC. Think of this like the normal Uplink from your physical switch to the rest of the backbone. Then you select the vSwitch to witch the VM is going to be connected. It behaves completely like a physical connection to a physical switch.

Kind Regards,

Gerrit Lehr

If you found this or other information useful, please consider awarding points for "Correct" or "Helpful".

Click to view  weinstein5's profile Guru vExpert 7,516 posts since
Nov 19, 2005
Garrett is right on with his explanation - also this doc might help - http://www.vmware.com/pdf/vi3_35/esx_3/r35/vi3_35_25_quickstart.pdf

Re: ESX NAT (Or How do the VMs get Internet Access)

3. May 5, 2008 10:32 PM in response to: mikhaill
Click to view klich's  profile Enthusiast 58 posts since
Jul 25, 2005

You'll need to implement a VM to handle the NAT routing for you.

Effectively, your NAT router VM will be connected to two vSwitches that you create (you'll configure the VM with 2 vNICs). Lets call them "Internet vSwitch" and "Local vSwitch". Your physical link to the network will be connected to the Internet vSwitch, and all of your virtual machines will connect to the Local vSwitch.

Physical Network <--> Internet vSwitch <--> NAT Router VM <--> Local vSwitch <--> Virtual Machines

There are several options out there for you to choose from for the NAT router VM.

1. Internet Connection Sharing Appliance http://www.vmware.com/appliances/directory/395 (pre-built VM, use Importer to add it to your ESX server, WS v6.x includes importer built-in, approx 4MB)
2. FreeSCO - http://www.freesco.org/ (build a new VM. load and configure. This has a very small footprint, designed to fit on a floppy, and is what they use in the VMware classes to demonstrate exactly what you want to do here)
3. Vayatta - http://www.vyatta.com/ (pre-built VM, largest footprint at approx 145MB, but very feature rich... probably overkill for just a NAT router, but good to know its out there if you need to do some fancy routing)

Hope that will help you on your way.

Re: ESX NAT (Or How do the VMs get Internet Access)

4. May 5, 2008 11:15 PM in response to: klich
Click to view  Gerrit.Lehr's profile Master 827 posts since
Nov 9, 2005
I assume that he refered to the NAT Network Devices available in VMWare Workstation and Server, where NAT on the Hostsystem can be used to connect a VM to the physical network, instead of really wanting to implement NAT via ESX to connect the VMs to the Internet. Using a normale vNIC connected to an uplinked vSwitch should be enough to get the VM to see the physical LAN and the Internet over standardgateway.

Kind Regards,

Gerrit Lehr

If you found this or other information useful, please consider awarding points for "Correct" or "Helpful".

Re: ESX NAT (Or How do the VMs get Internet Access)

6. May 7, 2008 12:42 AM in response to: mikhaill
Click to view Rumple's  profile Master 1,458 posts since
Jan 6, 2005

Vmware didn't make this easier because it is an enterprise product geared at enterprise environments (or was) so typically people have hardware Firewall's/applicances and routers in place

Think of vm's as physical servers and ESX is just providing the switching capabilities if that makes it easier to understand

In this case you'd need some type of firewall to isolate the external network from the internal networks The only 2 options are hardware and software and you'd build accordingly

Without trying to offend you, I suspect its just lack of overall experience with networking in general thats probably caused your confustion...

We've all been there, but luckily there are lots of people on these forums with some extrordinary experience to help us along our way :o)

Re: ESX NAT (Or How do the VMs get Internet Access)

7. Oct 27, 2008 2:19 AM in response to: klich
Click to view  paragpdoke's profile Novice 28 posts since
Jul 13, 2007
Hello Klich, Mikhaill & Rumple.

Rumple,
I'm new to VMware networking concepts and was looking for the same NAT configuration for VMs hosted on ESXi (installed using VMware-VMvisor-InstallerCD-3.5.0_Update_2-110271.i386.iso). Possibly because of lack of expertise / knowhow.

Klich,
I tried following your instructions and downloaded Internet Connection Sharing Appliance. I did not want much of configuration steps so going by your description, attempted with the 1st download (http://motsug.googlepages.com/vmware-nat-appliance-11.zip). After extracting the zip file, I tried:
1) Using VMware converter (VMware-converter-3.0.3-89816.exe) to import the appliance into my ESXi server. But it complained of being unable to recognize/identify the OS on the VM. When I read your reply closely, I thought maybe there was some other option to import.
2) Found the File -> Virtual Appliance -> Import option in the VI client (2.5.0 build 103682) and pointed it to the location where I extracted the zip file contents. It complained that a VMware configuration file cannot be imported.

Mikhaill,
Have you had success trying to get the VMs access the internet using NAT like networking ? If yes, could you please share your experiences (for a newbie) ?

If not, then I'm not sure how to proceed. Any pointers are welcome.
Thanks in advance,
Parag
Click to view  paragpdoke's profile Novice 28 posts since
Jul 13, 2007
I managed to get the FreeSCO VM router to work...but don't know what to do next. Please find 2 images (host configuration & guest configuration) attached with this reply. Still looking out for help...

Thanks in advance,
Parag

Wednesday, May 26, 2010

How to Sysprep Windows Server 2008

— SkyHi @ Wednesday, May 26, 2010

I was going sysprep a base image of Windows Server 2008 this morning and followed my own instructions on sysprepping Windows. I went to the installation DVD and couldn’t find sysprep. A quick google later and a bit of poking around revealed that sysprep is now installed by default on Windwos Server 2008. You can find it at:


c:\Windows\System32\sysprep\sysprep.exe


The experience is also streamlined considerably. Simply run sysprep.exe above and you are presented with:


 image


Check the “Generalize” checkbox (regenerates system SID), change the Shutdown Options to “Shutdown”, and click OK. The system will go through the sysprep process and shut itself down. You can now create cloned servers to your heart’s content simply by creating linked servers and booting the clone as originally documented here.


UPDATE: Benjamin Chau noticed that SIDs weren’t being regenerated. Turns out the you need to check the Generalize checkbox to make that happen.


REFERENCES:

http://jameskovacs.com/2008/10/15/how-to-sysprep-windows-server-2008/


How to Sysprep Windows 2003

— SkyHi @ Wednesday, May 26, 2010

Every time I need to set up a bunch of virtual machines, I have to go back and look up where to find the Sysprep tool and how to use it. Here are the details so I can find it in the future…


In case you haven’t encountered Sysprep before, it is a tool that allows you to create a base OS image (including Windows, Office, Visual Studio, or whatever other applications you want) and then re-package it. You can then create cloned disks (or just copy the whole thing) and when you boot the new disk, it is like booting Windows for the first time, except with all your software installed. You get to choose a new computer name, SIDs are regenerated, etc.


Each version of Windows requires the correct version of Sysprep. Where do you find the correct version of Sysprep? On your install disks in <DVD>:\Support\Tools\Deploy.cab. Although System Preparation tool for Windows Server 2003 Service Pack 2 Deployment claims to install the Sysprep tool, I’ve never been able to make it work on my system. So don’t bother wasting your time. Go to your original install media and grab the file from there.


Creating the Sysprep Image


  1. Open <DVD>:\Support\Tools\Deploy.cab and extract setupcl.exe, setupmgr.exe, and sysprep.exe to C:\Sysprep. (N.B. C: is your system drive. If you installed Windows to another drive letter, use that drive letter rather than C:.)
  2. Run setupmgr.exe from C:\Sysprep.
  3. The Setup Manager wizard starts. Click Next…
  4. Create new… Next…
  5. Select “Sysprep setup”. Next…
  6. Select the correct OS version… Next…
  7. Select “No, do not fully automate the installation”… Next…
  8. Enter Name and Organization, Time Zone, Product Key, and Workgroup or Domain. The other settings can remain defaulted. Note that you don’t want to specify the computer name since you will be creating multiple computers from the base image and you don’t want to specify the admin password, even encrypted. If the sysprep program can extract the password from the answer file, so can any hacker worth their salt. Click Next… through to the end.
  9. Finish… Save to C:\Sysprep\sysprep.inf. OK…
  10. Wait while Setup Manager finishes. Cancel… (Yes, odd way to exit a program that has completed successfully.)
  11. Run sysprep.exe.
  12. Click OK.
  13. Ensure that “Don’t regenerate security identifiers” is UNCHECKED. You want to regenerate the SIDs when each new clone boots.
  14. Click Reseal, OK to confirm that you want to regenerate SIDs, and wait for the system to shut down.

Creating a Cloned Server


  1. If you’re using VMWare Workstation, create a linked clone of your Sysprepped server. (You can also create a new linked disk using VirtualPC using File… Virtual Disk Wizard and then creating a new VM using the linked disk.)
  2. Change any VM settings such as memory. DO NOT change number of processors from 1 to 2 as the HAL (hardware abstraction layer) for uni-processor vs. multi-processor Windows is different. Your system will blue screen if you do this.
  3. Boot the cloned server.
  4. The Windows Setup wizard will appear. Next…
  5. Accept the license agreement. Next…
  6. Enter a new computer name and administrator password. Next…
  7. Windows will boot and you can log in with the administrator password you just entered.
  8. When prompted, click “Yes” to update your product activation.
  9. Select “Yes, let’s activate Windows over the Internet now”. Next…
  10. Select “No, I don’t want to register now; let’s just activate Windows”. Next…
  11. OK…
  12. Update this server… to go to Microsoft Update.
  13. Once you’re ensured that your patches are up-to-date, you can close the browser and click Finish… then Yes… on the dialog to start using Windows.

You should now have a fresh copy of Windows. You can create as many cloned servers as you need for your mini-network.


REFERENCES:

http://jameskovacs.com/2007/07/11/how-to-sysprep-windows/


NSA Security Configuration Guides Red Hat Linux 5 Hardening Tips

— SkyHi @ Wednesday, May 26, 2010
NSA RHEL5 cheat-sheet:
www.nsa.gov/ia/_files/factsheets/rhel5-pamphlet-i731.pdf


A 170 page PDF about securely configuring Red Hat, written by and for
the government. If you look around on NSA.gov

http://www.nsa.gov/ia/_files/os/redhat/rhel5-guide-i731.pdf


The United States National Security Agency has created some excellent guides for securely configuring today’s more popular operating systems. Check out the links below for PDF copies of the guides.

From the National Security Agency and Central Security Service Website:

“NSA has developed and distributed configuration guidance for operating systems. These guides are currently being used throughout the government and by numerous entities as a security baseline [for] their systems.”

Mac OS X

Linux

Microsoft Windows

Solaris

For more information and guides to additional operating systems refer to the National Security Agency and Central Security Service’s Operating Systems Website listed below:

Centos OS Protection

— SkyHi @ Wednesday, May 26, 2010

Computer security is once again becoming a hot topic for administrators. There are dozens of new sites springing up around the web, and each is slinging their own ‘Perfect’ setup instructions. They have the usual bell curve of good advice, okay advice, and advice that will effectively leave you with a smoldering pile of rubble where your data used to be. Here, we're going to discuss locking down a CentOS 5 system the proper way. This proper way is based on the NSA RHEL5 guide, Steve Grubb's RHEL Hardening presentation, and other reputable sources.

For the purposes of this wiki article, we are assuming that we are configuring a server. Laptops and workstations may have different requirements, such as encrypted filesystems which are not covered here. Likewise, they may require the use of USB storage or wireless modules, which are disabled in this security guide.

File System Partitioning

By separating file systems into various partitions, you can fine tune permissions and functionality. Doing so will provide you greater granularity for permissions, as well as adding a layer of security for any potential bad guys to work through.

Steve Grubb suggests, and quite rightly so, that areas where users have write privileges be kept on their own partition. This allows you to prevent hard link privilege escalation attempts, prevent creative device additions, and other unsavory behavior.

Modifying fstab

Once you have your partitions broken out and sized accordingly, you can begin to restrict the various mount points as much as possible. You should add nodev, noexec, and nosuid wherever possible. An example of a decently restricted /etc/fstab file is below:

/dev/VG_OS/lv_root          /        ext3      defaults     1 1
/dev/VG_OS/lv_tmp /tmp ext3 defaults,nosuid,noexec,nodev 1 2
/dev/VG_OS/lv_vartmp /var/tmp ext3 defaults,nosuid,noexec,nodev 1 2
/dev/data_vol/lv_home /home ext3 defaults,nosuid,nodev 1 2
/dev/VG_OS/lv_var /var ext3 defaults,nosuid 1 2
/dev/data_vol/lv_web /var/www ext3 defaults,nosuid,nodev 1 2
/dev/sda1 /boot ext3 defaults,nosuid,noexec,nodev 1 2
tmpfs /dev/shm tmpfs defaults 0 0
devpts /dev/pts devpts gid=5,mode=620 0 0
sysfs /sys sysfs defaults 0 0
proc /proc proc defaults 0 0
/dev/_VG_OS/lv_swap swap swap defaults 0 0

Obviously you'll need to modify this example to suit your own system. LVM, volume names, labels etc are all subject to change. Please don't copy this example verbatim and expect it to work for you.

The webserver mount can also be set noexec, however this will impact cgi based applications, as well as server side includes which rely on the execute bit hack. If you're not using cgi applications, I would recommend at least testing noexec and using it if there are no negative side-effects.

Package installs

When it comes to the packages you install on your systems, it's good to remember that less is more. More things on the system mean more things to track for vulnerabilities and updates, as well as more things which can potentially get in the way of something you're trying to do. Since server tasks are often very different, I won't even attempt to give a list of what should or should not be installed. Instead, I recommend a basic strategy of customizing the package list and unchecking everything but base. Once you have this done, generate a list of what's currently installed, and further prune back what you don't need.

yum list installed >> ~/installed.txt

For x86_64 users: If you don't need i386/i686 packages for compatability purposes, you may want to remove them as well, by using yum remove *.i?86, and then keep them gone by adding exclude = *.i?86 to your /etc/yum.conf

Regular Updates

Now that we have our minimal package set in place, we have to update them periodically. I do not recommend the use of yum-updatesd. I've had far too many bad experiences with it hogging resources for me to advise its use. You could set a cron job to update, or check for updates, which is what the NSA guide recommends. You could simply manually apply the updates on a weekly basis, or you could go for broke and set up a spacewalk server to push and manage updates across multiple systems. However you decide to manage your update policy, it basically boils down to this. Apply updates in a timely fashion to avoid problems. Additionally, subscribing to the CentOS-Announce mailing list is always a good idea. This way you will be sent a notification every time there is an update, and you can apply any critical patches early if need be.

Once you have your package list sufficiently pruned and updated, you will want to go through your services list and disable anything you won't be using on your server. Again, since every environment is different, I won't pretend to tell you what you should or should not turn off; however, you do need to ask yourself if that server REALLY needs bluetooth running :-P

Basic Hardening

Now that we have the partitioning done, restrictions added, and package list pruned, it's time to get around to the meat of the matter. It's time to lock down the system. Some of these may or may not apply based on your environment. You should consider all of them, but your particular situation may dictate doing things a different way.

Physical Protection

  • The only folks allowed near the server should be directly responsible for it.
  • Don't allow the system to boot from removable media as the default option
  • Require a bios password to change boot options. OS security doesn't matter much if your attacker brings their own OS to the party.
  • Use a password for grub. All the security in the world is for naught if someone can simply pass some arguments to your loader and disable your security.
  • Require a password for single user mode. Same reason as above.
  • Most servers don't need usb storage devices. Disable the usb-storage driver if possible.

For directions on protecting grub, see BIOS and Boot Loader Security. To require root's password for single user mode, you can use:

echo "Require the root pw when booting into single user mode" >> /etc/inittab
echo "~~:S:wait:/sbin/sulogin" >> /etc/inittab
echo "Don't allow any nut to kill the server"
perl -npe 's/ca::ctrlaltdel:\/sbin\/shutdown/#ca::ctrlaltdel:\/sbin\/shutdown/' -i /etc/inittab

Now disable USB mass storage, if you're not using it in your environment

echo "Disabling USB Mass Storage"
echo "blacklist usb-storage" > /etc/modprobe.d/blacklist-usbstorage

User Rights

This is by far the largest category, with some of the most important stuff. Since each organization is different not all of these may apply to you, but you should consider them.

By default, users are given quite a bit of freedom. Much of this freedom can easily be stripped from them to help secure the system. Since root has the most power, we'll start with restricting root first.

Restricting Root

Once a server is up and running, root shouldn't be logging in directly except in emergency situations. These usually require hands at the console, so that's the only place root should be allowed to log in. To do this, we need to modify /etc/securetty. Additionally, no one other than root should be allowed in root's home directory. The default settings are close to this, but not quite paranoid enough.

echo "tty1" > /etc/securetty
chmod 700 /root

Since we have effectively removed root's ability to log in from anywhere but the local console, it becomes necessary to use su and sudo. This offers a few secondary benefits in a multi-admin environment.

  • sudo allows for granular control over privileged actions. This way a website administrator can start, stop and otherwise manage the web server without being able to affect other services.
  • You get a much clearer picture of who did what in your logs, since who became root at what time is no longer a mystery.

Password Policies

Now that we have root mostly restricted, it's time to move on to everyone else. First, we need to set down some ground rules when it comes to new accounts.

  • Strong passwords should be used. A strong password should have mixed case, special characters, numbers, and be longer than 8 characters.
  • Password complexity requirements should be in place to enforce strong password usage.
  • Passwords should be changed reasonably regularly. Some folks argue the value of changing passwords, however the longer you have a password, the longer someone has to break it. Conversely, if you're frequently changing passwords, your users will tend to use weaker passwords in order to remember them. You should to find a happy medium that suits your organization.
  • Passwords shoudn't be changed more than once a day

echo "Passwords expire every 180 days"
perl -npe 's/PASS_MAX_DAYS\s+99999/PASS_MAX_DAYS 180/' -i /etc/login.defs
echo "Passwords may only be changed once a day"
perl -npe 's/PASS_MIN_DAYS\s+0/PASS_MIN_DAYS 1/g' -i /etc/login.defs

The command below will update your system to use sha512 instead of md5 for password protection. This alleviates a number of bureaucratic security issues regarding the security of md5 for password protection. It also keeps the people wearing tinfoil hats happy too.

authconfig --passalgo=sha512 --update

Umask restrictions

Modifying the default umask can make things interesting. A umask of 077 is recommended for security, but can tend to be a pain for users who regularly share files. Be careful if you decide to implement this, and listen to your users.

perl -npe 's/umask\s+0\d2/umask 077/g' -i /etc/bashrc
perl -npe 's/umask\s+0\d2/umask 077/g' -i /etc/csh.cshrc

Now is where things get a little more tricky. If a user fails to enter the correct credentials, pam_tally2 will deny access until the unlock_time is reached. Translated, if you fail to log in properly 3 times you will have to wait certain period of time before you can try again.

Pam modifications

And now we need to update /etc/pam.d/system-auth

touch /var/log/tallylog
cat << 'EOF' > /etc/pam.d/system-auth
#%PAM-1.0
# This file is auto-generated.
# User changes will be destroyed the next time authconfig is run.
auth required pam_env.so
auth sufficient pam_unix.so nullok try_first_pass
auth requisite pam_succeed_if.so uid >= 500 quiet
auth required pam_deny.so
auth required pam_tally2.so deny=3 onerr=fail unlock_time=60

account required pam_unix.so
account sufficient pam_succeed_if.so uid < 500 quiet
account required pam_permit.so
account required pam_tally2.so per_user

password requisite pam_cracklib.so try_first_pass retry=3 minlen=9 lcredit=-2 ucredit=-2 dcredit=-2 ocredit=-2
password sufficient pam_unix.so sha512 shadow nullok try_first_pass use_authtok remember=10
password required pam_deny.so

session optional pam_keyinit.so revoke
session required pam_limits.so
session [success=1 default=ignore] pam_succeed_if.so service in crond quiet use_uid
session required pam_unix.so
EOF

The file /var/log/tallylog is a binary log containing failed login records for pam. You can see the failed attempts by running the pam_tally2 command without any options, and unlock user accounts early by using pam_tally2 --reset -u username

Reaping idle users

Now that we've restricted the login options for the server, lets kick off all the idle folks. To do this, we're going to use a bash variable in /etc/profile. There are some reasonably trivial ways around this of course, but it's all about layering the security.

echo "Idle users will be removed after 15 minutes"
echo "readonly TMOUT=900" >> /etc/profile.d/os-security.sh
echo "readonly HISTFILE" >> /etc/profile.d/os-security.sh
chmod +x /etc/profile.d/os-security.sh

Restricting cron and at

In some cases, administrators may want the root user or other trusted users to be able to run cronjobs or timed scripts with at. In order to lock these down, you will need to create a cron.deny and at.deny file inside /etc with the names of all blocked users. An easy way to do this is to parse /etc/passwd. The script below will do this for you.

echo "Locking down Cron"
touch /etc/cron.allow
chmod 600 /etc/cron.allow
awk -F: '{print $1}' /etc/passwd | grep -v root > /etc/cron.deny
echo "Locking down AT"
touch /etc/at.allow
chmod 600 /etc/at.allow
awk -F: '{print $1}' /etc/passwd | grep -v root > /etc/at.deny

Network Security

Now that we have the basics for the OS protected, it's time to take a look at the basic network functionality. We're not interested in too many services here. We're simply looking at the interfaces themselves and ssh for management purposes.

Kernel Network Security

There are a number of methods to improving network security with just a few modifications, and some module blacklisting.

Wireless has to go

Since we're looking at server security, wireless shouldn't really be an issue. If you need a wireless network, you can skip this step, because we're about to disable all the wireless drivers. You could go through the contents of /lib/modules for your current kernel and remove all the wireless drivers. This will certainly disable wireless, however it's not a permanent solution. The next time you upgrade the kernel, they'll be right back, and you'll be doing this all over again. Instead, a simple loop can be used to disable them via a blacklist file in /etc/modprobe.d

for i in $(find /lib/modules/`uname -r`/kernel/drivers/net/wireless -name "*.ko" -type f) ; do echo blacklist $i >> /etc/modprobe.d/blacklist-wireless ; done

Sysctl Security

Next we need to have a look inside /etc/sysctl.conf and make some basic changes. If these lines exist, modify them to match below. If they don't exist, simply add them in. If you have multiple network interfaces on the server, some of these may cause issues. Test these before you put them into production. If you want to know more about any of these options, install the kernel-doc package, and look in Documentation/networking/ip-sysctl.txt

net.ipv4.ip_forward = 0
net.ipv4.conf.all.send_redirects = 0
net.ipv4.conf.default.send_redirects = 0
net.ipv4.tcp_max_syn_backlog = 1280
net.ipv4.icmp_echo_ignore_broadcasts = 1
net.ipv4.conf.all.accept_source_route = 0
net.ipv4.conf.all.accept_redirects = 0
net.ipv4.conf.all.secure_redirects = 0
net.ipv4.conf.all.log_martians = 1
net.ipv4.conf.default.accept_source_route = 0
net.ipv4.conf.default.accept_redirects = 0
net.ipv4.conf.default.secure_redirects = 0
net.ipv4.icmp_echo_ignore_broadcasts = 1
net.ipv4.icmp_ignore_bogus_error_responses = 1
net.ipv4.tcp_syncookies = 1
net.ipv4.conf.all.rp_filter = 1
net.ipv4.conf.default.rp_filter = 1
net.ipv4.tcp_timestamps = 0

Using TCP Wrappers

TCP wrappers can provide a quick and easy method for controlling access to applications linked to them. Examples of TCP Wrapper aware applications are sshd, and portmap. A restrictive example is below. This example blocks everything but ssh.

echo "ALL:ALL" >> /etc/hosts.deny
echo "sshd:ALL" >> /etc/hosts.allow

Beefing up IPTables

The default iptables ruleset in CentOS is a little too lenient. The policy defaults are to allow traffic, there are open ports, and no real accountability for the traffic. We can do a better job.

Open up /etc/sysconfig/iptables in a text editor, and lets have a look. In the first 3 lines, there are already two problems. The INPUT and FORWARD tables are set to accept everything. Further down we see that ports, 50, 51, 5353, 631 and 22 are open. Now port 22 I don't have a problem with. The rest of them need to go, unless you want mDNS, cups, and ipsec talking to the outside world. I generally don't like strangers using my printer.

There's also no real logging of any malicious scanning or other unsavory behavior. A stronger ruleset might look like this:

#Drop anything we aren't explicitly allowing. All outbound traffic is okay
*filter
:INPUT DROP [0:0]
:FORWARD DROP [0:0]
:OUTPUT ACCEPT [0:0]
:RH-Firewall-1-INPUT - [0:0]
-A INPUT -j RH-Firewall-1-INPUT
-A FORWARD -j RH-Firewall-1-INPUT
-A RH-Firewall-1-INPUT -i lo -j ACCEPT
-A RH-Firewall-1-INPUT -p icmp --icmp-type echo-reply -j ACCEPT
-A RH-Firewall-1-INPUT -p icmp --icmp-type destination-unreachable -j ACCEPT
-A RH-Firewall-1-INPUT -p icmp --icmp-type time-exceeded -j ACCEPT
# Accept Pings
-A RH-Firewall-1-INPUT -p icmp --icmp-type echo-request -j ACCEPT
# Log anything on eth0 claiming it's from a local or non-routable network
# If you're using one of these local networks, remove it from the list below
-A INPUT -i eth0 -s 10.0.0.0/8 -j LOG --log-prefix "IP DROP SPOOF A: "
-A INPUT -i eth0 -s 172.16.0.0/12 -j LOG --log-prefix "IP DROP SPOOF B: "
-A INPUT -i eth0 -s 192.168.0.0/16 -j LOG --log-prefix "IP DROP SPOOF C: "
-A INPUT -i eth0 -s 224.0.0.0/4 -j LOG --log-prefix "IP DROP MULTICAST D: "
-A INPUT -i eth0 -s 240.0.0.0/5 -j LOG --log-prefix "IP DROP SPOOF E: "
-A INPUT -i eth0 -d 127.0.0.0/8 -j LOG --log-prefix "IP DROP LOOPBACK: "
# Accept any established connections
-A RH-Firewall-1-INPUT -m state --state ESTABLISHED,RELATED -j ACCEPT
# Accept ssh traffic. Restrict this to known ips if possible.
-A RH-Firewall-1-INPUT -m state --state NEW -m tcp -p tcp --dport 22 -j ACCEPT
#Log and drop everything else
-A RH-Firewall-1-INPUT -j LOG
-A RH-Firewall-1-INPUT -j DROP
COMMIT

Now arguably since we're responding to pings, dropping the traffic instead of rejecting it isn't fooling anyone. It's really personal preference. If you would rather reject the traffic, you could change the last line before COMMIT to read this way instead:

-A RH-Firewall-1-INPUT -j REJECT --reject-with icmp-host-prohibited

Tamper Resistance

Since you've put a fair amount of your time into hardening the system and configuring it to do your bidding, it's generally a good idea to make sure no one comes along behind you to mess with it. This is just as valid for shops with multiple administrators as it is for keeping an eye on the bad guys. There are two very good tools built into CentOS for guarding your system. The first of these is aide. Aide is somewhat like tripwire, and can be configured to periodically check your system against a hash of key files for modifications. The second is auditd. The audit subsystem in CentOS will watch your system in real time, based on rules that you set. It will log anything and everything you tell it to, and probably more.

If it's at all possible, you should consider having a central log collection server on a non-public network interface. It's much harder for a malicious user to cover their tracks if the logs are being sent to a remote system they can't access.

Aide

Rather than re-invent the wheel telling you how to configure aide, please see this website instead.

Auditd

To Be Written

REFERENCES
http://wiki.centos.org/HowTos/OS_Protection

Configure Exchange 2003 Server SMTP Connector for outbound emails

— SkyHi @ Wednesday, May 26, 2010

Configuring your new Exchange 2003 server for internet email with POPcon for downloading the email from POP3 mailboxes isn't hard if you just do it step by step as shown in this configuration sample. In this guide we will step through a sample installation of Exchange 2003 for a company we will call "Mycompany". Mycompany consequently owns the internet domain name "mycompany.com".

Actually it only takes these five steps:

  1. Adding your internet domain name to the recipient policies
  2. Configuring the SMTP server for inbound email
  3. Adding a SMTP Connector for outbound emails
  4. Configuring the email addresses of your users
  5. Installing and configuring POPcon or POPcon PRO

And this is how to configure the Exchange Server to accept email for mycompany.com and work with POPcon:


First install the software from CD. You may have to go back to the "Add/remove Software" utility in the control panel to add NNTP support if you did not do so during initial setup of your windows installation. Then open the Exchange System Manager and configure the new Exchange installation.


1. Adding your internet domain name to the recipient policies

Open the Exchange System-Manager. It should look like this:


One of the problems most often encountered when configuring an Exchange 2003 Server system is the fact that often the internet domain nane you want to receive email for ("mycompany.com") does not match your standard active directory domain name (i.e. "servername.mycompany.com"). The Exchange 2003 Server component handling incomming emails - the SMTP server - does not accept emails for other domains than the ones entered in the "recipient policies", even if you entered the correct email addresses ("user@mycompany.com") in the active directory.

To make Exchange accept email for additional domains like your internet domain you need to add the domain names to the default recipient policy like this:


On the main tree panel of the exchange system manager expand the tree "Recipients" and then click on "Recipient Policies". The policies will be shown on the right panel. Normally only the "Default Policy" will be there:


Open the properties of the "Default Policy" by double-clicking it:


In the Default Policy Properties please choose the tab "E-Mail Addresses". There you will find a list of domains supported by your exchange server. Usually only your internal active directory server domain will be listed here:


Like you can see, after installing our Exchange Server from scratch only our AD domain "Christensen.local" was listed as accepted SMTP address. But emails from the internet will be comming in addressed to "@mycompany.com" and not Christensen.local!


Choose "New..." here to add another accepted inbound domain. Since emails on the internet are sent via the SMTP protocol we want to add an "SMTP Address":


Now enter the domain name you want to receive email for. Please add a leading "@" to the domain name. This is what we entered to support emails addressed to @mycompany.com:


This is how the Default Policy Properties look like after entering the additional SMTP domain:


Enable the newly created entry with a check mark next to it:


When you OK the above dialog, Exchange will ask you with the next dialog box if you want to add the new address to all new users. Usually you do want exactly that to save some typing later.


Please note: You may need to restart your server to activate the new domain!


2. Configuring the SMTP server for inbound email

Next we will configure the SMTP-Server. This is the part of Exchange that accepts incomming emails from POPcon. No special settings are needed to work with POPcon but these are the standard settings in any case:


You will find the settings for the SMTP server under Servers/Protocols/SMTP/Default SMTP Virtual Server. Open the properties by right-clicking on the Default SMTP Virtual Server and choosing "Properties":


The settings on tab "General" can normally be left to the defaults.


On the tab "Access" you can find some configuration settings that might interfere with POPcon.


POPcon only works with a standard SMTP connection WITHOUT authentication, so allow "Anonymous access" in the "Authentication" dialog:


Choose "Connection" to grant or refuse the right to connect to the SMTP server to individual or multiple IP Address Ranges. Please ensure the system POPcon runs on does have the right to connect granted. With this setting ALL systems will have access to your SMTP server:


Under "Relay..." you can assign the right to relay through your SMTP-Server to some systems. This might be needed in some configuration and to be sure you should grant the system POPcon runs on relay rights. All other systems will need to authenticate before accessing the SMTP server to prevent unauthorized users using your system to relay spam:


Under the "Messages" tab you can restrict message size and number of messages accepted for each connection. Please make sure these settings are liberal enough to allow POPcon to transmit large messages to your server.


Also, on this tab you can choose an internal additional recipient for copies of the non-delivery reports. These NDRs will be sent back to senders of mails addressed to recipients unknown in your Exchange Server and they include a copy of the original message sent. You can use these postmaster copies of the NDRs to manually forward emails sent to mistyped recipients to the correct users.


Under tab "Delivery" some more configuration settings for outgoing emails can be found:


3. Adding the SMTP Connector for outbound emails

Now we need to add an SMTP-Connector (vs. SMTP Server) to handle outgoing email to the Internet.


Right-click "Connectors" in the Exchange System Manager and choose "New", "SMTP-Connector" to start adding the new connector and name it appropriately (like "SMTP-Out" in our case):


On the "General" tab you can now choose wether Exchange will send outgoing emails directly to the recipients system ("Use DNS...") or if all emails should be relayes through a SMTP relay server ("smart host").

The first option, DNS, is more direct but can sometimes cause problems when you use a dialup internet connection because some recipient systems will not accept emails that are coming from you ISP's dialup IP range while pretending to come from your real internet domain. Sending via your ISP's smart host / smtp relay server is the better option in this case. We chose our ISPs smtp relay server here.


Also, on this tab you need to add the "local bridgehead" server (as shown above)

On the tab "Address Space" we need to add a wildcard address space for SMTP. We want to allow emails to any domain, so we use the wildcard "*" here:


Side note about the "Cost" entry: If you want to send emails to some domains via a different route you can create multiple SMTP connectors and set the "Cost" entry of this wildcard connector to a higher value while setting the cost entry of the special domain route to a lower cost but with only the special domain allowed on this page. This is especially useful if you generally want to send via DNS and only route to some systems that won't accept your email via some relay server.


If your ISP's SMTP server requires authentication (and almost all of them do today) you can set the username and password on the "Advanced" tab of the SMTP connector. Select "Outbound Security":


Select "Basic authentication" and chose "Modify" to enter the username and password:


And that's alreay it - Your Exchange is now configured to send email to the internet and receive an SMTP email feed like it will come from POPcon or a direct internet connection. All you should do now is configure your users' email addresses in the Active directory.


4. Configuring your user's email addresses in the Active Directory

You can set one or multiple email addresses for each user to receive email at. We will step through the neccessary actions when creating a new user called John Galt.

First open the active directory and right-click the "Users" item to select "New", "User":

[Image]

The resulting dialog will allow you to create a new AD user to log into your server and creates an Exchange mailbox all in one wizard pass:

[Image]
Next...
[Image]
Next...
[Image]

Now the wizard continues into the Exchange Server realm and lets us create a new exchange mailbox

We just accepted the default alias here. Next...

[Image]

Ok, fine - but wait: What about our desired email address? john@servolutions.com? We need to add this mail address manually. We are back at the AD configuration console and select the properties of our new user "John Galt" by right-clicking on the name:

[Image]

Lot's of tabs on this resulting dialog:

[Image]

We go to the "E-mail Addresses" tab:

[Image]

And surprise: john@servolutions.com is already there, but in suspiciously non-bold print. Actually, Exchange automatically entered this additional email address because we choose so during the editing of the default recipient policies. But we want this address to be the primary address meaning all email sent by John will get this address as the "senders" and "reply" addresses in the mail headers. So we click on "Set As Primary" and are done:

[Image]

We could also add more email addresses like info@servolutions.com or sales@servolutions.com but only one of these addresses can be the primary address that will be the default senders' address in all emails sent out by john.

And that's really it - just step through you other user's AD entries and set the appropriate primary and additional email addresses.


5. Installing and configuring POPcon or POPcon PRO

After going through the above 4 steps your Exchange is configured to send out email but it still can't pull down email from POP3 or IMAP mailboxes on your provider server. For this you need to install and configure POPcon.

Configuring POPcon is quite straightforward. You need to follow these steps:

a) Configure a Postmaster email address on the GENERAL configuration tab.

b) Add one or more POP3 mailboxes on the POP3/IMAP tab.

c) Configure the Exchange server name on the EXCHANGE configuration tab.


Download and run the self-extracting installer of POPcon or POPcon PRO and follow the instructions during the installation. It will install the POPcon Administrator program and the POPcon service that runs in the background on your system.

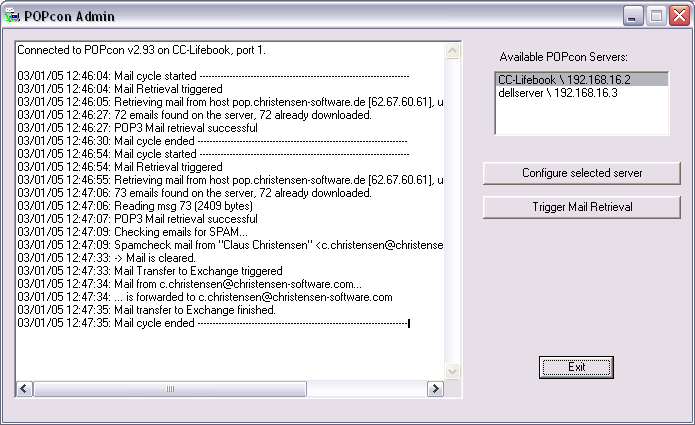
Run POPcon Adminstrator from Start > Programs > POPcon

POPcon Administrator

POPcon Screenshot


Click on "Configure" to open up the POPcon configuration screen.


a) Configure a Postmaster email address on the GENERAL configuration tab.

Screenshot of general options tab in POPcon PRO

On this first configuration page you only need to enter the email address of your Postmaster or Administrator user. The Postmaster will receive all emails without a valid recipient as well as general POPcon status notifications. It is very important to define a real email address from inside your exchange server here because mails can be lost irretrievably if POPcon forwards some mail with no recipient information to the postmaster and that account does not exist in your exchange server.

You can leave the log file options to their default settings for now.


Next go to the POP3/IMAP tab to configure the POP3 or IMAP mailbox accoutns you want POPcon to download email from.

b) Add one or more POP3 mailboxes on the POP3/IMAP tab.

POPcon PRO POP3 accounts configuration screenshot

POPcon PRO collects mail from as many POP3 accounts you like. Just click on Add to add another POP3 host or account to the list of Polled POP3 Hosts. For each server or account you need to fill in the POP3 server settings as shown below.

If you are using catch-all style mailboxes (mailboxes that receive email for a whole domain, regardless of the recipient part before the "@") POPcon needs to filter recipients from incoming mail so only the recipients at your own internet domain are accepted. Please add the domain you consider your own in the "Accepted Recipient Domains" box. This is the same domain you configured earlier in the Exchange Default Policy.


Individual account settings

POPcon PRO POP3/IMAP account configuration settings screenshot

This dialog lets you input the specifics about a POP3 or an IMAP server you want to have polled by POPcon PRO.

This is the information POPcon PRO needs to know about each server:

Server type:

Here you can select on the four supported server types:

POP3: Default. POP3 servers are by far the most common mail server types on the internet.

POP3-SSL: Some POP3 Servers need SSL encryption enabled for the connection in order to protect passwords and sensitive information. Choose this type to have a SSL-encrypted connection to a POP3 server.

IMAP: IMAP Servers are also quite common and theoretically allow the client to manipulate email folders and move email between folders online. In our case the protocol is used to download email from the INBOX of the IMAP server to your exchange server.

IMAP-SSL: Supports SSL connections to IMAP servers for added protection.


Access:

Configure the server name, account name and password to connect to the mail server here.

Servername: The name the server you want to have polled. You can also enter the IP address directly.

Username: The username needed to log into your POP3 or IMAP mail server.

Password: The password needed to log into your mail server.

IP portnumber: Almost always the TCP/IP port for POP3 mail is 110. Under some circumstances, internet routers or firewalls change the port number. Please ask your network administrator or internet provider. The standard port for POP3-SSL is 995, for IMAP it is 143 and for IMAP-SSL this should be set to 993.

Timeout: Leave this to the default value.

Please ask your POP3 mailbox hosting provider if you do not have the above information.


Type of mailbox / distribution:

POPcon PRO supports both catch-all and single user mailboxes

Catch-all mailbox ("*@domainname.com"): For this type of mailbox, POPcon PRO will distribute the email retrieved from this server according to what it finds in the TO:, CC:, BCC: and other header-fields of the mail. If you choose this option, don’t forget to add your internet domain name(s) to the "Accepted Recipient Domains" box. on the POP3/IMAP configuration dialog

Single user mailbox ("user@domainname.com"): This type of mailbox receives email for only one specific Exchange mailbox. You need to specify the receiver of the email here. POPcon PRO will then direct all mail retrieved from this server to the recipient email address given here.


Delete / keep email on the server:

This block allows you to configure POPcon PRO to either delete email after downloading or keep it on your POP3 or IMAP server for a specified amount of time or indefinitely.

Delete downloaded email: This is the default setting – POPcon PRO will delete the Email on your POP3 or IMAP server after successfully downloading it.

Leave a copy of downloaded email (indefinitely): This option will cause POPcon PRO to leave a copy of the email on the server. Only use this option during testing or when you are sure the mail will be deleted eventually, i.e. by another system periodically downloading an deleting email.

Leave a copy of downloaded email for n number of days: Causes POPcon PRO to leave a copy of the email on the POP3/IMAP server for the specified number of days before deleting it. You can use this option to allow access to a single POP3 or IMAP mailbox by two different systems.

c) Configure the Exchange server name on the EXCHANGE configuration tab.

POPcon PRO SMTP/Exchange settings screenshot

On this configuration screen you can specify the Exchange™-(SMTP) Server you want the mail to be directed to. Normally this will be the computer name of your Exchange™ server (like "MYSERVER").

You can leave all other settings default


These three steps to configure POPcon will provide you with a working set-up. Test it out by confirming the new configuration with OK and then use the "Trigger mail retrieval" button on the POPcon Administrator main screen to start the first mail download. You can follow what is happening in the scrolling log display on that screen. Watch out for any error messages there. There is also a POPcon log file (c:\program files\POPcon\POPconSrv.log – open with notepad) that you can view at your leisure.