Friday, November 27, 2009

tar exclude directory or files

SkyHi @ Friday, November 27, 2009
it`s very annoying to use exclude like this

#tar \
--exclude… \
--exclude… \
--exclude… \
--exclude… \
-cvpzf home_bup.tgz /home/username


I suggest such manner

for fedora core

#tar cvpzPf /tmp/backup.tar.gz –exclude={/proc/*,/sys/*,/tmp/*,/dev/*} /

for Debian

#tar cvfpP /tmp/debian2.tar –exclude={“/proc/*”,”/sys*”,”/tmp/*”,”/home/user/*”} /

and more common if i need backup using ssh

#ssh root@192.168.0.1 “cd /;nice -n 10 tar cvpP –exclude={“/proc/*”,”/sys*”,”/tmp/*”,”/home/user/*”} /”>backup.tar.gz


TEST:
[user1@home html]$man tar
--exclude PATTERN
exclude files based upon PATTERN

-X, --exclude-from FILE
exclude files listed in FILE


[user1@home html]$pwd
/var/www/html

[user1@home html]$ mkdir test{1,2,3}
drwxrwsr-x  2 user1 group1     4096 Nov 27 15:32 test1
drwxrwsr-x  2 user1 group1     4096 Nov 27 15:32 test2
drwxrwsr-x  2 user1 group1     4096 Nov 27 15:32 test3

[user1@home html]$ ll
total 10000
-rw-r--r--  1 user1 group1      493 Nov  2 16:09 1.php
-rw-r--r--  1 user1 group1      493 Nov  2 16:09 1.php.bak
-rw-r--r--  1 user1 group1      466 Nov  2 15:36 2.php
-rw-r--r--  1 user1 group1     1090 Nov  3 14:22 3a.php
-rw-r--r--  1 user1 group1     1047 Nov  3 14:16 3a.php.bak
-rw-r--r--  1 user1 group1      513 Nov  3 13:58 3.php
-rw-r--r--  1 user1 group1      525 Nov  2 16:24 3.php.bak
-rw-r--r--  1 user1 group1      160 Nov  2 16:56 4.php
-rw-r--r--  1 user1 group1      160 Nov  2 16:56 4.php.bak
-rw-r--r--  1 user1 group1     1013 Nov  3 12:35 5.php
-rw-r--r--  1 user1 group1     1013 Nov  3 12:33 5.php.bak
-rw-r--r--  1 user1 group1      295 Nov  3 12:49 6.php
-rw-r--r--  1 user1 group1      232 Nov  3 12:48 6.php.bak

[user1@home html]$ cp [1-4]*.php test1
[user1@home html]$ cp [5-7]*.php test2

##create a tarball of all the test directories except test1 directory

[user1@home html]$ tar cvpzPf testnov27.tar.gz --exclude=test1 test*
test2/
test2/6.php
test2/5.php
test3/


[user1@home html]$ tar tvf testnov27.tar.gz
drwxrwsr-x user1 group1      0 2009-11-27 15:33:36 test2/
-rw-r--r-- user1 group1      295 2009-11-27 15:33:36 test2/6.php
-rw-r--r-- user1 group1      1013 2009-11-27 15:33:36 test2/5.php
drwxrwsr-x user1 group1      0 2009-11-27 15:32:44 test3/


##camera server
[/var/www] # tar -cvzf camerawww.tar.bz2 --exclude=html/pics html/

Reference: http://hobbylobby.wordpress.com/2007/11/04/exclude-directories-when-tarring-with-tar/

How to Backup and Restore the Configuration of a Cisco Router

SkyHi @ Friday, November 27, 2009
When would you need this: When you plan to upgrade the IOS, plan to implement something new in the configuration, or when you need to copy the configuration from one router to the other.

Special Requirements: None.


Before starting the procedure of configuration backup or restore, you will need to install TFTP server software on a PC connected to the router Ethernet interface. There are many free downloadable TFTP servers’ software on the Internet, however, our recommendation is Free TFTP Server 6.0.

Afterwards, you make sure to direct the TFTP server to the folder that you want to contain the backups, and that the TFTP server has enough free space to contain the backups.

1. Create a console connection with the default settings (9600 baud, 8 databits, 0 parity bits, 1 stop bit, no flow control).

2. Check the connectivity between the router and the TFTP server with the ‘ping’ command.

3. Start copying the configuration to the TFTP server:

Router#copy run tftp

Or

Router#copy start tftp

Then you will be asked for the IP address of the TFTP server

Address or name of remote host []? XXX.XXX.XXX.XXX

Afterwards, you will be asked for a destination file name to be saved on the TFTP server

Destination filename [Router-confg]? backup_cfg_for__routerX

It is better to choose a descriptive name so you would not mix the different configuration files.

Now you will see the progress of the operation

!!

xxxx bytes copied in y.yyy secs (zzz bytes/sec)

The configuration file is usually copied quickly because it usually not more than few kilobytes.

The backup procedure is now over. You can open the file copied to the TFTP server with the text editor and view or modify it.

The restore procedure is done by replacing step 3 of the previous procedure with the following:

Router#copy tftp run

Or

Router#copy tftp start

Now you will be asked to provide the TFTP server IP address

Address or name of remote host []? XXX.XXX.XXX.XXX

Then you will be asked for the source file name

Source filename []?backup_cfg_for__routerX

Destination filename [running-config]? <<< or [startup-config]

Accessing tftp://XXX.XXX.XXX.XXX/backup_cfg_for_routerX...

Loading backup_cfg_for_router from XXX.XXX.XXX.XXX (via FastEthernet0/0): !

[OK - xxxx bytes]


xxxx bytes copied in y.yyy secs (zzz bytes/sec)


It is advised that you remove any configuration lines containing ‘AAA’ commands from the backup file before restoring so you would not have any security problems accessing the router. You can do that with any text editor.

There are two other ways to backup and restore the configuration; FTP and the HyperTerminal.

You can use FTP to backup and restore the configuration by doing the following:

1. Give the router username and password to use for FTP access:

Router(config)#ip ftp username YOURUSERNAME

Router(config)#ip ftp password YOURPASSWORD

2. Use the following commands for copying the configuration to and from the FTP server:

Router#copy run ftp <<< or copy start ftp

And

Router#copy ftp run <<< or copy ftp start

And you will have to give the same info given in step 3 of the previous procedure to complete the transfers.

If you do not have TFTP or FTP servers around, you can use the good old HyperTerminal to backup and restore the configuration by doing the following steps:

1. Create a console connection with the default settings (9600 baud, 8 databits, 0 parity bits, 1 stop bit, no flow control).

2. Issue the following command:

Router#terminal length 0

This command will cause the show commands results to be displayed continuously without pagination.

3. On the HyperTerminal menu, select Transfer > Capture Text. The Capture Text window will appear.

4. Choose a name for the configuration file to be saved (ex: configuration.txt) and click Start.

5. Issue the command:

Router#show run <<< or show start depending on the configuration you want to backup

6. After you see the whole configuration displayed, on the HyperTerminal menu, select Transfer > Capture Text > Stop to end the screen capture.

This concludes the backup. You may also edit the file that you have saved to erase the lines containing ‘AAA’ commands to avoid access and security problems that may be caused by the restore operation.

The restore procedure goes as the following:

1. Open the configuration backup file with a text editor and select all the text by pressing Ctrl-A key simultaneously. Now choose ‘Copy’ from the Edit menu or simply press Ctrl-C.

2. Go to the HyperTerminal window that is connecting you to the router you want to perform the restore on. Afterwards, go to the privileged mode.

3. From the HyperTerminal menu, choose Edit > Paste to Host.

4. Check the configuration by ‘show run’ command. If everything sounds fine, use the ‘copy run start’ command to save the restored configuration.

Reference: http://www.routergeek.net/content/view/34/37/

How to Backup an IOS File from a Cisco Router

SkyHi @ Friday, November 27, 2009
When would you need this: When you are planning to upgrade the IOS file or you need to copy it to another router.

Special Requirements: None.


Before starting the procedure of IOS file backup, you will need to install TFTP server software on a PC connected to the router Ethernet interface. There are many free downloadable TFTP servers’ software on the Internet, however, our recommendation is Free TFTP Server 6.0.

Afterwards, you make sure to direct the TFTP server to the folder that you want to contain the backups, and that the TFTP server has enough free space to contain the backups.

1. Create a console connection with the default settings (9600 baud, 8 databits, 0 parity bits, 1 stop bit, no flow control).

2. Check the connectivity between the router and the TFTP server with the ‘ping’ command.

3. Start copying the IOS file with one of the following command:

Router#copy flash tftp

Use this command if your router has internal flash memory (ex: 2600). If your router uses PCMCIA flash cards (ex: 3600), use the following command:

Router#copy slot1: tftp >>> or Slot0: depending on the file you want to copy

4. Now you will be asked for the IP address of the TFTP server:

Address or name of remote host []? XXX.XXX.XXX.XXX

Afterwards, you will be asked for a destination file name to be saved on the TFTP server

Destination filename [cXXXX-X-XX.XXX-XX.bin]?

It is better to leave the IOS file name as it is so you would not be confused when you want to restore it.

Now you will see the progress of the files transfer

!!!!!!!!!!!!!!!!!!!!!!!!!!!!!!!!!!!!!!!!!!!!!!!!!!!!!!!!!!!!!!!!!!!!!!!!!

!!!!!!!!!!!!!!!!!!!!!!!!!!!!!!!!!!!!!!!!!!!!!!!!!!!!!!!!!!!!!!!!!!!!!!!!!

!!!!!!!!!!!!!!!!!!!!!!!!!!!!!!!!!!!!!!!!!!!!!!!!!!!!!!!!!!!!!!!!!!!!!!!!!

!!!!!!!!!!!!!!!!!!!!!!!!!!!!!!!!!!!!!!!!!!!!!!!!!!!!!!!!!!!!!!!!!!!!!!!!!

!!!!!!!!!!!!!!!!!!!!!!!!!!!!!!!!!!!!!!!!!!!!!!!!!!!!!!!!!!!!!!!!!!!!!!!!!

!!!!!!!!!!!!!!!!!!!!!!!!!!!!!!!!!!!!!!!!!!!!!!!!!!!!!!!!!!!!!!!!!!!!!!!!!

!!!!!!!!!!!!!!!!!!!!!!!!!!!!!!!!!!!!!!!!!!!!!!!!!!!!!!!!!!!!!!!!!!!!!!!!!

!!!!!!!!!

[OK - xxxx bytes]


xxxxxx bytes copied in yy.yyy secs (zzz bytes/sec)


For the restore procedure, you can refer to the IOS file upgrade procedure.

Reference: http://www.routergeek.net/content/view/35/37/

ow to Configure NAT and PAT on a Cisco Router

SkyHi @ Friday, November 27, 2009
When would you need this: When you want to connect a local network to the Internet and you don’t have that much IP addresses.

Special Requirements: None.


There are two types of NAT that can be configured on a Cisco router; static, and dynamic.

Static NAT Configuration:

This type is used when you want to do one-to-one assignment of local IP addresses to global IP addresses.

1. Establish static translation between an inside local address and an inside global address,

Router(config)#ip nat inside source static XXX.XXX.XXX.XXX YYY.YYY.YYY.YYY

where,

XXX.XXX.XXX.XXX is the (inside) local address

YYY.YYY.YYY.YYY is the (inside) global address

2. Specify the local interface. This is done by going to the interface configuration mode and issuing,

Router(config-if)#ip nat inside

3. Specify the global address. This is done by going to the interface configuration mode and issuing,

Router(config-if)#ip nat outside

Dynamic NAT Configuration:

This type is used when you want the router to do the mapping dynamically. This method is useful when you have too many global and local addresses and you do not want to do the mapping manually, or when the number of global addresses available is less than the local addresses.

This would lead us to two different scenarios,

A. The number of global IP addresses is equal or less than the local addresses and more than one. (global >= local >1)

1. Define a pool of global addresses that would be employed in the translation,

Router(config)#ip nat pool NAME XXX.XXX.XXX.XXX YYY.YYY.YYY.YYY netmask ZZZ.ZZZ.ZZZ.ZZZ

where,

NAME is the name of the pool

XXX.XXX.XXX.XXX is the starting IP address of the pool

YYY.YYY.YYY.YYY is the end IP address of the pool

ZZZ.ZZZ.ZZZ.ZZZ is the subnet mask of the network that the pool is part of.

2. Define the range of local addresses permitted to participate in the translation using an access-list.

Router(config)#access-list NO permit XXX.XXX.XXX.XXX YYY.YYY.YYY.YYY

where,

NO is the number of the access-list, which is usually a standard access list

XXX.XXX.XXX.XXX is the network address of the local network or the starting IP address of the range.

YYY.YYY.YYY.YYY is the wildcard mask used to define the range

You can issue more than one access-list sentence in the same access-list to define the specific IP address range(s).

3. Associate the pool and the local range in a dynamic NAT translation command,

Router(config)#ip nat inside source list NO pool NAME [overload]

where,

NO is the number of the access list

NAME is the name of the global pool

overload This parameter MUST be used when you have global IP addresses less than local IP addresses (which is known as PAT).

4. Specify the local interface. This is done by going to the interface configuration mode and issuing,

Router(config-if)#ip nat inside

5. Specify the global address. This is done by going to the interface configuration mode and issuing,

Router(config-if)#ip nat outside

B. There is only one global IP address and a group of local IP addresses.

In this case, the only global IP address is assigned to the interface connected to the global network.

1. Define the range of local addresses permitted to participate in the translation using an access-list.

Router(config)#access-list NO permit XXX.XXX.XXX.XXX YYY.YYY.YYY.YYY

where,

NO is the number of the access-list, which is usually a standard access list

XXX.XXX.XXX.XXX is the network address of the local network or the starting IP address of the range.

YYY.YYY.YYY.YYY is the wildcard mask used to define the range

You can issue more than one access-list sentence in the same access-list to define the specific IP address range(s).

2. Associate the pool and the local range in a dynamic NAT translation command,

Router(config)#ip nat inside source list NO interface TYPE INTNO overload

where,

NO is the number of the access list

TYPE is the type of the interface that has the global IP address (ex: serial , or Ethernet)

INTNO the number of the interface

An example of the interface type and number is serial 0, or Ethernet 0.

3. Specify the local interface. This is done by going to the interface configuration mode and issuing,

Router(config-if)#ip nat inside

4. Specify the global address. This is done by going to the interface configuration mode and issuing,

Router(config-if)#ip nat outside


Troubleshooting commands:

Router#show ip nat translation

To show the current translations preformed by NAT

Router#show ip nat static

To show the static translations of NAT

Router#debug ip nat

To watch the instantaneous interactions of NAT


Note: To disable NAT, you need to do the following steps:

1. Disable NAT on the local and global interfaces

Router(config-if)#no ip nat inside

on the local, and

Router(config-if)#no ip nat outside

on the global interface.

2. Clear the contents of the translation table,

Router#clear ip nat translations

3. Remove the NAT assignment command by preceding it with a ‘no’

4. Remove the access-list, if any.

Reference: http://www.routergeek.net/content/view/39/37/

How to Configure DHCP on a Cisco Router

SkyHi @ Friday, November 27, 2009
When would you need this: When using the router as a DHCP server to provide IP addresses and related information to DHCP clients.

Specials Requirements: DHCP server software is supported for these series; 800, 1000, 1400, 1600, 1700 series (support for the Cisco 1700 series was added in Cisco IOS Release 12.0[2]T), 2500, 2600, 3600, 3800, MC3810, 4000, AS5100, AS5200, AS5300, 7000, 7100, 7200, MGX 8800 with an installed Route Processor Module, 12000, uBR900, uBR7200, Catalyst 5000 family switches with an installed Route Switch Module, Catalyst 6000 family switches with an installed MultiLayer Switch Feature Card, and Catalyst 8500.


1. Define the DHCP address pool,

Router(config)#ip dhcp pool POOLNAME

Router(dhcp-config)#network XXX.XXX.XXX.XXX YYY.YYY.YYY.YYY

where,

XXX.XXX.XXX.XXX is the network address to be used by the DHCP pool

YYY.YYY.YYY.YYY is the subnet mask for the network.

You can replace the subnet mask by a (/PREFIX) to provide the subnet mask.

2. Configure the parameters to be sent to the client,

Router(dhcp-config)#dns-server XXX.XXX.XXX.XXX

To provide the DNS server IP address

Router(dhcp-config)#default-router XXX.XXX.XXX.XXX

To provide the IP address of the default gateway

Router(dhcp-config)#domain-name NAME

To provide the name of the domain of the network (if in a domain environment)

Router(dhcp-config)#netbios-name-server XXX.XXX.XXX.XXX

To provide the IP address of the NetBIOS name server

Router(dhcp-config)#lease DAYS HOURS MINUTES

To define the lease time of the addresses given to the client. You can make it infinite by using this command instead; lease infinite

There is a large group of settings that you can configure to be sent to the clients, and I have only mentioned the most frequently used.

3. Configure the IP addresses to be excluded from the pool. This is usually done to avoid the conflicts caused by the DHCP with servers and printers. Remember to give ALL servers and network printers static IP addresses in the same range of the DHCP pool. And then exclude these addresses from the pool to avoid conflicts.

Router(config)#ip dhcp excluded-address XXX.XXX.XXX.XXX

Use the command in the previous form to excluded a single address. You can repeat it as much as you see fit for the IP addresses you want to exclude. Or,

Router(config)#ip dhcp excluded-address YYY.YYY.YYY.YYY ZZZ.ZZZ.ZZZ.ZZZ

where,

YYY.YYY.YYY.YYY is the start of the range to be excluded from the pool

ZZZ.ZZZ.ZZZ.ZZZ is the end of the range

This way you can exclude a range or ranges of IP addresses and reserve them for static addresses use.

4. Enable the DHCP service in the router

Router(config)#service dhcp

To disable it use

Router(config)#no service dhcp

Usually the DHCP service is enabled by default on your router.

5. Use the following commands to check the DHCP operation on the router:

Router#show ip dhcp binding

This command shows the current bindings of addresses given to clients

Router#show ip dhcp server statistics

This command show the DHCP server statistics.

Router#debug ip dhcp server

This debug command is used to troubleshoot DHCP issues.

Implementation notes:

1. If you have a DHCP server other than the router, and you would like to let the router to forward the DHCP requests from a certain LAN to the DHCP server laying outside that LAN, go to the Ethernet interface that does not have the DHCP server and type the following command:

Router(config-if)#ip helper-address XXX.XXX.XXX.XXX

where XXX.XXX.XXX.XXX is the IP address of the server laying outside this LAN.

2. You can create a DHCP database agent that stores the DHCP binding database. A DHCP database agent is any host, for example, an FTP, TFTP, or RCP server that stores the DHCP bindings database. You can configure multiple DHCP database agents and you can configure the interval between database updates and transfers for each agent. To configure a database agent and database agent parameters, use the following command in global configuration mode:

Router(config)#ip dhcp database url [timeout seconds | write-delay seconds]

An example url is this

ftp://user:password @ 192.168.0.3/router-dhcp (remove the spaces before implementing)

If you choose not to configure a DHCP database agent, disable the recording of DHCP address conflicts on the DHCP server. To disable DHCP address conflict logging, use the following command in global configuration mode:

Router(config)#no ip dhcp conflict logging

3. DHCP service uses port 67 and 68. So, if you are using a firewall, remember to open these ports.

4. To clear DHCP server variables, use the following commands as needed:

Router#clear ip dhcp binding *

If you want to clear a certain binding not all of them, replace the * in the previous command with the IP address to be cleared.

Router#clear ip dhcp server statistics

Reference: http://www.routergeek.net/content/view/37/37/

Wednesday, November 25, 2009

Bit Calculator - Convert between bits/bytes/kilobits/kilobytes/megabits/megabytes/gigabits/gigabytes.

SkyHi @ Wednesday, November 25, 2009
Enter a number and choose the type of Units

Amount: Units: Notation Type: (see National Institute of Standards.)
1 megabits (informal notation: kilobyte = 1024 bytes)
bits 1048576
bytes 131072
kilobits 1024
kilobytes 128
megabits 1
megabytes 0.125
gigabits 0.0009765625
gigabytes 0.0001220703125
terabytes 1.19209289550781e-07
petabytes 1.16415321826935e-10
Source code

How to release and renew a DHCP IP address in Ubuntu Linux 9.04 Jaunty Jackalope

SkyHi @ Wednesday, November 25, 2009

Say you’ve got a Ubuntu system with a DHCP address, and you want to release that address and obtain a new one. Releasing a DHCP address in Ubuntu is quite simple. Go to a Terminal window and type this command:

sudo dhclient -r

(Note that you must use dhclient either as root or with the sudo command for it to work.)

This will release your current IP address. To obtain a new one, use the dhclient without any arguments:

sudo dhclient

Assuming that dhclient can reach a DHCP server, your system will receive a new IP address in short order.

-JM


Reference: http://www.jonathanmoeller.com/screed/?p=1049

Tuesday, November 24, 2009

Some Reasonable Defaults for MySQL Settings

SkyHi @ Tuesday, November 24, 2009
A few weeks ago we ran into another set of a problems that pointed at suboptimal default settings in MySQL. Frustrated, I realized that I had a good collection of these problems and decided to rant about them on my blog. Having had a bit of time to think about what I said and talk to some other folks about it, I feel like it’s worth expanding what I wrote and sharing it with a wider audience.

Oh, you may be wondering where the third part of my CouchDB series is. A combination of things conspired against me this week, not the least of which seems to be the issue known as COUCHDB-345 in the bug tracking system used by the Apache Software Foundation. I’m still trying to work out the root of the problem(s) I’m seeing. Hopefully I will return to that soon–things were just starting to get interesting.

Disclaimer

Before I get into the nitty gritty details, I want to be clear that the changes I’m suggesting here are meant to be used in what I consider typical high-volume environments. That means a number of MySQL servers using master/slave replication, multiple busy web servers talking to them, and both read and write queries happening at the rate of dozens (or more) per second.

This doesn’t apply to applications or sites that have mostly static data or see very low usage most of the time. In fact, some of these could be troublesome in such environments.

Motivation

The main motivation behind these changes is to make MySQL more tolerant of transient network problems–the kind that can interrupt replication, break connections between clients and servers, cause DNS resolution to become slow or fail entirely, or cause other types of mayhem that impact MySQL or you applications.

In other words, I see this as an exercise in hardening MySQL and helping to ensure that its built in recovery and abuse mitigation mechanisms don’t work against you. Caveat lector.

slave_net_timeout

There is no heartbeat mechanism that helps slaves to know that their connection to a master hasn’t vanished. What can happen is a network connection gets broken between the two in a way that neither detects. This is typically a firewall/router issue or something that neither host initiates or sees, so neither one is able to send (or receive) a TCP packet that would normally begin to shut down the connection. This is especially true of replication topologies that involve crossing significant distances where multiple networks and providers may be involved.

MySQL uses a simple timeout mechanism to detect this hopefully rare occurrence. If the slave I/O thread has not seen anything from the master in slave_net_timeout seconds, it will connect and then attempt to reconnect and continue replicating. That mechanism works very well and allows slaves to deal with the occasional network glitch.

Unfortunately the default value for this variable is 3600. That’s a full hour of time that passes before the slave decides to give up and try starting with a new connection. So not only do you run the risk of a slave being nearly an hour behind on replication, you may find that this is trickier to detect than you might think!

Why? Because it’s common to use the output of SHOW SLAVE STATUS to check the health of replication. The field Seconds_Behind_Master generally gives you a sense of whether or not the slave is keeping up. But, that’s not entirely correct. What that value actually tells you is how far behind the master the slave THINKS it is. If it hasn’t seen anything new from the master in 15 minutes and the SQL thread has executed all the queries that the I/O thread wrote to the relay log, it will happily report that it’s 0 seconds behind. Ignorance is bliss.

So it’s clear watching Seconds_Behind_Master is not the best way to monitor the replication health of your slaves. But that’s secondary to the real problem here. I recommend setting slave_net_timeout far lower than the default. Personally, I think that anything higher than 20 seconds is asking for trouble.

Of course this all depends on the nature of your application and how sensitive it may be to slightly out of date slaves. But if you’re expecting writes on the master to happen every second or two, there’s no reason for such a high timeout on the slaves. You’re just asking for trouble some day.

skip-name-resolve

Out of the box, MySQL will perform a reverse DNS lookup on the IP address of any new incoming connection to get the host name from which the connection originated. It then uses that information internally when consulting the various privilege tables to make sure the user connecting is allowed to connect and perform whatever actions he or she may try to perform.

But, believe it or not, DNS is flaky at times. It’s nothing really inherent to DNS itself, but this is an external dependency that doesn’t need to be there in the first place. A simple dropped packed or mis-configured DNS server can mean MySQL connection being denied or delayed for reasons that may not be immediately obvious. A denial of service (DoS) attack against your DNS server could be sufficient to bring new database connections to a standstill.

I recommend adding skip-name-resolve to your /etc/my.cnf file and updating all your GRANT statements to use IP addresses instead of DNS names. This simple change can pay dividends for years to come.

connect_timeout and max_connect_errors

MySQL has a limit to how many clients can be connected at one time: max_connections. So one way to DoS a MySQL server is open up many connections but communicate with the server very slowly–especially during the initial authorization handshake. In doing so you use up all the available connections and lock out anyone else from getting in.

To mitigate this, MySQL has a timeout on establishing new connections: connect_timeout. By default this is set to 5 seconds. And normally that’s a perfect fine value. However, if you have a situation where connections simply take longer–say packet loss on your network or DNS servers timing out on that reverse lookup, you can end up in a situation where MySQL is closing connections on perfectly good clients. Those clients are likely to try to reconnect in short order and that almost makes the problem worse.

When this happens, MySQL internally increments a per-host counter it uses to track how many “bad connections” it has seen. When this counter exceeds the value of max_connect_errors MySQL will block the host from connecting again until you issue a FLUSH HOSTS command. By increasing the connect_timeout a bit you can avert this type of situation.

It’s possible to set max_connect_errors to a sufficiently large value that you may never encounter the situation described above. A number as large as 1,844,674,407,370,954,751 is a pretty high bar, yet is perfect valid if you’re using a 64-bit version of MySQL (and you really should be!).

Sadly, setting the variable to 0 does not disable the check or the lockout behavior described above, so you have to resort to games like this. The good news is that you can make the change without restarting your servers.

Doing the Deed

Before you start making changes, it’s probably worth looking over the list of Server System Variables in MySQL. Make sure to check the documentation that matches the version of MySQL you’re running. Things changed between 4.1, 5.0, 5.1, and up to 5.4. There may be other problematic settings you want to correct at the same time.

There’s a table on that page that tells you if each variable is “dynamic” and if it can be set in the an option file (meaning /etc/my.cnf for our purposes). The dynamic values are easy because you can change them on the fly using a SET GLOBAL variable = value command. However, you have to make sure to also make the corresponding change in the configuration file so that the server doesn’t revert back to its old behavior after a reboot.

Any non-dynamic values can only be changed in the configuration file and will require a restart of MySQL to take effect.

What else?

I hope this has given you some incentive to look at your configuration settings for MySQL and make sure you understand more of the defaults and how they could affect your systems. I find that it’s a good idea to scan through a listing of the variables now and then just to make sure the settings are still sensible.

Have you found yourself needing to make surprising adjustments to some of MySQL’s settings?
Jeremy Zawodny is a software engineer at Craigslist where he works on MySQL, Search, and various back-end infrastructure. He's also the co-author of "High Performance MySQL" and blogs at http://jeremy.zawodny.com/blog/

Using the Cisco console in Linux

SkyHi @ Tuesday, November 24, 2009

Using the Cisco console in Linux

Introduction

People who work with Cisco network equipment need to be able to connect to the console port on their devices. In Windows, you can simply fire up HyperTerminal to get basic access to your devices. If you are using Linux, then you need to know how this can be done with an application called Minicom.

Hardware

First, you are going to need a Cisco console cable, a Cisco device, and a computer. If your computer has a serial port, then you can use the standard console cable that comes with every Cisco device.


If you do not have a serial port (like most new laptops), then you need to purchase a USB to Serial adapter that supports Linux. This device will allow you to use the standard Cisco cable, which has a serial port on one end.

Install Minicom

You can easily install Minicom by using "System > Administration > Synaptic Package Manager". Search for "minicom" and choose to install the package. Click "Apply" and Minicom should be installed within a few seconds.


Find the name of your serial port


The first thing you need to find out is which device your serial port is mapped to. The easiest way to do this is to connect the console cable to a running Cisco device. Now open up a Terminal using "Applications > Accessories > Terminal" and type this command:
dmesg | grep tty
The output will look something like this:


Look in this output for words that contain "tty". In this case, it is "ttyS0". That meas the name of the device the corresponds to your serial port is "ttyS0". Now we are ready to configure Minicom to use this information.

Configure Minicom

Open a terminal using "Applications > Accessories > Terminal". Now type this command to enter the configuration menu of Minicom:
sudo minicom -s
Use the keyboard arrow keys to select the menu item labeled "Serial Port Setup" and then hit "Enter". This will open a window that looks similar to the one below:


Change your settings to match the ones in the picture above. Here is what I had to change:
  • Change the line speed (press E) to "9600"
  • Change the hardware flow control (press F) to "No"
  • Change the serial device (press A) to "/dev/ttyS0"
    • Be sure to use the device name that you learned in the previous step
Once your screen looks like mine, you can hit "Escape" to go back to the main menu. Next, you need to select "Save setup as dfl" and hit "Enter" to save these settings to the default profile. Then select "Exit Minicom" to exit Minicom... ;)

To find out if you have configured Minicom correctly, type this command in the terminal:
sudo minicom
After entering your Ubuntu user password, you should be connected to your Cisco device.

Note: You may want to delete the Minicom init string if you see a bunch of gibberish every time you connect to a device. To do this, enter Minicom configuration with:
sudo minicom -s
Then select "Modem and dialing". Press "A" to edit the Init string, and delete all characters so that it becomes empty. Make sure you save this to the default profile with "Save setup as dfl". You should no longer see gibberish when you connect to devices.


Create a desktop launcher

If you want to have quicker access to Minicom, you can create a desktop launcher.
  1. Right-click on the desktop and choose "Create launcher"
  2. Click on "Icon" and choose the picture you want to use
  3. Use the "Type" pull-down menu and select "Application in terminal"
  4. Create a name like "Cisco Console" in the field labeled "Name"
  5. Enter this command into the field labeled "Command"
    • sudo minicom
  6. Hit "OK" and your desktop launcher is ready for you to use.

13 comments:

Tristan Rhodes said...

I have added this content to the Ubuntu wiki, which you can find here:

https://help.ubuntu.com/community/CiscoConsole

skyegod said...

Good day,
What would the device be if you were using a usb -> serial adapter?

Thanks
Andrew

Tristan Rhodes said...

Andrew,

It would probably look something like this:

/dev/ttyUSB0

Hope that helps.

Tristan

Anonymous said...

Thanks for this tip/howto. I am a sysadmin making the switch to linux desktop and your article really helped. Keep up the good work!!

Anonymous said...

Wow, thanks for the easy and helpful guide. I got connected to my Cisco gear in the time it took me to read this post.

NetworkDr said...

It would probably look something like this: /dev/ttyUSB0

When I run dmesg | grep tty I get the following and minicom complains that there is no ttyUSB0 when I try to use it.


[ 6.461116] 00:0a: ttyS0 at I/O 0x3f8 (irq = 4) is a NS16550A
[1409448.804000] usb 2-2: FTDI USB Serial Device converter now attached to ttyUSB0
[1409449.128000] usb 2-2: usbfs: interface 0 claimed by ftdi_sio while 'brltty' sets config #1
[1409449.128000] usb 2-2: usbfs: USBDEVFS_CONTROL failed cmd brltty rqt 128 rq 8 len 1 ret -71
[1409454.228000] usb 2-2: usbfs: interface 0 claimed by ftdi_sio while 'brltty' sets config #1
[1409454.232000] ftdi_sio ttyUSB0: FTDI USB Serial Device converter now disconnected from ttyUSB0
[1412269.852000] usb 2-1: FTDI USB Serial Device converter now attached to ttyUSB0
[1412272.068000] usb 2-1: usbfs: interface 0 claimed by ftdi_sio while 'brltty' sets config #1
[1412272.072000] ftdi_sio ttyUSB0: FTDI USB Serial Device converter now disconnected from ttyUSB0
[1497234.816000] usb 2-2: FTDI USB Serial Device converter now attached to ttyUSB0
[1497237.612000] usb 2-2: usbfs: interface 0 claimed by ftdi_sio while 'brltty' sets config #1
[1497237.612000] ftdi_sio ttyUSB0: FTDI USB Serial Device converter now disconnected from ttyUSB0
[1497315.008000] usb 2-2: usbfs: interface 0 claimed by usbfs while 'brltty' sets config #1
[1497380.332000] usb 2-2: usbfs: interface 0 claimed by usbfs while 'brltty' sets config #1
[1497385.764000] usb 2-2: usbfs: interface 0 claimed by usbfs while 'brltty' sets config #1
[1497717.864000] usb 2-2: usbfs: interface 0 claimed by usbfs while 'brltty' sets config #1
[1497723.316000] usb 2-2: usbfs: interface 0 claimed by usbfs while 'brltty' sets config #1


Sidenote and possible issue....I have VMWare Server installed and when I run dmesg alone I see many calls to vmware and usbfs as shown below:


[1497948.908000] usb 2-2: usbfs: process 20365 (vmware-vmx) did not claim interface 0 before use
[1497953.944000] usb 2-2: usbfs: process 20365 (vmware-vmx) did not claim interface 0 before use
[1497958.936000] usb 2-2: usbfs: process 20365 (vmware-vmx) did not claim interface 0 before use
[1497963.968000] usb 2-2: usbfs: process 20365 (vmware-vmx) did not claim interface 0 before use

Any suggestions?

Al


Telnet - SMTP Commands (sending mail using telnet)

SkyHi @ Tuesday, November 24, 2009


In order to access your mailbox you will need 3 things:
  • An active internet connection (an embarrasing stage to miss sometimes!)
  • The address of a mail server capable of relaying for you - usually provided by your dialup provider (e.g. mail.domain.ext)
  • A valid email address (e.g. mail@domain.ext)
The first thing to do is to open a connection from your computer to your mail server.
telnet mail.domain.ext 25
You should receive a reply like:
Trying ???.???.???.???...
Connected to mail.domain.ext.
Escape character is '^]'.
220 mail.domain.ext ESMTP Sendmail ?version-number?; ?date+time+gmtoffset?


You will then need to delcare where you are sending the email from:
HELO local.domain.name - dont worry too much about your local domain name although you really should use your exact fully qualified domain name as seen by the outside world the mail server has no choice but to take your word for it as of RFC822-RFC1123.
This should give you:
250 mail.domain.ext Hello local.domain.name [loc.al.i.p], pleased to meet you

Now give your email address:
(On many mailservers the space after the : is required rather that optional. Thanks to Justing Goldberg)
MAIL FROM: mail@domain.ext
Should yeild:
250 2.1.0 mail@domain.ext... Sender ok
If it doesn't please see possible problems.

Now give the recipients address:
RCPT TO: mail@otherdomain.ext
Should yeild:
250 2.1.0 mail@otherdomain.ext... Recipient ok
If it doesn't please see possible problems.

To start composing the message issue the command DATA

If you want a subject for your email type Subject:-type subject here- then press enter twice (these are needed to conform to RFC 882)

You may now proceed to type the body of your message (e.g. hello mail@otherdomain.ext from mail@domain.ext)

To tell the mail server that you have completed the message enter a single "." on a line on it's own.
The mail server should reply with: 250 2.0.0 ???????? Message accepted for delivery

You can close the connection by issuing the QUIT command.
The mailserver should reply with something like:221 2.0.0 mail.domain.ext closing connection
Connection closed by foreign host.


Here are a list of problems I've encountered and their fixes

501 nouser@nosuchplace.here... Sender domain must exist
The domain that you are sending from must exist

503 Need MAIL before RCPT
A recipient has been specified before a sender.

550 mail@domain.ext... Relaying Denied


Sending Mail (SMTP)

SkyHi @ Tuesday, November 24, 2009


Before you send mail, the entire message needs to be composed.
You need to know where it is going, who gets it, and what the
text of the message is. When this information has been gathemiles,
you begin the process of transferring the information to a mail
server.


Note:
The mail service will be listening for your connection on TCP port 25.
But this information will not be important until you see some Perl code
later in the chapter.


The message that you prepare can only use alphanumeric characters.
If you need to send binary information (like files), use the MIME
protocol. The details of the MIME protocol can be found at the

http://ds.internic.net/ds/dspg0intdoc.html


Web site.


SMTP uses several commands to communicate with mail servers. These
commands are described below.

Note: The commands are not case sensitive,
which means you can use either Mail or MAIL. However, remember
that mail addresses are case sensitive.


The basic SMTP commands are:

HELO
-- Initiates a
conversation with the mail server. When using this command you can specify your domain
name so that the mail server knows who you are. For example, HELO mailhost2.
cf.ac.uk
.
MAIL
-- Indicates who is sending the mail. For example,

MAIL FROM:
<dave@cs.cf.ac.uk>
.


Remember this is not going to be your name -- it's the
name of the person who is sending the mail message. Any returned mail will be sent back
to this address.

RCPT
-- Indicates who is recieving the mail. For example,

RCPT
TO:
<user@email.com>
. You can indicate more than one user by issuing multiple
RCPT
commands.

DATA
-- Indicates that you are about to send the text (or body) of the
message. The message text must end with the following five letter sequence:
"\r\n.\r\n."
QUIT
-- Indicates that the
conversation is over.

EXPN

-- Indicates that you are using a mailing list.
HELP
-- Asks for help from the
mail server.
NOOP
-- Does nothing other than get a reponse from the mail server.
RSET
Aborts the current conversation.
SEND
-- Sends a message to a user's terminal
instead of a mailbox.
SAML
-- Sends a message to a user's terminal and to a user's
mailbox.
SOML
-- Sends a message to a user's terminal if they are logged on;
otherwise, sends the message to the user's mailbox.
TURN
-- Reverses the role of
client and server. This might be useful if the client program can also act as a server
and needs to receive mail from the remote computer.
VRFY
-- Verifies the existence and
user name of a given mail address. This command is not implemented in all mail servers.
And it can be blocked by firewalls.


Every command will receive a reply from the mail server in the
form of a three digit number followed by some text describing
the reply. For example,

250 OK


or

500 Syntax error, command unrecognized.


The complete list of reply codes is shown below: (you'll never see most of them if
you program your mail server correctly!!)

211
-- A system status or help reply.
214
-- Help
Message.
220
-- The server is ready.
221
-- The server is ending the conversation.
250
-- The requested action was completed.
251
-- The specified user is not local, but the server will forward the mail
message.
354
-- This is a reply to the DATA command. After getting this, start
sending the body of the mail message, ending with
"\r\n.\r\n."
421
-- The mail server will be shut down. Save the mail message and try again
later.
450
-- The mailbox that you are trying to reach is busy. Wait a little while and
try again.
451
-- The requested action was not done. Some error occurmiles in the mail server.
452
-- The requested action was not done. The mail server ran out of system
storage.
500
-- The last command contained a syntax error or the command line was too
long.
501
-- The parameters or arguments in the last command contained a syntax error.
502
-- The mail server has not implemented the last command.
503
-- The last command was sent out of sequence. For example, you might have
sent DATA before sending RECV.
504
-- One of the parameters of the last command has not been implemented by the
server.
550
-- The mailbox that you are trying to reach can't be found or you don't have
access rights.
551
-- The specified user is not local; part of the text of the message will
contain a forwarding address.
552
-- The mailbox that you are trying to reach has run out of space. Store the
message and try again tomorrow or in a few days-after the user gets a chance to delete
some messages.
553
-- The mail address that you specified was not syntactically correct.
554
-- The mail transaction has failed for unknown causes.


Now that you've seen all of the SMTP commands and reply codes,
let's see what a typical mail conversation might look like. In
the following conversation, the '>' lines are the SMTP commands
that your program issues. The '<' lines are the mail server's
replies.

>HELO
<250 sentinel.cs.cf.ac.uk Hello dave@cs.cf.ac.uk [X.X.X.X],pleased to meet you


>MAIL From: <(Ralph Martin)>
<250 <(Ralph Martin)>... Sender ok


>RCPT To: <dave@cs.cf.ac.uk>
<250 <dave@cs.cf.ac.uk>... Recipient ok


>DATA
<354 Enter mail, end with "." on a line by itself


>From: (Ralph Martin)
>Subject: Arrows
>This is line one.
>This is line two.
>.
<250 AAA14672 Message accepted for delivery


>QUIT
<221 sentinel.cs.cf.ac.uk closing connection


Some
of the SMTP commands are a bit more complex than others. In the
next few sections, the MAIL,
RCPT, and DATA
commands are discussed. You will also see how to react to undeliverable
mail.


The MAIL Command

The MAIL command tells the mail server to start a new conversation. It's also used to let the mail server know where to send a mail message to report errors. The syntax looks like this:

MAIL FROM:

If the mail server accepts the command, it will reply with a code of 250. Otherwise, the reply code will be greater than 400.

In the example shown previously

>MAIL From:<(dave@cs.cf.ac.uk)>

<250>... Sender ok

The reverse-path is different from the name given as the sender following the DATA command.

You can use this technique to give a mailing list or yourself an alias. For example, if you are maintaining a mailing list to your colleaguse, you might want the name that appears in the reader's mailer to be 'MyNickname' instead of your own name.


The RCPT Command

You tell the mail server who the recipient of your message is by using the RCPT command. You can send more than one RCPT command for multiple recipients. The server will respond with a code of 250 to each command. The syntax for the RCPT is:

RCPT TO:

Only one recipient can be named per RCPT command. If the recipient is not known to the mail server, the response code will be 550. You might also get a response code indicating that the recipient is not local to the server. If that is the case, you will get one of two responses back from the server:

* 251 User not local; will forward to -This reply means that the server will forward the message. The correct mail address is returned so that you can store it for future use.
* 551 User not local; please try -This reply means that the server won't forward the message. You need to issue another RCPT command with the new address.

The DATA Command

After starting the mail conversation and telling the server who the recipient or recipients are, you use the DATA command to send the body of the message. The syntax for the DATA command is very simple:

DATA

After you get the standard 354 response, send the body of the message followed by a line with a single period to indicate that the body is finished. When the end of message line is received, the server will respond with a 250 reply code.

Note The body of the message can also include several header items like Date, Subject, To, Cc, and From.


Reporting Undeliverable Mail

The mail server is responsible for reporting undeliverable mail, so you may not need to know too much about this topic. However, this information may come in handy if you ever write/run a list service or if you send a message from a temporary account.

An endless loop happens when an error notification message is sent to a non-existent mailbox. The server keeps trying to send a notification message to the reverse-path specified in the MAIL command.

The answer to this dilemma is to specify an empty reverse path in the MAIL command of a notification message like this:

MAIL FROM:<>

An entire mail session that delivers an error notification message might look like the following:

MAIL FROM:<>
250 ok
RCPT TO:<@HOST.COM@HOSTW.ARPA>
250 ok
DATA
354 send the mail data, end with .
Date: 12 May 99 10:55:51
From: dave@cs.cf.ac.uk
To: user@net.com
Subject: Problem delivering mail.


your message to fmiles@net.com was not
delivemiles.


net.com said this:
"550 No Such User"
.
250 ok


Using Perl to Send Mail

Enough theory let's see some actual Perl code.

The sendmail.pl program below does just this. It' basic operation is as follows:

(Some comments have been added to indicate changes that are needed for porting to some machines)

* Turn on the warning compiler option.
* Load the Socket.
* Turn on the strict pragma.
* Initialize $mail To which holds the recipient's mail address.
* Initialize $mailServer which holds the symbolic name of your mail server.
* Initialize $mailFrom which holds the originator's mail address.
* Initialize $realName which holds the text that appears in the From header field.
* Initialize $subject which holds the text that appears in the Subject header field.
* Initialize $body which holds the text of the letter.
* Declare a signal handler for the Interrupt signal. This handler will trap users hitting Ctrl+c or Ctrl+break.
* Get the protocol number for the tcp protocol and the port number for the smtp service. Recall: Windows 95 and NT do not implement the getprotobyname()or getservbyname() functions so default values are supplied.
* Initialize $serverAddr with the mail server's Internet address.
* The $length variable is tested to see if it is defined, if not, then the gethostbyname() function failed.
* Create a socket called SMTP using standard parameters.
* Initialize $packedFormat with format specifiers.
* Connect the socket to the port on the mail server.
* Change the socket to use unbuffer input/output. Normally, sends and receives are stomiles in an internal buffer before being sent to your script. This line of code eliminates the buffering steps.
* Create a temporary buffer. The buffer is temporary because it is local to the block surrounded by the curly brackets.
* Read two responses from the server. Some servers send two reponses when the connection is made. Your server may only send one response -- If so, delete one of the recv() calls.
* Send the HELO command. The sendSMTP() function will take care of reading the response.
* Send the MAIL command indicating where messages that the mail server sends back (like undeliverable mail messages) should be sent.
* Send the RCPT command to specify the recipient.
* Send the DATA command.
* Send the body of the letter. Note that no reponses are received from the mail server while the letter is sent.
* Send a line containing a single period indicating that you are finished sending the body of the letter.
* Send the QUIT command to end the conversation.
* Close the socket.
* Define the closeSocket() function which will act as a signal handler.
* Close the socket.
* Call die() to display a message and end the script.
* Define the send SMTP() function.
* Get the debug parameter.
* Get the smtp command from the parameter array.
* Send the smtp command to STDERR if the debug parameters were true.
* Send the smtp command to the mail server.
* Get the mail server's response. Send the response to STDERR if the debug parameter were true.
* Split the response into reply code and message, and return just the reply code.

The Perl code for sendmail.pl is as follows:

#!/usr/bin/perl -w


use Socket;
use strict;


my($mailTo) = 'dave@cs.cf.ac.uk';


my($mailServer) = 'mailhost2.cs.cf.ac.uk';


my($mailFrom) = 'dave@cs.cf.ac.uk';
my($realName) = "Ralph Martin";
my($subject) = 'Test';
my($body) = "Test Line One.\nTest Line Two.\n";


$main::SIG{'INT'} = 'closeSocket';


my($proto) = getprotobyname("tcp") || 6;
my($port) = getservbyname("SMTP", "tcp") || 25;
my($serverAddr) = (gethostbyname($mailServer))[4];


if (! defined($length)) {


die('gethostbyname failed.');
}


socket(SMTP, AF_INET(), SOCK_STREAM(), $proto)
or die("socket: $!");


$packFormat = 'S n a4 x8'; # Windows 95, SunOs 4.1+
#$packFormat = 'S n c4 x8'; # SunOs 5.4+ (Solaris 2)


connect(SMTP, pack($packFormat, AF_INET(), $port, $serverAddr))
or die("connect: $!");


select(SMTP); $| = 1; select(STDOUT); # use unbuffemiles i/o.


{
my($inpBuf) = '';


recv(SMTP, $inpBuf, 200, 0);
}


sendSMTP(1, "HELO\n");
sendSMTP(1, "MAIL From: <$mailFrom>\n");
sendSMTP(1, "RCPT To: <$mailTo>\n");
sendSMTP(1, "DATA\n");


send(SMTP, "From: $realName\n", 0);
send(SMTP, "Subject: $subject\n", 0);
send(SMTP, $body, 0);


sendSMTP(1, "\r\n.\r\n");
sendSMTP(1, "QUIT\n");


close(SMTP);


sub closeSocket { # close smtp socket on error
close(SMTP);
die("SMTP socket closed due to SIGINT\n");
}


sub sendSMTP {
my($debug) = shift;
my($buffer) = @_;


print STDERR ("> $buffer") if $debug;
send(SMTP, $buffer, 0);


recv(SMTP, $buffer, 200, 0);
print STDERR ("< $buffer") if $debug; return( (split(/ /, $buffer))[0] ); } This program displays: > HELO
<> MAIL From:
<>... Sender ok
> RCPT To:
<>... Recipient ok
> DATA
<>
.
<> QUIT
<>

Outlook: 503 Valid RCPT command must precede DATA

SkyHi @ Tuesday, November 24, 2009
The original message was received at Mon, 19 Oct 2009 17:54:42 -0700 from webmail.pro.net [127.0.0.1]

----- The following addresses had permanent fatal errors -----
(reason: 550 No Such User Here)

----- Transcript of session follows ----- ... while talking to jaguarrichmond.com.:
>>> DATA
<<< 550 No Such User Here
550 5.1.1 ... User unknown <<< 503-All RCPT commands were rejected with this error:
<<< 503-No Such User Here
<<< 503 Valid RCPT command must precede DATA


Use Spam Bully for Outlook and Outlook Express

The 503 valid RCPT command must precede DATA error is a common one that often occurs as a result of the spam software you're using, or as a result of Outlook's default spam utility. We recommend giving Spam Bully a try. You can try it for free, and it's one of the better known and more powerful spam filters. You can nail two birds with one stone - get rid of this annoying error and get rid of your annoying spam messages at the same time. Look at the error as a blessing - it helped you find Spam Bully Smiling. Click here for details and to download a free trial.
503 valid RCPT command must precede DATA

We recently got this error when trying to send an email in Outlook. The culprit? Apparently this occurs when a server is expecting to receive mail before sending. This is usually results from server authentication priorities (for example, you attempt to send mail before your "spam filter" has finished its receiving process.)
Solutions to resolve the 503 RCPT error

* Pop before SMTP -- Run a check for new messages (F9 key in Outlook) before sending your message and restart and rerun your spam filter application. Your IP address is entered in a relayhosts file, allowing email to be sent from your address for up to half an hour.
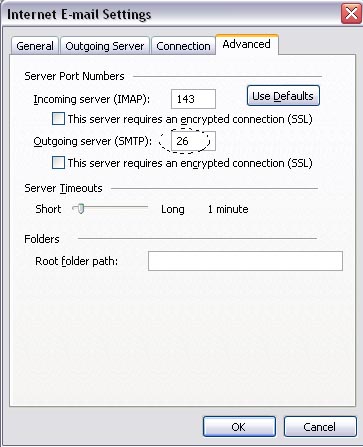
* If the problem still persists check "my server requires authentication" to authenticate automatically. With this setting you can bypass the check above and send mail without having to "pop" your mail box first. You can also try changing the outgoing port from 25 to 26, since some ISP's block this port.
* One of our readers pointed out that it may help to remove apostrophes from your email account names.
* Finally, if using a mail screening utility such as Mail Washer, you may want to disable the "automatically check at intervals" setting and check mail manually. If the system checks mail while you are sending you may get this error.

If these don't work, check your mail server

If none of the above work we recommend contacting your hosting provider. Your mail services account needs to be set up properly (associated with the right user name, etc.). We encountered this exact problem when switching hosts once - the mail server configuration got goofed up, and none of the above solutions worked. In the interim (until settings are fixed by your hosting provider) you can adjust your outgoing mail server to reflect that which your ISP uses, which should let you send mail again through your local client (Outlook, but not from the server (Webmail)), until the problem is fixed.

Email problem: 503 Need Rcpt Command

SkyHi @ Tuesday, November 24, 2009
I've started taking a closer look at the bounces I get from my monthly mailout. Bounces from hotmail accounts start off by saying 'user unavailable' and then 'user unknown', so I wrote that off to exactly what it says -- the mailbox isn't available because there isn't a user by that name.

But today I read a little further and noticed a 503 error -- "Need Rcpt Command". Here's all the pertinent info:

----- The following addresses had permanent fatal errors -----
<our_customer@hotmail.com>
(reason: 550 Requested action not taken: mailbox unavailable)

----- Transcript of session follows -----
... while talking to mx2.hotmail.com.:
>>> DATA
<<< 550 Requested action not taken: mailbox unavailable
550 5.1.1 <our_customer@hotmail.com>... User unknown
<<< 503 Need Rcpt command


Now I should point out that we have no problem sending to the vast majority of hotmail accounts, and it IS possible that these few are, in fact, dead and gone, and that the 503 business is simply misleading. I tried Googling this error, but nothing seemed to address this in a way I could understand.

Can anyone here shed some light on this? And on a way to avoid this, if indeed there's a real hotmail user at the end of this chain?


A bit cheeky, but why not try emailing one of the users from a test Hotmail account to see if it bounces? Doesn't need to be linked to your business, just send a blank email from some random Hotmail address. Then you know whether there is a problem or not.

Is it always the same email addresses that fail? Are you sending all the emails in one go? Maybe Hotmail implements rate-limiting or something and is just stalling.


===================================================================
When sending email, you receive an immediate bounce such as the following:

Subject: RE: XXXXXX - October 27, 2005
Sent: 10/31/2005 12:40 PM
The following recipient(s) could not be reached:
'John Doe' on 10/31/2005 12:40 PM
503 valid RCPT command must precede DATA

This means you must check your email before trying to send mail meaning that our mail server requires authentication, which can be achieved using one of these methods:

A) Pop before smtp -- check your email for new mail before trying to send email. This adds your IP address to a relayhosts file and allows any email to be sent from that IP address for up to 30 minutes. After 30 minutes you have to authenticate again.

B) Configure your email client to authenticate automatically by checking the "my server requires authentication" box in your email configuration. You will be able to send mail without having to "pop" your mail box first.

If using MS Outlook, please try the following:

1) Open outlook
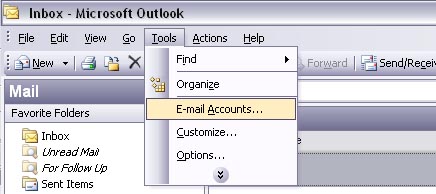
2) Go to Tools/Email Accounts
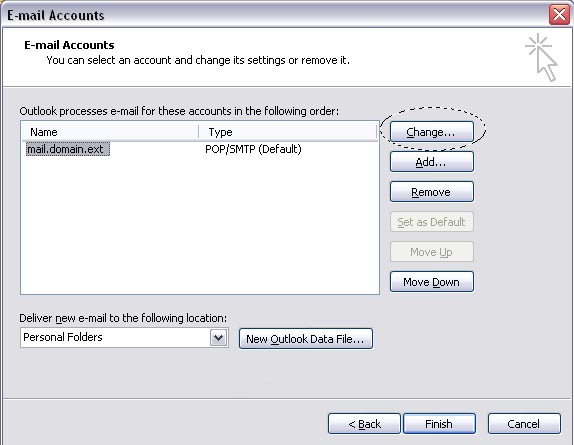
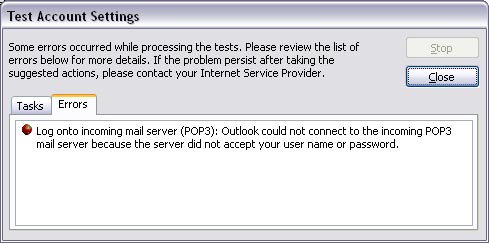
3) Select the Account with the trouble and click Change
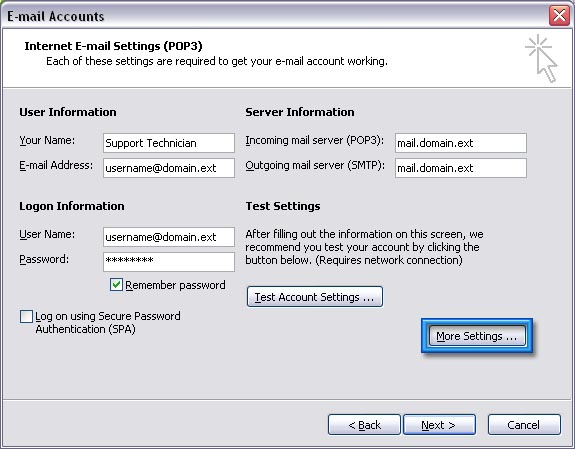
4) Click on More Settings
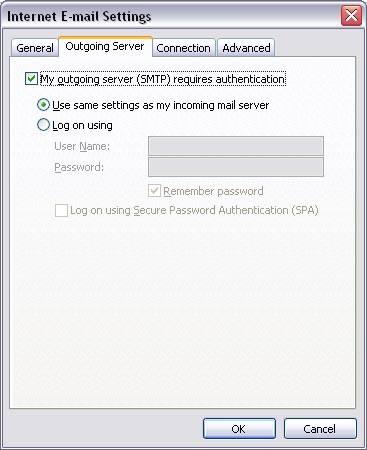
5) Click on Outgoing Server Tab
6) Click "Outgoing Mail Server (SMTP) requires authentication" and make sure "Use same settings as incoming mail server" is selected (see attached image)
7) Click on "Advanced Tab"
8) Set outgoing Port (SMTP) to 25
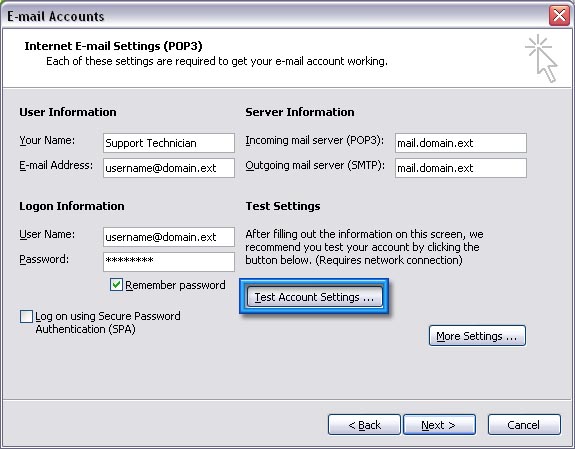
9) Click Ok and then Test Account Settings

If it fails on send then repeat starting from 7.

7) Click on Advanced Tab
8) Set outgoing Port (SMTP) to 587 (See attached)

REFERENCES
https://www.powersurge.net/support/index.php?_m=knowledgebase&_a=viewarticle&kbarticleid=185


=======================================================================

This usually is a result of the mail server requiring authentication.
If you are using Outlook 2003, here are the steps to enable authentication:

Watch the Outlook 2003 Tutorial!
  1. Open Outlook
  2. Go to Tools | Email Accounts
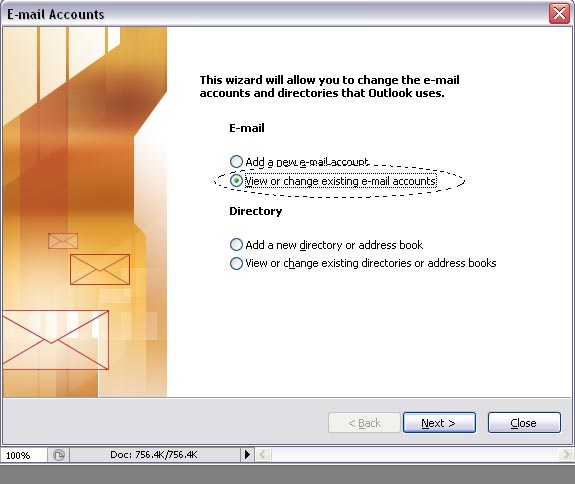
  3. "View or change existing e-mail accounts" should already be marked
  4. Click Next
  5. Select the Account with the trouble and click Change
  6. Click on More Settings
  7. Click on the Outgoing Server Tab
  8. Click "My outgoing server (SMTP) requires authentication" and make sure "Use same settings as my incoming mail server" is selected
  9. Click on the Advanced Tab
  10. Set "Outgoing server (SMTP):" port to 26
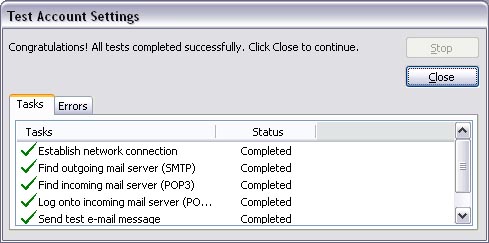
  11. Click OK and then Test Account Settings
  12. If everything is fine and reports no errors,
    • Click Close.
    • Click Next.
    • Click Finish.
  13. If an error does occur, it will switch to the Errors tab and display the error
Note: If you are still having errors, make sure your login username is your full email address and that the password is correct.

REFERENCES
https://www.bluehost.com/cgi/help/000218


=========================================================================
Your message did not reach some or all of the intended recipients.
Subject: Insert files as printouts
Sent: 1/1/2009 12:12 PM
The following recipient(s) cannot be reached:
dest@host.com’ on 1/1/2009 12:12 PM
503 Valid RCPT command must precede DATA
Generally, when you get this error when sending a message from microsoft outlook, it is because you did not enable authentication for outgoing emails.
To fix this error open the outlook “tools menu” and select “account settings” , from there select “Change” while selecting the account you want to use from the list. Now click the “More settings” button and select “outgoing server”, click “My outgoing server (SMTP) requires authentication” and keep “Use same settings as for my incoming mail server”
Press Ok , next , finish, close, die
try it now, it should be working


REFERNCES
http://angrybyte.com/windows-hacks/503-valid-rcpt-command-must-precede-data-fix/

SSH for Cisco IOS

SkyHi @ Tuesday, November 24, 2009
  • SSH in IOS. Recent Cisco-router firmware (IOS 12.x on some models only — Cisco 2500 and 1700 series not being supported for performance reasons) is said to include a Cisco-written implementation of ssh 1.5, server and client. Note that international versions of IOS are limited to DES session encryption, only.

Jim Dennis notes: One way to gain secured access to older Cisco routers, or smaller (2500 or 1700) or other devices with serial consoles is to run a null modem cable to them from any nearby Unix, Linux, FreeBSD box — ssh thereto and use cu, tip, minicom, or kermit.


Monday, November 23, 2009

The Challenge With Securing Shared Hosting

SkyHi @ Monday, November 23, 2009
 Posted by Stuart Herbert @ 9:04 AM, Wed 21 Nov 07

Filed under: The Web Platform

14 Comments

(Many thanks to everyone for their feedback on my first post in this series.)

Most of us started out hosting our code on shared hosting, whether it was on a box provided by an ISP, something we rented ourselves, or something we built so that we had somewhere to host the websites we built for our customers. Love it or loathe it, shared hosting has some unique security challenges, and understanding those challenges is a good way to learn the fundamentals of how your web server actually works.

This article is looking squarely at Linux systems running Apache, which is by far the most common shared hosting platform, but the principles involved apply to Lighttpd or any other Apache alternative running on Linux.

What Is A Shared Server?

For many web developers, their first experience of hosting code on the Internet comes on a shared server. Shared servers offer cheap hosting, but that’s because there are many different people sharing the same server and therefore sharing the costs.

A shared server is a single server that hosts more than one website. Each website may be owned by a different company, group, or person. Typically, each customer on the box has a user account which they log into to upload new files for the website. Each file that the customer uploads is owned by the customer’s user account:

ls -lh ~thecube/public_html
drw-r--r-- thecube public 4K images
-rw-r--r-- thecube public 1.2K index.php

Apache Needs Access To Your Files

On your classic shared hosting server, there’s one copy of the Apache web server running, and PHP is installed either as mod_php, or as a CGI executable. That one copy of Apache handles all the incoming HTTP requests for all the websites that are sharing the server. When Apache is running in this way, it runs as a specific user – normally www, or apache (or nobody on badly-configured systems).

In order to serve up your website, Apache needs to be able to read your HTML files, CSS files, images, PHP scripts and so on. Some web applications (blogs, content management systems and so on) also need write access to your website’s directories.

Read and write access is normally granted by setting the group permissions on a file or directory. Each customer’s user account, and Apache, are members of the same group. By default, the FTP daemon will be set up to ensure that the group has read access to all of the files that are uploaded, so that Apache can serve the website.

Apache Has Access To Everyone’s Files

There is one copy of Apache, and it runs as a single user – no matter which website is being served. This single user has read access to every single website on the shared hosting server, and it probably has write access to most (if not all) of the websites too.

An attacker from the outside only needs to break into one website on the server, and that will give him access to every other website hosted on the same box!

But here is the rub. The attacker doesn’t need to break into the box. He can just as easily become a customer, get a legitimate account on the box, and then just upload PHP scripts to access the other websites hosted on the box. Provided he’s careful and doesn’t change anything, he can steal whatever data he wants, and no-one will even notice.

Why does that work? It’s possible because the PHP code is executed by Apache – and Apache has access to all of the files from all the websites on the box. That includes all the PHP scripts that contain the usernames and passwords for all the MySQL databases.

This is the worse-case scenario – but it’s also the default scenario. Slap Apache + mod_php on a box, start putting websites on it, and these security problems will exist, unless you (as the server administrator) take additional steps to prevent them.

The Challenge

The challenge with securing a shared hosting server is this: how do we put as many websites as possible onto the one machine without each customer being able to steal sensitive information, or interfere with, any of the other customers that they are sharing with?

There are a few ways to tackle this, which I’ll cover in the next article or two.

This article is part of The Web Platform, an on-going series of blog posts about the environment that you need to create and nurture to run your web-based application in. If you have any topics that you’d like to see covered in future articles, please leave them in the comments on this page.

14 Comments

  1. Web Hosting » The Challenge With Securing Shared Hosting says:
    November 21st, 2007 at 9:38 am

    [...] You can read the rest of this blog post by going to the original source, here [...]

  2. Mislav says:
    November 21st, 2007 at 12:22 pm

    Will you be talking about “caged” environments and how to set them up?

    I believe Site5 is configured that way.

  3. Nicolas Grekas says:
    November 21st, 2007 at 8:31 pm

    Personally, I use apache with mpm_itk and it works like a charm.

  4. Stu says:
    November 21st, 2007 at 11:35 pm

    @Nicolas: mpm_itk is one of the solutions I’m going to cover in the next article. It solves the problem, but at a cost that won’t be acceptable to everyone.

  5. Jonathan Street says:
    November 23rd, 2007 at 6:01 pm

    How can you keep us waiting?

    It’s shaping up to be an interesting series.

  6. Samir M. Nassar says:
    November 27th, 2007 at 3:13 am

    Will you be looking at mpm_peruser? It probably has some of the same drawbacks that mpm_itk has, but it would be interesting to get more information about it.

  7. PHP’s Built-In Solutions For Shared Hosting | Stu On PHP says:
    November 27th, 2007 at 9:12 am

    [...] my last article, I covered the fundamental security problem that exists when you have multiple websites owned by [...]

  8. developercast.com » Stuart Herbert’s Blog: PHP’s Built-In Solutions For Shared Hosting says:
    November 27th, 2007 at 4:50 pm

    [...] up on a previous article, Stuart Herbert has posted some of the things that PHP can do to help solve the previously [...]

  9. Using suexec To Secure A Shared Server | Stu On PHP says:
    December 18th, 2007 at 9:10 am

    [...] The challenge with securing a shared hosting server is how to secure the website from attack both from the outside and from the inside. PHP has built-in features to help, but ultimately it’s the wrong place to address the problem. [...]

  10. Using suphp To Secure A Shared Server | Stu On PHP says:
    January 18th, 2008 at 8:10 am

    [...] The challenge with securing a shared hosting server is how to secure the website from attack both from the outside and from the inside. PHP has built-in features to help, but ultimately it’s the wrong place to address the problem. Apache has built-in features too, but the performance cost of these features is prohibitive. [...]

  11. Using mpm-peruser To Secure A Shared Server | Stuart Herbert On PHP says:
    March 20th, 2008 at 5:34 pm

    [...] The challenge with securing a shared hosting server is how to secure the website from attack both from the outside and from the inside. PHP has built-in features to help, but ultimately it’s the wrong place to address the problem. Apache has built-in features too, but the performance cost of these features is prohibitive. [...]

  12. Stuart Herbert On PHP - » Using mpm-itk To Secure A Shared Server says:
    April 19th, 2008 at 1:00 pm

    [...] The challenge with securing a shared hosting server is how to secure the website from attack both from the outside and from the inside. PHP has built-in features to help, but ultimately it’s the wrong place to address the problem. Apache has built-in features too, but the performance cost of these features is prohibitive. [...]

  13. Centos 5 and mpm-itk | hostby.net says:
    July 12th, 2008 at 2:21 pm

    [...] is such that its impossible to make it secure in a per user way. After reading Stuart Herbert discussion of the pros and cons of different solutions to this problem, i decided to look into it further.On [...]

  14. Zilvinas says:
    September 14th, 2008 at 9:23 pm

    Hello,

    We currently run a PHP/FastCGI + suexec setup. Our main problem now is safe_mode_exec_dir configuration that is going to be removed in PHP6. It allows to only use exec, system from a specified directory. And we can make sure that that directory is safe and only root can write there so scripts there are safe to execute.

    And the only available solution to this afaik is chroot. But to chroot your web application you must copy some of the libraries .. mysql, dns, libm, libz and so on. The problem is it’s very hard to know which required libs are needed. So you copy them all. You use a lot more disk space. And you need some kind of updates system to update your libraries when system libraries get updated. So it doesn’t seem elegant and clean.

    Do you know a better solution for this problem? If not .. It is really sad safe_mode_exec_dir is getting removed.