Showing posts with label Bind DNS. Show all posts

Monday, April 15, 2013

What is a Glue Record?

SkyHi @ Monday, April 15, 2013

Glue Records

This article offers a definition of a Glue Record, a description of why a Glue Record is need and how they are resolved through DNS, and how to create a Glue Record through the CloudAccess.net Client Area.

What is a Glue Record?

Why are Glue Records needed?

How to create a Glue Record

What is a Glue Record?

A Glue Record is the IP Address of a name server at a domain name registry. Glue Records are fundamental parts of DNS records because they help to resove DNS servers at a core level. If you would like to change the name servers for a site, you ll have to provide the Glue Records for the new name serves. Without them, a domain name will not work because anyone requiring the DNS information will be stuck in a loop. There is a cyclic dependency of circular referencing. Circular references exist where the name servers for a domain can t be resolved without resolving the domain they re responsible for. Glue Records are additional A records that allow the DNS client to locate name servers. 

When are Glue Records needed?

For example, let s say your domain (yourdomain.com) is using ns1.nameserver.com and ns2.nameserver.com as name servers, but gridfast.net also uses ns1.nameserver.com and ns2.nameserver.com as name servers. This is how the cyclic dependency is created. To break the cycle, DNS systems use Glue Records. 
You can also understand Glue Records by understanding A Records. An A record (an A address) is a DNS record that can be used to point your domain name and host names to a static IP address. For example, the A record for gridfast.net includes ns1.gridfast.net and ns2.gridfast.net and their IP addresses. These servers can be reached directly without any further resolution. For a domain name like CloudAccess.net, however, the root DNS servers pass the ns1.gridfast.net and ns2.gridfast.net nameservers, and a further chain of resolution is needed to resolve the DNS. This is when a Glue Record is needed.


REFERENCES
http://www.cloudaccess.net/infrastructure-networking/66-servers-dns/318-glue-records.html

Tuesday, January 8, 2013

Force slave BIND9 server reload immediately

SkyHi @ Tuesday, January 08, 2013
Normally your secondary NS should synchronize by itself after a certain amount of time. The problem for the slave NS is to know about changes. In your primary NS, you can add the "notify yes" command in the zone declaration, so that salve NS (declared in the zone file!) are notified about changes. If your slave NS is not declared in the SOA of your zone, you can use the "also-notify x.x.x.x" parameter.

After doing this, the secondary should synchronise as soon as the master has reload the updated zone. If it's not the case, you should have a careful look to the serial number...


Have you enabled
also-notify { ip-to-slave };
for the zone in named.conf?


REFERENCES
https://groups.google.com/forum/?fromgroups=#!topic/comp.protocols.dns.bind/PeNtDguXNBY
http://serverfault.com/questions/379818/bind-dns-master-with-zerigo-slaves-bind-wont-update-the-slave-servers
http://www.mail-archive.com/debian-user@lists.debian.org/msg490738.html

Thursday, August 16, 2012

bind $TTL

SkyHi @ Thursday, August 16, 2012

The $TTL directive is defined in RFC 2308.
TTL in the DNS context defines the duration in seconds that the record may be cached. Zero indicates the record should not be cached. Note: RFC 1912 cautions that 0 = no caching is not widely implemented so make no assumptions.
The default TTL for the zone is defined in BIND9 by the $TTL directive which must appear at the beginning of the zone file i.e. before any RR to which it will apply. This $TTL is used for any Resource Record which does not explicitly set the 'ttl' field.
The TTL field is defined to be an unsigned 32 bit value with a valid range from 0 to 2147483647 (clarified in RFC 2181) - which is a long time! - somewhere on the other side of 68 years.
The $TTL field may take any time value.
In BIND 8 the SOA record (minimum parameter) was used to define the zone default TTL value. In BIND 9 the SOA 'minimum' parameter is used as the negative (NXDOMAIN) caching time (defined in RFC 2308).
RFC 1912 recommends that the $TTL value be set to 1 day or longer and that certain RRs which rarely change, such as the MX records for the domain, use an explicit TTL value to set even longer values such as 2 to 3 weeks. The value of this field is a balance between how frequently you think the DNS records will change vs load on the DNS server. In the example below the $TTL value of 2d (2 days) indicates that any change may not be fully propagated for 48 hours, equally caching DNS servers will require to re-read the RRs from your DNS every 48 hours which can be a non-trivial load. Many users will set this value to say 2w (2 weeks) in normal operation then prior to planned changes will reduce the value to say 1d or 12h, until the change has stabilized then restore the value to 2w.

Example

; example.com zone file fragment 
$TTL 2d ; zone default
      3w   IN      MX  10 192.168.254.2  ; overrides default     
joe   3h   IN      A      192.168.254.3  ; overrides default     
www        IN      A      192.168.254.3  ; uses zone default = 2 days


BIND Time formats

BIND allows a number of time formats in combinations. Formats allowed are (case insensitive):
  • #s = seconds = # x 1 seconds (really!)
  • #m = minutes = # x 60 seconds
  • #h = hours = # x 3600 seconds
  • #d = day = # x 86400 seconds
  • #w = week = # x 604800 seconds

Examples

; foo.com zone file fragment
; common origin (@) format
@           IN      SOA   ns.foo.com. root.foo.com. (
               2003080800 ; serial number
               10800s     ; refresh =  3 hours
               15M        ; update retry = 15 minutes
               3W12h      ; expiry = 3 weeks + 12 hours
               2h20M      ; minimum = 2 hours + 20 minutes
               )
www 12H15m  IN     A      10.0.5.17 ; A record TTL value

REFERENCES
http://www.zytrax.com/books/dns/apa/ttl.html

Monday, August 13, 2012

Migrating without downtime

SkyHi @ Monday, August 13, 2012
Using DNS, you can migrate your website, email, or other internet services to different servers with minimal downtime, here's the steps: 

(To minimize the chance that you would lose inbound email for your domain, we recommend our Mail Pathfinder service. With Mail Pathfinder, our servers become your MX records and accept mail for your domain and relay it to your mail server. When the old mail server goes offline, Mail Pathfinder will queue your mail, so that change will be transparent to the rest of the world. When the new mail server is online, all you need to do is reconfigure Mail Pathfinder to point to the new IP and your queued mail will be delivered.)

72 Hours prior to the migration:
Set the TTLs of each DNS record that will be changed down to 60 seconds.

24 Hours prior to the move:
Verify that your services are functioning on the new server(s). You may have to modify your local hosts file, or use a browser plugin that will let you modify your HTTP headers in order to see your web site on the new IP prior to migration.
Query the SOA record for your domain and record it.

At migration time:
Update all appropriate DNS records to point to the new IP addresses.
Empty all local DNS caches, including your local system DNS cache and yodur network/domain's DNS cache.

5 minutes after migration:
Query the SOA record for your domain and verify the Serial Number has been updated.
Query the DNS records directly against our nameservers to confirm our nameservers are advertising the new IP addresses.
Query your local DNS to verify it has picked up the new IP addresses.
Check your services directly, either by browsing to your web site from different locations, or checking that mail is flowing, etc.

If you observe any issues with your services, you can always revert back to the old IPs (assuming the servers are still available) and with the 60 second TTLs the records will revert very quickly.

24 hours after migration:
Increase the TTLs on all changed records back to 3600 seconds.

(NOTE: These time windows above are simple recommendations. The conditions of your migration may differ and require you to perform the above steps at different intervals.)

REFERENCES
https://dnspark.zendesk.com/entries/21424146-migrating-without-downtime

Wednesday, June 20, 2012

DNS zone transfer dump

SkyHi @ Wednesday, June 20, 2012
DNS zone transfer, also sometimes known by its (most common) opcode mnemonic AXFR, is a type of DNS transaction. It is one of the many mechanisms available for administrators to replicate DNS databases across a set of DNS servers. Zone transfer comes in two flavors, full (opcode AXFR) and incremental (IXFR). Nearly universal at one time, it is now becoming less popular in favor of the use of other database replication mechanisms that modern DNS server packages provide.


https://www.ultratools.com/tools/zoneFileDump

Thursday, March 1, 2012

What is a glue record?

SkyHi @ Thursday, March 01, 2012
A glue record in simplest terms is an IP address that is "glued" to a specific domain or subdomain in the registry. Glue records are most commonly needed for users that are trying to use name server addresses that are subdomains of the domain itself. To explain a little further: 

John has a domain registered named domain.com. John wants to set up his own name servers (DNS) using the addresses ns1.domain.com and ns2.domain.com. The problem with this is that because of the way that DNS works, every time someone tries to access domain.com, they will have to check with one of the subdomains (ns1.domain.com or ns2.domain.com) for the address which are both "under" the domain. Since you can't get to a subdomain before getting to the domain, and the domain is what we are looking for in the first place, we seem to be stuck. Let's personify the process for finding the correct address for a domain in the DNS lookup process:


Q: "I am trying to find domain.com. What is the IP address for the website domain.com?"
A: "I do not have the address. Check the name server for domain.com. You will find the address there."
Q: "Okay. What is the name server for domain.com?"
A: "ns1.domain.com"
Q: "Okay. What is the address for ns1.domain.com so I can check there?"
A: "I do not have the address. ns1.domain.com is a subdomain of domain.com. So check the name server for domain.com."
Q: "Okay.... What is the name server for domain.com?"
A: "ns1.domain.com"
Q: "You just said that. So you know the name of the name server but don't have the address?"
A: "Yes, only the name server has the address of the name server!"
Q: "So if only the name server knows the address for the name server, how am I supposed to get the address?!"   


The solution to this is to set up a glue record. A glue record will glue the IP address to the domain/subdomain so that the process is a bit more like:


Q: "I am trying to find domain.com. What is the IP address for the website domain.com?"
A: "I do not have the address. Check the name server for domain.com. You will find the address there."
Q: "Okay. What is the name server for domain.com?"
A: "ns1.domain.com(127.0.0.1)"   


This time the name came with an address since they were "glued" together! Now that's helpful!


This process may seem very technical but setting up a glue record in the 1&1 Control Panel is actually quite easy and may have already happened without you even knowing it. Any time a subdomain is created with "ns" at the beginning, a glue record is automatically created for this subdomain. Follow the next steps to get a better understanding:

Step 1:

Log in to the 1&1 Control Panel using your Customer ID OR domain name and your password

If you have only one package, you will land on the Administration page. If you have more than one package, select the package in question to reach its Administration page.

selectLinux.png
Step 2:

Click the Domains link from the Domains & Webspace panel.

selectDomains.png
Step 3:

Click the down arrow button next to New and select Create Subdomain.

newSubdomain1.png
Step 4:

Enter a subdomain that starts with "ns" such as ns1ns2, etc. and select the appropriate domain from the drop-down box.
Click the OK button when finished to create the subdomain.

newSubdomain2.png
Step 5:

The subdomain should be set up within the next 15 minutes or so. The glue record will be applied to the subdomain since it starts with "ns" however since the glue record is a DNS record, it may take 24-48 hours until fully updated and recognized by all servers/computers on the Internet.

You must have at least two name server addresses. Repeat this process to create another subdomain that starts with "ns" such as ns2.

If you need to change the IP address that the subdomain points to, please reference How do I edit/change a domain's IP Address (A record)?


REFERENCE
http://faq.1and1.co.uk/domains/domain_admin/dns_settings/3.html

Monday, January 9, 2012

Fixing ip_conntrack Bottlenecks: The Tale Of The DNS Server With Many Tiny Connections

SkyHi @ Monday, January 09, 2012
Server management is a funny thing. No matter how long you have been doing it, new interesting and unique challenges continue to pop up keeping you on your toes. This is a story about one of those challenges.
I manage a server which has a sole purpose: serving DNS requests. We use PowerDNS, which has been great. It is a DNS server whose backend is SQL, making administration of large numbers of records very easy. It is also fast, easy to use, open source and did I mention it is free?
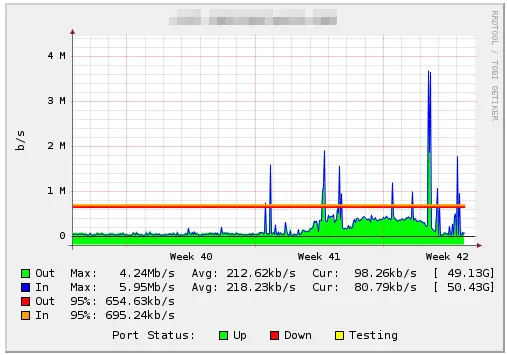
The server has been humming along for years now. The traffic graphs don’t show a lot of data moving through it because it only serves DNS requests (plus MySQL replication) in the form of tiny UDP packets.

We started seeing these spikes in traffic but everything on the server seemed to be working properly. Test connections with dig proved that the server was accurately responding to requests, but external tests showed the server going up and down.

The First Clue

I started going through logs to see if we were being DoSed or if it was some sort of configuration problem. Everything seemed to be running properly and the requests, while voluminous, seemed to be legit. Within the flood of messages I spied error messages such as this:
1
2
printk: 2758 messages suppressed.
ip_conntrack: table full, dropping packet.
Ah ha! A clue! Let’s check the current numbers of ip_conntrack, which is a kernel function for the firewall which keeps tabs on packets heading into the system.
1
2
3
4
5
6
7
8
9
10
11
[root@ns1 log]# head /proc/slabinfo
slabinfo - version: 2.0
# name             : tunables : slabdata
ip_conntrack_expect      0      0    192   20    1 : tunables  120   60    8 : slabdata      0      0      0
ip_conntrack        34543  34576    384   10    1 : tunables   54   27    8 : slabdata   1612   1612    108
fib6_nodes             5    119     32  119    1 : tunables  120   60    8 : slabdata      1      1      0
ip6_dst_cache          4     15    256   15    1 : tunables  120   60    8 : slabdata      1      1      0
ndisc_cache            1     20    192   20    1 : tunables  120   60    8 : slabdata      1      1      0
rawv6_sock             4     11    704   11    2 : tunables   54   27    8 : slabdata      1      1      0
udpv6_sock             0      0    704   11    2 : tunables   54   27    8 : slabdata      0      0      0
tcpv6_sock             8     12   1216    3    1 : tunables   24   12    8 : slabdata      4      4      0
Continuing this line of logic, lets check our current value for this setting:
1
2
[root@ns1 log]# sysctl net.ipv4.netfilter.ip_conntrack_max
net.ipv4.netfilter.ip_conntrack_max = 34576
So it looks like we are hitting up against this limit. After the number of connections reaches this number, the kernel will simply drop the packet. It does this so that it will not overload and freeze up due to too many packets coming into it at once.
This system is running on CentOS 4.8, and since then newer versions of RHEL5 have the default set at 65536. For maximum efficiency we keep this number at multiples of 2. The top size depends on your memory, so just be careful as overloading it may cause you to run out of it.

Fixing The ip_conntrack Bottleneck

In my case I decided to go up 2 steps to 131072. To temporarily set it, use sysctl:
1
2
[root@ns1 log]# sysctl -w  net.ipv4.netfilter.ip_conntrack_max=131072
net.ipv4.netfilter.ip_conntrack_max = 131072
Test everything out, if you have some problems with your network or system crashing, a reboot will set the value back to normal. To make the setting permanent on reboot, add the following line to your /etc/sysctl.conf file:
1
2
# need to increase this due to volume of connections to the server
net.ipv4.netfilter.ip_conntrack_max=131072
My theory is that since the server was dropping packets, remote hosts were re-sending their DNS requests causing a ‘flood’ of traffic to the server and the spikes you see in the traffic graph above whenever traffic was mildly elevated. The bandwidth spikes were caused by amplification of traffic due to resending of the requests. After increasing ip_conntrack_max I immediately saw the bandwidth resume to normal levels.
Your server should now be set against an onslaught of tiny packets, legitimate or not. If you have even more connections than what you can safely track with ip_conntrack you may need to move to the next level which involves hardware firewalls and other methods for packet inspection off-server on dedicated hardware.
Some resources used in my investigation of this problem:
[1] http://wiki.khnet.info/index.php/Conntrack_tuning
[2] http://serverfault.com/questions/111034/increasing-ip-conntrack-max-safely
[3] http://www.linuxquestions.org/questions/red-hat-31/ip_conntrack-table-full-dropping-packet-615436/


REFERENCES
http://systembash.com/content/fixing-ip_conntrack-bottlenecks-the-tale-of-the-dns-server-with-many-tiny-connections/

Wednesday, July 6, 2011

What risks are associated with recursive DNS queries?

SkyHi @ Wednesday, July 06, 2011
There are two types of DNS queries: iterative and recursive.

NOTE: We do not allow recursive DNS to run on dedicated or virtual dedicated servers unless it runs locally and for a specific IP range. If we find your server running an improper configuration of recursive DNS, we will exercise our right to suspend your account. The account will remain suspended until arrangements are made to turn off recursive DNS.

Iterative
Iterative DNS queries are ones in which a DNS server is queried and returns an answer without querying other DNS servers, even if it cannot provide a definitive answer. Iterative queries are also called non-recursive queries.
Recursive
Recursive DNS queries occur when a DNS client requests information from a DNS server that is set to query subsequent DNS servers until a definitive answer is returned to the client. The queries made to subsequent DNS servers from the first DNS server are iterative queries.

Recursive DNS query risks

A DNS server that supports recursive resolution is vulnerable to DOS (denial of service) attacks, DNS cache poisoning, unauthorized use of resources, and root name server performance degradation.

DOS attacks
Servers supporting recursive DNS queries are vulnerable to phony requests that flood a particular IP address with the results of each server's query. This can overwhelm the IP address with a volume of traffic too large to be processed.
DNS cache poisoning
Cache poisoning results from someone tricking a DNS server into believing that a fake DNS query response is authentic. Because responses are normally cached, this false information can be distributed to users of that server.
Unauthorized use of resources
With recursive DNS queries enabled, a server is more easily hijacked and its performance compromised.
Root name server performance degradation
When DNS servers are not configured correctly, queries using RFC1918 addressing (also known as "private" addressing) may be leaked to the root name servers, causing a degradation in service for legitimate queries to those servers.

Disabling recursive DNS

For information on disabling recursive DNS, see the following:

* Windows -- How do I disable recursive DNS queries on my Windows dedicated or virtual dedicated server?
* Windows w/ Plesk -- How do I disable recursive DNS queries on my Windows dedicated or virtual dedicated server with Plesk?
* Linux -- How do I disable recursive DNS queries on my Linux dedicated/virtual dedicated server?


Reference: http://help.godaddy.com/article/1184

How do I list all the DNS records for a domain?

SkyHi @ Wednesday, July 06, 2011
There are two ways, both require administrator access or trust to the DNS records:

* Perform an AFXR transfer on the domain to retrieve all records for the domain. The DNS administrator needs to explicitly allow AFXR transfers to your IP address from your chosen DNS server. You can perform such a transfer like this: dig @ns1.google.com google.com AFXR
* Directly view the zonefile on the relevant DNS server. You need administrator access to the DNS server for this.


#[home]# host -t axfr condominiumfirst.com ns1.superb.net
Trying "condominiumfirst.com"
;; communications error to 66.36.226.4#53: end of file


[home]# dig @ns1.superb.net condominiumfirst.com any

; <<>> DiG <<>> @ns1.superb.net condominiumfirst.com any
; (1 server found)
;; global options: printcmd
;; Got answer:
;; ->>HEADER<<- opcode: QUERY, status: NOERROR, id: 41483
;; flags: qr aa rd; QUERY: 1, ANSWER: 10, AUTHORITY: 0, ADDITIONAL: 5

;; QUESTION SECTION:
;condominiumfirst.com. IN ANY

;; ANSWER SECTION:
condominiumfirst.com. 86400 IN MX 10 condominiumfirst.com.inbound10.mxlogic.net.
condominiumfirst.com. 86400 IN MX 10 condominiumfirst.com.inbound10.mxlogicmx.net.
condominiumfirst.com. 86400 IN NS ns1.superb.net.
condominiumfirst.com. 86400 IN NS ns2.superb.net.
condominiumfirst.com. 86400 IN NS ns3.superb.net.
condominiumfirst.com. 86400 IN NS ns4.superb.net.
condominiumfirst.com. 86400 IN NS ns5.superb.net.
condominiumfirst.com. 86400 IN SOA ns1.superb.net. hostmaster.superb.net. 1255116905 0 0 0 0
condominiumfirst.com. 86400 IN TXT "v=spf1 mx mx:mail.condominiumfirst.com ~all"
condominiumfirst.com. 86400 IN A 209.61.248.54

;; ADDITIONAL SECTION:
ns1.superb.net. 86400 IN A 66.36.226.4
ns2.superb.net. 86400 IN A 209.160.56.15
ns3.superb.net. 86400 IN A 207.228.249.4
ns4.superb.net. 86400 IN A 207.228.225.4
ns5.superb.net. 86400 IN A 209.160.56.4

;; Query time: 95 msec
;; SERVER: 66.36.226.4#53(66.36.226.4)
;; WHEN: Fri Oct 9 12:39:21 2009
;; MSG SIZE rcvd: 449

Friday, December 3, 2010

DNS: trailing periods

SkyHi @ Friday, December 03, 2010
The trailing '.' makes the name into a "Fully Qualified Domain Name", i.e. an absolute domain name.

The trailing dot tells the DNS server that this is a fully qualified name. The dot is the root of the DNS heirarchy. If you don't use the dot, the DNS server will assume that it's a record in the current zone and will append it for you. For example, if you have a CNAME in exmaple.com that points to host.example.org, when you query for that, you'll get host.example.org.example.com, which probably isn't what you wanted.


In Bind config files if you don't add the trailing '.' then the name is assumed to be relative to the current zone file's $ORIGIN.


$ORIGIN example.com.
mail           IN A      192.168.1.1
mail2         IN A      192.168.1.2
server      IN A      192.168.1.3
@             IN MX 10  mail                       ; not FQDN - example.com. appended
                IN MX 20  mail2.example.com.     ; FQDN 
                IN MX 30  mail.example.net.      ; FQDN in another domain
                IN MX 40  mail2.example.net      ; ERROR - not FQDN - example.com appended
www      IN CNAME  server                    ; not FQDN - example.com. appended


REFERENCES
http://serverfault.com/questions/18113/dns-trailing-periods

Wednesday, November 10, 2010

Updating a DNS record

SkyHi @ Wednesday, November 10, 2010

Changing DNS records can result in your website being unreachable for a while.
This article explains how you can minimize downtime while changing domain name records.


NS records


When changing nameserver records, first ensure that your new nameserver(s) define
the same records as your old nameservers. That is to say, your new nameservers
must be in a ready-to-use state.

Now you can change your NS records so that they point to the new nameserver(s).
But pay attention to the fact, that the NS records of your parent DNS servers are usually
cached for 48 hours. Thus you should keep your old nameservers online for at
least 48 hours after making the changes to your NS records.


Other records


For A records, MX records, PTR records and the like there is a nice way to
update a record while still not having inconsistent data. What I mean by "inconsistent"
is the following scenario:

Suppose you have an A record for www.dnswatch.info pointing to the IP address
193.111.199.111 with a "Time To Live" value set to 3600 (1 hour). And let's further
assume that you now want to update this A record so that it points to the IP
address 193.111.199.214.

If you just changed the record now, DNS resolvers all over the world who don't
have the old data cached would instantly see the new IP address (193.111.199.214).
But DNS resolvers who do have this record cached (e.g. a resolver who already queried
your nameserver 8 minutes ago) would still see the old IP address (193.111.199.111).
So if a resolver queried your nameserver 8 minutes ago, it would see the old
data for the next 52 minutes because the "Time To Live" value's set
to 1 hour meaning that the record may be cached for 1 hour.

If for example, there was some webserver behind those IPs, some browsers would now be accessing
your old webserver (on the old IP) and some would request data from your new webserver (on the new IP).


The easy solution to this inconsistent state is as follows:

First reduce the TTL of the record that you want to change to a minimal value,
e.g. 30 seconds. Then wait "old TTL value" seconds. So we'd
have had to wait 1 hour in our last example after reducing the TTL to 30 because
the old TTL was 1 hour. After that period you can change your data. Or you can
now even further reduce the TTL to 5 seconds. Then wait 30 seconds, and then do
the actual update to the record. This results in your DNS data being inconsistent
for only 5 seconds instead of an hour as in the initial example.
Don't forget however to increase the TTL again, after changing the record
and assuring that your change was successful. If you leave the TTL at 5 seconds,
your DNS servers could get overwhelmed by lookup requests. In addition a DNS lookup
can take quite some time (sometimes even half a second), thus the end user would need many coffe breaks.

REFERENCES
http://www.dnswatch.info/articles/dns-update

Tuesday, November 9, 2010

Google Apps Domain Create SPF Records For BIND or Djbdns

SkyHi @ Tuesday, November 09, 2010
I work for a small business and outsourced our email hosting to Google. However, I noticed that spammers are using our From: First Last to send their spam messages. All bounced messages come to our catch only account. How do I stop this? How do I validate our domain using SPF? How do I configure a SPF for Google Apps domain using BIND 9 or djbdns?

You must create a Sender Policy Framework (SPF) recored for all your domains which are used to send emails. An SPF can identifies which mail servers are permitted to send email on behalf of your domain. This is used to prevent spammers from sending messages with forged From addresses at your domain such as foo@example.com, where foo is not a valid username. In this example, spammers use foo@example.com to send spam to vivek@nixcraft.net.in. When my mail server receives a message from foo@example.com, it will check the SPF record for example.com to find out if it is a valid message or not. If the message comes from a server other than the mail servers listed in the SPF record, than my mail server can reject it as spam or mark as spam.

Sample Setup

nixcraft.com can send email using the ALL of the following servers:
      ///
       |                                        +----------------------+
    Mail Server (point to)                      | server1.nixcraft.com | w/ local sendmail 74.86.48.99
       |                             +----------+----------------------+
   +------------+                    |
   |   Google   |                    |          +----------------------+
   |   Apps     |                    |          | server2.nixcraft.com | w/ local sendmail 74.86.48.98
   |   Mail     +--------------------+----------+----------------------+
   |   Server   |                    |
   +------------+                    |          +----------------------+
         |                           |          | server3.nixcraft.com | w/ local sendmail 74.86.48.102
 nixcraft.com.s7b1.psmtp.com.        +----------+----------------------+
 nixcraft.com.s7b2.psmtp.com.
 nixcraft.com.s7a1.psmtp.com.
 nixcraft.com.s7a2.psmtp.com.
 
Consider the following examples:
$ host -t mx nixcraft.com

Sample outputs:
nixcraft.com mail is handled by 4 nixcraft.com.s7b2.psmtp.com.
nixcraft.com mail is handled by 1 nixcraft.com.s7a1.psmtp.com.
nixcraft.com mail is handled by 2 nixcraft.com.s7a2.psmtp.com.
nixcraft.com mail is handled by 3 nixcraft.com.s7b1.psmtp.com.
Above four MX servers receive mail for nixcraft.com domain. All of the above servers are managed by Google apps. However, nixcraft.com has 3 KVM based vps server to host its website. Those 3 nodes also send emails to its customers or users. You need to add them to your list too:
kvm1: 74.86.48.99
kvm2: 74.86.48.98
kvm3: 74.86.48.102


Finally, its public ip address may also send an email to its customer or users:
$ host nixcraft.com
Sample outputs:
75.126.153.214

How Do I Build a SPF Record for nixcraft.com?

You need to add the entry as follows in nixcraft.com zone file (BIND 9 syntax):

@ 3600   IN TXT   "v=spf1 a mx ip4:74.86.48.99 ip4:74.86.48.98 ip4:74.86.48.102 include:_spf.google.com ~all"
If you are using djbdns, enter:

'nixcraft.com:v=spf1 ip4\07274.86.48.99 ip4\07274.86.48.102 ip4\07274.86.48.98 a mx include\072_spf.google.com ~all:3600
'nixcraft.com.s7a1.psmtp.com:v=spf1 a -all:3600
'nixcraft.com.s7a2.psmtp.com:v=spf1 a -all:3600
'nixcraft.com.s7b1.psmtp.com:v=spf1 a -all:3600
'nixcraft.com.s7b2.psmtp.com:v=spf1 a -all:3600
's7a1.psmtp.com:v=spf1 a -all:3600
's7a2.psmtp.com:v=spf1 a -all:3600
's7b1.psmtp.com:v=spf1 a -all:3600
's7b2.psmtp.com:v=spf1 a -all:3600

Where,
  • @ : Domain name i.e. nixcraft.com.
  • 3600 : TTL for domain recored.
  • IN TXT "v=spf1 : Start an SPF recored.
  • a : nixcraft.com's IP address is 75.126.153.214 which is allowed to send mail from nixcraft.com.
  • mx : The *.psmtp.com. servers are allowed to send mail from nixcraft.com.
  • ip4:74.86.48.99 : 74.86.48.99 is allowed to send mail from nixcraft.com.
  • ip4:74.86.48.98 : 74.86.48.98 is allowed to send mail from nixcraft.com.
  • ip4:74.86.48.102 : 74.86.48.102 is allowed to send mail from nixcraft.com.
  • include:_spf.google.com: Send mail from _spf.google.com (includes large number of Google apps server) is also allowed to send mail from nixcraft.com.
  • ~all : Messages that are not sent from an approved server should still be accepted but may be subjected to greater scrutiny or spam check.
Finally, reload your BIND 9 named (don't forget to increase serial number):
# /etc/init.d/named reload

How Do I Verify My SPF Records?

Type the following command:
$ dig txt nixcraft.com
OR
$ host -t txt nixcraft.com

Sample outputs:

nixcraft.com descriptive text "v=spf1 a mx ip4:74.86.48.99 ip4:74.86.48.98 ip4:74.86.48.102 include:_spf.google.com ~all"

REFERENCES
http://www.cyberciti.biz/faq/bind-named-djbdns-google-apps-sender-policy-framework/

Linux / UNIX: DNS Lookup Command

SkyHi @ Tuesday, November 09, 2010
How do I perform dns lookup under Linux or UNIX or Apple OS X operating systems without using 3rd party web sites for troubleshooting DNS usage?

You can use any one of the following dns lookup utility under Linux / UNIX. You can skip all 3rd party websites and use the following to debug your dns servers and lookup issues:
[a] host command - DNS lookup utility.
[b] dig command - DNS lookup utility.
Both commands will allow you to get answer to various dns queries such as the IP address (A), mail exchanges (MX), name servers (NS), text annotations (TXT), or ANY (all) type.

host DNS Lookup Examples

host command is a simple utility for performing DNS lookups. It is normally used to convert names to IP addresses and vice versa. When no arguments or options are given, host command displays a short summary of its command line arguments and options. The syntax is as follows:
host example.com
host -t TYPE example.com
host -t a example.com

Task: Find Out the Domain IP

$ host -t a cyberciti.biz
Sample outputs:
cyberciti.biz has address 75.126.153.206

Task: Find Out the Domain Mail Server

$ host -t mx cyberciti.biz
Sample outputs:
cyberciti.biz mail is handled by 2 CYBERCITI.BIZ.S9A2.PSMTP.com.
cyberciti.biz mail is handled by 3 CYBERCITI.BIZ.S9B1.PSMTP.com.
cyberciti.biz mail is handled by 4 CYBERCITI.BIZ.S9B2.PSMTP.com.
cyberciti.biz mail is handled by 1 CYBERCITI.BIZ.S9A1.PSMTP.com.

Task: Find Out the Domain Name Servers

$ host -t ns cyberciti.biz
Sample outputs:
cyberciti.biz name server ns2.nixcraft.net.
cyberciti.biz name server ns1.nixcraft.net.
cyberciti.biz name server ns5.nixcraft.net.
cyberciti.biz name server ns4.nixcraft.net.

Task: Find Out the Domain TXT Recored (e.g., SPF)

$ host -t txt cyberciti.biz
Sample outputs:
cyberciti.biz descriptive text "v=spf1 a mx ip4:74.86.48.99 ip4:74.86.48.98 ip4:74.86.48.102 ip4:74.86.48.101 ip4:74.86.48.100 ip4:72.26.218.170 ip4:93.89.92.12 ip4:180.92.186.178 include:_spf.google.com ~all"

Task: Find Out the Domain CNAME Record

$ host -t cname files.cyberciti.biz
Sample outputs:
files.cyberciti.biz is an alias for files.cyberciti.biz.edgesuite.net.

Task: Find Out the Domain SOA Record

$ host -t soa cyberciti.biz
Sample outputs:
cyberciti.biz has SOA record ns1.nixcraft.net. vivek.nixcraft.com. 2008072353 10800 3600 604800 3600

Task: Query Particular Name Server

Query ns2.nixcraft.net:
$ host cyberciti.biz ns2.nixcraft.net
Sample outputs:
Using domain server:
Name: ns2.nixcraft.net
Address: 75.126.168.152#53
Aliases: 

cyberciti.biz has address 75.126.153.206
cyberciti.biz has IPv6 address 2607:f0d0:1002:51::4
cyberciti.biz mail is handled by 3 CYBERCITI.BIZ.S9B1.PSMTP.com.
cyberciti.biz mail is handled by 4 CYBERCITI.BIZ.S9B2.PSMTP.com.
cyberciti.biz mail is handled by 1 CYBERCITI.BIZ.S9A1.PSMTP.com.
cyberciti.biz mail is handled by 2 CYBERCITI.BIZ.S9A2.PSMTP.com.

Task: Display All Information About Domain Records and Zone

You need to pass the -a (all) option and asking host command to make a query of type ANY:
$ host -a cyberciti.biz
OR
$ host -t any cyberciti.biz
Sample outputs:
Trying "cyberciti.biz"
;; Truncated, retrying in TCP mode.
Trying "cyberciti.biz"
;; ->>HEADER<<- opcode: QUERY, status: NOERROR, id: 34079
;; flags: qr rd ra; QUERY: 1, ANSWER: 14, AUTHORITY: 0, ADDITIONAL: 0

;; QUESTION SECTION:
;cyberciti.biz.   IN ANY

;; ANSWER SECTION:
cyberciti.biz.  3423 IN AAAA 2607:f0d0:1002:51::4
cyberciti.biz.  3600 IN SOA ns1.nixcraft.net. vivek.nixcraft.com. 2008072353 10800 3600 604800 3600
cyberciti.biz.  3600 IN TXT "v=spf1 a mx ip4:74.86.48.99 ip4:74.86.48.98 ip4:74.86.48.102 ip4:74.86.48.101 ip4:74.86.48.100 ip4:72.26.218.170 ip4:93.89.92.12 ip4:180.92.186.178 include:_spf.google.com ~all"
cyberciti.biz.  3600 IN MX 2 CYBERCITI.BIZ.S9A2.PSMTP.com.
cyberciti.biz.  3600 IN MX 3 CYBERCITI.BIZ.S9B1.PSMTP.com.
cyberciti.biz.  3600 IN MX 4 CYBERCITI.BIZ.S9B2.PSMTP.com.
cyberciti.biz.  3600 IN MX 1 CYBERCITI.BIZ.S9A1.PSMTP.com.
cyberciti.biz.  2805 IN A 75.126.153.206
cyberciti.biz.  3423 IN NS ns2.nixcraft.net.
cyberciti.biz.  3423 IN NS ns5.nixcraft.net.
cyberciti.biz.  3423 IN NS ns1.nixcraft.net.
cyberciti.biz.  3423 IN NS ns4.nixcraft.net.
cyberciti.biz.  84092 IN RRSIG NSEC 8 2 86400 20101125013720 20101026010313 50568 biz. OjDv09mccTZR2bYCl4D57QcnNEkBq6bNEa20ExsI6NC2sI9pmiKLnq+w UnCYxWMnkMi7WNXwIhhUWtNhV48X3wJGj1Mufrhq8MnO25JIcRE6UJF2 y12TTZHHE0UJV6HSkw1sac3XlZKXLi/oSvE/IXTsdj2SckPh+pMlaieQ jAA=
cyberciti.biz.  84092 IN NSEC CYBERCITIZEN.biz. NS RRSIG NSEC

Received 749 bytes from 192.168.1.254#53 in 0.1 ms

Task: Use IPv6 Query Transport

Test your dns lookup using IPv6 query transport (you must have IPV6 based connectivity including IPv6 enabled resolving name servers):
$ host -6 cyberciti.biz
$ host -6 -a cyberciti.biz
$ host -6 cyberciti.biz ns1.nixcraft.net
$ host -6 -t ns cyberciti.biz ns3.nixcraft.net
Sample outputs:
Using domain server:
Name: ns3.nixcraft.net
Address: 2001:48c8:10:1::2#53
Aliases: 

cyberciti.biz name server ns2.nixcraft.net.
cyberciti.biz name server ns4.nixcraft.net.
cyberciti.biz name server ns5.nixcraft.net.
cyberciti.biz name server ns1.nixcraft.net.

Task: Reverse IP Lookup

Type the command:
$ host {IP-Address-Here}
$ host 75.126.153.206

Sample outputs:
206.153.126.75.in-addr.arpa domain name pointer www.cyberciti.biz.

Task: Get TTL Information

Type the command as follows:
$ host -v -t {TYPE} {example.com}
$ host -v -t a cyberciti.biz
$ host -v -t a i.hexindia.net

Sample outputs:
Trying "cyberciti.biz"
;; ->>HEADER<<- opcode: QUERY, status: NOERROR, id: 17431
;; flags: qr rd ra; QUERY: 1, ANSWER: 1, AUTHORITY: 4, ADDITIONAL: 7

;; QUESTION SECTION:
;cyberciti.biz.   IN A

;; ANSWER SECTION:
cyberciti.biz.  1866 IN A 75.126.153.206

;; AUTHORITY SECTION:
cyberciti.biz.  3850 IN NS NS1.NIXCRAFT.NET.
cyberciti.biz.  3850 IN NS NS4.NIXCRAFT.NET.
cyberciti.biz.  3850 IN NS NS5.NIXCRAFT.NET.
cyberciti.biz.  3850 IN NS NS2.NIXCRAFT.NET.

;; ADDITIONAL SECTION:
NS1.NIXCRAFT.NET. 85669 IN A 72.26.218.170
NS1.NIXCRAFT.NET. 85689 IN AAAA 2001:48c8:7::2
NS2.NIXCRAFT.NET. 85669 IN A 75.126.168.152
NS2.NIXCRAFT.NET. 85669 IN AAAA 2607:f0d0:1002:51::3
NS4.NIXCRAFT.NET. 85669 IN A 93.89.92.12
NS4.NIXCRAFT.NET. 85669 IN AAAA 2a01:348:0:15:5d59:50c:0:1
NS5.NIXCRAFT.NET. 85669 IN AAAA 2001:48c8:10:1::2

Received 291 bytes from 10.0.80.11#53 in 2 ms
If you run the same command again, you’ll notice that the TTL number (1866) reduced.

dig DNS Lookup Examples

dig (domain information groper) or host command is a flexible tool for interrogating DNS name servers. It performs DNS lookups and displays the answers that are returned from the name server(s) that were queried. Most DNS administrators use dig to troubleshoot DNS problems because of its flexibility, ease of use and clarity of output. hos dns lookup tool have less functionality than dig.

Examples

dig @{ns1.example.com} {example.com}
dig @{ns1.example.com} {example.com} {TYPE}
dig cyberciti.biz a
dig cyberciti.biz mx
dig cyberciti.biz ns
dig cyberciti.biz txt
dig @ns1.nixcraft.net cyberciti.biz a

Task: Trace Usage

See how domains are resolved using root servers i.e. turn on tracing of the delegation path from the root name servers for the name being looked up. When tracing is enabled, dig makes iterative queries to resolve the name being looked up. It will follow referrals from the root servers, showing the answer from each server that was used to resolve the lookup:
$ dig +trace cyberciti.biz
Sample outputs:
<<>> DiG 9.3.6-P1-RedHat-9.3.6-4.P1.el5_4.2 <<>> +trace cyberciti.biz
;; global options:  printcmd
.   41219 IN NS b.root-servers.net.
.   41219 IN NS e.root-servers.net.
.   41219 IN NS i.root-servers.net.
.   41219 IN NS d.root-servers.net.
.   41219 IN NS g.root-servers.net.
.   41219 IN NS k.root-servers.net.
.   41219 IN NS l.root-servers.net.
.   41219 IN NS c.root-servers.net.
.   41219 IN NS m.root-servers.net.
.   41219 IN NS a.root-servers.net.
.   41219 IN NS h.root-servers.net.
.   41219 IN NS j.root-servers.net.
.   41219 IN NS f.root-servers.net.
;; Received 436 bytes from 10.0.80.11#53(10.0.80.11) in 2 ms

biz.   172800 IN NS h.gtld.biz.
biz.   172800 IN NS c.gtld.biz.
biz.   172800 IN NS e.gtld.biz.
biz.   172800 IN NS b.gtld.biz.
biz.   172800 IN NS g.gtld.biz.
biz.   172800 IN NS a.gtld.biz.
biz.   172800 IN NS f.gtld.biz.
;; Received 316 bytes from 192.228.79.201#53(b.root-servers.net) in 34 ms

cyberciti.biz.  7200 IN NS NS5.NIXCRAFT.NET.
cyberciti.biz.  7200 IN NS NS1.NIXCRAFT.NET.
cyberciti.biz.  7200 IN NS NS2.NIXCRAFT.NET.
cyberciti.biz.  7200 IN NS NS4.NIXCRAFT.NET.
;; Received 115 bytes from 2001:503:8028:ffff:ffff:ffff:ffff:ff7e#53(h.gtld.biz) in 23 ms

cyberciti.biz.  3600 IN A 75.126.153.206
cyberciti.biz.  3600 IN NS ns4.nixcraft.net.
cyberciti.biz.  3600 IN NS ns5.nixcraft.net.
cyberciti.biz.  3600 IN NS ns1.nixcraft.net.
cyberciti.biz.  3600 IN NS ns2.nixcraft.net.
;; Received 307 bytes from 2001:48c8:10:1::2#53(NS5.NIXCRAFT.NET) in 222 ms

Task: Get Only Short Answer

A quick way to just get the answer is to type the following command:
$ dig +short cyberciti.biz
Sample outputs:
75.126.153.206

Task: Display All Records

$ dig +noall +answer cyberciti.biz any
Sample outputs:
cyberciti.biz.  3490 IN A 75.126.153.206
cyberciti.biz.  2733 IN NS NS2.NIXCRAFT.NET.
cyberciti.biz.  2733 IN NS NS1.NIXCRAFT.NET.
cyberciti.biz.  2733 IN NS NS4.NIXCRAFT.NET.
cyberciti.biz.  2733 IN NS NS5.NIXCRAFT.NET.
cyberciti.biz.  85668 IN RRSIG NSEC 8 2 86400 20101125013720 20101026010313 50568 biz. OjDv09mccTZR2bYCl4D57QcnNEkBq6bNEa20ExsI6NC2sI9pmiKLnq+w UnCYxWMnkMi7WNXwIhhUWtNhV48X3wJGj1Mufrhq8MnO25JIcRE6UJF2 y12TTZHHE0UJV6HSkw1sac3XlZKXLi/oSvE/IXTsdj2SckPh+pMlaieQ jAA=
cyberciti.biz.  85668 IN NSEC CYBERCITIZEN.biz. NS RRSIG NSEC

Task: Reverse IP Lookup

Type the following command:
$ dig -x +short {IP-Address-here}
$ dig -x 75.126.153.206 +short

Sample outputs
www.cyberciti.biz.

Task: Find Domain SOA Record

$ dig +nssearch cyberciti.biz
Sample outputs:
SOA ns1.nixcraft.net. vivek.nixcraft.com. 2008072353 10800 3600 604800 3600 from server ns5.nixcraft.net in 81 ms.
SOA ns1.nixcraft.net. vivek.nixcraft.com. 2008072353 10800 3600 604800 3600 from server ns4.nixcraft.net in 216 ms.
SOA ns1.nixcraft.net. vivek.nixcraft.com. 2008072353 10800 3600 604800 3600 from server ns1.nixcraft.net in 347 ms.
SOA ns1.nixcraft.net. vivek.nixcraft.com. 2008072353 10800 3600 604800 3600 from server ns2.nixcraft.net in 316 ms.

Task: Find Out TTL Value Using dig

$ dig +nocmd +noall +answer {TYPE} {example.com}
$ dig +nocmd +noall +answer a cyberciti.biz

Sample outputs:
cyberciti.biz.  1642 IN A 75.126.153.206
Run again, enter:
$ dig +nocmd +noall +answer a cyberciti.biz
Sample outputs:
cyberciti.biz.  1629 IN A 75.126.153.206

See also:

See man page for more information:
man dig
man host


REFERENCES
http://www.cyberciti.biz/faq/unix-linux-dns-lookup-command/

Thursday, September 2, 2010

HOWTO Design a fault-tolerant DHCP + DNS solution

SkyHi @ Thursday, September 02, 2010
In this article, we will describe a design for a fault-tolerant (redundant) DHCP + DNS solution on Linux.
Design criteria:
  • Failure of one DHCP server should not prevent Clients from obtaining a valid IP address.
  • Failure of one DNS server should not prevent Clients from executing DNS queries.
  • The design should allow for Dynamic DNS updates.

Contents

[hide]

[edit] Design Overview

In the image below, you can see the design involving DNS Master / Slave as well as DHCP Primary / Secondary servers.
The sequence of events is as follows:
  1. The Client initiates a DORA (Discover, Offer, Request, Accept) communications sequence with the DHCP servers.
  2. Depending on the Client MAC address, one of the DHCP servers will respond with a DHCP_OFFER.
  3. The Client obtains an IP address as well as additional network settings.
  4. The DHCP server communicates the new lease to its partner.
  5. The DHCP server sends a DNS update to the DNS Master server.
  6. The DNS Slave server(s) are kept in sync using DNS Zone Transfers.

[edit] Fault-Tolerant DHCP Service

In this design, we will use the ISC DHCP daemon. One of the features includes a DHCP Primary / Secondary failover configuration, consisting of exactly 2 DHCP servers.
The DHCP servers share a pool of IP addresses, and keep the lease database for this pool in sync between them. If one DHCP server fails, the remaining server will continue to issue IP addresses. This guarantees uninterrupted service to the Clients.

[edit] Fault-Tolerant DNS Service

In this design, we will use the ISC DNS daemon. There are two ways to achieve fault tolerance:
  1. Master / Slave configuration
  2. Multi-Master configuration

[edit] DNS Master / Slave

DNS Master / Slave configuration is fairly straightforward. All zone data is kept on the DNS Master. The Master is configured to allow zone transfers from the DNS Slaves. Each DNS Slave performs zone transfers to obtain the most recent DNS information from the DNS Master.
Clients obtain a list of DNS servers through DHCP. If a DNS server fails, the Client will attempt to contact one of the remaining DNS servers. This guarantees uninterrupted DNS resolution service to the clients.
If the DNS Master fails, the situation becomes more severe. The DHCP servers communicate their updates only to the DNS Master server. In case of an outage, Dynamic DNS updates could be lost. One possible solution is the use of a DNS Multi-Master configuration.

[edit] DNS Multi-Master

DNS Multi-Master configuration is more complicated to configure and maintain than a Master / Slave configuration.
In case of a DNS server failure, both DNS Query and DNS Update services remain operational.

[edit] Design Decision

For our design, it is sufficient if DNS Queries from Clients remain operational. We will choose the DNS Master / Slave approach here as it is less complex, and still satisfies the design criteria.
how

[edit] Operational Issues

[edit] Managing combined Static and Dynamic DNS

Dynamic DNS is an all-or-nothing feature. If DDNS is enabled for a specific DNS zone, it should no longer be edited manually - your changes may be corrupted or overwritten. This often conflicts with existing systems management practices.
There are two approaches to avoid potential DNS corruption issues when managing a combined Static / Dynamic DNS environment:
Create a separate DNS zone for Dynamic DNS records
Static DNS records can still be managed in their own zone (example.local) as usual. Dynamic DNS records will be managed automatically in a separate DNS (sub-)domain, like "ddns.example.local".
Keep all DNS records in one Dynamic zone
All entries, both static and dynamic, are in the same DNS zone (example.local). Static entries should be managed using the "nsupdate" utility - this means that system management practices and tooling may need to be changed.
In this design, we will use a single Dynamic zone. Static entries will be managed using the "nsupdate" utility.


HOWTO Configure DHCP failover

HOWTO Configure DHCP failover

From Consultancy.EdVoncken.NET

Jump to: navigation, search
The ISC DHCP server currently supports failover using a maximum of 2 servers: primary and secondary. This is an active/active setup; a simple form of load balancing is used to spread the load across both servers.
In this example, we'll be setting up failover DHCP on two servers, 192.168.123.1 and 192.168.123.2. These servers also run DNS and NTP. Dynamic clients will get an address in the range 192.168.123.100-199. Static leases are defined for several networked devices.
Since the ISC DHCP server allows the use of "include-files" in the configuration, we will use them to help keep the configurations simple and in sync across servers.

Contents

[hide]

[edit] Installation

Install the following package, for example using yum:
dhcp
This example is based on version dhcp-3.0.5-18.el5.

[edit] Configuration

The configuration consists of several sections, each stored in a separate file to make maintenance easier.

[edit] Failover parameters

For the Primary, define the following failover parameters in /etc/dhcpd.conf_primary:
##########################
 # DHCP Failover, Primary #
 ##########################
 
 failover peer "example" {                   # Failover configuration
        primary;                             # I am the primary
        address 192.168.123.1;               # My IP address
        port 647;
        peer address 192.168.123.2;          # Peer's IP address
        peer port 647;
        max-response-delay 60;
        max-unacked-updates 10;
        mclt 3600;
        split 128;                           # Leave this at 128, only defined on Primary
        load balance max seconds 3;
 }
For the Secondary, define the following failover parameters in /etc/dhcpd.conf_secondary:
############################
 # DHCP Failover, Secondary #
 ############################
 
 failover peer "example" {                   # Fail over configuration
        secondary;                           # I am the secondary
        address 192.168.123.2;               # My ip address
        port 647;
        peer address 192.168.123.1;          # Peer's ip address
        peer port 647;
        max-response-delay 60;
        max-unacked-updates 10;
        mclt 3600;
        load balance max seconds 3;
 }

[edit] Subnet declaration

Write a subnet declaration using our failover pool in /etc/dhcpd.conf_subnet. This section is identical on Primary and Secondary:
subnet 192.168.123.0 netmask 255.255.255.0  # zone to issue addresses from
 {
       pool {
               failover peer "example";      # Pool for dhcp leases with failover bootp not allowed
               deny dynamic bootp clients;
               range 192.168.123.100 192.168.123.190;
       }
       pool {                                # Accomodate our bootp clients here; no replication and failover
               range 192.168.123.191 192.168.123.199;
       }
       allow unknown-clients;
 
       authoritative;
 
       option routers             192.168.123.254;
       option subnet-mask         255.255.255.0;
       option broadcast-address   192.168.123.255;
       option domain-name         "example.local.";
       option domain-name-servers 192.168.123.1, 192.168.123.2;
       option ntp-servers         192.168.123.1, 192.168.123.2;
       option netbios-node-type   8;
 
       default-lease-time         300;
       max-lease-time             600;
 
       filename                   "/pxelinux.0";
       next-server                192.168.123.1;
 }
Note: the manpage for dhcpd.conf(5) states that dynamic BOOTP leases are not compatible with failover.
Therefore, BOOTP should be disabled in in pools using failover.

[edit] Dynamic DNS

If you are configuring Dynamic DNS, write the settings in /etc/dhcpd.conf_subnet. This section is identical on Primary and Secondary:
ddns-update-style interim;
 ddns-updates on;
 ddns-domainname "example.local."; 
 ignore client-updates;
 
 # Forward zone for DNS updates
 zone example.local
 {
       primary 192.168.123.1;                # update the primary DNS
       key ddns-update;                      # key to use for the update
 }
 
 # Reverse zone for DNS updates
 zone 123.168.192.in-addr.arpa
 {
       primary 192.168.123.1;                # update the primary DNS
       key ddns-update;                      # key for update
 }
Note: for security reasons, DNS updates need to be "signed" using a public/private key mechanism.
The "key ddns-update" statement specifies that DHCP will use a key named "ddns-update" during update requests.
For more information on this key, please refer to HOWTO Configure Dynamic DNS.

[edit] Static leases

For more flexible IP address management, configure all devices to use DHCP and set up static leases for these devices.
In /etc/dhcpd.conf_static, create all static leases that you may need (outside of the DHCP/BOOTP range!). Again, this section is identical on Primary and Secondary:
# Axis Security Camera
 host cam-reception {
       hardware ethernet 00:40:12:c0:ff:ee;
       fixed-address 192.168.123.200;
 }
 
 # Axis Security Camera
 host cam-fireexit {
       hardware ethernet 00:40:fe:ed:fa:ce;
       fixed-address 192.168.123.201;
 }
 
 # Axis Security Camera
 host cam-frontdoor {
       hardware ethernet 00:40:de:ad:be:ef;
       fixed-address 192.168.123.202;
 }

[edit] Overall configuration

The configuration of the Primary and Secondary DHCP servers is mostly identical, except for the Failover parameters. By keeping the sub-configurations in sync across servers (perhaps using rsync), maintenance is reduced to a minimum.
The overall configuration file, /etc/dhcpd.conf, is only slightly different on Primary and Secondary.

[edit] Configuring /etc/dhcpd.conf on the Primary

# DHCP Server - Configuration file for Primary
 #
 # File $Id: dhcpd.conf,v 1.21 2009/07/09 16:26:57 root Exp root $
 
 # Global configuration
 set vendorclass = option vendor-class-identifier;
 
 # Dynamic DNS Updates
 include "/etc/ddns-update.dnskey";
 include "/etc/dhcpd.conf_ddns";
 
 # DHCP Failover, Primary
 include "/etc/dhcpd.conf_primary";
 
 # Subnet declaration
 include "/etc/dhcpd.conf_subnet";
 
 # Static IP addresses
 include "/etc/dhcpd.conf_static";
 
 # EOF

[edit] Configuring /etc/dhcpd.conf on the Secondary

# DHCP Server - Configuration file for Secondary
 #
 # File $Id: dhcpd.conf,v 1.9 2009/07/09 16:31:20 root Exp root $
 
 # Global configuration
 set vendorclass = option vendor-class-identifier;
 
 # Dynamic DNS Updates
 include "/etc/ddns-update.dnskey";
 include "/etc/dhcpd.conf_ddns";
 
 # DHCP Failover, Secondary
 include "/etc/dhcpd.conf_secondary";
 
 # Subnet declaration
 include "/etc/dhcpd.conf_subnet";
 
 # Static IP addresses
 include "/etc/dhcpd.conf_static";
 
 # EOF

[edit] Miscellaneous

[edit] SElinux considerations

By default, SELinux policy does not allow the BIND daemon (named) to write to files labeled with the name_zone_t type, which is used for master zone files. The zone files should be stored under /var/named/chroot/var/named/data or /var/named/chroot/var/named/dynamic.
# restorecon -R -v /var/named/chroot/var/named/data
 # restorecon -R -v /var/named/chroot/var/named/dynamic
This will reset the zone files to the named_cache_t type, hopefully solving the "SELinux is preventing named (named_t) "unlink"" error messages.

[edit] Firewall settings

Your firewall should allow inbound traffic on 69/UDP, 69/TCP and 647/TCP. Sample entries for /etc/sysconfig/iptables:
# DHCP server
 -A INPUT -p udp -m udp --dport 69 -j ACCEPT
 -A INPUT -p tcp -m tcp --dport 69 -j ACCEPT
 -A INPUT -m state --state NEW -m tcp -p tcp --dport 647 -j ACCEPT

[edit] Starting the service

On both DHCP Primary and Secondary, run the following commands as root:
# chkconfig dhcpd on
 # service dhcpd start

[edit] References


HOWTO Configure Dynamic DNS

HOWTO Configure Dynamic DNS

From Consultancy.EdVoncken.NET

Jump to: navigation, search
In this example, we will set up a DNS Master and DNS Slave server, on 192.168.123.1 and 192.168.123.2 respectively.
The configuration will also allow for Dynamic DNS updates from our DHCP servers.

Contents

[hide]

[edit] Installation

Install the following packages, for example using yum:
bind
 bind-chroot
 bind-utils
This example is based on bind-9.3.4-10.P1.el5_3.1.

[edit] Configuration

The configuration and data files for the chroot()-ed BIND DNS server can be found under /var/named/chroot/. Under /etc, you will find a symlink pointing to /var/named/chroot/etc/named.conf.

[edit] DNS Keys

For Dynamic DNS to work, the updates need to be "signed" using a transaction key. Since this is a symmetric key, it has to be shared between DNS and DHCP. It must be protected to prevent unauthorized changes being made to your DNS zones. The key has to be available on both DHCP servers. Generate the key as follows:
# cd /tmp
 # dnssec-keygen -a HMAC-MD5 -b 512 -n HOST ddns-update
These commands generate a set of .key and .private files in the current working directory. Move these files to a better name and location:
# mv Kddns-update.*.key /etc/ddns-update.key
 # cat /etc/ddns-update.key 
 ddns-update. IN KEY 512 3 157 K3EaOD3IysiC/D7lIXp+4hrYGDLyIq6la[...]9oE4kZ3O1ZFxKSMHfwG5YvUkYE7gxMHCmCg==
 
 # mv Kddns-update.*.private /etc/ddns-update.private
 # cat /etc/ddns-update.private 
 Private-key-format: v1.2
 Algorithm: 157 (HMAC_MD5)
 Key: K3EaOD3IysiC/D7lIXp+4hrYGDLyIq6la[...]9oE4kZ3O1ZFxKSMHfwG5YvUkYE7gxMHCmCg==
Note that the actual private and public keys are identical for HMAC-MD5. This is normal. The .key and .private files are needed by the nsupdate utility, later on.
We now need create a configuration file in a different format, for use by the DHCP and DNS servers- we will call this file /etc/ddns-update.dnskey. The syntax is identical to the /etc/rndc.key file. We need to set the key name and the key value properly:
# cat /etc/ddns-update.dnskey 
 key "ddns-update" {
       algorithm hmac-md5;
       secret "K3EaOD3IysiC/D7lIXp+4hrYGDLyIq6la[...]9oE4kZ3O1ZFxKSMHfwG5YvUkYE7gxMHCmCg==";
 };
Make sure it has the proper ownership and permissions:
# ls -l /etc/ddns-update.dnskey
 -rw-r----- 1 root named 145 Jul  9 12:25 ddns-update.dnskey
On the Primary DHCP / Master DNS server, the key needs to be available both as /etc/ddns-update.dnskey (for DHCP) and /var/named/chroot/etc/ddns-update.dnskey (for DNS). Creating a symlink will not work due to the SElinux policy; you will have to copy the file instead, so each copy has its own SElinux context:
# cp /etc/ddns-update.dnskey /var/named/chroot/etc/
 # ls -lZ /etc/ddns-update.dnskey /var/named/chroot/etc/ddns-update.dnskey 
 -rw-r-----  root root  root:object_r:etc_t              /etc/ddns-update.dnskey
 -rw-r-----  root named root:object_r:named_conf_t       /var/named/chroot/etc/ddns-update.dnskey

[edit] DNS Master configuration

On the Master, we will define all zones that we are authoritative for. We will also allow DNS updates to these zones from our DHCP servers.
# ISC BIND Configuration File
 #
 # Purpose:
 #   Configure BIND as caching/forwarding nameserver with authority
 #   for local networks as well as support for Dynamic DNS Updates
 #
 # File $Id: named.conf,v 1.4 2009/07/07 12:59:12 root Exp root $
 
 options {
       directory "/etc";
       pid-file "/var/run/named/named.pid";
       forwarders {
               // Put your ISP's DNS servers here
               66.159.123.200;
               66.159.123.201;
       };
       allow-query { localhost; localnets; };
 };
 
 # Key used by DHCP servers for Dynamic DNS Updates
 include "/etc/ddns-update.dnskey";
 
 zone "example.local" {
       type master;
       file "/var/named/data/example.local.zone";
       allow-transfer { 192.168.123.2; };
       allow-update { key "ddns-update"; };
 };
 
 zone "123.168.192.in-addr.arpa" {
       type master;
       file "/var/named/data/192.168.123.zone";
       allow-transfer { 192.168.123.2; };
       allow-update { key "ddns-update"; };
 };
 
 # EOF
SELinux Note: On the DNS Master, use the "data" sub-directory to store zone files.
Otherwise, you will see errors while trying to create journal files on the Master.

[edit] DNS Slave configuration

You can have multiple DNS Slave servers. Each will perform a zone transfer regularly, keeping the data in sync.
Dynamic DNS updates, originating from our DHCP servers are sent to the DNS Master only.
# ISC BIND Configuration File
 #
 # Purpose:
 #   Configure BIND as caching/forwarding slave nameserver
 #
 # File $Id: named.conf,v 1.4 2009/07/08 02:02:19 root Exp $
 
 options {
       directory "/etc";
       pid-file "/var/run/named/named.pid";
       forwarders {
               // Put your ISP's DNS servers here
               66.159.123.200;
               66.159.123.201;
       };
       allow-query { localhost; localnets; };
       allow-notify { 192.168.123.2; };
 };
 
 # Dynamic DNS Updates are only sent to the Primary DNS
 
 zone "example.com" {
       type slave;
       masters { 192.168.123.1; };
       file "/var/named/slaves/example.com.zone";
 };
 
 zone "123.168.192.in-addr.arpa" {
       type slave;
       masters { 192.168.123.1; };
       file "/var/named/slaves/192.168.123.zone";
 };
The "allow-notify" option prevents BIND from generating error messages as it apparently tries to notify itself of updates. Go figure ;-)
SELinux Note: On the DNS Slave, use the "slaves" sub-directory to store data from the DNS Master.
Otherwise, you will get a "permission denied" error on the Slave while trying to transfer the zones from the Master.

[edit] DNS Zone files

On the DNS Master, we create a minimal set of zone files (forward and reverse zones). Entries will be managed either by DHCP or nsupdate.
/var/named/data/example.local.zone:
 ; DO NOT EDIT MANUALLY - use the "nsupdate" utility to prevent data loss
 ;
 $ORIGIN example.local.
 $TTL 86400 ; 1 day
 @  IN SOA ns1.example.local. hostmaster.example.local. (
     2009074711 ; serial
     7200       ; refresh (2 hours)
     300        ; retry (5 minutes)
     604800     ; expire (1 week)
     60         ; minimum (1 minute)
     )
   IN NS ns1.example.local.
   IN NS ns2.example.local.
 ns1  IN A 192.168.123.1
 ns2  IN A 192.168.123.2
/var/named/data/192.168.123.zone:
 ; DO NOT EDIT MANUALLY - use the "nsupdate" utility to prevent data loss
 ;
 $ORIGIN 123.168.192.in-addr.arpa.
 $TTL 86400 ; 1 day
 @  IN SOA ns1.example.local. hostmaster.example.local. (
     2009074711 ; serial
     7200       ; refresh (2 hours)
     300        ; retry (5 minutes)
     604800     ; expire (1 week)
     60         ; minimum (1 minute)
     )
   IN NS ns1.example.local.
   IN NS ns2.example.local.
 1  IN PTR ns1.example.local.
 2  IN PTR ns2.example.local.

[edit] Miscellaneous

[edit] Client configuration

On RHEL/CentOS/Fedora clients, you should edit /etc/sysconfig/network-scripts/ifcfg-eth0 and set the DHCP_HOSTNAME variable to the short hostname of your machine. The client will now send its hostname to the DHCP server during IP address negotiation. The DHCP_HOSTNAME is used for updating Dynamic DNS. Sample:
# Sample Network Device
 DEVICE=eth0
 HWADDR=00:16:de:ad:be:ef
 ONBOOT=yes
 BOOTPROTO=dhcp
 DHCP_HOSTNAME=demo01

[edit] Using nsupdate to add or remove DNS entries

[edit] Adding a host (A and PTR records)

# nsupdate -k /etc/ddns-update.key
 > update add gateway.example.local 38400 A 192.168.123.254
 > 
 > update add 254.123.168.192.in-addr.arpa. 38400 PTR gateway.example.local.
 >
 > quit
Note: The empty line is necessary, it sends the update to DNS. Since we are adding records to two different zones, we need to send two separate updates.

[edit] Deleting a host (A and PTR records)

# nsupdate -k /etc/ddns-update.key 
 > update delete gateway.example.local IN A 192.168.123.254
 > 
 > update delete 254.123.168.192.in-addr.arpa PTR gateway.example.local.
 > 
 > quit

[edit] Adding a mail-host (MX records)

The domain "example.local" wishes to use "mail.example.local" as their primary mail host.
We first need to add the standard A and PTR records for the mailhost (TTL 86400 seconds), followed by the MX record for the domain:
# nsupdate -k /etc/ddns-update.key 
 > update add mail.example.nl 86400 IN A 192.168.123.25
 > 
 > update add 25.123.168.192.in-addr.arpa. 86400 PTR mail.example.local.
 > 
 > update add example.local 86400 MX 10 mail.example.local.
 > 
 > quit
Note: The mailhost should of course be accessible from the Internet and use a routable IP address instead of an RFC1918 address.
Verify the results using 'dig':
# dig example.local MX
 
 ; <<>> DiG 9.3.4-P1 <<>> example.local MX
 ;; global options:  printcmd
 ;; Got answer:
 ;; ->>HEADER<<- opcode: QUERY, status: NOERROR, id: 15733
 ;; flags: qr aa rd ra; QUERY: 1, ANSWER: 1, AUTHORITY: 2, ADDITIONAL: 3
 
 ;; QUESTION SECTION:
 ;example.local.   IN MX
 
 ;; ANSWER SECTION:
 example.local.  86400 IN MX 10 mail.example.local.
 
 ;; AUTHORITY SECTION:
 example.local.  86400 IN NS ns2.example.local.
 example.local.  86400 IN NS ns1.example.local.
 
 ;; ADDITIONAL SECTION:
 mail.example.local. 86400 IN A 192.168.123.25
 ns1.example.local. 86400 IN A 192.168.123.1
 ns2.example.local. 86400 IN A 192.168.123.2
 
 ;; Query time: 1 msec
 ;; SERVER: 127.0.0.1#53(127.0.0.1)
 ;; WHEN: Fri Jul 31 11:34:29 2009
 ;; MSG SIZE  rcvd: 134

[edit] Deleting a mail-host (MX records)

If we wish to remove the mail-host, just delete the MX, A and PTR records:
# nsupdate -k /etc/ddns-update.key 
 > update delete example.local MX 10 mail.example.local.
 > 
 > update delete mail.example.local IN A 192.168.123.25
 > 
 > update delete 25.123.168.192.in-addr.arpa PTR mail.example.local.
 > 
 > quit
Note: Mail may continue to be delivered to the old mailhost until the TTL expires!

[edit] Debugging

During development, you may want to enable some extra logging in /etc/named.conf:
logging {
       channel update_debug {
               file "/var/named/data/named-update.log";
               severity  debug 3;
               print-category yes;
               print-severity yes;
               print-time     yes;
       };
 
       channel security_info    {
               file "/var/named/data/named-auth.log";
               severity  debug 3;
               print-category yes;
               print-severity yes;
               print-time     yes;
       };
 
       category update { update_debug; };
       category security { security_info; };
 };

[edit] Starting the service

On both Master and Slave DNS, start the BIND nameserver:
# chkconfig named on
 # service named start
HOWTO Manage Dynamic DNS with nsupdate

HOWTO Manage Dynamic DNS with nsupdate

From Consultancy.EdVoncken.NET

Jump to: navigation, search

Contents

[hide]

[edit] A and PTR records

[edit] Adding a host (A and PTR records)

# nsupdate -k /etc/ddns-update.key > update add gateway.example.local 38400 A 192.168.123.254 > > update add 254.123.168.192.in-addr.arpa. 38400 PTR gateway.example.local. > > quit Note: The empty line is necessary, it sends the update to DNS. Since we are adding records to two different zones, we need to send two separate updates.

[edit] Deleting a host (A and PTR records)

# nsupdate -k /etc/ddns-update.key > update delete gateway.example.local IN A 192.168.123.254 > > update delete 254.123.168.192.in-addr.arpa PTR gateway.example.local. > > quit

[edit] MX records

[edit] Adding a mail-host

The domain "example.local" wishes to use "mail.example.local" as their primary mail host.
We first need to add the standard A and PTR records for the mailhost (TTL 86400 seconds), followed by the MX record for the domain:
# nsupdate -k /etc/ddns-update.key > update add mail.example.nl 86400 IN A 192.168.123.25 > > update add 25.123.168.192.in-addr.arpa. 86400 PTR mail.example.local. > > update add example.local 86400 MX 10 mail.example.local. > > quit Note: The mailhost should of course be accessible from the Internet and use a routable IP address instead of an RFC1918 address.
Verify the results using 'dig':
# dig example.local MX  ; <<>> DiG 9.3.4-P1 <<>> example.local MX  ;; global options: printcmd  ;; Got answer:  ;; ->>HEADER<<- opcode: QUERY, status: NOERROR, id: 15733  ;; flags: qr aa rd ra; QUERY: 1, ANSWER: 1, AUTHORITY: 2, ADDITIONAL: 3  ;; QUESTION SECTION:  ;example.local. IN MX  ;; ANSWER SECTION: example.local. 86400 IN MX 10 mail.example.local.  ;; AUTHORITY SECTION: example.local. 86400 IN NS ns2.example.local. example.local. 86400 IN NS ns1.example.local.  ;; ADDITIONAL SECTION: mail.example.local. 86400 IN A 192.168.123.25 ns1.example.local. 86400 IN A 192.168.123.1 ns2.example.local. 86400 IN A 192.168.123.2  ;; Query time: 1 msec  ;; SERVER: 127.0.0.1#53(127.0.0.1)  ;; WHEN: Fri Jul 31 11:34:29 2009  ;; MSG SIZE rcvd: 134

[edit] Deleting a mail-host

If we wish to remove the mail-host, just delete the MX, A and PTR records:
# nsupdate -k /etc/ddns-update.key > update delete example.local MX 10 mail.example.local. > > update delete mail.example.local IN A 192.168.123.25 > > update delete 25.123.168.192.in-addr.arpa PTR mail.example.local. > > quit Note: Mail may continue to be delivered to the old mailhost until the TTL expires!

[edit] Service (SRV) records

[edit] Adding SRV records for your IPA Server

After installing the IPA Server ("apollo" in this example), you should add some service-records to DNS for IPA discovery. The installer leaves a sample DNS zone file in /tmp. This is how I added the relevant records using nsupdate:
# nsupdate -k /etc/ddns-update.key > update add _ldap._tcp.example.local. 86400 IN SRV 0 100 389 apollo > > update add _kerberos._tcp.example.local. 86400 IN SRV 0 100 88 apollo > > update add _kerberos._udp.example.local. 86400 IN SRV 0 100 88 apollo > > update add _kerberos-master._tcp.example.local. 86400 IN SRV 0 100 88 apollo > > update add _kerberos-master._udp.example.local. 86400 IN SRV 0 100 88 apollo > > update add _kpasswd._tcp.example.local. 86400 IN SRV 0 100 464 apollo > > update add _kpasswd._udp.example.local. 86400 IN SRV 0 100 464 apollo > > quit

[edit] Navigation

[edit] References