The big security news of Summer 2008 has been
Dan Kaminsky's discovery of a
serious vulnerability in DNS. This vulnerability could allow an attacker to redirect network clients to alternate servers of his own choosing, presumably for ill ends.
This all led to a mad dash to patch DNS servers worldwide, and though there have been many writeups of just how the vulnerability manifests itself, we felt the need for one in far more detail. Hence, one of our Illustrated Guides.
This paper covers how DNS works: first at a high level, then by picking apart an individual packet exchange field by field. Next, we'll use this knowledge to see how weaknesses in common implementations can lead to cache poisoning.
By fully understanding the issues at play, the reader may be better equipped to mitigate the risks in his or her own environment.
We hope everybody who runs a DNS server patches soon.
Terminology
Before we see how DNS operates, we need to define a few terms to know who the players are, software-wise. This will be review for many, and in some cases we leave out side details that an expert would find fault with. Omitted details won't matter for an understanding of this issue.
- zone
- Think of this as a "domain": a collection of hostnames/IP pairs all managed together.
- Our servers operate unixwiz.net, and all the DNS records that go with it — www.unixwiz.net, mvp.unixwiz.net, cs.unixwiz.net, etc. — are all part of the unixwiz.net zone.
- The subtle distinction comes with subdomains: sometimes they are part of the main zone, sometimes they are a separate zone, but none of that matters for this paper.
- Nameserver
- This is server software that answers DNS questions, such as "What is the IP address for www.unixwiz.net?". Sometimes a nameserver knows the answer directly (if it's "authoritative" for the zone), other times it has to go out to the internet and ask around to find the answer (if it's a recursive nameserver).
- There is wide variety of software that performs this service: BIND, PowerDNS, djbdns, and many others. They all answer the same questions more or less the same way, though the minor differences matter some for this paper.
- Authoritative Nameserver
- For every zone, somebody has to maintain a file of the hostnames and IP address associations ("linux.unixwiz.net is 64.170.162.98", and so on). This is generally an administrative function performed by a human, and in most cases one machine has this file. It's the zone master.
- Zones with multiple public nameservers make administrative arrangements to transfer the zone data automatically to additional slave nameservers, all of which are authoritative as far as the outside world is concerned. The distinction between master and slave is unimportant for this paper.
- Resolver
- This is the client part of the DNS client/server system: it asks the questions about hostnames. The resolver is usually a small library compiled into each program that requires DNS services, and it knows just enough to send questions to a nearby nameserver.
- On Linux/UNIX systems, the location of the servers-to-ask is found in the file /etc/resolv.conf, and on Windows it's part of the Network Connections setup in the control panel. This usually consists of a list of IP addresses, each of which expects to find a nameserver on the other end.
- Resolvers are usually very small and dumb, relying on the servers to do the heavy lifting.
- Recursive Nameserver
- This is a nameserver that's willing to go out on the internet and find the results for zones it's not authoritative for, as a service to its clients. Not all nameservers are configured to provide recursive service, or are limited to just trusted clients (say, an ISP may provide nameservice only to its customers).
- Resource Record
- Though most think of DNS as providing hostname-to-IP mapping, there are actually other kinds of questions we can ask of a nameserver, and this highlights the notion that DNS is really a database of "resource records".
- The most common type is an IP Address (an "A" record), but other records exist too: NS (nameserver), MX (mail exchanger), SOA (Start of Authority), and so on.
- Delegation
- When a nameserver doesn't have the contents of a zone, but knows how to find the owner, it's said to delegate service of that zone to another nameserver. Informally, it's a pass-the-buck mechanism: "I know the zone you're asking about, go ask (hostname) for the details".
Following a simple DNS query
With a few key terms defined, we'll review how a simple recursive query works in the absence of any bugs or shenanigans; this forms the background of where the exploits can later be applied.
Though the DNS packet itself has many fields (each of which is important), we're omitting that detail for now in order to understand the high level flow of a full query, from top to bottom. Visualizing how delegation bounces requests from one server to another is vital to understanding the vulnerability will be exploited later.
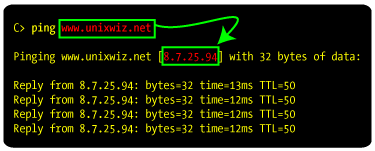
We can't really tell by looking at the query itself what prompted the query in the first place. In the logo of this section, we see that the user attempted to ping our webserver, and the
ping program asked the nameserver to perform this name-to-IP lookup.
But it could have just as easily been a user entering
http://www.unixwiz.net in a browser address bar. But it's not important to know
why the name's being looked up, only to know
how it looks up.
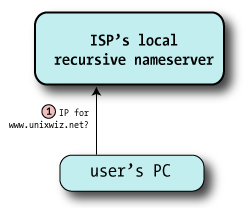
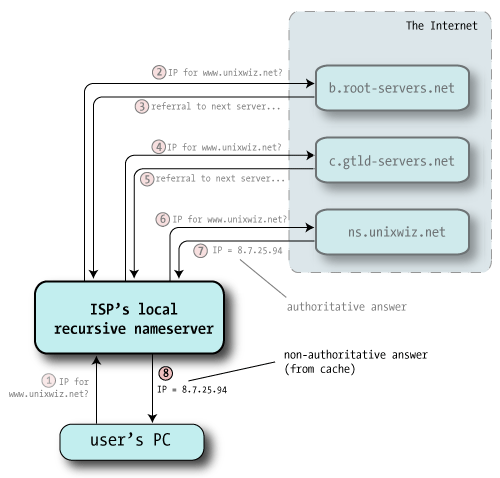
| 1 | The client (noted as "User's PC") makes a request for www.unixwiz.net, and it's routed to the nameserver provided by the user's ISP. It requests the A record, which represents an IP address.
The ISP's nameserver knows that it's not authoritative for unixwiz.net, so it can't look it up in its local zone database. It also doesn't find the name it its cache of recently-seen data, so it knows it has to go out to the internet to find it for us.
|  |
| 2 | All recursive nameservers are preconfigured with a list of 13 root servers, a selection of which looks like:
Root hints A.ROOT-SERVERS.NET. IN A 198.41.0.4
B.ROOT-SERVERS.NET. IN A 192.228.79.201
C.ROOT-SERVERS.NET. IN A 192.33.4.12
...
M.ROOT-SERVERS.NET. IN A 202.12.27.33 Thankfully these IP addresses don't change very often.
The nameserver picks one at random and sends off the query for the A record of www.unixwiz.net; here it's going to b.root-servers.net
| 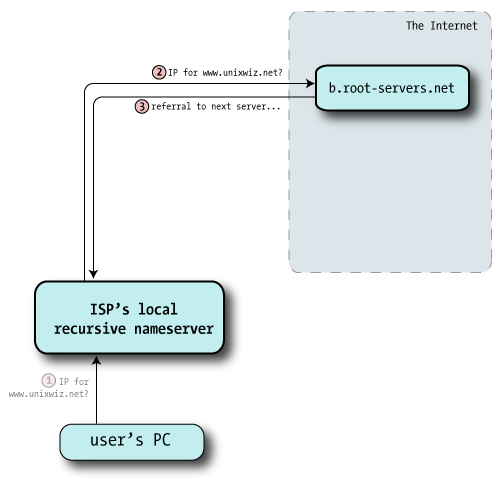 |
| 3 | The root server doesn't know anything about unixwiz.net, but is happy to send me the way of the Global Top Level Domain (GTLD) servers responsible for the .net domain. This is in the form of NS records of servers more qualified to answer our query: "Go ask these guys - here's a list".
.NET referrals /* Authority section */
NET. IN NS A.GTLD-SERVERS.NET.
IN NS B.GTLD-SERVERS.NET.
IN NS C.GTLD-SERVERS.NET.
...
IN NS M.GTLD-SERVERS.NET.
/* Additional section - "glue" records */
A.GTLD-SERVERS.net. IN A 192.5.6.30
B.GTLD-SERVERS.net. IN A 192.33.14.30
C.GTLD-SERVERS.net. IN A 192.26.92.30
...
M.GTLD-SERVERS.net. IN A 192.55.83.30Though technically we asked only for the NS records, the root servers also give us the IP address of each: this is known as "glue" and is provided to save us from having to look it up.
|
| 4 | With the helpful referral from the root servers, this nameserver chooses one of the authoritative servers at random — here, c.gtld-servers.net — and sends off the same query: "I was told to ask you: what's the A record for www.unixwiz.net?". | 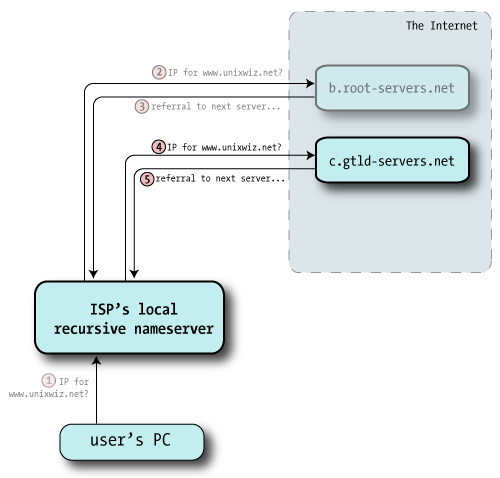 |
| 5 | The GTLD server doesn't know the specific answer to our query, but it does know how to get us closer. Like the root servers, it sends back a referral (a set of NS records) that are likely to have what we seek.
unixwiz.net referral /* Authority section */
unixwiz.net. IN NS cs.unixwiz.net.
IN NS linux.unixwiz.net.
/* Additional section - "glue" records */
cs.unixwiz.net. IN A 8.7.25.94
linux.unixwiz.net. IN A 64.170.162.98 |
| 6 | Once again the recursive nameserver is following a chain of referrals on the client's behalf, and it picks one of the nameservers at random and sends off a third query (the same as the other two). |  |
| 7 | Unlike the other answers, that merely passed the buck onto other nameservers, this one actually has what we were looking for: it provides the A record for www.unixwiz.net.
In addition, the response includes a flag saying "This is an authoritative response", indicating it came from the source of truth for this domain.
|
| 8 | Now with answer in hand, the ISP's recursive nameserver hands that answer back to the client, and that satisfies the entire query.
The recursive nameserver also files away this answer into its own cache in case this or some other client makes the same query later.
But we'll note that the reply to the client doesn't include the "authoritative" indicator. Even though it received one from cs.unixwiz.net, the recursive nameserver can't pretend to the client that it's actually the source of authority, so it's considered a non-authoritative answer.
|  |
This procedure goes on under the hood trillions of time every day over the internet. DNS is quite fast, so the eight-packet handshake (for this particular query) routinely completes in just a split second.
This reveals the distributed nature of DNS: no one machine knows everything, but they do know how to find each other via delegation.
As a side note, nothing prevents any nameserver from hosting any zone, including those it doesn't really own. A bad guy could set up a nameserver and configure an authoritative zone for
BankOfSteve.com, but it has no effect because no higher-level nameserver ever delegates to it.
What's in a DNS packet?
With a grasp of the high-level exchanges we dig a bit deeper into what's inside a DNS packet: the details are required to understand cache poisoning and this recent vulnerability. There's a lot of detail here, but fortunately many of the fields aren't important for an understanding of these issues.
The illustration on the right shows the overall structure of a single packet of DNS data, and it can reflect a question packet or an answer packet. We've highlighted some of the fields that are most related to this exploit.
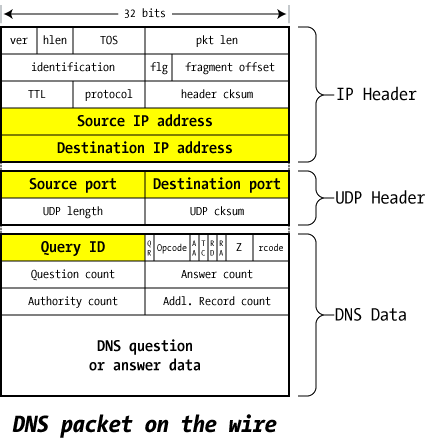
- Source / Destination IP address
- These reflect the IP addresses of the machines that sent and should receive the packet. It's possible to forge the source address, but pointless to forge the destination.
- Analog in the real world: on an envelope sent in the US Mail, you can put anything you want as the return address — the source address — but if you lie about the recipient, it's not going to go where you want.
- Source / Destination port numbers
- DNS servers listen on port 53/udp for queries from the outside world, so the first packet of any exchange always includes 53 as the UDP destination port.
- The source port varies considerably (though not enough, as we'll find shortly): sometimes it's also port 53/udp, sometimes it's a fixed port chosen at random by the operating system, and sometimes it's just a random port that changes every time.
- As far as DNS functionality is concerned, the source port doesn't really matter as long as the replies get routed to it properly. But this turns out to be the crux of the problem at hand.
- Query ID
- This is a unique identifier created in the query packet that's left intact by the server sending the reply: it allows the server making the request to associate the answer with the question.
- A nameserver might have many queries outstanding at one time — even multiple queries to the same server — so this Query ID helps match the answers with the awaiting questions.
- This is also sometimes called the Transaction ID (TXID).
- QR (Query / Response)
- Set to 0 for a query by a client, 1 for a response from a server.
- Opcode
- Set by client to 0 for a standard query; the other types aren't used in our examples.
- AA (Authoritative Answer)
- Set to 1 in a server response if this answer is Authoritative, 0 if not.
- TC (Truncated)
- Set to 1 in a server response if the answer can't fit in the 512-byte limit of a UDP packet response; this means the client will need to try again with a TCP query, which doesn't have the same limits.
- RD (Recursion Desired)
- The client sets this to 1 if it wishes that the server will perform the entire lookup of the name recursively, or 0 if it just wants the best information the server has and the client will continue with the iterative query on its own. Not all nameservers will honor a recursive request (root servers, for instance, won't ever perform recursive queries).
- RA (Recursion Available)
- The server sets this to indicate that it will (1) or won't (0) support recursion.
- Z — reserved
- This is reserved and must be zero
- rcode
- Response code from the server: indicates success or failure
- Question record count
- The client fills in the next section with a single "question" record that specifies what it's looking for: it includes the name (www.unixwiz.net), the type (A, NS, MX, etc.), and the class (virtually always IN=Internet).
- The server repeats the question in the response packet, so the question count is almost always 1.
- Answer/authority/additional record count
- Set by the server, these provide various kinds of answers to the query from the client: we'll dig into these answers shortly.
- DNS Question/Answer data
- This is the area that holds the question/answer data referenced by the count fields above. These will be discussed in great detail later.
We'll see these in action as we disassemble our sample query shortly.
Resource Record Types
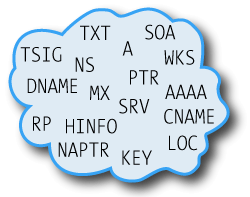
Ultimately, DNS is a kind of distributed database, and each query or response includes a name, a type, and (for a response) a value. The resource types represent different purposes, and no understanding of DNS is complete without knowing about them.
There are dozens of resource record types, though only a few are in common usage. The rest are experimental, obsolete, or serve obscure purposes that rarely come up in practice.
Common DNS Resource Record Types
| Type | Description |
| A | This is an IP Address record, and is the most obvious type of data supported by DNS. Indeed; many users have no idea that DNS deals with anything other than IP addresses. |
| NS | This describes a Nameserver record responsible for the domain asked about. |
| MX | The MX record encodes the name of a Mail Exchanger, a system responsible for handling email for the given domain. Multiple MX records can be provided for a domain (they included way to specify priority). Email server software is the main consumer of MX resource records.
Curiously, the mail exchanger for a domain doesn't have to be part of that domain; it's common for the mailserver at a large hosting operation to be primary MX for thousands of customer domains.
|
| SOA | The Start of Authorities record describes some key data about the zone as defined by the zone administrator (on the domain master machine). It includes things such as the contact address for the admin, and the amount of time that slave nameservers should hang onto the zone in case the master is unreachable. |
| CNAME | The Canonical Name, more commonly known as an Alias, this allows providing an alternate name for a resource. |
| TXT | A generic Text record that provides descriptive data about domain. These are essentially comments, though some applications (such as SPF) use them for programmatic purposes. |
It's generally (but not universally) allowed that one name can have multiple resource records, even more than one of the same type. A common example would be a machine having multiple IP addresses, both of which are entered in DNS:
www.example.com. IN A 192.168.1.3
www.example.com. IN A 192.168.7.149
Here, the name
www.example.com has two IP address records associated with it, and both will be returned in answer to an
A query for this name. Note that the order of the addresses as they appear in the file are not maintained in the responses: they're usually shuffled.
We'll note that the
IN token means the
INternet class, and this is virtually the only class you'll ever see in practice. Others (such as Chaos or Hesiod) are defined but are for specialized and mostly obsolete purposes.
Drilling down to a real query
Recalling our query exchange above, we're going to study steps 4 through 7 in some detail: they are most representative of the DNS name-resolution process without adding duplicative steps.
Ultimately, DNS is a kind of distributed database, and it can look up much more than just an IP address: there are multiple
resource record types involved in a query, and one can't understand the packet structure without knowing their distinctions.
We'll note that not
every detail is predictable even when the protocol is fully understood: nameservers have some latitude in how they accomplish a resolution, so a few alternatives are available. We're just choosing one common path through this process.
In this example, we're using the nameserver of our own ISP —
dnsr1.sbcglobal.net — (referred to as
dnsr1) as the local recursive nameserver, and we'll find a few things in common for all of them.
- In every case, the Question section is the same: "What is the A record for www.unixwiz.net?". This question is also repeated in the answer — mainly as a convenience — so it's seen in common in every packet we look at.
- The ISP's nameserver usually sets the RD=1 flag (Recursion Desired) on the odd chance that the other end is willing to do the heavy lifting and go find this answer for us. Most top-level nameservers are unwilling to do this, so they give us the best information they have and set RA=0 flag (Recursion Unavailable) to let us know that we have to do the work ourselves.
- In this example, the source UDP port number for all queries from our ISP's nameserver is the same. It's a common practice for nameserver software to request a random port from the operating system at startup, then use it for every query.
- We observe that the Query ID increments by one each time it sends a new query.
So with this information in hand, let's walk through the steps in detail and see how our "simple" query is actually resolved.
| 2&3 | In this step our ISP's nameserver queried a root server for www.unixwiz.net, and it replied with a list of global top-level domain servers that knew about the .net hierarchy. From this delegation, the ISP's nameserver chose one at random (c.gtld-servers.net), as shown in step 4. | (not illustrated) |
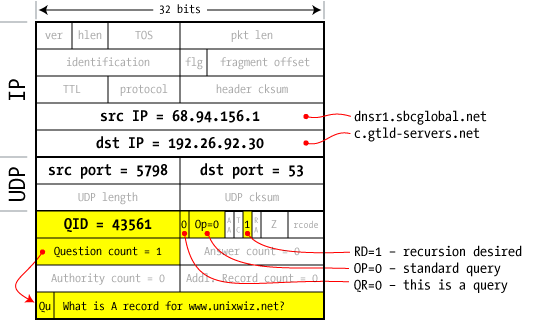
4
client to server | The dnsr1 server at our ISP grabs one of the GTLD nameservers received from a root server (in step 3) and fires off a second query. This is essentially the same as the first; the Question is about the A record www.unixwiz.net.
Because this is a query — not a response — the answer/authorities/additional records fields are blank (as shown with a count of zero).
The Query ID value was taken as the next ID available from this server's internal counter.
|  |
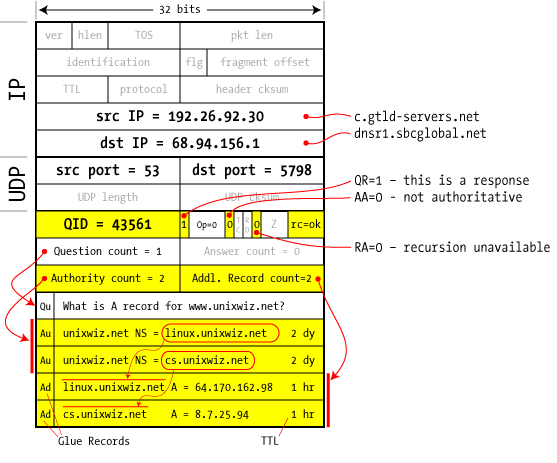
5
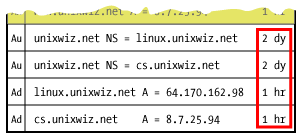
server to client | The GTLD server we asked doesn't know the specific answer to our question, but it knows where to ask: it responds with a series of NS records that should know how to handle our request. They show up in the Authorities section as cs.unixwiz.net and linux.unixwiz.net.
We're given hostnames of the nameservers we ought to contact, but real network connections are only made by IP address: how do we look these up? Avoiding what would clearly be a chicken-and-egg problem, the GTLD nameserver provides not only the hostnames of the authoritative servers, but their IP addresses too.
These are provided as A records in the "Additional Records" section, and are known as "glue data".
Because this nameserver can't give us the final answer, it sets the AA=0 flag (Authoritative Answer) to zero, indicating that somebody else knows the real story and we have to keep asking around.
But a related note: dnsr1 is a very busy nameserver, having perhaps hundreds of queries outstanding every second. How does it know that this reply packet is a response to that specific pending request?
The answer is: by matching on the Query ID. Inbound DNS packets that don't have a waiting Query ID are ignored.
The TTL is a Time To Live, discussed later.
|  |
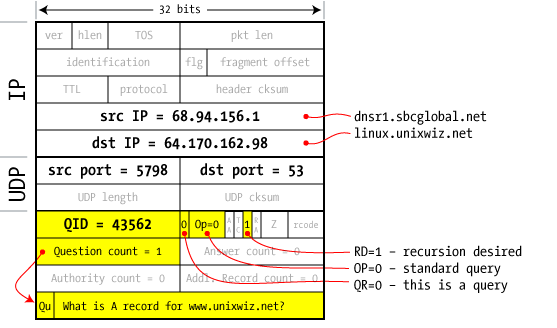
6
client to server | In step 5 we received two nameservers that are purported to know more about the unixwiz.net domain, so one more query is created that asks the same question — again! — of these just-learned nameservers.
This request is really no different from the previous queries, though it does increment the Query ID by one before sending it off. The idea is that we keep following these delegations until we actually get a real answer, not a referral.
|  |
7
server to client | And at last the answer comes!
Unlike the previous replies, this one has answer count=1, and it carries an A record with the IP address to satisfy our query.
In addition, this response has the AA=1 flag set, which indicates that it's an authoritative answer (aka "from the horse's mouth"). If an answer is provided but with AA=0, we assume it's from the server's cache.
The answer also includes the authority and glue information, but this time all we're really interested in is the answer itself. And the nameserver used the Query ID of 43562 to match this reply to the pending request.
|  |
As noted previously, these transactions typically occur
very rapidly across the internet, and the user is normally unaware that so much is going on under the hood on his behalf.
But local performance is further enhanced by use of a local
cache in the recursive nameservers: this is an important part of the domain-name system, and gets us one step closer to our security issue.
What's in the cache?

In the DNS lookups we've seen so far, the ISP's resolving nameserver has gone out and fully resolved each name from scratch, relying on no prior knowledge except the built-in root hints.
But in practice this full road trip is not necessary: once we get an authoritative answer for a given name, we can save it in a local cache to use to satisfy future queries directly.
The more clients serviced by a nameserver, the more benefit of the cache: the work of the full name resolutions is spread out over the whole client base. It may well require quite a bit of memory in the nameserver, but the amounts of RAM required are peanuts compared with the benefits.

The Time-To-Live
When a DNS answer is stored in the local cache, it can't keep it forever: this could lead to terribly stale data that effectively breaks the domains involved.
Fortunately, the recursive nameserver doesn't have the burden of guessing how long to cache things: the
administrator of the zone specifies this information for every resource record. This is known as a
Time To Live (TTL), and it's a lifetime measured in seconds.
A TTL can be a short as a few minutes, or as long as a week or more: this is entirely determined by the administrator of the zone.
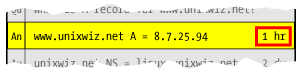
In our final Step-7 answer above (with snippet to the right), we see the TTL of one hour for the
A record in
www.unixwiz.net. All client requests for this resource record in the next hour will be satisfied immediately, from the cache. But once it expires, it's removed from cache and the next request will force a full lookup from scratch.
But it's not just the
A record that's cached; all the other authority data (the
NS data plus associated glue
A records) arrive with their own TTLs, and are also cached. This means that a full lookup for a single resource record could well fill the cache with a half dozen associated records or more.
Poisoning the cache
With a good understanding of a properly-functioning DNS, it's time to see where things break.
Cache poisoning is where the bad guy manages to inject bogus data into a recursive nameserver's cache, causing it to give out that bad information to unsuspecting local clients.
It's not so simple as just sending random DNS packets to a nameserver, as DNS only accepts
responses to pending queries; unexpected responses are simply ignored.
How does a nameserver know that any response packet is "expected"?
- The response arrives on the same UDP port we sent it from: otherwise the network stack would not deliver it to the waiting nameserver process (it's dropped instead).
- The Question section (which is duplicated in the reply) matches the Question in the pending query.
- The Query ID matches the pending query
- The Authority and Additional sections represent names that are within the same domain as the question: this is known as "bailiwick checking".
This prevents ns.unixwiz.net from replying with not only the IP address of www.unixwiz.net, but also fraudulent information about (say) BankOfSteve.com.
If all of these conditions are satisfied, a nameserver will accept a packet as a genuine response to a query, and use the results found inside. This includes caching answers, as well as valid authority and additional data found there too.
But if the bad guy can predict and forge a DNS response packet that's
just right, he can cause all kinds of shenanigans for the victims.
The bad guy normally first chooses his
victim by finding a nameserver he believes vulnerable to poisoning: all of the clients of that DNS server get to unwittingly ride the victim train as well.
Then he finds a
target domain, one he wishes to take over. His intent is to fool the victims into visiting his own malicious website instead of the real deal: by getting
www.goodsite.com to resolve to the
bad guy's IP address, the user's traffic visits the bad guy's website instead of the good one.
We noted that unexpected packets were simply dropped, so a bad guy need not get everything right every time: sending many packets attempting to guess some of the key parameters is likely to prove fruitful with enough attempts.
Guessing the Query ID
In old nameservers (and in our detailed packet trace example), the Query ID simply increments by one on each outgoing request, and this makes it easy to guess what the next one will be as long as an interloper can see a single query.
We probably can't directly ask the nameserver for its query ID, but we can provoke it into telling us:
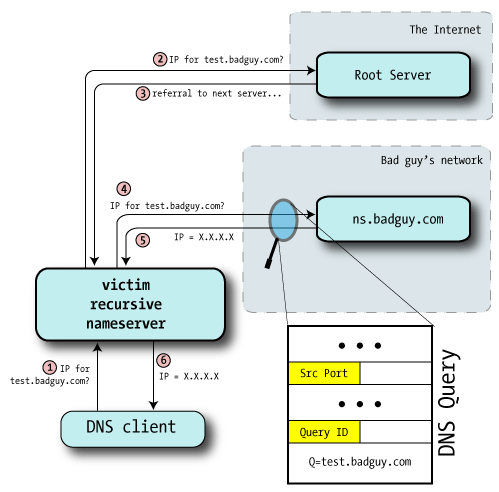
- Bad guy asks the victim nameserver to look up a name in a zone for a nameserver he controls (perhaps test.badguy.com).
He might query the server directly, if it permits recursion from his location, or he might convince a user to lookup a name — perhaps by including the test hostname on a web page.
- Victim nameserver receives the request and makes the usual rounds to resolve the name starting at the root servers. Here, we've put the root and GTLD servers in the same category to separate them from the bad guy's nameserver.
- Eventually, the victim nameserver will be directed to the bad guy's nameserver: after all, it's authoritative for badguy.com.
- Bad guy monitors this lookup of test.badguy.com by sniffing the IP traffic going to his own machine, or perhaps even with a custom modification to the nameserver software, and from this discovers the source port and Query ID used.
Aha!
At this point he knows the last query ID and source port used by the victim nameserver.
But the thoughtful might wonder: so what? This hasn't poisoned anything yet, and there's no need to engage in DNS shenanigans for
badguy.com anyway. After all, the bad guy is already authoritative for his own zone.
True enough, but this was only the first step: the
next one engages in DNS shenanigans for
other domains.
Shenanigans, Version 1
With the ability to easily predict a query ID, and since our victim nameserver always sends queries from the same UDP port, it should be easy enough to cause some trouble.
In this illustration, we'll attempt to poison a particular nameserver with a fraudulent IP for a legitimate banking website,
www.BankOfSteve.com. The bad guy's intention is to get all of the ISP's customers to visit his own malicious site instead of the real one operated by the Bank.
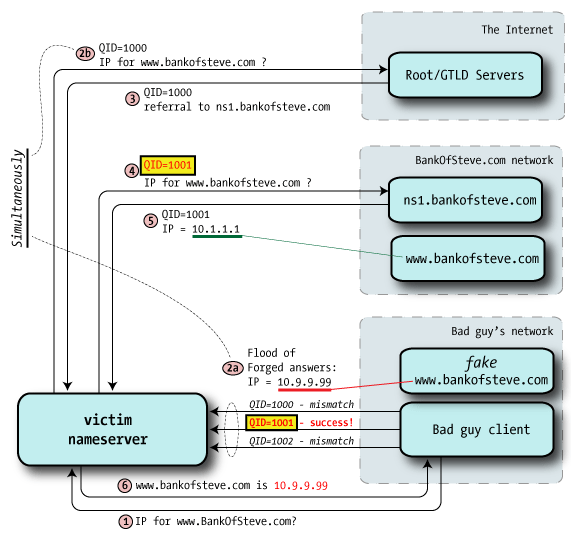
- Step 1 — Bad guy sends a DNS query to the victim nameserver for the hostname it wishes to hijack. This example assumes that the victim nameserver allows recursive queries from the outside world.
- Step 2a — Knowing that the victim will shortly be asking ns1.bankofsteve.com (as directed from the root/GTLD servers) for an IP address, the bad guy starts flooding the victim with forged DNS reply packets. All purport to be from ns1.bankofsteve.com, but include the answer with the IP of badguy's fraudulent webserver.
- Steps 2b & 3 — Root/GTLD servers provide referral to ns1.bankofsteve.com. This may be multiple queries, but we're showing just one for simplicity.
- Step 4 — victim nameserver asks ns1.bankofsteve.com for the IP address of www.bankofsteve.com, and it uses query ID 1001 (one higher than the previous query).
- Step 5 — the real nameserver provides a legitimate response to this query, with QID=1001. But if the bad guy has successfully matched the query ID in the step 2a flood, this legal reply arrives too late and is ignored. Oops.
- Step 6 — With the bogus IP address (of the bad guy's webserver) in cache it provides this poisoned answer to the requesting DNS client. Boom.
- Step 7 (not illustrated) — future DNS clients asking for www.bankofsteve.com will receive the same fraudulent answer.
The rule is:
first good answer wins. Most of the forged answers are dropped because the Query ID doesn't match, but if
just one in the flurry of fake responses gets it right, the nameserver will accept the answer as genuine.
And because that satisfies the request, the
real answer that arrives later is dropped, because the query is no longer pending.
In any case, once the bad guy gets the answer from the victim's nameserver, the matter is closed, and he can stop flooding the victim.
We'll note that even though this illustrates trying to beat just the reply from
ns1.bankofsteve.com, our forged DNS traffic could actually match the query ID of
any of the prior steps.
This includes matching an earlier reply from the root server or the GTLD (.com) server: if the query ID matches, our fake
authoritative wins, and pollutes the cache. This is a race, but only the attacker knows it's playing.
- The name can't already be in the cache
- If www.bankofsteve.com is already in the victim nameserver's cache, all of the external queries are avoided, and there's simply no way to poison it in this manner.
- If the bad guy still wants to poison that particular hostname, he has to wait for it to expire from cache (as determined by the TTL).
- The bad guy has to guess the query ID
- This is made easy with (now-obsolete) nameservers that increment the Query ID by one each time — even a busy nameserver has a fairly small range to guess from.
- The bad guy has to be faster than the real nameserver
- If the victim nameserver and the real nameserver are topologically close (network wise), then the steps 2/3 and 4/5 may complete so quickly that the bad guy has a too-small window to exploit.
Mitigations
An obvious mitigation here is to
randomize the Query ID.
With
sequential Query IDs, the bad guy has a fairly limited range of guesses required once he observes a single current Query ID. If he sees QID=999, then he may flood with QIDs 1000-1029 in an attempt to make at least one match.
Experience has shown this is an easy window to beat.
But if the nameserver chooses
random Query IDs, then the attacker has the full 16-bit pool to choose from — that's 64k values — and this is a much harder target to hit in the narrow window of time while the victim is going through the routine resolution steps.
Though forging 20 packets in routine name-resolution time is straightforward enough, doing so with
thousands of packets is a much more substantial challenge.
So true randomization of Query IDs raises the bar quite a bit.
Dan's Shenanigans
So far we've seen how to poison a single record, but this has less impact than expected: it's just one record, and many properties require multiple hostnames to operate, and it's harder to hack them all.
Dan Kaminsky found an approach that's dramatically more effective than this, and it caused quite a furor in the security community. The general approach is the same as the simple approach shown above, but the key difference is the nature of the forged payload.
In the simple example, our intention was to poison the final answer, the A record with the IP address, but what Dan discovered is that we can go up one level and
hijack the authority records instead.
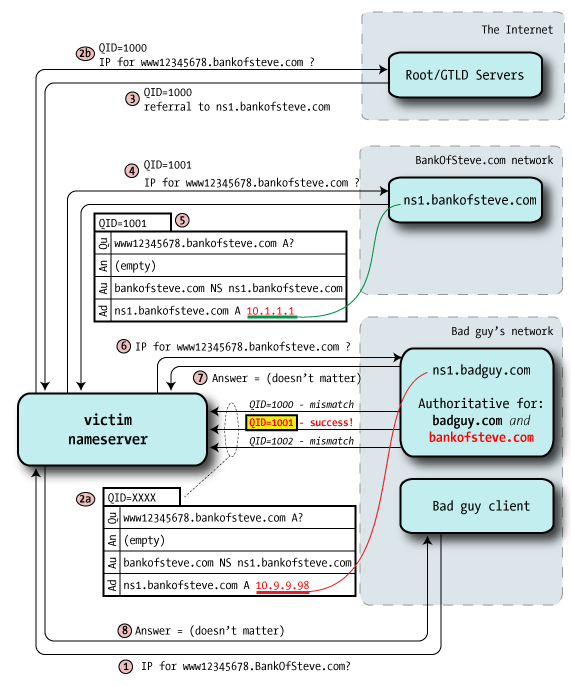
Before undertaking the attack, the bad guy configures a nameserver that's authoritative for the
bankofsteve.com zone, including whatever resource records he likes: A records, MX for email, etc.
There's nothing stopping anybody from configuring his own nameserver to be authoritative for
any domain, but it's pointless because the root servers won't point to it: it's got answers, but nobody ever asks it a question.
- Step 1 — bad guy client requests a random name within the target domain (www12345678.bankofsteve.com), something unlikely to be in cache even if other lookups for this domain have been done recently.
- Step 2a — As before, the bad guy sends a stream of forged packets to the victim, but instead of A records as part of an Answer, it instead delegates to another nameserver via Authority records. "I don't know the answer, but you can ask over there".
The authority data may well contain the "real" bankofsteve.com nameserver hostnames, but the glue points those nameservers at badguy IPs. This is the crucial poisoning, because a Query ID match means that the victim believes that badguy's nameservers are authoritative for bankofsteve.com.
The bad guy now owns the entire zone.
- Curiously, the rest of the steps don't matter: the point of this process was to fake out the victim into thinking that badguy runs the domain in question, and that would have been successful in this step.
Once one of the victim's queries has been poisoned — it could be any in the chain — all the rest are directed to badguy's servers.
This is a devastating attack: by owning the entire target domain, the bad guy controls essentially everything with respect to that resolving nameserver. He can redirect web visitors to his own servers (imagine redirecting
google.com), he can route email to his own servers via serving up bogus MX records.
The bad guy will typically set a very high TTL in the poisoning responses so that the victim will keep the bogus data in cache as long as possible.
Flurry of queries
Our example has shown a single query being hijacked, but this is unlikely to be successful: because of Query ID randomization, it's not likely that that the bad guy will manage to get a hit in the short time required to match on 64k IDs.
Instead, the bad guy issues a flurry of queries, each for a different random name under the main domain. The
first request caused the nameserver to perform the usual root-first resolution, but it eventually caches the valid
ns1.bankofsteve.com values. Subsequent queries within this domain go directly to that nameserver, skipping the root steps.
But the next request for a different random name (which certainly won't be in cache) causes an immediate query to the valid
ns1 server. The bad guy then throws a flood of forged data at the victim about that second random name, though the odds here are still pretty long.
Just for the sake of discussion, let's assume that the bad guy can generate 50 forged replies for each random name query before the real reply arrives from the real nameserver. This appears to be a very small chance, but when repeated over and over — and run from automated tools — success by the bad guy is likely.
It's been reported that success can commonly be achieved in 10 seconds.
Going for the top
Our examples have all focused on hijacking an end domain, but the same techniques can do the same thing up a level: taking over
.COM,
.NET, or the like.
By poisoning the Authority records for .COM and the like, the victim nameserver will route all DNS lookups to the bad guy's nameservers. This effectively hijacks all names under that top level, including domains he didn't actually request. This gives a great deal of flexibility even though it may well require substantial computing and network resources to serve the flood of requests that this hijacking must generate.
What's the fix?
This all sounds awful: how does one fix this?
As has been alluded to several times, it's the small space — just 16 bits — of the Query ID that makes this attack possible. Though certainly one might wish to increase that ID to something larger (perhaps 32 bits), it's simply not possible do that in the short term because it would break DNS on the internet: the fields are what they are, and they can't be changed casually.
But an additional source of randomness is required nevertheless, and that's been done by
randomizing the source port. Rather than use just a single UDP port, which is trivial to discover, a much larger range of ports is allocated by the nameserver and then used randomly when making outbound queries.
As one would imagine, the nameserver would keep track of which source port was used for each query: replies arriving on the wrong port would be discarded just as if the Query ID failed to match.
Microsoft's updated DNS server is said to preallocate 2,500 UDP ports to use for these random queries, and for discussion we'll round this down to an even power of two:
2 11 = 2,048. This yields this much larger transaction space:
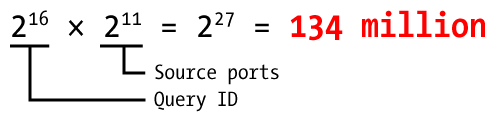
Increasing the search space from 64k to 134M provides far better odds for the good guys.
We presume that each nameserver provides a way of setting how large of a pool to use for these source ports, as well as a way of excluding certain port numbers known to be required for other purposes.
Summary
This has been an exceptionally serious vulnerability because it undermines the very faith in DNS: this is at the core of the internet. Most experts believe that if you can't trust DNS, all else is lost, and we're of this same mind.
There is far more detail about this vulnerability than we can present here, and we'll urge the reader to consult other resources (especially
Dan's presentation).
But we can include a few (ahem) random notes about this matter that didn't seem to fit in elsewhere, and seem important and/or interesting enough to include in this paper.
- Patch your servers: Tools exist to make exploit-in-a-box available to even low-skilled bad guys.
- Authoritative-only nameservers are not vulnerable because they have no cache to poison, but we'd be surprised if no small number of "auth only" nameservers actually provided recursive service to at least some clients.
- A nameserver need not be directly visible to the Internet to be exploitable. By convincing a user to visit a particular web page, it can trigger a chain of events that reliably lead to poisoning.
- Even patched servers may still be vulnerable if an intervening firewall performs Port Address Translation in a way that un-randomizes the source ports.
- It's been suggested that DNSSEC or IPv6 are solutions to this problem, but this is only in theory. Both of these technologies have to be fully rolled out to be effective, and this is likely years away, at best.
- The Secure Sockets Layer (SSL) is only a partial protection against being redirected to malicious websites. Putting up a fake BankOfSteve.com website will have the wrong SSL certificate name (which is a warning to the user who's paying attention), but the great majority of users skip right through those warnings.
- But the bad guy can subvert even SSL: since many Certificate Authorities validate a user's control over a domain by sending email, hijacking a mailserver by attacking the cert vendor's resolving DNS, this may well mean that an attacker can obtain a fully-valid certificate for the target domain.
This is very scary.
References
Reference:
http://unixwiz.net/techtips/iguide-kaminsky-dns-vuln.html


 David Davis has worked in the IT industry for 15+ years and holds several certifications, including CCIE, CCNA, CCNP, MCSE, CISSP, VCP. He has authored hundreds of articles and numerous IT training videos. Today, David is the Director of Infrastructure at