Showing posts with label Windows. Show all posts

Tuesday, March 25, 2014

Mounting a remote linux directory onto a windows machine for editing files

SkyHi @ Tuesday, March 25, 2014

Introduction


In many cases it can become cumbersome to transfer files to and from a droplet. Imagine a development usage scenario where you are coding apps remotely and find yourself uploading a script repeatedly to your virtual server to test. This can become quite a hassle in a very short period of time. Luckily there is a way to mount your VPS file system to your local computer so you can make changes on the fly and treat your droplet as local storage. In this article, we will show you how to do exactly that.

Installing SSHFS


On Ubuntu/Debian


SSHFS is Linux based software that needs to be installed on your local computer. On Ubuntu and Debian based systems it can be installed through apt-get.
sudo apt-get install sshfs

On Mac OSX


You can install SHFS on Mac OSX. You will need to download FUSE and SSHFS from the osxfuse site

On Windows


To install SSHFS in Windows you will need to grab the latest win-sshfs package from the google code repository. A direct download link can be found below. After you have downloaded the package, double click to launch the installer. You may be prompted to download additional files, if so the installer will download the .NET Framework 4.0 and install it for you.
https://win-sshfs.googlecode.com/files/win-sshfs-0.0.1.5-setup.exe

Mounting the Remote File System


The following instructions will work for both Ubuntu/Debian and OSX. Instructions for Windows systems can be found at the bottom of the tutorial.
To start we will need to create a local directory in which to mount the droplet's file system.
sudo mkdir /mnt/droplet <--replace code="" droplet="" prefer="" whatever="" you="">
Now we can use sshfs to mount the file system locally with the following command. If your VPS was created with a password login the following command will do the trick. You will be asked for your virtual server's root password during this step.
sudo sshfs root@xxx.xxx.xxx.xxx:/ /mnt/droplet
If your droplet is configured for login via ssh key authorization, you will need to tell sshfs to use your public keys with the following command. You will be asked to enter the passphrase you used during the creation of your keys with ssh-keygen.
sudo sshfs -o IdentityFile=~/.ssh/id_rsa root@xxx.xxx.xxx.xxx:/ /mnt/droplet
Now you can work with files on your droplet as if it were a physical device attached to your local machine. For instance, if you move to the /mnt/droplet directory on your local machine you can create a file locally and the file will appear on your virtual server. Likewise you can copy files into the /mnt/droplet folder and they will be uploaded to your droplet in the background.
It is important to note that this process provides only a temporary mount point to your droplet. If the virtual server or local machine is powered off or restarted, you will need to use the same process to mount it again.

Unmounting the Remote File System


When you no longer need the mount point you can simply unmount it with the command
sudo umount /mnt/droplet

Permanently Mounting the Remote File System


SSHFS also allows for setting up permanent mount points to remote file systems. This would set a mount point that would persist through restarts of both your local machine and droplets. In order to set up a permanent mount point, we will need to edit the /etc/fstab file on the local machine to automatically mount the file system each time the system is booted.
First we need to edit the /etc/fstab file with a text editor.
sudo nano /etc/fstab
Scroll to the bottom of the file and add the following entry
sshfs#root@xxx.xxx.xxx.xxx:/ /mnt/droplet
Save the changes to /etc/fstab and reboot if necessary.
It should be noted that permanently mounting your VPS file system locally is a potential security risk. If your local machine is compromised it allows for a direct route to your droplet. Therefore it is not recommended to setup permanent mounts on production servers.

Using Win-SSHFS to Mount Remote File Systems on Windows


After launching the win-sshfs program, you will be presented with a graphical interface to make the process of mounting a remote file share simple.
  • Step 1: Click the Add button in the lower left corner of the window.
  • Step 2: Enter a name for the file share in the Drive Name field.
  • Step 3. Enter the IP of your droplet in the Host field.
  • Step 4. Enter your SSH port. (Leave as port 22 unless you have changed the SSH port manually).
  • Step 5. Enter your username in the Username field. (Unless you have set up user accounts manually you will enter root in this field).
  • Step 6. Enter your SSH password in the password field. (Note on Windows you will need to have your droplet configured for password logins rather than ssh-key-authentication).
  • Step 7. Enter your desired mount point in the Directory field. (Enter / to mount the file system from root. Likewise you can enter /var/www or ~/ for your home directory).
  • Step 8. Select the drive letter you would like Windows to use for your droplets file system.
  • Step 9. Click the Mount button to connect to the droplet and mount the file system.
Now your virtual server's file system will be available through My Computer as the drive letter you chose in step 8.

Usage of the Remote Mount Point


The remote mount behaves similarly to locally mounted storage: you are able to create, copy, move, edit, compress or perform any file system operations you would be able to do on the droplet, but you are not able to launch programs or scripts on the remote server.
One typical usage of this would be if you host a website on your VPS and need to make changes to the website on a regular basis. Mounting the file system locally allows you to launch whatever code editor, IDE, or text editor you wish to edit the site, and any changes you make will reflect on the virtual server as soon as they are made on your local machine.
Similarly, on droplets used for testing purposes of coding projects, it allows for much simpler code modifications which can be tested immediately without the need to modify the code locally as well as remotely (and eliminates the hassle of uploading new copies of files for small code changes).

REFERENCES
https://www.digitalocean.com/community/articles/how-to-use-sshfs-to-mount-remote-file-systems-over-ssh


Monday, December 17, 2012

WSD port monitor for Printers and TCP/IP ports, what is the difference?

SkyHi @ Monday, December 17, 2012

There is a lot of discussion about IP addresses etc for printer problems. There is no mention of a new feature for porting for printers, WSD port for plug and play of printers, I assume that IP addresses do not matter with WSD, My printer is confusingly set up for WSD port and TCP/IP port, can someone please expain


The WSD Port Monitor is a new printer port monitor in Windows Vista and Windows Server 2008.  This port monitor supports printing to network devices that are designed to include Web Services for Devices (WSD) technology.  Web Services for Devices allows network-connected IP-based devices to advertise their functionality and offer these services to clients by using the Web Services protocol.  WSD-based devices and clients communicate over the network using a series of SOAP (Simple Object Access Protocol) messages over UDP and HTTP(S).  WSD for Devices provides a network plug-and-play experience that is similar to installing a USB device.  Web Services for Devices also defines a security profile that may be extended to provide additional protection and authentication using device-based certificates.
The WSD Port Monitor is installed by default on Windows Vista.  On Windows Server 2008, the port monitor is installed along with the Print Services server role.  Web Services for Devices is not available for Windows XP or Windows Server 2003.  These clients can print to WSD-based devices that are shared on computers running Windows Vista or Windows Server 2008.  There are four main tasks performed by the WSD Port Monitor:
  • Discover and connect to WSD-based network printers
  • Send print jobs to WSD printers
  • Monitor the status and configuration of the WSD printers and update the printer object status accordingly
  • Respond to bidirectional queries from WSD printers
These are the same functions provided by other port monitors (for example the Standard TCP/IP port monitor, tcpmon.dll).  The WSD Port Monitor is implemented in wsdmon.dll.  This DLL is loaded under the print spooler process (spoolsv.exe) and is defined as a port monitor in the following registry key:HKLM\SYSTEM\CurrentControlSet\Control\Print\Monitors\WSD Port.  For WSD-based print devices, the WSD Port Monitor is used by default.  If the print device does not support the WSD Port Monitor, then the Standard TCP/IP Port Monitor is used instead.
Now that we know what the WSD Port Monitor does, let's look at the communications mechanism used by WSD.  When a WSD-based printer is connected to a network, it sends out an unsolicited "Hello" message to advertise its presence.  Computers running Windows Vista or Windows Server 2008 listen for these advertisements and add the printer to their list of available network printer resources.  When a WSD-based device is gracefully removed from the network it sends another message (a "Bye" message) to advertise that it is no longer available.  In addition, Windows Vista and Windows Server 2008 machines can discover WSD-based printers by using a "Probe" message when searching for printers via Network Discovery or the Add Printer Wizard.  A typical WSD communication sequence is shown below:
WSD-Communication
Let's examine each piece of this sequence:
  1. To find a printer, the client sends a multicast Probe message.  The Probe indicates that the client is looking for a print service.  The probe also indicates whether or not the client requires security.
  2. The WSD-based device listens for Probe messages and responds directly to the client with a Probe Match message since it hosts a print service.
  3. To find out more about the WSD device and what services it hosts, a client sends a Get Metadata message directly to the device using unicast.  Prior to sending a Get Metadata message, a client may also send a Resolve message if the name of the WSD device is known.
  4. The device replies with its metadata.  The metadata may either be in-line within the response message or the device may send a pointer to the metadata.  Besides information like the device manufacturer, serial number and firmware version, the metadata also includes the endpoint reference for each of the services hosted by the device.
  5. To find out more about the print service itself, the client may send a Get Metadata message directly to the service.
  6. The service replies with its metadata, including information about the operations that the service supports and printer-specific metadata (ability to print in color, pages per minute, number and size of paper trays etc).
  7. The client sends a message to start a print job.
  8. The service responds with a status to acknowledge the client request to start a print job.
  9. To receive updates on the status of the job or about the overall status of the print service, the client may send a Subscribe message to the print service.
  10. The Subscribe response message include an identifier for the subscription and when it will expire.  If the client needs status information after the expiration, it has to renew the subscription.
  11. The client sends the print job itself to the print service, encoding large images as attachments to the message.  Attachments are an optimization for transmitting a SOAP message by selectively re-encoding portions of the message while still presenting the required XML to the SOAP application.
  12. The print service responds to indicate that the job has been accepted.
  13. The print service sends an event to the client, informing it of, for instance, a change in the print job, number of pages printed, paper jam, completion etc.
Hello, Bye, Probe, Resolve and Get messages are all generated without network solicitation.  These messages are used to announce device state, issue a search request, or obtain metadata.  ProbeMatches, ResolveMatches, and GetResponse messages are generated in response to Probe, Resolve and Get messages.  Hello, Bye, Resolve and ResolveMatches messages are sent by UDP multicast to port 3702.  Get and GetResponse metadata messages occur over HTTP (TCP port 5357) or HTTPS (TCP port 5358).  Probe and ProbeMatches messages are sent over UDP (port 3702) unless they are "directed" messages.  A "directed" message is one where the WSD device name is known and accessed directly by name.  For directed messages, the Probe and ProbeMatches messages use the same ports as the Get and GetResponse metadata messages.  Obviously, to allow WSD network discovery, the Network Discovery firewall exceptions for the listed ports must be enabled in the Windows Firewall.  Finally, you can disable Multicast by setting the IGMPLevel value to 0 in the following registry key: HKLM\SYSTEM\CurrentControlSet\Services\Tcpip\Parameters.
And that brings Day Eleven to a close.  Tomorrow we'll be looking at Printer Driver Packages.  Until next time ...
Additional Resources:

REFERENCES

Monday, August 27, 2012

Windows XP schedule a task without password

SkyHi @ Monday, August 27, 2012

winxp backs do not need a password. here is the over ride.
WIN_XP will allow you to work around the password requirement for windows scheduler. set up the backup task and schedule it for later as required.
once the task has been scheduled , go into the schedluer and selcet the properties under the newly created backup task. in the botom portion of the task properties, place this text in the run as cell.
nt authority\system
this will prompt for a password... do not enter a password, just click ok and yes on the no password warning.
right click the task and run it. it will run and you can reschedule it from the scheduler.


Scheduled Tasks - Applying/Running tasks without a password
For Pro:  Go to Start/Administrative Tools/'Local Security Policy/Security Settings\Local Policies\Security Options
Accounts: Limit local account use of blank passwords to console logon only. This is enabled by default, disable it.

For Home: (Keith Miller) Go to Start/Run/Regedit and navigate to this key:
HKEY_LOCAL_MACHINE\SYSTEM\CurrentControlSet\Control\Lsa

Value name: limitblankpassworduse, Type: REG_DWORD, Data: 0 (disabled) 1 (enabled)

For Home: Run Scheduled Task without a Password (Line 67)
http://www.kellys-korner-xp.com/xp_tweaks.htm


REFERENCES
http://www.askdavetaylor.com/backup_requires_password_on_windows_xp.html
http://www.vas.com/Tnotes/XP%20Task%20Scheduler%20and%20Password%20problems.htm

How To Fix Shockwave Flash Crashes in Google Chrome

SkyHi @ Monday, August 27, 2012


flashchromecrash
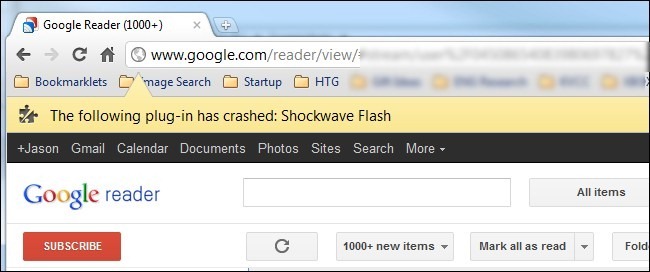
If your copy of Google Chrome has taken on a sudden and inexplicable hatred for Shockwave Flash, we’re here to help. Read on as we show you how to tame Chrome and get it to play nice with Flash.
More so than other browsers, Google Chrome is particularly susceptible to a specific but not uncommon situation in which it simply will not coexist peacefully with Adobe Flash—frequent slow downs and annoying crashes are common as a result. The following tutorial will help you get Chrome back to its speedy self.

What’s Causes The Issue?

2012-01-16_134919
The reason we’re talking about Chrome and not, say, Firefox, is because of the way Chrome handles Flash content. While other browsers call upon the Flash installation of the host system, Chrome includes an internal Flash installation. When everything goes smoothly this isn’t a problem—the internal Flash installation is updated with every new Chrome release.
Unfortunately things can fall apart pretty easily if Chrome gets confused and attempts to utilize both the OS installation of Flash and the internal Chrome installation of Flash. The result is serious browser lag, temporary lockup, and then a browser-wide crash of all active Flash instances. You don’t realize how many web sites use Flash until every single tab locks up with a crash warning—”The following plug-in has crashed: Shockwave Flash”

How Do I Know A Conflicting Flash Installation Is Causing The Crashes? 2012-01-16_134644

First of all, despite the warning about Shockwave, the actual warning has nothing to do with Adobe Shockwave which is a separate program/multimedia system from Adobe Flash. Second, while not every instance of Flash flaking out in Chrome can be attributes to a Flash install conflict, we’ve found it to be the most common reason users are experiencing Flash-related problems.
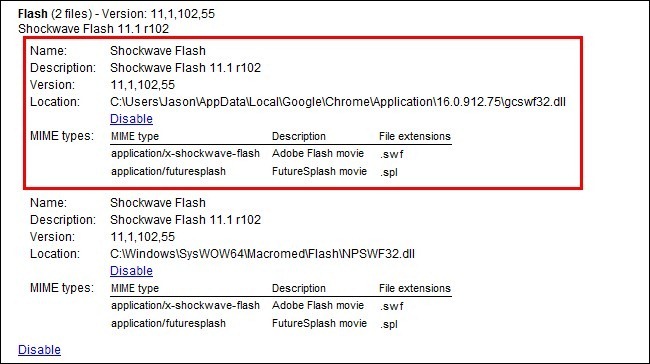
How can you tell if a Flash conflict is the source of your trouble? Run Chrome. In the address bar, type about:plugins in the address bar. After you press enter you’ll be greeted with a list of all the plug-ins installed in Chrome (this is different than user-installed Extensions). Look down the list of plug-ins for the Flash entry. If the entry looks like Flash (2 Files) there is a very good chance the source of your Flash-related crashes is a conflict between the two.
In the upper right hand corner of the browser window there is a small toggle labeled [+] Details. Click on that toggle to expand the entries for all the plug-ins. Return to the entry for Flash.
2012-01-16_135248
You should see something like the screenshot above: two entries for Flash, one for the internal Chrome installation (highlighted in red here) and one for the host OS’s installation (seen below the highlighted entry).
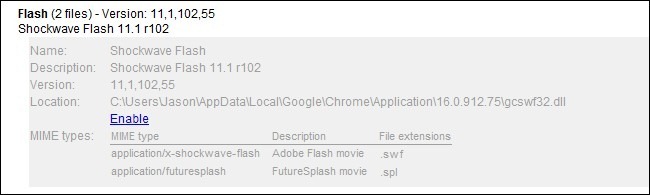
You need to click on the Disable link for Chrome’s internal installation of Flash (make sure you disable the one located in Chrome’s AppData folder and not the separate stand-alone Flash installation). Once you do so the entry for the internal installation should look like so:
2012-01-16_135912
Go ahead and close the tab and then close Google Chrome. Restart Chrome and resume normal browsing—visit Adobe’s test page to ensure everything looks good:
2012-01-16_194053
Remember, you’ll no longer be getting automatic updates with each Chrome upgrade. Make sure to check for updates at Adobe’s Flash download page and/or turn on the update check in your local installation of Adobe Flash.
If for whatever reason disabling the built-in Flash doesn’t help, we suggest playing around with different combinations. Try turning off the OS Flash installation instead of the built-in Flash installation for example. Also, try visiting a flash-based web site while Incognito Mode (when you enter Incognito Mode it turns off all your Extensions which may or may not be causing issues with Flash). Finally, as a last ditch effort, you can reinstall Chrome (if Flash works in every other browser but Chrome, this is likely the only option you have left).

Have a tip or trick for dealing with tricky Flash installations or other browser quirks? Sound off in the comments.


REFERENCES
http://www.howtogeek.com/103292/how-to-fix-shockwave-flash-crashes-in-google-chrome/

Monday, July 2, 2012

Mediaplayer classic, Choppy playback FIX!

SkyHi @ Monday, July 02, 2012
I've been having problems with video playback using the CCCP codec pack which contains Media player classic.

The problem has been that when I use the seekbar in MPC the videoplayback has been choppy for a few seconds. This only seemed to appear while playing backwards. Seeing that MPC is the best mediaplayer out there (my opinion) I knew that I had to get it working properly once more since my old XP system.

What solved the problem for me was just changing the output renderer to EVR (Vista/.Net3) instead of EVR Custom Pres.

For all you wondering how to do this, it can be found under:
-> Main menu -> View -> Options -> Playback -> Output

I've also added a screenshot for your conveniance  :


REFERENCES
http://windows7forums.com/tweaks-guides-howto/41153-mediaplayer-classic-choppy-playback-fix.html

Friday, June 1, 2012

Random Reboots. Error Codes: 1000008e, 1000000a, 0000004e

SkyHi @ Friday, June 01, 2012
To stop it rebooting, go to Control Panel>System, then click "Advanced System settings" in the left-hand pane. In the System Properties dialog, click Settings under "Startup and Recovery", and then uncheck "Automatically restart". After that it will give a Blue Screen error which is easier to troubleshoot.

Then download UBCD and burn it to CD, it has all the memory testing and disk diagnostic utilities on it plus many more besides. Run MemTest and Windows Memory Diagnostic, as well as the disk utility for your brand of hard drive (or Seatools if you aren't sure). All you have to do is to boot up with the disc in the drive, select the utility that you want to use, and it will run.

Ultimate Boot CD

Tuesday, April 10, 2012

Having problems browsing SAMBA shares? ..README

SkyHi @ Tuesday, April 10, 2012
I've seen "SAMBA isn't working, now I can't connect to shares on my HTPC" being posted in a few places so I thought I'd post a note to educate people on what's going on. The statement that SAMBA is broken is rarely true. It's usually running fine, and the cause of the problem is simply the ugly way that NetBios over TCP/IP name resolution works. 

The reason you cannot see an smb://share "that was working 5 mins ago" is down to browser election fights between the computers on the network. An election fight is a peer-to-peer negotiation over who gets elected to be in charge of the domain(s) and/or local master browser list; the list of computer names that will appear in the Windows Network Neighbourhood (or it's current equivalent). The machine that wins the election is determined through a combination of uptime, OS version and config settings - meaning the outcome can be unpredictable, and the election process can take time (minutes not milliseconds). Over time your HTPC (as longest uptime device) has probably been elected the master browser, so if you reboot your HTPC the browser list is gone and the remaining machines on the network will restart an election process to decide who owns/creates the replacement. Once the election is over it will take time (again, minutes not milliseconds) to distribute the list and ensure every client has the same version. If you reboot other computers they will join the network and announce their availability, so an election discussion takes place to see if they should become the master browser. It's easy to see how this process may go titsup.com from time to time. Sadly, Mac and Linux computers can suffer the same issues as their Windows counterparts as they (via their local SAMBA client) are ultimately participating in the same process.

In corporate networks this issue is mitigated by having a pre-determined machine configured to win all the elections and maintain the browser list(s) - usually a domain controller. Rigging the election guarantees the election result and ensures the election process is completed quicker. The good news is that it's simple to configure SAMBA on your OE based HTPC to do the same thing. The reason for picking the HTPC to be the master browser is that it's probably the going to be the computer that has the highest uptime in your home network.

First, ensure you have /storage/.config/samba.conf. If you don't there is a sample one in the directory that can be renamed. Then add the lines indicated below to your [global] section:

[global]
  server string = Media Centre(%i)
  workgroup = HOME
  domain master = yes  <-- add this line
  local master = yes  <-- add this line
  preferred master = yes  <-- add this line
  os level = 100  <-- add this line
  netbios name = AppleTV
  security = share
  guest account = root
  socket options = TCP_NODELAY IPTOS_LOWDELAY SO_RCVBUF=65536 SO_SNDBUF=65536
  wins support = yes
  syslog only = yes
  name resolve order = lmhosts wins bcast host
  printcap name = /dev/null
  load printers = no

Even if you do this the problem will never be completely eliminated, but Windows network browsing should in theory be more consistent (in theory!). If it does not clear the problem the solution is usually to "turn everything off and on again" so that the old (incorrect) browser list is lost and a new (correct) one is created, or access your HTPC directly via an IP address based URL, e.g. \\192.168.1.2\ 

NB: in pre-RC6 setups the last two lines shown above (printcap name and load printers) were incorrectly placed under the [printers] section of the sample configuration file. If you move them to [global] as above you'll see some SAMBA startup errors in /var/log/messages go away.

REFERENCES

Tuesday, January 31, 2012

How can I mount an FTP to a drive letter in windows?

SkyHi @ Tuesday, January 31, 2012


REFERENCES
http://serverfault.com/questions/6079/how-can-i-mount-an-ftp-to-a-drive-letter-in-windows

Wednesday, January 4, 2012

Preferred Master Browser

SkyHi @ Wednesday, January 04, 2012
Yes, Domain Controllers should be Master Browsers - setting your domain controllers as "Preferred Master" should fix most of the Master Browser election problem.
One of the common reasons for operating a WINS server is to provide a central reference for NetBIOS names across several subnets. Choosing one primary WINS server and pointing all clients to it lets NetBIOS name resolution work across subnets without requiring the use of Domain Controllers.
But if your system is supposed to rely on domain controllers, loss of replication for site C may explain your symptoms. So start with verifying successful replication.


Setting the IsDomainMaster parameter entry to True or Yes makes that computer a Preferred Master Browser which has priority over other computers in master browser elections. Whenever a preferred master browser starts, it forces a browser election. Any computer running Windows NT Workstation or Windows NT Server can be configured as a preferred master browser. If no other condition prevents it, the preferred master browser will always win the election. Set the parameter in the following registry path:
Hive: HKEY_LOCAL_MACHINE
Key: SYSTEM\CurrentControlSet\Services\Browser\Parameters
Type: REG_SZ
Name: IsDomainMaster
Value: True


REFERENCES
http://www.windowsnetworking.com/kbase/windowstips/windowsnt/registrytips/network/preferredmasterbrowser.html
http://serverfault.com/questions/239066/which-machines-should-be-running-as-master-browser

Saturday, November 5, 2011

The device, \Device\Harddisk0\DR0, has a bad block.

SkyHi @ Saturday, November 05, 2011
 That sounds like an issue with your hardrive. It might possibly be manifesting as crashes in some read/write sequences. Prehaps it would be worthwhile checking your hardisks for any faults. Which hardrive do you have (make model)? If your not sure, go into your device manager (Type "Device Manager" in Start search bar. Look under "Disk drives" and make a note of the code and model you see there.

We can download a diagnostic tool straight from the manufacturers and check the drives make sure they are not experiencing problems. YOu can either post your hardrive details and ill go get the relevant file for you or you can hunt them down yourself. Heres a list;

Hitachi Hard Drives: Diagnostic Utilities Here
http://www.hitachigst.com/support/downloads/

IBM Hard Drives: Use Hitachi Utilities*

Maxtor Hard Drives: Diagnostic Utilities Here (SeaGate owns Maxtor)
http://www.seagate.com/ww/v/index.js...00dd04090aRCRD

Toshiba Hard Drives: Use Hitachi or Maxtor Utilities

Quantum Hard Drives: Use Maxtor Utilities

Samsung Hard Drives: Diagnostic Utilities Here
http://www.samsung.com/global/busine...eshooting.html

Seagate Hard Drives: Diagnostic Utilities Here
http://www.seagate.com/www/en-us/sup...ads/discwizard
http://www.seagate.com/www/en-us/support/downloads

Conner Hard Drives: Use Seagate Utilities

Western Digital Hard Drives: Diagnostic Utilities Here
http://support.wdc.com/product/download.asp?lang=en


You can also run a check disk which may help resolve issues with that error message. To run a checkdisk you can either do so in normal windows mode or at boot time. Note that in normal windows, although check disk may find faults with the hardrive, it cannot attempt to repair them, so its a like a read only mode.
To run Checkdisk in normal windows;
Click start, type "Command Prompt" into the search bar. When the launcher appears in the start list, right click it and select "runs as adminstrator". A black window will appear. The cursor will already be set so all you need to do is type "chkdsk" and hit enter. Let it run its checks and see if it reports any faults/bad sectors. If it does, you can run check disk again at boot and let windows try to repair it.

To run at boot time;
Open "Computer" (my computer), go to your hardrive where windows is installed and right click it. Select "Properties" in drop down list that appears. Properties window will appear. Selct "Tools" tab and under Error-checking click on "Check Now".
Another pop up window will appear with Check Disk Options. Make sure both tick boxes ("Automatically fix file system errors" and "Scan for and attempt recovery of bad sectors") are ticked and click on "Start"
You will get another pop up window saying Windows can't check the disk while its in use. Just click on "Schedule disk check" and restart your pc.

As i said, you dont have to do this, but i highly recommend it. Id start with the check disk, see if that does anything. If it does do some repairs, check your event log and see if that errors gone away. If it has, run your game again and see if you get any more crashes.

If check disk comes up clear, try the utilities tools for the hardrive you own and check to make sure there is no issues there. There may be a fault that windows may not detect, or may detect but be unable to repair. Let me know your thoughts.

EDIT PS, I think your problem lays here. Looking at your original post, you crashed randomly, but later consistantly at the same part (queen of the castle). Iam guessing its a fault/bad sector, depending how old the drive(s) are.

REFERENCES
http://www.sevenforums.com/hardware-devices/137454-dr0-has-bad-block.html
http://forums.steampowered.com/forums/showthread.php?t=1972282

Friday, May 13, 2011

Windows VBScript To Send Email Using CDO

SkyHi @ Friday, May 13, 2011
Windows 2000 and Windows XP use CDO messaging as a replacement for CDONTS.

Sending email with CDO is a simple task. First we create a reference to the CDO component


Set objMessage = CreateObject("CDO.Message")
then fill-in Sender, Subject and Recipient (To) fields of the headers and the body text which can be either plain text or HTML. You can also add a file attachment. You then use the Send method to send the email.

Below I'll show all three types of emails, and how to send an email using a remote SMTP server in the event you are not running your own. I've added and example to illustrate how to request a return receipt and delivery status notifications.

Please note, when using the AddAttachment method in your scripts you must use a fully qualified pathname as the argument to the method.  Using just a file name or a relative path will produce the error The specified protocol is unknown.
If you receive an error message related to objMessage.From then you should try replacing it with objMessage.Sender
I've added sample code to illustrate how to load the body of the email from a text file on your disk.
I've added a sample of how to load recipient data from a database.
I've added a sample illustrating how to use data from Excel in an email.
If you are looking for an ASP based email form processor then please look here.
If you are interested in a mass mailer using CDO and VBScript, look here.


This sample sends a simple text email that can be viewed in any email client.  
 
Set objMessage = CreateObject("CDO.Message")
objMessage.Subject = "Example CDO Message"
objMessage.From = "me@my.com"
objMessage.To = "test@paulsadowski.com"
objMessage.TextBody = "This is some sample message text."
objMessage.Send

Sending an HTML email.

Note the use of the Cc & Bcc properties to send using Blind Carbon Copy (Bcc) and Carbon Copy (Cc).
These properties can be used with either text or HTML email.

Set objMessage = CreateObject("CDO.Message")
objMessage.Subject = "Example CDO Message"
objMessage.From = "me@my.com"
objMessage.To = "test@paulsadowski.com"
'The line below shows how to send using HTML included directly in your script
objMessage.HTMLBody = "

This is some sample message html.

"

'The line below shows how to send a webpage from a remote site
'objMessage.CreateMHTMLBody "http://www.paulsadowski.com/wsh/"

'The line below shows how to send a webpage from a file on your machine
'objMessage.CreateMHTMLBody "file://c|/temp/test.htm"

objMessage.Bcc = "you@your.com"
objMessage.Cc = "you2@your.com"
objMessage.Send


Sending a text email with an attached file. By repeating the .AddAttachment method you can attach more than one file.
When attaching files keep in mind that your recipient may be limited in their
ability to receive files above a certain size. Many ISPs limit emails to 8 or 10MB each.
You should not send large files to anyone before obtaining their permission.
 
Set objMessage = CreateObject("CDO.Message")
objMessage.Subject = "Example CDO Message"
objMessage.From = "me@my.com"
objMessage.To = "test@paulsadowski.com"
objMessage.TextBody = "This is some sample message text."
objMessage.AddAttachment "c:\temp\readme.txt"
objMessage.Send

Sending a text email using a remote server. Sometimes you need to send email using another server. It may be required by your
company, or your ISP may be blocking the SMTP port, or your dynamic IP may be
blacklisted for being in a dynamic pool.

This code shows you how to use a remotes server rather than the SMTP server
on your own machine.
 
Set objMessage = CreateObject("CDO.Message")
objMessage.Subject = "Example CDO Message"
objMessage.From = "me@my.com"
objMessage.To = "test@paulsadowski.com"
objMessage.TextBody = "This is some sample message text."

'==This section provides the configuration information for the remote SMTP server.
'==Normally you will only change the server name or IP.
objMessage.Configuration.Fields.Item _
("http://schemas.microsoft.com/cdo/configuration/sendusing") = 2

'Name or IP of Remote SMTP Server
objMessage.Configuration.Fields.Item _
("http://schemas.microsoft.com/cdo/configuration/smtpserver") = "smtp.myserver.com"

'Server port (typically 25)
objMessage.Configuration.Fields.Item _
("http://schemas.microsoft.com/cdo/configuration/smtpserverport") = 25

objMessage.Configuration.Fields.Update

'==End remote SMTP server configuration section==

objMessage.Send


Sending a text email using authentication against a remote SMTP server. More and more administrators are restricting access to their servers to control spam or limit
which users may utilize the server. This example shows you how to use basic authentication,
the most commonly used authentication method, when the SMTP server you are using requires it.

This code is slightly more complex but not very difficult to understand or work with.
 
Const cdoSendUsingPickup = 1 'Send message using the local SMTP service pickup directory.
Const cdoSendUsingPort = 2 'Send the message using the network (SMTP over the network).

Const cdoAnonymous = 0 'Do not authenticate
Const cdoBasic = 1 'basic (clear-text) authentication
Const cdoNTLM = 2 'NTLM

Set objMessage = CreateObject("CDO.Message")
objMessage.Subject = "Example CDO Message"
objMessage.From = """Me"" "
objMessage.To = "test@paulsadowski.com"
objMessage.TextBody = "This is some sample message text.." & vbCRLF & "It was sent using SMTP authentication."

'==This section provides the configuration information for the remote SMTP server.

objMessage.Configuration.Fields.Item _
("http://schemas.microsoft.com/cdo/configuration/sendusing") = 2

'Name or IP of Remote SMTP Server
objMessage.Configuration.Fields.Item _
("http://schemas.microsoft.com/cdo/configuration/smtpserver") = "mail.your.com"

'Type of authentication, NONE, Basic (Base64 encoded), NTLM
objMessage.Configuration.Fields.Item _
("http://schemas.microsoft.com/cdo/configuration/smtpauthenticate") = cdoBasic

'Your UserID on the SMTP server
objMessage.Configuration.Fields.Item _
("http://schemas.microsoft.com/cdo/configuration/sendusername") = "youruserid"

'Your password on the SMTP server
objMessage.Configuration.Fields.Item _
("http://schemas.microsoft.com/cdo/configuration/sendpassword") = "yourpassword"

'Server port (typically 25)
objMessage.Configuration.Fields.Item _
("http://schemas.microsoft.com/cdo/configuration/smtpserverport") = 25

'Use SSL for the connection (False or True)
objMessage.Configuration.Fields.Item _
("http://schemas.microsoft.com/cdo/configuration/smtpusessl") = False

'Connection Timeout in seconds (the maximum time CDO will try to establish a connection to the SMTP server)
objMessage.Configuration.Fields.Item _
("http://schemas.microsoft.com/cdo/configuration/smtpconnectiontimeout") = 60

objMessage.Configuration.Fields.Update

'==End remote SMTP server configuration section==

objMessage.Send

Send using authentication against a remote server with a file attachment and return receipt and
delivery disposition notification requests.
In order to use the Delivery Status Notifications (Return
Receipt and Delivery Disposition requests) we need to create a reference to the CDO Configuration
object in addition to the CDO Message object and set a small number of properties. You must
use cdoSendUsingPort (network connection) and not the SMTP server's pickup directory
(cdoSendUsingPickup).
 

Const cdoSendUsingPickup = 1
Const cdoSendUsingPort = 2 'Must use this to use Delivery Notification
Const cdoAnonymous = 0
Const cdoBasic = 1 ' clear text
Const cdoNTLM = 2 'NTLM
'Delivery Status Notifications
Const cdoDSNDefault = 0 'None
Const cdoDSNNever = 1 'None
Const cdoDSNFailure = 2 'Failure
Const cdoDSNSuccess = 4 'Success
Const cdoDSNDelay = 8 'Delay
Const cdoDSNSuccessFailOrDelay = 14 'Success, failure or delay

set objMsg = CreateObject("CDO.Message")
set objConf = CreateObject("CDO.Configuration")

Set objFlds = objConf.Fields
With objFlds
  .Item("http://schemas.microsoft.com/cdo/configuration/sendusing") = cdoSendUsingPort
  .Item("http://schemas.microsoft.com/cdo/configuration/smtpserver") = "mail.yourhost.com"
  .Item("http://schemas.microsoft.com/cdo/configuration/smtpauthenticate") = cdoBasic
  .Item("http://schemas.microsoft.com/cdo/configuration/sendusername") = "your-username"
  .Item("http://schemas.microsoft.com/cdo/configuration/sendpassword") = "your-password"
  .Update
End With

strBody = "This is a sample message." & vbCRLF
strBody = strBody & "It was sent using CDO." & vbCRLF

With objMsg
  Set .Configuration = objConf
  .To = "test@paulsadowski.com"
  .From = "me@my.com"
  .Subject = "This is a CDO test message"
  .TextBody = strBody
   'use .HTMLBody to send HTML email.
  .Addattachment "c:\temp\Scripty.zip"
  .Fields("urn:schemas:mailheader:disposition-notification-to") = "me@my.com"
  .Fields("urn:schemas:mailheader:return-receipt-to") = "me@my.com"
  .DSNOptions = cdoDSNSuccessFailOrDelay
  .Fields.update
  .Send
End With

In real world usage you'll most likely want to load the text of the email from a file on your
computer. The sample code below shows you how to do this. The text can be either
plain text or HTML as needed.Our example assumes your text is in the file
C:\Temp\MyEmail.txt. This code loads the entire content of that file into a variable,
here named BodyText which you can then reference in your CDO code. We
assume BodyText is in the scope of your CDO code.
 

'These constants are defined to make the code more readable
Const ForReading = 1, ForWriting = 2, ForAppending = 8
Dim fso, f
Set fso = CreateObject("Scripting.FileSystemObject")
'Open the file for reading
Set f = fso.OpenTextFile("c:\temp\MyEmail.txt", ForReading)
'The ReadAll method reads the entire file into the variable BodyText
BodyText = f.ReadAll
'Close the file
f.Close
Set f = Nothing
Set fso = Nothing
Once the text is loaded you can use it in your CDO code something like this...

objMessage.TextBody = BodyText
or
objMessage.HTMLBody = BodyText


Load Recipients from a Database As is the case with most thing in Windows there are many ways to accomplish a task. This is one method of many.
Our database is an Access format database that resides on the local disk. The table in our database that we are     interested in is called Customers and each record consists of 4 fields named "ID", "Name", "Email", and "Customer", where ID is an autogenerated index, Name is the full name of our customer, Email is the customer's email address and Customer is their customer identification number.
We are only interested here in two fields, Name and Email.
ID Name Email Customer
1 Bob Jones bjones@test.com 12345
2 Jane Smith jsmith@test.net 12346

Set OBJdbConnection = CreateObject("ADODB.Connection")
OBJdbConnection.Open "DRIVER={Microsoft Access Driver (*.mdb)}; DBQ=c:\Acme Inc\Databases\Customers.mdb"
SQLQuery = "SELECT Name, Email FROM Customers"
Set Result = OBJdbConnection.Execute(SQLQuery)
if Not Result.EOF then
  Do While Not Result.EOF
    SendMail Result("Name"), Result("Email")
    Result.MoveNext
  Loop
end if
OBJdbConnection.Close
As you can see the code is simple. We create a database connection object then open the database and query it for the Name and Email fields of each customer. Those values are passed for each customer to a subroutine that sends the customer an email.
Sub SendMail(TheName, TheAddress)
Dim objMessage, Rcpt

Rcpt = Chr(34) & TheName & Chr(34) & "<" & TheAddress & ">"
Set objMessage = CreateObject("CDO.Message")
objMessage.Subject = "This Month's Sales" objMessage.From = """Acme Sales"" "
objMessage.To = Rcpt
objMessage.HTMLBody = TextBody
objMessage.Send

End
Sub

If you are not accustomed to working with databases then this may have seemed a daunting task but as you can see from the code above, it's really quite simple.

We've already covered sending email so I'll just mention that this subroutine assumes the HTML body text is a variable called TextBody (see Loading email body text from a file)
Also we format the recipient's address in the standard format of "Name" for a more professional look to the recipient..

Remarks

As previously stated there are many ways to do this. I've presented one simple method here. Your own use may be with an ODBC connection; it may use mySQL or SQL Server; it may include personalization of the email body text and more. My intent here was to provide you with the basics to get you started.
Load data from an Excel Worksheet
 
There may be times when you want to generate an email using data from an application such as Excel. This is one simple illustration of how that could be done. In our example we will be using a Workbook with three columns starting at column A row 1. Each row represents one product in our inventory and the three columns contains the following data about each item: Part Number, Name of Part, Number of Items in Inventory. Graphically our Workbook looks like this:
Part Name Stock
4583586 Fliggalhopper 452
5898547 Looplonger 293
This particular script works by walking down each cell of column 1 till it finds an empty cell which it assumes is the end of the list of entries. If your file may contain empty cells then you can use the Worksheet's UsedRange.Rows.Count property to find the last row in which an entry is made. Your code would then use a for loop something like this:
 
rowLast = objSheet.UsedRange.Rows.Count
for x = rowStart to rowLast
' do stuff
next

Function GetData()
Dim x, strTemp, objExcel, objWB

Set
objExcel = Wscript.CreateObject("Excel.Application")
Set
objWB = objExcel.Workbooks.Open("c:\Acme Inc\Workbooks\Test.xls")
Set
objSheet = objExcel.ActiveWorkbook.Worksheets(1)

' Make Excel visible while debugging

objExcel.Visible = True

' This is the row of our first cell.

x = 1

do
while objExcel.Cells(x, 1).Value <> ""
  strTemp = strTemp & objExcel.Cells(x, 1).Value & _
    Space
(10 - Len(objExcel.Cells(x, 1).Value))
  strTemp = strTemp & objExcel.Cells(x, 2).Value & _
    Space
(50 - Len(objExcel.Cells(x, 2).Value))
  strTemp = strTemp & objExcel.Cells(x, 3).Value & vbCRLF
  x = x + 1
loop

' This will prevent Excel from prompting us to save the workbook.

objExcel.ActiveWorkbook.Saved = True

' Close the workbook and exit the application.

objWB.Close
objExcel.Quit

set
objWB = Nothing
set
objExcel = Nothing

GetData
= strTemp
End
Function

' This is our main function.
Dim
strBody

Set
objMessage = CreateObject("CDO.Message")
objMessage.Subject = "Inventory report for " & Date
objMessage.From = "me@my.com"
objMessage.To = "bossman@my.com"
strBody = "Part" & Space(6) & "Item" & Space(46) & "Stock" & vbCRLF

' Here we call the function GetData to populate the body text.

strBody = strBody & GetData

objMessage.TextBody = strBody
objMessage.Send

The code above will produce an email that looks something like this:

To: bossman@my.com
From: me@my.com
Subject: Inventory report for 3/19/2005

Part      Item                                              Stock
4583586   Fliggalhopper                                     452
5898547   Looplonger                                        293

This sample sends a simple text email via GMail servers.  

It's like any other mail but requires that you set the SMTP Port to 465 and tell CDO to use SSL
 
Const cdoSendUsingPickup = 1 'Send message using the local SMTP service pickup directory.
Const cdoSendUsingPort = 2 'Send the message using the network (SMTP over the network).

Const cdoAnonymous = 0 'Do not authenticate
Const cdoBasic = 1 'basic (clear-text) authentication
Const cdoNTLM = 2 'NTLM

Set objMessage = CreateObject("CDO.Message")
objMessage.Subject = "Example CDO Message"
objMessage.From = """Me"" "
objMessage.To = "me@my.com"
objMessage.TextBody = "This is some sample message text.." & vbCRLF & "It was sent using SMTP authentication and SSL."

'==This section provides the configuration information for the remote SMTP server.

objMessage.Configuration.Fields.Item _
("http://schemas.microsoft.com/cdo/configuration/sendusing") = 2

'Name or IP of Remote SMTP Server
objMessage.Configuration.Fields.Item _
("http://schemas.microsoft.com/cdo/configuration/smtpserver") = "smtp.gmail.com"

'Type of authentication, NONE, Basic (Base64 encoded), NTLM
objMessage.Configuration.Fields.Item _
("http://schemas.microsoft.com/cdo/configuration/smtpauthenticate") = cdoBasic

'Your UserID on the SMTP server
objMessage.Configuration.Fields.Item _
("http://schemas.microsoft.com/cdo/configuration/sendusername") = "You@gmail.com"

'Your password on the SMTP server
objMessage.Configuration.Fields.Item _
("http://schemas.microsoft.com/cdo/configuration/sendpassword") = "YourPassword"

'Server port (typically 25)
objMessage.Configuration.Fields.Item _
("http://schemas.microsoft.com/cdo/configuration/smtpserverport") = 465

'Use SSL for the connection (False or True)
objMessage.Configuration.Fields.Item _
("http://schemas.microsoft.com/cdo/configuration/smtpusessl") = True

'Connection Timeout in seconds (the maximum time CDO will try to establish a connection to the SMTP server)
objMessage.Configuration.Fields.Item _
("http://schemas.microsoft.com/cdo/configuration/smtpconnectiontimeout") = 60

objMessage.Configuration.Fields.Update

'==End remote SMTP server configuration section==

objMessage.Send


REFERENCES
http://www.paulsadowski.com/wsh/cdo.htm