I blogged a while back about
delivering pages as PDF using PHP, and at the time DOMPDF seemed to be the best-of-breed package for converting HTML into PDF for the purposes of delivering PDF versions of web content.
However, I noted at the time that DOMPDF's last release was in July 2007, and it still doesn't look like being updated any time soon. The fundamental problem with packages like DOMPDF is that they tend to implement their own rendering engine. The thing is, HTML and CSS are both pretty huge now - writing a rendering engine that can cope with all the different combinations is a huge task, so projects like DOMPDF end up missing out important bits of functionality.
A better approach would be to use an existing rendering engine from a browser, and then build a binary around it that can take a website as input and produce a PDF as output. That way you can get results consistent with how browsers would print a page and if you pick the right engine you'll not have to keep up with any changes to HTML standards, the engine developers will do that for you.
This is essentially the approach
wkhtmltopdf takes: it extracts the open-sourced Webkit renderer used inside browsers like Safari and Chrome and bundles it up into a Linux CLI application which produces some pretty impressive results.
I thought I'd jump right in and start by compiling it on my Debian webserver. The wkhtmltopdf site has some instructions for building it on Ubuntu, which I thought were worth a try. The basic procedure was as follows:
#apt-get update
#apt-get install libqt4-dev qt4-dev-tools build-essential cmake

#svn checkout http://wkhtmltopdf.googlecode.com/svn/trunk/ wkhtmltopdf
#cd wkhtmltopdf
#cmake -D CMAKE_INSTALL_PREFIX=/usr .
#make
#sudo make install
In my case, this installed a terrifying amount of new packages to my server, but everything went very smoothly. I was left with a binary in /usr/bin and ploughed right in!
#wkhtmltopdf http://ciaranmcnulty.com /tmp/ciaranmcnulty.pdf
wkhtmltopdf: cannot connect to X server
Argh. The rendering engine depends on there being a GUI running on the machine so it can do cool things like generate graphics, render fonts and so forth. A typical webserver won't be running X, but luckily there are ways around it.
One such way is
xvfb, or the X Virtual Frame Buffer. This is a handy bit of code that basically runs an X instance but without a lot of the overheads. You can create a temporary X buffer and run a command in it using the xvfb-run binary, the benefit of which is that the x instance gets thrown away afterwards. I installed xvfb and then invoked it as follows:
#apt-get install vfb
#xvfb-run -a -s "-screen 0 640x480x16" wkhtmltopdf --dpi 200
  --page-size A4 http://ciaranmcnulty.com /tmp/ciaranmcnulty.pdf
The options should be fairly self-explanatory, the key things to note are that -a makes xvfb pick an unused display number (to avoid collisions) and -screen starts up the virtual framebuffer with a display with the correct bit depth and dimensions.
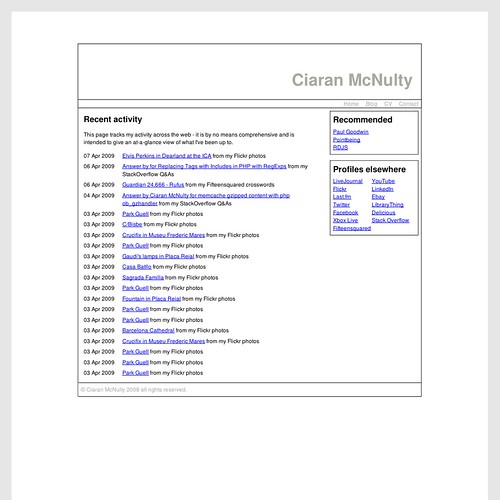
The results are fairly good, certainly better than PHPDOM would generate given the same input. My site layout uses a fair bit of floating and absolute positioning, and the PDF came out exactly as I'd expect:
It's important to note that this isn't a bitmap, the text in the PDF is still 'text'.
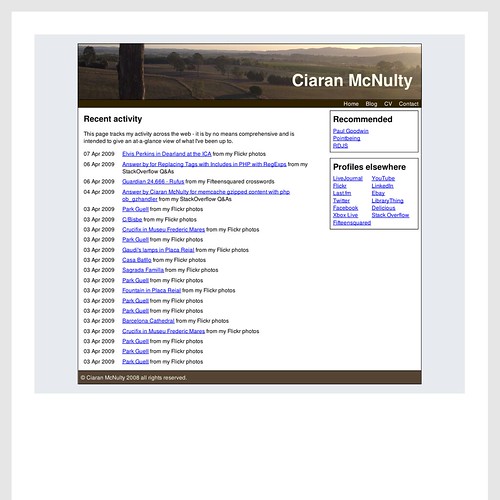
A quick dig around showed that to print the backgrounds I'd need to have Qt4.5 installed, something I wasn't really prepared to risk my server for. However, I thought I'd quickly try doing what I should have in the first place. The wkhtml project provides a linux binary that's statically compiled against Qt.
I downloaded this binary and gave it a whirl. The results were much better:
Frankly I think this is a great rendition of the page, and certainly good enough for an autogenerated PDF on a website. A bit of further investigation and experimentation has left me pretty impressed with the breadth of CSS print functionality webkit can support.
The next step for me is going to be to try and replace some of the DOMPDF installations in some of my smaller sites, and see how it performs under load. The time taken to generate a PDF is pretty high, and I've not really checked out how xvfb is with concurrency so I'd hesitate to throw it onto a production site straight away, but it'll be my first port of call next time I want to do something with a PDF.
=======================================================================
Use this to install:
In a
previous post I wrote about using wkhtmltopdf for html to pdf conversion with Ruby and Rails.
As can by typical with components, moving them to production you hope will be straight forward but is often not. Such was the case for me on getting wkthmltopdf working on my Ubuntu Server 10.04 server from my Mac Leopard dev environment.
The first question was how to install wkhtmltopdf on the server. Since **I had not been successful** installing it on my own on my Mac (I used the PdfKit ruby gem to install it), it was not clear if I would succeed here.
I ended up finding that there is a package for wkhtmltopdf for Ubuntu:
sudo apt-get install wkthmltopdf
This package did its work and it installed. It seemed too easy. And it was.
While wkhtmltopdf (v0.9.9) did install, I was soon getting the following and dreaded error:
Cannot connect to X server
The reason for this error is that the current incarnation of Web Kit requires a GUI. Hopefully this will change in the future.
After some research I found what looked like a solution:
Use Xvfb (‘X Virtual Frame Buffer’). Xvfb promised to create a lightweight, temporary situation that would trick wkhtmltopdf into running. Please excuse my un-technical and probably inaccurate description of what Xvfb does, but you get the point.
So I did:
sudo apt-get install xvfb
And in the terminal I now could run wkhtmltopdf and see an output:
xvfb-run -a -s "-screen 0 640x480x16" wkhtmltopdf path_html path_pdf
It worked also from my Rails app:
%x[xvfb-run -a -s "-screen 0 640x480x16" wkhtmltopdf #{path_html} #{path_pdf}]It worked great! At least until…. I discovered that those darned links in the converted document were not active. I could not find an answer for this, so kept googling. My sense was that this problem must have something to do with running wkhtmltopdf through xvfb.
I ended up being right, and the solution was to use a patched QT in lieu of xvfb.
So I decided to try installing the static binary of wkhtmltopdf as follows:
- Uninstall the wkhtmltopdf package:
apt-get remove wkhtmltopdf
- (in usr/local/bin)
sudo curl -C - -O http://wkhtmltopdf.googlecode.com/files/wkhtmltopdf-0.9.9-static-amd64.tar.bz2
- (in usr/local/bin)
sudo tar -xvjf wkhtmltopdf-0.9.9-static-amd64.tar.bz2
**I originally was trying to install the wrong wkhtmltopdf static binary for my machine.** I have 64bit Linux and it was not obvious to me that I should use the binary labelled ‘amd’. I thank Michael Schuerig on the Rails Google Group for his insight. So make sure you have the right one for your machine. Initially when I had the wrong binary installed, when I would run it from the terminal, it looked like it executed (no error), but with no output. Also thanks to Michael, I ran:
strace wkhtmltopdf #{path_html} #{path_pdf}
This showed me that a certain linux source file was missing and led to resolving the problem. In short, if one of the binaries does not work, try the other.
Once I got this installed everything worked, links were rendering and the client happy.
========================================================================
Issue Summary
I had some minor problems getting wkhtmltopdf running that might stump some people, so here are my instructions on getting it running on Ubuntu 10.04. These instructions perhaps should be added to INSTRUCTIONS.txt
1. Download wkhtmltopdf.
http://code.google.com/p/wkhtmltopdf/downloads/list
2. Extract it and move it to
/usr/bin/
3. Rename it to wkhtmltopdf so that now you have an executable at
/usr/bin/wkhtmltopdf
4. Set permissions:
sudo chmod a+x /usr/bin/wkhtmltopdf
4. Install required support packages.
sudo apt-get install openssl build-essential xorg libssl-dev
5. Check to see if it works: run
wkhtmltopdf http://www.google.com test.pdf. If it works, then you are done -- make sure to make a symbolic link as per INSTRUCTIONS.txt. If you get the error "Cannot connect to X server" then continue to number 6.
6. We need to run it headless on a 'virtual' x server. We will do this with a package called xvfb.
sudo apt-get install xvfb
7. We need to write a little shell script to wrap wkhtmltopdf in xvfb. Make a file called
wkhtmltopdf.sh and add the following:
xvfb-run -a -s "-screen 0 640x480x16" wkhtmltopdf $*
8. Move this shell script to
/usr/bin, and set permissions:
sudo chmod a+x /usr/bin/wkhtmltopdf.sh
9. Finally, make your symbolic link in
/sites/all/modules/print/lib. Command is
ln -s /usr/bin/wkhtmltopdf.sh wkhtmltopdf
REFERENCES
http://www.webupd8.org/2009/11/convert-html-to-pdf-linux.html
http://blog.structuralartistry.com/post/2327213260/installing-wkhtmltopdf-on-ubuntu-server
http://drupal.org/node/870058