Wednesday, September 22, 2010

To Do List After installing Ubuntu 10.04 aka Lucid Lynx

SkyHi @ Wednesday, September 22, 2010
It has become a tradition with my to do lists. This time, it’s for “Lucid Lynx”, the new Ubuntu release from Canonical. And yep it’s better than the previous version “Karmic Koala”. There have been some drastic changes in the UI and under the hood. Lucid Lynx, out of box, is faster, more social, cloud integrated…basically it feels like an operating system you would want to use today.  So without wasting any more word let’s get on with the list :)  :
1 – Expand the Software Repository List
First of all, lets make Ubuntu “see” more packages. Go to the terminal and edit your sources.list with :
sudo gedit /etc/apt/sources.list
Here is the content of my sources.list which I think is quite complete to have all the necessary applications you could ever need. So delete the whole content of your sources list and replace it with the content of mine
Save it. Now import the necessary repositories keys to avoid “aptitude” crying about some missing keys, go to the terminal and type:
sudo apt-key adv --recv-keys --keyserver keyserver.ubuntu.com DCF9F87B6DFBCBAE F9A2F76A9D1A0061 A040830F7FAC5991 2EBC26B60C5A2783
Get your system up to date with :
sudo aptitude update && sudo aptitude full-upgrade
Now all your programs will run on the last version.
2 – Anti-Virus
Windows equivalent : AVG AntiVirus, NAV, TrendMicro, F-Prot, Kaspersky, …
Ubuntu equivalent : ClamAV, Avast
ClamAV
sudo aptitude install clamav clamtk
Access it through System Tools → Virus Scanner .
Avast
wget http://files.avast.com/files/linux/avast4workstation_1.3.0-2_i386.deb && sudo dpkg -i avast4workstation_1.3.0-2_i386.deb
Access it through Accessories → avast! Antivirus .
3 – Essential tools for compiling from sources
sudo aptitude install build-essential checkinstall cdbs devscripts dh-make fakeroot libxml-parser-perl check avahi-daemon
4 – Java runtime environment
Java is a very important thing to install, now that many programs like Azureus need it to run. So type:
sudo aptitude install sun-java6-jre sun-java6-plugin equivs
6 – Multimedia
Windows equivalent : windows media player, real player, vlc, mplayer
Ubuntu equivalent : vlc, mplayer, helix player
To have Ubuntu playing all kinds of stuff, you need to install many codecs. So on the Terminal, type:
* Installing vlc and mplayer (plays almost everything):
sudo aptitude install vlc mplayer
* Common packs
sudo aptitude install non-free-codecs libxine1-ffmpeg gxine mencoder mpeg2dec vorbis-tools id3v2 mpg321 mpg123 libflac++6 ffmpeg libmp4v2-0 totem-mozilla icedax tagtool easytag id3tool lame nautilus-script-audio-convert libmad0 libjpeg-progs libmpcdec3 libquicktime1 flac faac faad sox ffmpeg2theora libmpeg2-4 uudeview flac libmpeg3-1 mpeg3-utils mpegdemux liba52-dev
* Gstreammer 0.10
sudo aptitude install gstreamer0.10-ffmpeg gstreamer0.10-fluendo-mp3 gstreamer0.10-gnonlin gstreamer0.10-pitfdll gstreamer0.10-sdl gstreamer0.10-plugins-bad-multiverse gstreamer0.10-schroedinger gstreamer0.10-plugins-ugly-multiverse totem-gstreamer
* More programs
sudo aptitude install gstreamer-dbus-media-service gstreamer-tools ubuntu-restricted-extras
* Enable dvd support
sudo aptitude install libdvdcss2 && sudo /usr/share/doc/libdvdread4/./install-css.sh
* Flash
sudo aptitude install gsfonts gsfonts-x11 flashplugin-nonfree
7. Tweak your eyecandy
Ubuntu 10.04 comes with compiz fusion effects OOTB but doesn’t offer a way to customize them.
In a terminal copy/paste this:
sudo aptitude install simple-ccsm
Now navigate to System → Preferences → Simple CompizConfig Settings Manager .
8 – Missing Windows software?? Run Windows softwares in Linux!!!
Run Windows Applications such as 7zip, Google Sketchup, AutoCAD, Dreamwaver, Flash MX, Fireworks MX, IE6, IE7, Safari, Itunes, Windows Media Player and many more…
Play Windows Games in Linux like Age Of Empires, Call Of Duty, Diablo, Fear, Fallout, Far Cry, Grand Theft Auto, Half Life, Halo, Hitman, Max Payne, Need For Speed, Prince Of Persia, Sim City Star Wars, The Simsworld of warcraft , Tomb Raider, Warcraft, World Of Warcraft, Counterstrike and many other can be played.
Install Playonlinux. It’s based on wine. Wine is a compatibility layer for running Windows programs in Linux.
sudo aptitude install wine playonlinux
9 – Clipboard Management
By Default in ubuntu when u copy something from an application and closes the application u will not be able to access it from the clipboard. And also when u copy severals text in serial u only have the last on available to you in the clipboard. To solve that install either of the following but Glipper is better because it supports plugins.
Glipper
sudo aptitude install glipper
Then right click ur panel → Add to Panel then drag Clipboard Manager to ur panel
Parcellite
sudo aptitude install parcellite
10 – Archiver/ Packing software
Windows equivalent : winrar, zip, 7zip
Ubuntu equivalent : tar, unrar, p7zip, arj, unace
It’s bad when you don’t have Internet on your computer/notebook, but you have to pack/unpack something but the file format isn’t recognized by the system. To prevent from this bad situation, you can install a bunch of packing software by typing this on the terminal:
sudo aptitude install unace rar unrar zip unzip p7zip-full p7zip-rar sharutils uudeview mpack lha arj cabextract file-roller
11 – Graphical web browser
Windows equivalent : Internet explorer, firefox, opera
Ubuntu equivalent : Firefox, opera, chromium
Opera
sudo aptitude install opera
Firefox (installed by default intrepid)
sudo aptitude install firefox
Chromium (open source equivalent of Google Chrome)
sudo aptitude install chromium-browser chromium-browser-l10n
12 – Download Manager
Windows equivalent : Free download manager
Ubuntu equivalent : Multiget
MultiGet is a http/ftp downloader with a nice GUI for linux desktop users. It can run on almost all desktops without any configuration. It has many powerful functions comparing to others.
sudo aptitude install multiget
Access it through Applications → Internet → MultiGet .
13 – Graphical Email client
Windows equivalent : Outlook
Ubuntu equivalent : Evolution, Thunderbird
Evolution (installed by default in lucid)
sudo aptitude install evolution
Access it through Applications → Internet → Evolution Mail .
Thunderbird
sudo aptitude install thunderbird
Access it through Applications → Internet → Mozilla Thunderbird Mail/News .
14 – Instant Messanging protocal clients
Windows equivalent : MSN messenger, Yahoo messenger, QQ, AIM, Gtalk, ICQ,IRC
Ubuntu equivalent : Empathy, Pidgin, emesene
Empathy IM Client (installed by default)
Add the related launchpad repository :
sudo add-apt-repository ppa:telepathy/ppa && sudo aptitude update
Then install it by running the following :
sudo aptitude install empathy telepathy-mission-control-5 telepathy-gabble telepathy-butterfly telepathy-haze telepathy-idle telepathy-salut telepathy-sofiasip libtelepathy-farsight0 python-tpfarsight galago-eds-feed python-galago python-galago-gtk msn-pecan
Access it through Applications → Internet → Empathy IM Client .
Pidgin
Pidgin is an easy to use and free chat client used by millions. Connect to AIM, MSN, Yahoo, and more chat networks all at once. Supported chat networks: AIM, Bonjour, Gadu-Gadu, Google Talk, Groupwise, ICQ, IRC, MSN, MySpaceIM, QQ, SILC, SIMPLE, Sametime, XMPP, Yahoo!, Zephyr
Add the launchpad repository :
sudo add-apt-repository ppa:pidgin-developers/ppa && sudo aptitude update
Then install it :
sudo aptitude install pidgin pidgin-data pidgin-lastfm pidgin-guifications msn-pecan pidgin-musictracker pidgin-plugin-pack pidgin-themes
Access it through Applications → Internet → Pidgin Internet Messenger .
Emesene only for MSN Messenger.
Add the launchpad repository :
sudo add-apt-repository ppa:bjfs/ppa && sudo aptitude update
Then install it :
sudo aptitude install emesene
Access it through Applications → Internet → Emesene .
15 – VOIP
Windows equivalent : skype
Ubuntu equivalent : skype
Skype
sudo aptitude install skype
Access it through Applications → Internet → Skype.
16 – Viewing PDF files
Windows equivalent : Adobe Reader
Ubuntu equivalent : Adobe Reader
Adobe Reader
sudo aptitude install acroread acroread-fonts
Access it through Applications → Office → Adobe Reader.
17– Adobe Air
wget http://airdownload.adobe.com/air/lin/download/latest/AdobeAIRInstaller.bin
chmod +x ./AdobeAIRInstaller.bin

sudo ./AdobeAIRInstaller.bin
Access it through Applications → Accessories → Adobe Air Application Installer.
18 – Music / MP3 / OGG Players
Windows equivalent : iTunes, Winamp
Ubuntu equivalent : Rhythmbox, Banshee, Amarok
Rhythmbox
sudo aptitude install rhythmbox
Access it through Applications → Sound & Video → Rhythmbox Music Player.
Banshee
sudo aptitude install banshee banshee-extension-ubuntuonemusicstore libappindicator0-cil banshee-extension-appindicator banshee-extension-lyrics banshee-extension-mirage
Access it through Applications → Sound & Video → Banshee Media Player.
Amarok
sudo aptitude install amarok amarok-common
Access it through Applications → Sound & Video → Amarok.
19– Hard Disk Partitions Manager
Windows equivalent : Symanted Partition Magic
Ubuntu equivalent : GParted
GParted
sudo aptitude install gparted ntfsprogs menu ntfs-config
Access it through System → Administration → Partition Editor.
20 – Vector Graphics Editor
Windows equivalent : Adobe Illustrator
Ubuntu equivalent : Inkscape
Inkscape
sudo aptitude install inkscape
Access it through Applications → Graphics → Inkscape Vector Graphics Editor.
21 – Image Editor
Windows equivalent : Adobe Photoshop, Paint.Net
Ubuntu equivalent : GIMP
GIMP
Add the launchpad repository :
sudo add-apt-repository ppa:matthaeus123/mrw-gimp-svn && sudo aptitude update
Then install it with the following command :
sudo aptitude install gimp gimp-data gimp-plugin-registry gimp-data-extras
Access it through Applications → Graphics → GIMP Image Editor.
PINTA
Add the launchpad repository :
sudo add-apt-repository ppa:moonlight-team/pinta && sudo aptitude update
Then install it with the following command :
sudo aptitude install pinta
Access it through Applications → Graphics → Pinta Image Editor.
22 – 3D Graphics Applications
Windows equivalent : 3D Studio MAX
Ubuntu equivalent : Blender
Blender
sudo aptitude install blender
Access it through Applications → Graphics → Blender (windowed).
23 – Simple Yet Advanced Text Editor
Windows equivalent : Notepad ++
Ubuntu equivalent : GEdit
GEdit
sudo aptitude install gedit gedit-plugins
Access it through Applications → Accessories → Text Editor.
24 – Office Applications
Windows equivalent : Microsoft Office
Ubuntu equivalent : OpenOffice
OpenOffice
sudo aptitude install openoffice.org
Access it through Applications → Office
25 – Microsoft Visio
Windows equivalent : Microsoft Visio
Ubuntu equivalent : Dia
Dia
sudo aptitude install dia
Access it through Applications → Graphics → Dia Diagram Editor
26 – Microsoft Project
Windows equivalent : Microsoft Project
Ubuntu equivalent : OpenProj
OpenProj
wget http://nchc.dl.sourceforge.net/sourceforge/openproj/openproj_1.4-2.deb && sudo dpkg -i openproj_1.4-2.deb
Access it through Applications → Office → OpenProj
27 – Development IDE
Windows equivalent : Dreamweaver
Ubuntu equivalent : Quanta, Kompozer, NetBeans
Quanta
sudo aptitude install quanta
Access it through Applications → Programming → Quanta Plus
Komposer
sudo aptitude install kompozer nvu
Access it through Applications → Internet → Kompozer
NetBeans
sudo aptitude install netbeans
Access it through Applications → Programming → NetBeans IDE
28 – Source Control Management
Windows equivalent : TortoiseSVN
Ubuntu equivalent : RabbitVCS
RabbitVCS
Add the launchpad repository :
sudo add-apt-repository ppa:rabbitvcs/ppa && sudo aptitude update
Then install it :
sudo aptitude install rabbitvcs-nautilus
killall nautilus
Right Click on any folder or file and access the RabbitVCS submenu
29 – Graphical FTP clients
Windows equivalent : CuteFTP, SmartFTP
Ubuntu equivalent : FileZilla
FileZilla
This is great FTP program, very complete, in my opinion, the best one for linux.
On the terminal type:
sudo aptitude install filezilla filezilla-common
Access it through Applications → Internet → FileZilla FTP Client.
30 – P2P Clients / Servers, File Sharing
Windows equivalent : utorrent, azureus, emule
Ubuntu equivalent : Deluge, azureus, amule
Bittorent clients
Deluge (written in python)
Add the launchpad repository :
sudo add-apt-repository ppa:deluge-team/ppa && sudo aptitude update
Then install it :
sudo aptitude install deluge-torrent
Access it through Applications → Internet → Deluge Torrent.
Azureus: Uses Java to run, very complete but a bit heavy
sudo aptitude install azureus
Access it through Applications → Internet → Azureus.
Emule Donkey Clients
Amule
Add the launchpad repository :
sudo add-apt-repository ppa:happyaron/amule-dlp && sudo aptitude update
Then install it with the following command :
sudo aptitude install amule-dlp amule-dlp-gnome-support amule-dlp-utils-gui amule-dlp-daemon
Access it through Applications → Internet → aMule.
31 – Programs for CD burning with GUI
Windows equivalent : Nero, Roxio Easy CD Creator
Ubuntu equivalent : K3b, Brasero
K3b
Nero is available for linux,but its not free.A trial is available for 1 month usage and later it asks or activation code.But K3B is as good as Nero.Have a good feature set as Nero.
sudo aptitude install k3b k3b-data libk3b6
Access it through Applications → Sound & Video → K3B.
Brasero (installed by default in Lucid)
sudo aptitude install brasero
Access it through Applications → Sound & Video → Brasero Disc Burning .
32 – Mountings ISO files
Windows equivalent : Alcohol
Ubuntu equivalent : acetoneiso
Acetoneiso
The best one for linux ACETONEISO, which is similar to ALCOHOL in windows
its supports almost all formats. AcetoneISO is CD/DVD image manipulator for Linux.Using this tool it is very easy to Mount and Unmount ISO,MDF,NRG Images . I dont think its available in ubuntu repository.
sudo aptitude install libksba8 libenca0 libtwolame0 fuseiso kommander p7zip-full gnupg-agent gnupg2 pinentry-qt mencoder cdrdao && wget http://darkstar.ist.utl.pt/getdeb/ubuntu/jaunty/ac/acetoneiso_2.1.1-1~getdeb1_i386.deb && sudo dpkg -i acetoneiso_2.1.1-1~getdeb1_i386.deb
33 – Install Vista like gadgets.
Windows equivalent : Vista Sidebar
Ubuntu equivalent : google-gadgets
Google gadgets
sudo aptitude install google-gadgets-gtk
This will complete the installation.
Now press Alt+F2, and type “ggl-gtk” to start them. You should see a small icon show up in your system tray, and a sidebar. Right click on any of them and select ‘Add Gadgets’ to show a menu. If you’d like to have Google Gadgets start automatically, go to System – Preferences – Session, click ‘Add’, paste ‘Google Gadgets’ for the name and ‘ggl-gtk’ for the command. Click OK and Close, and you’re good to go.
34 – Google Desktop
Google Desktop allows one to full text search of a user’s e-mail, computer files, music, photos, chat, and Web pages viewed,OpenOffice documents , PDF files and more .
Now similar tools already existed on Linux like beagle (supported by novell ) , meta tracker etc . However Google Desktop search is not based on any of these tools and uses its proprietary algorithms to search for files on the computer ,also being 1.0 release and more stable then these products it could be preferred over tools like beagle .
To install Google Desktop Search type the following command in the terminal window : -
sudo aptitude install google-desktop-linux
Access it through Applications → Google Desktop → Google Desktop
Now after choosing appropriate option through Applications → Google Desktop → Google Desktop Preferences, you would find Google Desktop icon in the bar at the top of the screen , now it would automatically scan and index files on computer and store it in local database which could be searched using web browser .
35 – Photo Management
Google Picasa
Google Picasa is an extremely professional good looking photo management application available on Windows ,Linux and Mac OS. Now Google Picasa has a number of features that many photo management software on Linux dont have further Google Picasa looks very user friendly as compared to similar open source application available on linux . Now Google Picasa for Linux is not a native linux application but runs on Linux thru application layer called wine which allows many windows application to run flawlessly on Linux.
Now to install Google – Picasa type the following command in the terminal window
wget http://dl.google.com/linux/deb/pool/non-free/p/picasa/picasa_3.0-current_i386.deb && sudo dpkg -i picasa_3.0-current_i386.deb
Access it through Applications → Graphics → Picasa → Picasa
36 – Map Viewing and Management
Google Earth
To install Google Earth type the following command in the Terminal Window.
sudo aptitude install googleearth
After downloading is over you will get a screen like this press ¨Yes¨ to accept the license agreement and complete software installation.
Now you can launch Google Earth from Application → Internet → Google Earth
37 – Gmail Notification
Checkgmail
If you would like to get notified when you have a new mail in your google mail account, checkgmail is for you. To install Checkgmail type the following command in the Terminal Window.
sudo aptitude install checkgmail
Now you can launch it from Application → Internet → CheckGmail
38 – Configure Firewall
If you are concern about your security, then it is pertinent that you activate the firewall and prevent any unauthorized access to your computer.
UFW is installed by default, but if you need a graphical interface, install GUFW.
sudo aptitude install gufw
39– Gnome Do
Gnome Do is a small application that allows you to search and do things faster and more efficiently in your Ubuntu machine. It is similar to QuickSilver in Mac and Launchy in Windows. For those who have not tried Gnome Do before, it might take some time for you to get used to it. But once you’re hooked to it, there will be no turning back for you.Gnome Do also comes with a dock interface that you can use it like any other docks.
sudo aptitude install gnome-do
Now you can launch it from Application → Accessories → Gnome Do
40 – Ubuntu Tweak
Ubuntu Tweak allows you to tweak your system settings, all in one place. You can install new applications, customize your desktop settings, configure your startup applications, changing the system filetype association and many more tweaks in this single application.
Add the launchpad repository :
sudo add-apt-repository ppa:ubuntu-tweak-testing/ppa && sudo aptitude update
Then install it with the following command :
sudo aptitude install ubuntu-tweak
Then access it through Applications → System Tools → Ubuntu Tweak
App Runner
App Runner is a small open source utility that makes it very easy to run any type of program/executable/script on any distro/OS that uses the nautilus file manager: Debian/Ubuntu/Super OS/Fedora/etc
wget http://hacktolive.org/files/app_runner/App_Runner_0.2.deb && sudo dpkg -i App_Runner_0.2.deb
Then right-click the file -> Scripts -> Run This App or Run This App (root)


REFERENCES
http://theindexer.wordpress.com/2010/03/21/to-do-list-after-installing-ubuntu-10-04-aka-lucid-lynx/

multimeter current voltage resistance

SkyHi @ Wednesday, September 22, 2010
 What is voltage?
So what is voltage anyhow? Well, its a pretty abstract term but a lot of people like to use the term "potential energy" which is that thing you heard about in high school physics and then forgot immediately.
Some people like to draw an analogy to water to describe voltage. A water pump is like a voltage supply (also known as a battery).
The pump pushes water through a hydraulic system, and the voltage supply pushes electrons through an electronic system.
The higher the rated pressure of the pump, the more 'work' the water can do.
Likewise, the higher the voltage the more 'work' (Watts) the electrons can do.
Voltage is used to provide power (via a battery or wall plug) and its also used as a way of transmitting data. For example, music is recorded from a microphone as an analog voltage signal, if that voltage waveform is applied to a speaker the voltage performs the work of making air move and produces sound.
Voltage is also used to in digital circuits to talk back and forth in binary, usually 5V or 3.3V is a "1" and 0V is a "0", by alternating the 1's and 0's millions of times a second, data can be moved around rather quickly.
AC/DC
Not just an 80's hair metal band! Voltage comes in two flavors (yum): Alternating Current (AC) and Direct Current (DC). Here is a quick tour of the differences.
Direct current voltage is what comes out of batteries. The battery is at 9V, and it pretty much keeps that voltage constant, until it dies. The chemical reactions inside the battery creates DC voltage.
Electronic circuits really like DC voltage.
Alternating current voltage is what comes out of the wall. The generator at the US power plant creates a voltage that oscillates, going from -120V to 0 to +120V to 0 again, 60 times a second. At the European power plant its -240V to +240V at 50 times a second. (Note that those voltages are 'RMS' - Root Mean Square - which means that the peak voltage is actually about 1.4x higher, but since multimeters show RMS voltages, its easier to just use those)
AC voltage is great for power plants because its easy to transform AC voltages (using a transformer) up to 50KV for long distance travel and then down to 240V or 120V to safely power your home. Those big honking grey things that you see next to buildings that hum are the huge transformers.
Motors (like your washing machine and refrigerator compressor pump) like running off of AC voltage.
You can turn AC voltage into DC voltage very easily by using a very small transformer to bring the 120V down to a reasonable level like say 16VAC and rectifier. This is basically what's inside a wall wart plug or your laptop power supply.
Its much harder to turn DC into AC, you will need an inverter which are more expensive than transformers/rectifiers.
Batteries only supply DC voltage and wall plugs only supply AC voltage. However, it is totally possible to have both AC and DC voltage at a certain point:
If an AC voltage is oscillating between -60V and +60V it has 120V AC and 0V DC because the average voltage of -60V and +60V is 0V.
If an AC voltage is oscilating between 0V and 120V then it has 120V AC and 60V DC because the average voltage of 0V and 120V is 60V.
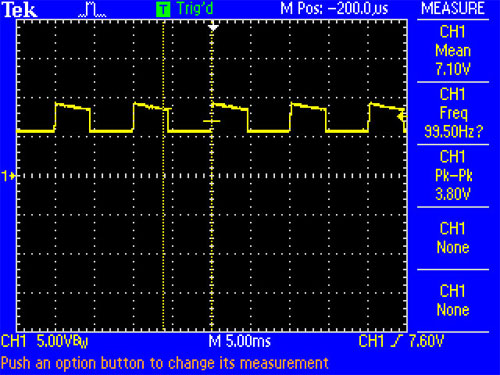
In the above oscilloscope image, the dashed horizontal line in the center is ground (0V) and each dashed division is 5V. The scope is displaying a signal that has both AC and DC components. There is an alternating voltage (a square wave) that is about 4V high at about 100Hz and a DC (mean average) voltage that is around 7V. Use the dashed divisions to verify for yourself that this is so.
What is voltage testing good for?
Voltage testing is very common, you'll use it a lot
  • Test if your power supply is working, are you getting 5V out of that 7805 regulator?
  • Verify that your circuit is getting enough power: when all of the blinky lights are on, is the power supply drooping too low?
  • Verify signals to and from chips to make sure they are what you expect once the circuit is up and running
  • Testing batteries, solar cells, wall plugs, and power outlets (carefully!)
  • With a current sense resistor you can perform current testing on a project without possibly damaging your meter.
Remember!
You can only test voltage when the ciruit is powered If there is no voltage coming in (power supply) then there will be no voltage in the circuit to test! It must be plugged in (even if it doesn't seem to be working)
Voltage is always measured between two points There is no way to measure voltage with only one probe, it is like trying to check continuity with only one probe. You must have two probes in the circuit. If you are told to test at a point or read the voltage at this or that location what it really means is that you should put the negative (reference, ground, black) probe at ground (which you must determine by a schematic or somewhere else in the instructions) and the positive (red) probe at the point you would like to measure.
If you're getting odd readings, use a reference voltage (even a 9V battery is a reasonable one) to check your voltage readings. Old meter batteries and wonky meters are the bane of your existence but they will eventually strike! Good places to take reference voltages are regulated wall plugs such as those for cell phones. Two meters might also be good :)
Voltage is directional If you measure a battery with the red/positive probe on the black/negative contact and the black probe on the positive contact you will read a negative voltage. If you are reading a negative voltage in your ciruit and you're nearly positive (ha!) that this cannot be, then make sure you are putting the black probe on the reference voltage (usually ground)
DC voltage and AC voltage are very different Make sure you are testing the right kind of voltage. This may require pressing a mode button or changing the dial.
Unless otherwise indicated, assume DC voltages

Multimeters have different input impedences that affect readings of high impedence circuits For example, measuring a sensor that has 1Mohm impedence with a 1Mohm impedence meter will give you only half the correct reading
Get into the right mode
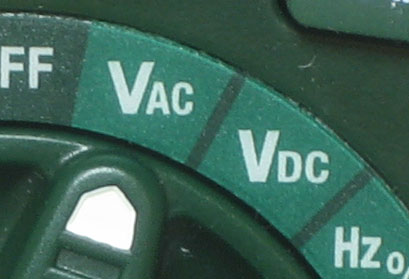
There are often two seperate modes for AC and DC voltage. Both will have a V but one will have two lines, one dashed and one solid (DC) and one with have a wave next to it (AC).
This meter has the double line for DC voltage, and 5 ranges, from 200mV to 600V. The lightning bolt symbol is a gentle reminder that this voltage is extremely dangerous.
There is also the V-wave symbol for AC, and two ranges since most AC voltages that are measured are power voltages and are pretty big. (For small AC waveforms, a scope is best since you will be able to see the waveform itself)
This autoranging meter makes it pretty clear which mode you want to be in
This ranged meter has 5 ranges, the top range is 750 VAC or 1000 VDC, to switch between DC and AC you need to press the DC/AC button on the upper right.
When the probes are not connected to anything, they should display 0V. They might flicker a bit if they pick up ambient voltage (your home is a big radiator of 60Hz voltage which can couple into your meter probes).
Example 1: Testing batteries
Testing batteries is a super useful skill and is one of the best ways to practice with your multimeter
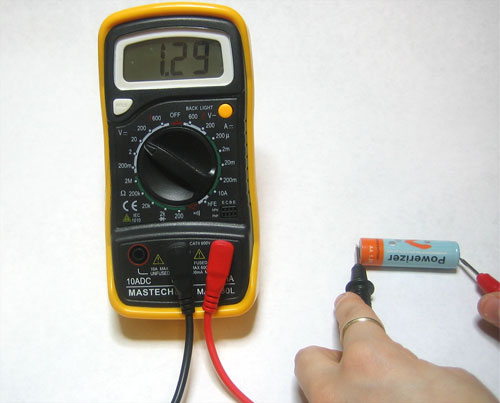
The first battery we'll test is a new 1.5V alkaline. This one is a AAA but a AA, C or D cell will be the same voltage. Set the range to 2V DC .
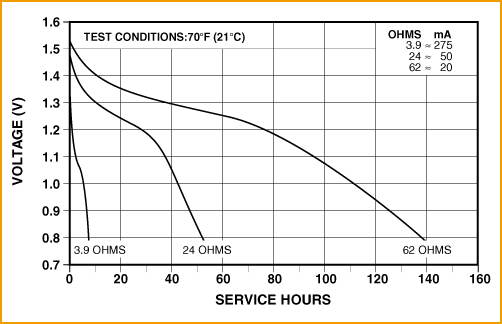
We read 1.588V, which you may think is a mistake, after all its a 1.5V battery so shouldn't it be 1.5V? Not quite, the 1.5V written on the side is just a nominal voltage, or the "average" you may expect from the battery.In reality, an alkaline battery starts out higher, and then slowly drifts down to 1.3V and then finally to 1.0V and even lower. Check out this graph from Duracell's page about alkaline battery voltage
Using this graph you can easy tell how fresh your battery is and how long you can expect it to last.
Next, we measure a 9V alkaline battery. If we still have the range set to 2VDC we will get a mysterious "1. " display, indicating is it over-range.
Fix the range so that it's 20V, and try again.
For this new battery we get 9.6V. Remember that battery voltage is nominal, which means that the "9V" is just the average voltage of the battery. In reality, it starts out as high as 9.5V and then drops down to 9 and then slowly drifts to 7V. You can check out the discharge curve in the Duracell 9V datasheet
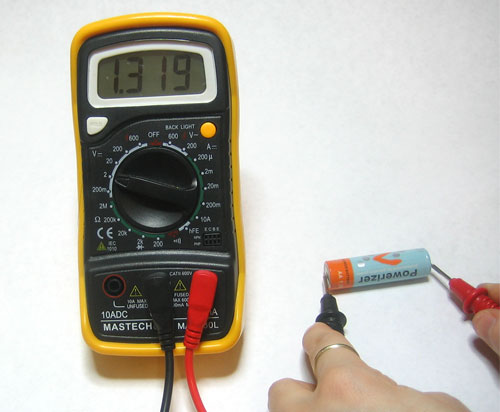
If we want to check a rechargeable AA battery, and it's set to a 20VDC range, we will read 1.3V, which is about what a fully charged NiMH battery will measure.

If we fix the range so it's 2VDC, we can get an extra digit of precision. This meter probably isnt more than 0.5% accurate so the precision may not mean much.

Finally, I test a lithium 3V coin cell, its at 2.7V which means it's getting near the end of it's life.
Example 2: Testing wall wart (adapter) plugs
Testing wall adapters is also very handy, especially when you build your own circuits.
The first kind we will test is a transformer-based adapter.

This photo has notes. Move your mouse over the photo to see them.
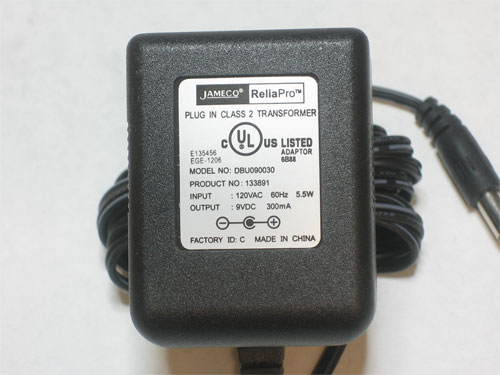
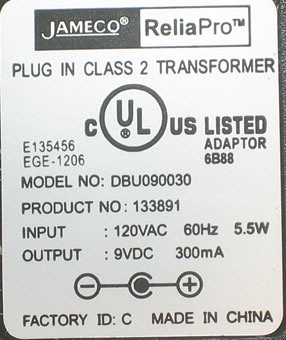
Note that the label says Transformer, its also blocky and heavy which indicates a transformer as well. It requires 120VAC input, US power only. The nominal output is 9VDC at 300mA. The polarity symbol shows that the middle is positive, the outside is negative, thus we place the ground (black) probe on the outside and the positive (red) probe on the inside.
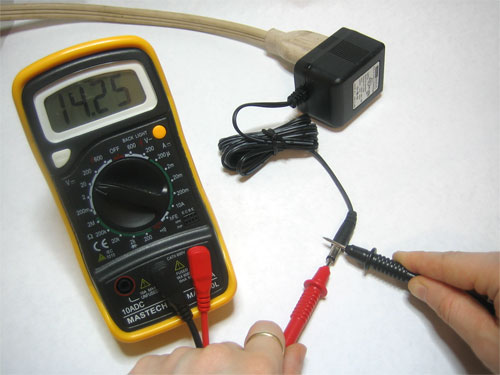
Yow! 14V? That's not anything like the 9V on the package, is this a broken wall wart? Turns out, its totally normal. Transformer-based wall adaptors are (almost always) unregulated, which means that the output is not guaranteed to be a particular value, only that it will be at least what is printed on the box. For example, with this adapter it means that when drawing 300mA, the voltage is guaranteed to be higher than 9V.
Since the output is unregulated, the voltage supplied will droop as more current is pulled from it, which means that open-circuit (connected to nothing) the measured output can be as high as 14V. Glitchbuster has a long page that describes this.
Next, lets check out a Switch-mode adapter
Notice that it's not square, its much thinner and although you cant feel it, its quite light for its size: There is no big honking transformer inside!

This photo has notes. Move your mouse over the photo to see them.

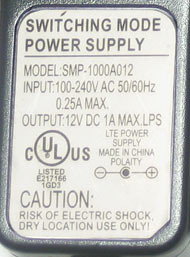
Note that it says Switching (not Transformer) on the label, and you can input US or European power. Like the transformer adapter, it is center-positive polarity.

Switch-mode wall adapters are regulated which means that the output doesn't droop from open-circuit to full load. Its not an ultra-high quality supply, the voltage is 12.2V which is less than 5% error. Still, its much better than the transformer's 50% error!
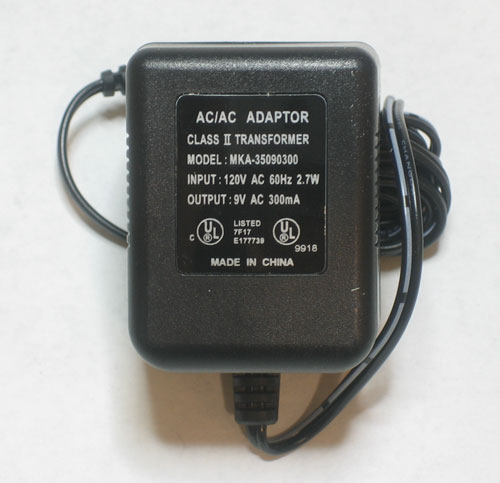
Lastly, we'll test a 9VAC adaptor, which outputs AC voltage instead of DC. Basically this means that there's still a transformer inside, but no rectifier. This is also an unregulated supply
Note that is is similar to the transformer-based DC supply we checked out first

This photo has notes. Move your mouse over the photo to see them.

Note again that the label says transformer. It requires 120VAC input, US power only. The nominal output is 9VAC at 300mA. The output is indicated twice, once at the top "AC/AC" and then again in the output designator "9V AC"
There is no polarity because AC adaptors are not polarized: AC power oscillates between positive and negative voltages.
We test the output, but get 0V! That's when we remember that the multimeter has to be in AC voltage mode.
Switching over to AC, we get a good reading, 10.5VAC. This is an unregulated supply so again we are going to get a voltage higher than 9V.

Example 3: Testing Wall output
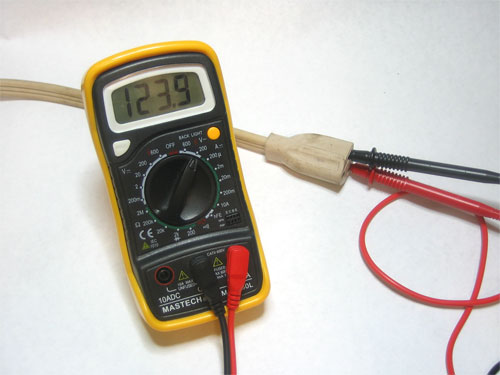
This is the 'easiest' test, just shove the two probes into a wall socket. If you're clumsy and think you'll somehow electrocute yourself, don't do this. Many people freak out about this test, but ironically it's what the multimeter was designed to do.
About 120V, as expected
Bonus Example: Testing a circuit with AC and DC
If you're trying to measure something that is just DC or just AC its very easy, just get into the right mode and measure away! The hardest thing to do is measure a circuit with both AC and DC voltages.
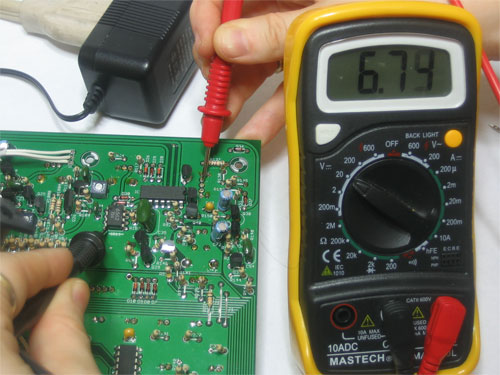
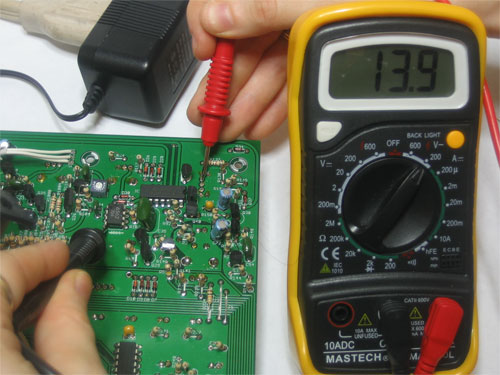
For example, here is a few attempts to measure the VCO output of a x0xb0x as seen in the oscilloscope output shown here (its the same one from above
The DC portion is the easy part to measure, most multimeters just average out the input measurement
We read 6.75V DC, which is about right.
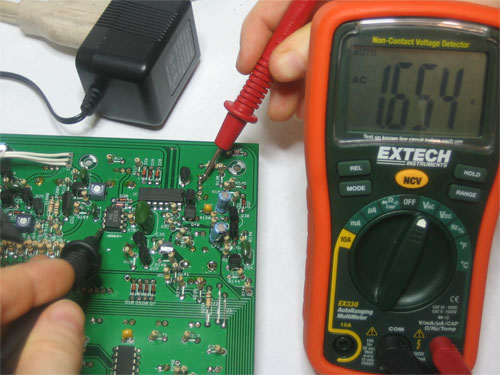
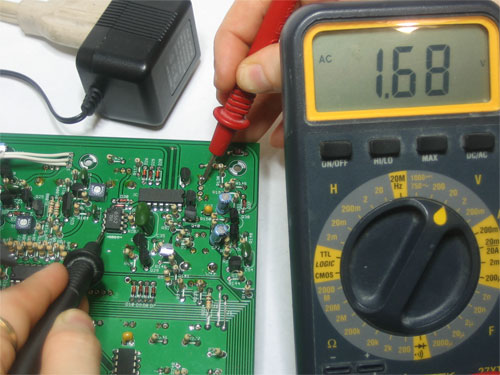
However, when trying to measure AC, this multimeter gives us a seemingly random number. (Maybe the DC voltage * 2 ?)
The Extech meter reads 1.65V
The Wavetek does the same
The lesson? You can't depend on your multimeter to measure AC voltages when there is a DC component!

REFERENCES


http://www.ladyada.net/learn/multimeter/voltage.html

http://www.youtube.com/watch?v=KzjMIcER4EU


http://www.multimeterwarehouse.com/usingamultimeter.htm

How to install OpenVZ and Vtonf control panel in centos

SkyHi @ Wednesday, September 22, 2010
OpenVZ is an operating system-level virtualization technology based on the Linux kernel and operating system. OpenVZ allows a physical server to run multiple isolated operating systemopenvz instances, known as containers, Virtual Private Servers (VPSs), or Virtual Environments (VEs). It is similar to FreeBSD Jails and Solaris Zones.
As compared to virtual machines such as VMware and paravirtualization technologies like Xen, OpenVZ is limited in that it requires both the host and guest OS to be Linux (although Linux distributions can be different in different containers). However, OpenVZ claims a performance advantage; according to its website, there is only a 1–3% performance penalty for OpenVZ
as compared to using a standalone server. One independent performance evaluation confirms this. Another shows more significant performance penaltie s  depending on the metric used.
In this tutorial will show you how to install OpenVZ in CentOS and how to install Vtonf, another web interface for OpenVZ

I- Install OpenVZ:

1-First add openVZ repository to Centos:
Open terminal and copy the commands:
wget http://download.openvz.org/openvz.reporpm --import http://download.openvz.org/RPM-GPG-Key-OpenVZ
cp openvz.repo /etc.recpo.d 

2-Install  openvz  kernel:


yum install ovzkernel

3- edit the /etc/systcl.conf

Open /etc/systcl.conf  and add these lines:
net.ipv4.ip_forward = 1
net.ipv4.conf.default.proxy_arp = 0
net.ipv4.conf.all.rp_filter = 1
kernel.sysrq = 1
net.ipv4.conf.default.send_redirects = 1
net.ipv4.conf.all.send_redirects = 0 

4- Disable Selinux

To disable Selinux, first open the config file
vi  /etc/selinux/config  
Then look for the line bellow and make sure that is disabled
SELINUX=disabled

5- Install openvz tools and plugins
yum install vzctl vzquota

6- Restart openv Services:
service vz restart

II - Create Virtual OS /Containers

we have Openvz installed. Now is time to create a Virtual os /containers, for that we need to download an OS template.
An OS template cache is an OS template installed into a container and then packed into a gzipped tarball. Using such a cache, a new container can be created in a matter of minutes, if not seconds.
In the example bellow we used Slackware template, for other templates please visit this link.
First cd the cache folder
cd   /vz/template/cache 

and download the template :

[root@localhost cache]# wget  http://download.openvz.org/template/precreated/contrib/slackware-13.0-i386-minimal.tar.gz
--2010-06-27 16:55:33--  http://download.openvz.org/template/precreated/contrib/slackware-13.0-i386-minimal.tar.gz
Resolving download.openvz.org... 64.131.90.11
Connecting to download.openvz.org|64.131.90.11|:80... connected.
HTTP request sent, awaiting response... 200 OK
Length: 39641862 (38M) [application/x-gzip]
Saving to: `slackware-13.0-i386-minimal.tar.gz'

100%[===============================================================>] 39,641,862  4.48M/s   in 14s     

2010-06-27 16:55:47 (2.71 MB/s) - `slackware-13.0-i386-minimal.tar.gz' saved [39641862/39641862]


  • Lets create the VPS 102 now

vzctl  create     102    --ostemplate    slackware-13.0-i386-minimal     --config   basic 
Output:
Creating container private area (slackware-13.0-i386-minimal)
Performing postcreate actions
Container private area was created


  • Make this VM(virtual machine start on boot)

[root@localhost cache]# vzctl set 102  --onboot yes --saveSaved parameters for CT 102make  a  Hostname  for  The  machien:vzctl set 102 --hostname  Hackers.example.com --saveGive  Ip  adress   192.168.0.130  to  the  machine:
[root@localhost cache]#  vzctl set 102 --ipadd 192.168.0.130  --saveSaved parameters for CT 102
[root@localhost cache]#
  • Now start the VM machine 102
  vzctl start
Output
102 Starting container ...Container is mountedAdding IP address(es): 192.168.0.130Setting CPU units: 1000Set hostname: Hackers.example.comContainer start in progress...
  • Make a root password for the machine:
  vzctl exec 102 passwd 
Output:
New password: Zz123456
Re-enter new password: Zz123456
Changing password for root
Enter the new password (minimum of 5, maximum of 127 characters)Please use a combination of upper and lower case letters and numbers.Password changed


  • Enter The slackware machine 102
  vzctl enter  102 
Output:
entered into CT 102
root@Hackers:/# cat /etc/slackware-version
Slackware 13.0.0.0.0
Stop of start or Exit
More commands :
To restart  use : vzctl restart To stop  use :   vzctl stop
to destroy the   vm machine user  : vzctl destro 102
For more commands use :vzctl -help

III- Install Vtonf a web interface manager for OpenVZ

VTONF is a Virtual private server (VPS) control panel. It is designed to perform VPS operations in a GNU/Linux server having OpenVZ virtualization technology. VTONF is a Free software distributed under GPL license.
  • Install  Vtonf :
Open terminal and type the commands bellow ( Don`t forget to change the version of vtonf  vtonfinstaller.x.x-beta1.tar.gz to the current version you are trying to install)
cd /tmp
 wget  http://mesh.dl.sourceforge.net/sourceforge/vtonf/vtonfinstaller.x.x-beta1.tar.gz
 tar xvfz vtonfinstaller.1.0-beta1.tar.gz
 cd vtonfinstaller.x.x-beta1
 ./install
When Vtonf control panel installation is completed, you can login to the control panel using the following informations:
http://192.168.0.109:8001/
 Login Name : admin
 Password : admin


REFERENCES
http://www.unixmen.com/linux-tutorials/1024-how-to-install-openvz-and-vtonf-control-panel-in-centos-

Macbuntu -A Mac OS X Transformation Pack for Ubuntu

SkyHi @ Wednesday, September 22, 2010
Macbuntu - Mac OS X Transformation Pack. Similar to Mac4Lin but dedicated to Ubuntu Linux. It can also be used in other OS based on Debian/GTK. Package includes all necessary system components to mimic Mac OS X appearance on Ubuntu Linux.


01-mcbuntu      2-mcubuntu

Important:
- Script significantly changes the desktop.
- Not compatible with Ubuntu Netbook Edition

Installation :


Open a terminal and type the following commands:
$wget https://downloads.sourceforge.net/project/macbuntu/macbuntu-10.04/v2.0/Macbuntu-10.04.tar.gz -O /tmp/Macbuntu-10.04.tar.gz
$tar xzvf /tmp/Macbuntu-10.04.tar.gz -C /tmp
$cd /tmp/Macbuntu-10.04/ $ ./install.sh


REFERENCES
http://www.unixmen.com/linux-distributions/4-ubuntu/1119-macbuntu-a-mac-os-x-transformation-pack-for-ubuntu