Thursday, February 17, 2011

how to kill defunct or zombie process

SkyHi @ Thursday, February 17, 2011
A “defunct” processes is also known as a “zombie” processes. A Zombie process is referred as dead process which is receding on your system thought its completed executing. In one shot we can say its a dead processes. This process will be in your process table and consuming your memory. Having more defunct process will consume your memory which intern slows your system. We have to kill the defunct process in order to free RAM and make system stable.
Why defunct process are created?Ans : When ever a process ends all the memory used by that process are cleared and assigned to new process but due to programming errors/bugs some processes are still left in process table. These are created when there is no proper communication between parent process and child process.
Some FAQ?
1. How to find a defunct process?
And : Grep defunct value in ps -ef output
#ps -ef grep defunct 

2. How can i kill a defunct process?And : Just use kill command#kill defunct-pid
 
3. Still not able to kill?

Ans : Then use kill -9 to force kill that process 
#kill -9 defunct-pid
 
4. Still have an issue in killing it?

Ans : Then try to kill its parent id and then defunct. 
#kill parent-id-of-defunct-pid
Then

#kill -9 parent-id-of-defunct-pid
 
5. Still having defunct?

Ans : If you still find defunct process eating up RAM then last and final solution is to reboot your machine.

6.What is orphan process?
Ans : An orphan process is said to be a process which runs though parent process is terminated, these process do not know what to do and when to terminate.

7. What is difference between orphan and defunct processes?Ans : A defunct process is a dead process where there is no execution happening where as orphan process is a live process which is still in execution state but don’t have parent process
I am having a system which daily creates defunct process, I cannot sit and kill these process on daily basis.

How to get rid of this problem?Ans : Just write a shell script to grep defunct process and kill them by putting this script in corntab.

Kill all process:

  1. #ps ax -o user,pid |grep 'postfix' |awk '{print $2}' |xargs -l  
  2. #ps ax -o user,pid |grep 'postfix' |awk '{print $2}' |xargs -r kill -9  
  3. #killall -9 PROCESS 


REFERENCES
http://www.linuxnix.com/2010/05/how-to-kill-defunct-or-zombie-process.html 

nmap Operating system detection

SkyHi @ Thursday, February 17, 2011
Hacker Fyodor (Gordon Lynn) wrote nmap to assist in port scanning and network analysis. He published the original source code in Phrack Magazine, Volume 7, Issue 51, Article 11, and now maintains the tool at Insecure.org. Security experts all over the world use nmap for simple network checks, detecting open ports and service versions; the NSA keeps a list of security tools and current versions—including nmap, Snort, and Nessus—up on the big board.
nmap does not only detect open ports; it detects services and operating system versions as well. You can use nmap to scan a default range of ports, or a specific subset; it can scan a single host, a range, or a set; and it can find out if hosts are up or down. nmap can become a powerful tool in the hands of a skilled user, for good or for evil.
The nmap network scanning tool supplies a diverse set of options to control its behavior. It can scan multiple hosts and host ranges; utilize various scanning techniques; identify operating systems and service versions; and even perform stealth scanning to avoid triggering certain IDS and IPS utilities.

Contents

[edit] Basic use

First, let's cover some basic use of nmap. You should at the very least know how to scan hosts and check for specific ports; these fundamentals will show you what's open on the target network.

[edit] Scanning hosts

Basic use of nmap just involves scanning a target IP address or domain name. For example:
bluefox@ice-ldap:~$ nmap webserv1

Starting Nmap 4.10 ( http://www.insecure.org/nmap/ ) at 2007-04-01 15:52 EDT
Interesting ports on webserv1 (192.168.30.11):
Not shown: 1644 closed ports, 28 filtered ports
PORT     STATE SERVICE
21/tcp   open  ftp
22/tcp   open  ssh
80/tcp   open  http
111/tcp  open  rpcbind
199/tcp  open  smux
443/tcp  open  https
1008/tcp open  ufsd

Nmap finished: 1 IP address (1 host up) scanned in 15.142 seconds
In this mode of operation, nmap shows the open ports and the common service carried on that port. nmap will not show services moved to other ports accurately; http on port 21 will read as ftp, for example.
You can specify multiple hosts on nmap's command line as well:
bluefox@ice-ldap:~$ nmap dbserv1 webserv1

Starting Nmap 4.10 ( http://www.insecure.org/nmap/ ) at 2007-04-01 15:56 EDT
Interesting ports on 192.168.40.11:
Not shown: 1667 closed ports
PORT     STATE    SERVICE
22/tcp   open     ssh
135/tcp  filtered msrpc
136/tcp  filtered profile
137/tcp  filtered netbios-ns
138/tcp  filtered netbios-dgm
139/tcp  filtered netbios-ssn
199/tcp  open     smux
445/tcp  filtered microsoft-ds
1720/tcp filtered H.323/Q.931
3306/tcp open     mysql
3389/tcp filtered ms-term-serv
5631/tcp filtered pcanywheredata

Interesting ports on webserv1 (192.168.30.11):
Not shown: 1644 closed ports, 28 filtered ports
PORT     STATE SERVICE
21/tcp   open  ftp
22/tcp   open  ssh
80/tcp   open  http
111/tcp  open  rpcbind
199/tcp  open  smux
443/tcp  open  https
1008/tcp open  ufsd

Nmap finished: 2 IP addresses (2 hosts up) scanned in 17.001 seconds
As you can see, my Web server exposes too many ports and my MySQL server has a weak firewall; I ran this scan from a DMZ, which has to go through the firewall to enter my network. Here we can see the power of nmap: I know I should switch my firewall to default deny and allow only the services needed through explicitly. nmap identifies filtered ports by a lack of response; closed ports send a TCP packet with a RST flag when you try to open them, indicating the server received the packet and would have allowed you to connect to any service listening on that port.

[edit] Advanced target specification

nmap allows you to use IP address targets for various sets and ranges based on a simple syntax.
  • x-y - Specify from x-y. nmap 192.168.0-1.1-2 will scan 192.168.0.1, 192.168.1.1, 192.168.0.2, and 192.168.1.2
  • * - Replaced with 0-255. Your shell will probably emit a bunch of file names, so just use 0-255.
  • x,y - Specify x and y. nmap 192.168.0.1,2,4 will scan 192.168.0.1, 192.168.0.2, and 192.168.1.4. Further, nmap 192.168.0.1-2,4 will scan the same set of hosts.
  • /n - Scan CIDR notated subnets. nmap 192.168.0.0/16 operates as nmap 192.168.0-255.0-255 for example.
You can combine these notations in any form you want. For example, if you wanted to scan a few subnets on 192.168.0.0/12, you could use nmap 192.168.0,16,64,96.0/4. Usually you will not want to do anything this drastic, and can stick to a single host; however, if you need it, you should know how to do it. Remember, nmap maps networks, not just hosts.

[edit] Scanning ports

  • Switches: -p
Sometimes you don't need to know everything open on a host, sometimes you just want to make sure proFTPd and Apache are up and the SMTP server hasn't died, and see if SSH is listening. For these situations, you can specify ports to scan. Port specification can be manipulated in the same way as target specification, using the x-y and x,y notations.
~$ nmap -p21-22,25,80,443 webserv1
Scanning specific ports lets you check specific issues several orders of magnitude faster. What version of Apache a server has (-sV -p80), whether a server runs MS SQL Server or MySQL (-sV -p1433,3306), if the server runs ssh, etc.

[edit] Service Scans

  • Switches: -sV, -A
nmap has the ability to do service scans and RPC grinding; in other words, it can tell you what high level protocol, application, version, version of libssl if the service supplies an SSL connection, etc., listens on a port instead of matching the port number to the common service. nmap also uses an RPC grinder, which makes RPC connections to ports running an RPC service; typically a single RPC portmapper port tells you which ports run RPC, but if the firewall blocks that then nmap will find it itself.
Let's take a look first at a scan against the server behind me. This server provides a profoundly good example because I've configured it to let me poke holes in my college's firewall, and thus it looks really strange. A typical nmap scan comes out well enough:
bluefox@icebox:/home/shared/qemu$ nmap 192.168.1.40

Starting Nmap 4.20 ( http://insecure.org ) at 2007-04-03 20:58 EDT
Interesting ports on 192.168.1.40:
Not shown: 1688 closed ports
PORT    STATE SERVICE
21/tcp  open  ftp
22/tcp  open  ssh
53/tcp  open  domain
80/tcp  open  http
81/tcp  open  hosts2-ns
139/tcp open  netbios-ssn
389/tcp open  ldap
443/tcp open  https
445/tcp open  microsoft-ds

Nmap finished: 1 IP address (1 host up) scanned in 0.971 seconds
The above shows FTP, DNS, hosts2-ns, HTTP/SSL, and Microsoft Directory Services (Active Directory). We can take a closer look with an nmap service scan using -sV. The below output gives us something quite different.
bluefox@icebox:/home/shared/qemu$ nmap -sV 192.168.1.40

Starting Nmap 4.20 ( http://insecure.org ) at 2007-04-03 21:01 EDT
Interesting ports on 192.168.1.40:
Not shown: 1688 closed ports
PORT    STATE SERVICE     VERSION
21/tcp  open  ssh         OpenSSH 4.3p2 Debian 5ubuntu1 (protocol 2.0)
22/tcp  open  ssh         OpenSSH 4.3p2 Debian 5ubuntu1 (protocol 2.0)
53/tcp  open  ssh         OpenSSH 4.3p2 Debian 5ubuntu1 (protocol 2.0)
80/tcp  open  http        Apache httpd 2.0.55 ((Ubuntu) PHP/5.1.6)
81/tcp  open  http        Apache httpd 2.0.55 ((Ubuntu) PHP/5.1.6)
139/tcp open  netbios-ssn Samba smbd 3.X (workgroup: MSHOME)
389/tcp open  ldap        OpenLDAP 2.2.X
443/tcp open  ssh         OpenSSH 4.3p2 Debian 5ubuntu1 (protocol 2.0)
445/tcp open  netbios-ssn Samba smbd 3.X (workgroup: MSHOME)
Service Info: OS: Linux

Service detection performed. Please report any incorrect results at http://insecure.org/nmap/submit/ .
Nmap finished: 1 IP address (1 host up) scanned in 13.747 seconds
So it seems this server really has Apache serving http on two ports; OpenSSH serving over the FTP, DNS, and HTTPS ports; and Samba providing SMB connections. Further, we can see that the server uses SSH 2.0 protocol on OpenSSH 4.3p2 Debian 5ubuntu1, a native Ubuntu .deb rather than a custom build. We can guess with relative accuracy that this server runs Ubuntu, even without an OS scan; either that or the administrator really doesn't have a clue what he's doing, or has managed to change banners with a rewrite proxy to fool us.
Worth note, the -A switch activates service scanning as well.

[edit] Advanced Port Scans

You can run many types of advanced port scans with nmap. Aside from the standard connect() port scan, nmap requires root access to perform these advanced scans because it needs to create raw sockets and construct raw TCP/IP packets.

[edit] Using nmap with root

The nmap program obtains different information with and without root access. With root access, nmap can perform advanced TCP/IP scans; operating system detection; and MAC address identification.
First let's check out a normal user utilizing nmap with the -A option. nmap -A activates operating system and service scanning, in the same way as nmap -O -sV. Operating system detection requires root access, so OS detection won't work at all. I've performed the below scan against a Linksys WRT54G wireless router.
bluefox@icebox:~$ nmap -A -p80,1 192.168.1.1

Starting Nmap 4.20 ( http://insecure.org ) at 2007-04-04 12:18 EDT
Interesting ports on 192.168.1.1:
PORT   STATE  SERVICE VERSION
1/tcp  closed tcpmux
80/tcp open   http    Linksys wireless-G WAP http config (Name Icelink)
Service Info: Device: WAP

Service detection performed. Please report any incorrect results at http://insecure.org/nmap/submit/ .
Nmap finished: 1 IP address (1 host up) scanned in 6.199 seconds
As you can see, nmap simply skips the OS detection phase. When we put nmap into operation as root, however, we see that it can also look up a lot more information. Below, we see it discovered the MAC address and identified the vendor owning that MAC space; the operating system and details about the OS; the uptime; and the network distance. It also gave us a device type; nmap sees a Linux OS used for desktops, wireless routers, or network storage, and thus classifies the device as either general purpose, WAP, or storage.
bluefox@icebox:~$ sudo nmap -A -p80,1 192.168.1.1

Starting Nmap 4.20 ( http://insecure.org ) at 2007-04-04 12:18 EDT
Interesting ports on 192.168.1.1:
PORT   STATE  SERVICE VERSION
1/tcp  closed tcpmux
80/tcp open   http    Linksys wireless-G WAP http config (Name Icelink)
MAC Address: 00:13:10:7D:06:C6 (Cisco-Linksys)
Device type: general purpose|WAP|storage-misc
Running: Linux 2.4.X, Linksys Linux 2.4.X, Asus Linux 2.4.X, Maxtor Linux 2.4.X
OS details: Linux 2.4.20 - 2.4.32, Linux-based embedded device (Linksys WRT54GL WAP,
 Buffalo AirStation WLA-G54 WAP, Maxtor Shared Storage Drive, or Asus Wireless Storage
 Router)
Uptime: 29.285 days (since Tue Mar  6 04:28:28 2007)
Network Distance: 1 hop
Service Info: Device: WAP

OS and Service detection performed. Please report any incorrect results at http://insecure.org/nmap/submit/ .
Nmap finished: 1 IP address (1 host up) scanned in 7.833 seconds
nmap becomes much more powerful with root access; however, for security reasons you should not haphazardly give nmap the SUID permission. You can allow users to run nmap specifically via sudo, but be aware that anything that allows a user to gain root access—SUID bits, sudo, etc—represents a security risk.

[edit] Operating system detection

  • Switches: -O
The -O switch enables nmap operating system detection. OS detection attempts to use characteristics of the target's TCP/IP stack to fingerprint the remote operating system; usually it can identify Linux, Windows, and BSD, and find a general range of versions and families like Windows NT/XP or 95/98/ME. A typical OS Detection scan looks like the below.
bluefox@ice-ldap:~$ sudo nmap -O 192.168.1.105 -P0

Starting Nmap 4.10 ( http://www.insecure.org/nmap/ ) at 2007-04-05 18:43 EDT
Warning:  OS detection will be MUCH less reliable because we did not find at least 1 open and 1 closed TCP port
Interesting ports on 192.168.1.105:
Not shown: 1677 filtered ports
PORT    STATE SERVICE
139/tcp open  netbios-ssn
445/tcp open  microsoft-ds
MAC Address: 00:0C:76:96:A5:DC (Micro-star International CO.)
Device type: general purpose
Running: Microsoft Windows NT/2K/XP
OS details: Microsoft Windows XP SP2

Nmap finished: 1 IP address (1 host up) scanned in 32.272 seconds

[edit] TCP connect() Scan

  • Switches: -sT
nmap allows a TCP connect() scan in all cases, administrative access or not; when you specify other scan types without root access, nmap automatically substitutes this scan type.
In this scanning mode, nmap opens a connection to the port in the same way a Web browser or FTP client does and checks to see how the TCP/IP stack responds. The following results arise from this scan:
  • open: nmap was able to complete a connection, and then closed the port.
  • closed: nmap tried to connect and got an error informing it that the port was closed (the OS got a RST packet).
  • filtered: nmap tried to connect and the OS gave it some other error, like host or port unreachable or connection time-out.
TCP connect() scans work with all privilege levels, but can execute slowly and produce excess packets. They also usually create more logs on the target, and can crash really poorly programmed services.

[edit] TCP SYN Scan

  • Switches: -sS
The nmap TCP SYN scan uses a simple SYN packet to connect to a port to determine its status. nmap uses this by default whenever it has raw socket privileges.
The TCP SYN scan sends a SYN packet as if opening a connection, and checks the result. The following statuses come from this test:
  • open: nmap got a SYN/ACK from the host on that port. nmap does not have to take further action; the OS has no record of the connection, and responds to the SYN/ACK with a RST, tearing down the connection on the target.
  • closed: nmap got a RST from the host on that port.
  • filtered: nmap got something else, or nothing.
TCP SYN scans execute very quickly, create fewer logs, and act in a more stealthy manner.

[edit] Scanning Firewalls

You can use nmap to penetrate firewalls as well. nmap can perform scans useful for determining whether a firewall uses stateful filtering or not; and which ports a firewall allows through. You can scan targets behind the firewall with this and discover the firewall rules, allowing more targeted scans and possibly evading firewall logging.

[edit] TCP ACK Scan

  • Switches: -sA

[edit] Stealth Scans

Unfortunately, if you scan through certain IPS or IDS machines, you get loads of fluff from proxy ports. This presents a minor annoyance. I had to trim below output, as it contained thousands of lines of text. I've obscured the host I scanned below; I had chosen a live machine on the Internet to scan for this, because I don't have the IPS hardware they use.
Starting Nmap 4.10 ( http://www.insecure.org/nmap/ ) at 2007-04-01 16:14 EDT
Stats: 0:00:02 elapsed; 0 hosts completed (1 up), 1 undergoing Connect() Scan
Connect() Scan Timing: About 20.95% done; ETC: 16:14 (0:00:09 remaining)
Interesting ports on %%% (%%%):
Not shown: 861 closed ports
PORT      STATE    SERVICE
2/tcp     open     compressnet
3/tcp     open     compressnet
7/tcp     open     echo
10/tcp    open     unknown
12/tcp    open     unknown
14/tcp    open     unknown
15/tcp    open     netstat
18/tcp    open     msp
19/tcp    open     chargen
20/tcp    open     ftp-data
21/tcp    open     ftp
25/tcp    open     smtp
27/tcp    open     nsw-fe
28/tcp    open     unknown
29/tcp    open     msg-icp
30/tcp    open     unknown
31/tcp    open     msg-auth
32/tcp    open     unknown
33/tcp    open     dsp
34/tcp    open     unknown
35/tcp    open     priv-print
38/tcp    open     rap
39/tcp    open     rlp
40/tcp    open     unknown
41/tcp    open     graphics
43/tcp    open     whois
47/tcp    open     ni-ftp
56/tcp    open     xns-auth
58/tcp    open     xns-mail
59/tcp    open     priv-file
60/tcp    open     unknown
64/tcp    open     covia
66/tcp    open     sql*net
.....
134/tcp   open     ingres-net
135/tcp   filtered msrpc
136/tcp   filtered profile
137/tcp   filtered netbios-ns
138/tcp   filtered netbios-dgm
139/tcp   filtered netbios-ssn
141/tcp   open     emfis-cntl
143/tcp   open     imap
145/tcp   open     uaac
147/tcp   open     iso-ip
148/tcp   open     cronus
149/tcp   open     aed-512
150/tcp   open     sql-net
155/tcp   open     netsc-dev
.....
27001/tcp open     flexlm1
27002/tcp open     flexlm2
27005/tcp open     flexlm5
27007/tcp open     flexlm7
27008/tcp open     flexlm8
27009/tcp open     flexlm9
27010/tcp open     flexlm10
27374/tcp open     subseven
27665/tcp open     Trinoo_Master
31337/tcp filtered Elite
32775/tcp open     sometimes-rpc13
32777/tcp open     sometimes-rpc17
32779/tcp open     sometimes-rpc21
32787/tcp open     sometimes-rpc27
38037/tcp open     landesk-cba
43188/tcp open     reachout
47557/tcp open     dbbrowse
50000/tcp open     iiimsf
54320/tcp open     bo2k
61441/tcp open     netprowler-sensor
65301/tcp open     pcanywhere

Nmap finished: 1 IP address (1 host up) scanned in 23.251 seconds
Fortunately, you can perform a stealth scan to evade this; unfortunately, stealth scans take an order of magnitude longer. Usually a polite scan will do the trick, it causes only 150 packets/minute.
~$ nmap -T polite %%%
The -T option takes one of five arguments, given by name or number. These are:
  • paranoid (0) - No parallel scanning. 5 minutes between sending packets.
  • sneaky (1) - No parallel scanning. 15 seconds between sending packets.
  • polite (2) - No parallel scanning. 0.4 seconds between sending packets.
  • normal (3) - Default scanning. Tries to be very fast without overloading the network.
  • aggressive (4) - Faster than normal, but loads the network.
  • insane (5) - Parallel scans, times out hosts in 15 minutes, won't wait more than 0.3 seconds for an individual probe. Loses a lot of information.
nmap also provides options to control scan time-outs. Combining these with the above provides more fine-tuned scans, for example a scan doing 100 packets per minute:
~$ nmap -T sneaky --scan_delay 600
Let's try the above scan again, politely.
bluefox@icebox:~$ nmap -T polite

Starting Nmap 4.20 ( http://insecure.org ) at 2007-04-02 19:52 EDT
Interesting ports on %%% (%%%):
Not shown: 1658 closed ports, 26 filtered ports
PORT     STATE SERVICE
21/tcp   open  ftp
25/tcp   open  smtp
80/tcp   open  http
110/tcp  open  pop3
143/tcp  open  imap
389/tcp  open  ldap
443/tcp  open  https
1026/tcp open  LSA-or-nterm
1027/tcp open  IIS
1433/tcp open  ms-sql-s
3389/tcp open  ms-term-serv
8000/tcp open  http-alt
9999/tcp open  abyss

Nmap finished: 1 IP address (1 host up) scanned in 693.146 seconds
As we can see, this scan takes 693 seconds instead of 23, 30 times longer.

[edit] External Links

Tuesday, February 15, 2011

Block China and Korea From Apache Based Servers or Forums with a .htaccess

SkyHi @ Tuesday, February 15, 2011
 
This blocklist was last updated on Wednesday, 09-Feb-2011 23:11:39 MST
<Files *>
order deny,allow

# Chinese (CN) IP addresses follow:
deny from 27.8.0.0/13 27.16.0.0/12 27.36.0.0/14 27.40.0.0/13 58.16.0.0/15 58.20.0.0/16 58.21.0.0/16 58.22.0.0/15 58.34.0.0/16 58.37.0.0/16 58.38.0.0/16 58.42.0.0/16 58.44.0.0/14 58.56.0.0/15 58.58.0.0/16 58.59.0.0/17 58.60.0.0/14 58.82.0.0/15 58.100.0.0/15 58.208.0.0/12 58.242.0.0/15 58.246.0.0/15 58.248.0.0/13 59.32.0.0/13 59.40.0.0/15 59.42.0.0/16 59.44.0.0/14 59.51.0.0/16 59.52.0.0/14 59.56.0.0/13 59.108.0.0/15 60.0.0.0/13 60.11.0.0/16 60.12.0.0/16 60.28.0.0/15 60.160.0.0/11 60.194.0.0/15 60.208.0.0/13 60.216.0.0/15 60.220.0.0/14 61.4.64.0/20 61.4.80.0/22 61.48.0.0/13 61.128.0.0/10 61.135.0.0/16 61.136.0.0/18 61.145.73.208/28 61.160.0.0/16 61.162.0.0/15 61.164.0.0/16 61.177.0.0/16 61.179.0.0/16 61.183.0.0/16 61.184.0.0/16 61.185.219.232/29 61.187.0.0/16 61.188.0.0/16 61.191.0.0/16 61.232.0.0/14 61.236.0.0/15 110.6.0.0/15 110.96.0.0/11 110.240.0.0/12 111.0.0.0/10 112.0.0.0/10 112.64.0.0/14 112.111.0.0/16 112.224.0.0/11 113.0.0.0/13 113.8.0.0/15 113.62.0.0/15 113.64.0.0/10 113.128.0.0/15 114.28.0.0/16 114.104.0.0/14 114.216.0.0/13 114.224.0.0/11 115.24.0.0/15 115.32.0.0/14 115.48.0.0/12 115.84.0.0/18 115.100.0.0/15 115.168.0.0/14 115.239.228.0/22 116.1.0.0/16 116.2.0.0/15 116.4.0.0/14 116.8.0.0/14 116.16.0.0/12 116.76.0.0/15 116.204.0.0/15 116.208.0.0/14 117.21.0.0/16 117.22.0.0/15 117.24.0.0/13 117.32.0.0/13 117.40.0.0/14 117.44.0.0/15 117.80.0.0/12 118.72.0.0/13 118.112.0.0/13 118.132.0.0/14 118.144.0.0/14 118.180.0.0/14 118.192.0.0/16 118.248.0.0/13 119.0.0.0/13 119.8.0.0/15 119.10.0.0/17 119.18.192.0/20 119.88.0.0/14 119.120.0.0/13 119.128.0.0/12 119.144.0.0/14 119.164.0.0/14 119.176.0.0/12 120.0.0.0/12 120.32.0.0/13 121.0.16.0/20 121.8.0.0/13 121.16.0.0/12 121.32.0.0/14 121.60.0.0/14 121.76.0.0/15 121.204.0.0/14 122.51.128.0/17 122.64.0.0/11 122.136.0.0/13 122.156.0.0/14 122.198.0.0/16 122.200.64.0/18 122.224.0.0/12 123.4.0.0/14 123.52.0.0/14 123.64.0.0/11 123.97.128.0/17 123.100.0.0/19 123.112.0.0/12 123.128.0.0/13 123.152.0.0/13 123.164.0.0/14 123.184.0.0/14 123.232.0.0/14 124.42.64.0/18 124.64.0.0/15 124.114.0.0/15 124.128.0.0/13 124.163.0.0/16 124.200.0.0/13 124.236.0.0/14 124.248.0.0/17 125.40.0.0/13 125.64.0.0/13 125.80.0.0/13 125.88.0.0/13 125.115.0.0/16 159.226.0.0/16 182.112.0.0/12 202.43.144.0/22 202.66.0.0/16 202.96.0.0/12 202.111.160.0/19 202.112.0.0/14 202.117.0.0/16 202.165.176.0/20 203.69.0.0/16 203.93.0.0/16 203.169.160.0/19 210.5.0.0/19 210.14.128.0/19 210.21.0.0/16 210.32.0.0/14 210.51.0.0/16 210.52.0.0/15 210.192.96.0/19 211.76.96.0/20 211.78.208.0/20 211.90.0.0/15 211.136.0.0/13 211.144.12.0/22 211.144.96.0/19 211.144.160.0/20 211.147.208.0/20 211.152.14.0/24 211.154.128.0/19 211.155.24.0/22 211.157.32.0/19 211.160.0.0/13 211.233.70.0/24 218.0.0.0/11 218.56.0.0/13 218.64.0.0/11 218.88.0.0/13 218.96.0.0/14 218.102.0.0/16 218.104.0.0/14 218.194.80.0/20 218.240.0.0/13 219.128.0.0/11 219.232.0.0/16 219.154.0.0/15 220.160.0.0/11 220.181.0.0/16 220.192.0.0/12 220.228.70.0/24 220.248.0.0/14 220.250.0.0/19 220.252.0.0/16 221.0.0.0/12 221.122.0.0/15 221.176.0.0/13 221.192.0.0/14 221.200.0.0/14 221.204.0.0/15 221.207.0.0/16 221.208.0.0/14 221.212.0.0/16 221.214.0.0/15 221.216.0.0/13 221.224.0.0/13 221.228.0.0/14 221.238.0.0/15 222.32.0.0/11 222.64.0.0/12 222.80.0.0/12 222.132.0.0/14 222.136.0.0/13 222.166.0.0/16 222.168.0.0/13 222.172.222.0/24 222.176.0.0/13 222.184.0.0/13 222.241.0.0/19 222.245.0.0/16

# Hong Kong (HK)
deny from 58.65.232.0/21 59.148.0.0/15 112.121.160.0/19 113.252.0.0/14 121.127.224.0/19 123.242.229.0/24 202.69.64.0/19 202.85.128.0/19 202.133.8.0/21 203.218.0.0/16 210.176.0.0/19 210.176.48.0/20 210.176.64.0/18 210.176.128.0/17 210.177.0.0/16 218.103.0.0/16 218.252.0.0/14 219.76.0.0/14 222.166.0.0/16

# India (IN) and Pakistan (PK)
deny from 59.88.0.0/13 59.96.0.0/14 59.164.0.0/16 9.176.0.0/13 59.184.0.0/15 61.247.238.0/24 112.110.40.0/21 115.108.0.0/14 115.240.0.0/12 116.72.0.0/14 117.192.0.0/10 193.53.87.0/24 121.240.0.0/13 122.160.0.0/15 122.164.0.0/15 122.166.0.0/15 122.167.0.0/16 122.169.0.0/16 122.170.0.0/17 122.173.0.0/16 122.174.0.0/16 122.176.0.0/13 123.236.0.0/14 124.124.0.0/15 202.63.160.0/19 202.154.224.0/24 203.115.80.0/20 203.197.0.0/16 218.248.0.0/20

# Indonesia (ID)
deny from 110.136.176.0/20 110.139.0.0/16 118.96.0.0/15 119.110.68.0/24 125.164.64.0/19 125.165.128.0/18

# Japan (JP) (hacking, scraping, or spamming)
deny from 58.188.0.0/14 59.146.0.0/15 61.112.0.0/12 118.0.0.0/12 118.86.0.0/15 118.106.0.0/16 122.200.192.0/18 122.208.0.0/12 123.216.0.0/13 126.0.0.0/8 150.70.84.41 210.248.0.0/13 211.19.0.0/16 218.216.0.0/13 218.224.0.0/13 219.94.128.0/17 219.96.0.0/11 221.121.160.0/20 222.231.64.0/18 222.231.128.0/17 222.144.0.0/13

# Korea (KR) IP addresses follow:
deny from 58.72.0.0/13 58.120.0.0/13 58.140.0.0/14 58.148.0.0/14 58.180.40.0/21 58.224.0.0/12 59.0.0.0/11 59.86.192.0/18 59.186.0.0/15 61.32.0.0/13 61.72.0.0/14 61.76.0.0/15 61.96.0.0/12 61.110.16.0/20 61.248.0.0/13 110.8.0.0/13 110.45.0.0/16 112.159.224.0/20 113.30.64.0/18 114.29.0.0/17 114.108.128.0/18 114.200.0.0/13 115.0.0.0/12 115.16.0.0/13 115.40.0.0/15 115.68.0.0/16 115.88.0.0/13 116.40.0.0/16 116.45.176.0/20 116.93.192.0/19 116.120.0.0/13 117.110.0.0/15 118.32.0.0/11 118.128.0.0/14 118.216.0.0/13 119.64.0.0/13 119.192.0.0/11 120.50.64.0/18 121.88.0.0/16 121.101.224.0/19 121.127.64.0/18 121.127.128.0/18 121.128.0.0/10 121.254.0.0/16 122.44.112.0/20 122.99.128.0/17 123.111.0.0/16 123.140.0.0/14 123.212.0.0/14 123.248.0.0/16 124.0.0.0/15 124.50.87.161 124.136.0.0/14 125.128.0.0/11 125.176.0.0/12 125.240.0.0/13 125.248.0.0/14 143.248.0.0/16 166.104.0.0/16 168.188.0.0/16 175.112.0.0/12 202.30.0.0/15 202.133.16.0/20 202.179.176.0/21 203.226.0.0/15 203.228.0.0/14 203.244.0.0/14 203.248.0.0/13 210.93.0.0/16 210.94.0.0/15 210.108.0.0/14 210.112.0.0/14 210.117.128.0/18 210.118.216.192/26 210.124.0.0/14 210.178.0.0/15 210.180.0.0/15 210.204.0.0/15 210.219.0.0/16 210.220.0.0/14 211.32.0.0/12 211.48.0.0/15 211.50.0.0/15 211.52.0.0/16 211.62.35.0/24 211.104.0.0/13 211.112.0.0/13 211.168.0.0/13 211.176.0.0/12 211.192.0.0/12 211.208.0.0/14 211.216.0.0/13 211.224.0.0/13 211.232.0.0/13 211.240.0.0/12 218.36.0.0/14 218.48.0.0/13 218.144.0.0/12 218.209.0.0/16 218.232.0.0/14 218.236.0.0/14 219.240.0.0/15 219.248.0.0/13 219.250.88.0/21 220.72.0.0/13 220.80.0.0/13 220.95.88.0/24 220.118.0.0/16 220.119.0.0/16 221.128.0.0/12 221.144.0.0/12 221.160.0.0/13 221.168.0.0/16 221.163.46.0/24 222.96.0.0/12 222.112.0.0/13 222.120.0.0/15 222.122.0.0/16 222.231.0.0/18 222.232.0.0/13

# Yahoo-Korea (provides free email services used by some spammers)
deny from 123.0.0.0/20

# Neighboring Asian countries:

# Malaysia (MY)
deny from 27.131.32.0/24 60.48.0.0/14 60.52.0.0/15 60.54.0.0/16 110.159.0.0/16 112.137.160.0/20 113.23.128.0/17 115.132.0.0/14 116.197.0.0/17 116.206.0.0/16 120.50.48.0/20 120.140.0.0/15 124.82.0.0/16 124.217.224.0/19 202.58.80.0/20 202.71.96.0/20 202.75.32.0/19 203.106.0.0/16 203.223.128.0/19 210.187.49.0/25 218.111.0.0/16 218.208.12.64/27

# Philippines (PH)
deny from 85.92.152.0/21 112.201.128.0/17 112.202.0.0/16 120.28.64.0/18 125.60.128.0/17 202.133.192.0/24 222.127.32.0/19 222.127.64.0/19

# Singapore (SG)
deny from 59.189.0.0/16 116.14.0.0/15 121.6.0.0/15 165.21.0.0/16 192.169.40.0/23 203.92.64.0/18 203.117.0.0/24 218.186.0.0/16 218.212.0.0/16 219.74.0.0/15 219.75.0.0/17

# Taiwan (TW)
deny from 59.124.0.0/14 60.198.0.0/15 60.249.0.0/16 60.250.0.0/15 61.31.0.0/16 61.67.128.0/17 61.220.0.0/14 61.224.0.0/14 61.228.0.0/14 110.24.0.0/13 110.50.128.0/18 111.240.0.0/12 114.24.0.0/14 114.32.0.0/12 115.80.0.0/14 115.85.144.0/20 118.160.0.0/13 122.116.0.0/15 122.120.0.0/13 123.240.0.0/15 124.8.0.0/14 140.109.0.0/16 140.110.0.0/15 140.112.0.0/12 140.128.0.0/13 140.136.0.0/15 140.138.0.0/16 203.64.0.0/14 203.71.0.0/16 203.72.0.0/16 210.59.0.0/17 210.240.0.0/16 211.20.0.0/15 211.23.0.0/16 211.75.0.0/16 211.76.160.0/20 211.79.32.0/20 218.160.0.0/12 219.84.0.0/15 219.90.3.0/24 220.128.0.0/12

# Thailand (TH)
deny from 1.46.0.0/15 58.8.0.0/16 58.9.0.0/16 58.10.0.0/16 58.137.13.0/24 61.19.64.0/18 61.19.205.0/24 61.47.0.0/17 113.53.0.0/17 115.87.128.0/17 117.47.0.0/16 118.172.0.0/14 124.120.0.0/16 124.121.0.0/16 124.122.0.0/16 202.28.0.0/15 202.44.135.0/24 202.133.128.0/18 202.143.128.0/18 203.107.142.0/24 203.113.0.0/17 203.130.149.0/24 203.144.128.0/17 203.148.128.0/17 203.149.0.0/18 203.150.128.0/17 203.151.38.0/24 203.155.0.0/16 203.158.96.0/19 203.158.128.0/17 203.172.128.0/17 203.185.128.0/19 210.213.0.0/18 222.123.0.0/16

# Vietnam (VN)
deny from 58.186.0.0/16 58.187.96.0/20 58.187.112.0/20 112.78.0.0/20 112.213.80.0/20 113.22.0.0/16 113.23.0.0/17 113.160.0.0/11 115.72.0.0/13 115.84.176.0/22 116.96.0.0/12 117.0.0.0/13 118.68.0.0/14 123.16.0.0/12 125.234.0.0/15 183.91.0.0/19 202.78.227.0/24 203.113.128.0/18 203.162.0.0/16 203.210.192.0/18 210.245.80.0/21 220.231.124.0/22 222.252.0.0/14

# End Chinese-Korean blocklist

# Add other blocked domain names or IP addresses here, starting with "deny from " without quotes

# If you find that you need to poke a hole in the blocklist, for legitimate visitors, follow this example: allow from 123.456.789.0

# Add "allow from" IP addresses, or CIDR Ranges, after all of the "deny from" items, just before the closing Files tag.

# Everything not included within these deny from ranges is PERMITTED by the allow portion of the directive.

</Files>


# This prevents web browsers or spiders from seeing your .htaccess directives:

<Files .htaccess>
deny from all
</Files>

# End of file


REFERENCES
http://www.wizcrafts.net/chinese-blocklist.html

How To Block Bots, Ban IP Addresses With .htaccess

SkyHi @ Tuesday, February 15, 2011
Got a spambot or scraper constantly showing up in your server logs? Or maybe there's another site that's leeching all your bandwidth? Perhaps you just want to ban a user from a certain IP address? In this article, I'll show you how to use .htaccess to do all of that and more!

Identifying bad bots

So you've noticed a certain user-agent keeps showing up in your logs, but you're not sure what it is, or if you want to ban it? There's a few ways to find out:
Once you've determined that the bot is something you want to block, the next step is to add it to your .htaccess file.

Blocking bots with .htaccess

This example, and all of the following examples, can be placed at the bottom of your .htaccess file. If you don't already have a file called .htaccess in your site's root directory, you can create a new one.
#get rid of the bad bot
   RewriteEngine on
   RewriteCond %{HTTP_USER_AGENT} ^BadBot
   RewriteRule ^(.*)$ http://go.away/
So, what does this code do? It's simple: the above lines tell your webserver to check for any bot whose user-agent string starts with "BadBot". When it sees a bot that matches, it redirects them to a non-existent site called "go.away".
Now, that's great to start with, but what if you want to block more than one bot?
#get rid of bad bots
   RewriteEngine on
   RewriteCond %{HTTP_USER_AGENT} ^BadBot [OR]
   RewriteCond %{HTTP_USER_AGENT} ^EvilScraper [OR]
   RewriteCond %{HTTP_USER_AGENT} ^FakeUser
   RewriteRule ^(.*)$ http://go.away/
The code above shows the same thing as before, but this time I'm blocking 3 different bots. Note the "[OR]" option after the first two bot names: this lets the server know there's more in the list.

Blocking Bandwidth Leeches

Say there's a certain forum that's always hotlinking your images, and it's eating up all your bandwidth. You could replace the image with something really gross, but in some countries that might get you sued! The best way to deal with this problem is simply to block the site, like so:
RewriteEngine on
RewriteCond %{HTTP_REFERER} ^http://.*somebadforum\.com [NC]
RewriteRule .* - [F] 
This code will return a 403 Forbidden error to anyone trying to hotlink your images on somebadforum.com. The end result: users on that site will see a broken image, and your bandwidth is no longer being stolen.
Here's the code for blocking more than one site:
RewriteEngine on
RewriteCond %{HTTP_REFERER} ^http://.*somebadforum\.com [NC,OR]
RewriteCond %{HTTP_REFERER} ^http://.*example\.com [NC,OR]
RewriteCond %{HTTP_REFERER} ^http://.*lastexample\.com [NC]
RewriteRule .* - [F] 
If you want to block hotlinking completely, so that no one can hotlink your files, take a look at my article on using .htaccess to block hotlinkers.

Banning An IP Address

Sometimes you just don't want a certain person (or bot) accessing your website at all. One simple way to block them is to ban their IP address:
order allow,deny
deny from 192.168.44.201
deny from 224.39.163.12
deny from 172.16.7.92
allow from all
The example above shows how to block 3 different IP addresses. Sometimes you might want to block a whole range of IP addresses:
order allow,deny
deny from 192.168.
deny from 10.0.0.
allow from all
The above code will block any IP address starting with "192.168." or "10.0.0." from accessing your site.
Finally, here's the code to block any specific ISP from getting access:
order allow,deny
deny from some-evil-isp.com
deny from subdomain.another-evil-isp.com
allow from all

Final notes on using .htaccess

As you can see, .htaccess is a very powerful tool for controlling who can do what on your website. Because it's so powerful, it's also fairly easy for things to go wrong. If you have any mistakes or typos in your .htaccess file, the server will spit out an Error 500 page instead of showing your site, so be sure to back up your .htaccess file before making any changes.
If you'd like to learn more about writing .htaccess files, I recommend checking out the Definitive Guide to Mod_Rewrite. This book covers everything you need to know about Apache's .htaccess rewrite system.

REFERENCES
http://blamcast.net/articles/block-bots-hotlinking-ban-ip-htaccess

Monday, February 14, 2011

Move or copy an SSL certificate from a Windows server to another Windows server

SkyHi @ Monday, February 14, 2011
If you have multiple Windows servers that need to use the same SSL certificate, such as in a load-balancer environment or using a wildcard or UC SSL certificates, you can export the certificate to .pfx file and import it on a new Windows server. This may also be necessary when you switch hosting companies. We will go over the exact process with step-by-step instructions in this article. If necessary, you can copy the SSL certificate to an Apache or other type of server.
We will assume that you have already successfully installed the SSL certificate on one Windows web server. You will follow these steps to move or copy that working certificate to a new server:
  1. Export the SSL certificate from the server with the private key and any intermediate certificates into a .pfx file.
  2. Import the SSL certificate and private key on the new server.
  3. Configure your web sites to use them in IIS.
On a Windows server you will need to export your certificate from the MMC console to a .pfx file with your private key. You can then copy that .pfx file to the new Windows server and import it. The following screenshots are from a Windows Server 2008 machine but any differences for Windows Server 2003 are noted.

Export the certificate from the Windows MMC console

Note: These instructions will have you export the certificate using the MMC console. If you have Windows Server 2008 (IIS7) you can also import and export certificates directly in the Server Certificates section in IIS. Click here to hide or show the images
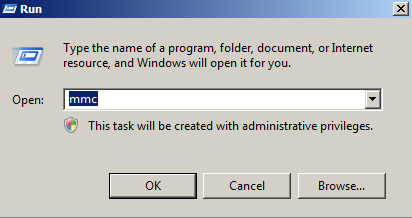
  1. Click on the Start menu and click Run.
  2. Type in mmc and click OK.
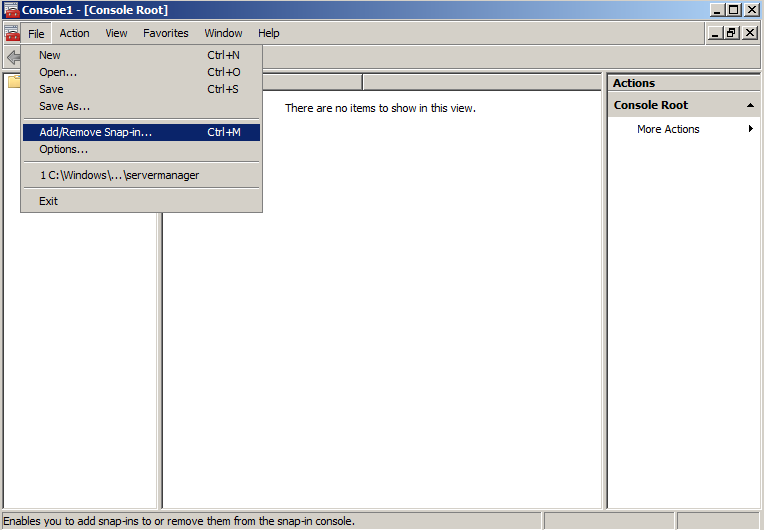
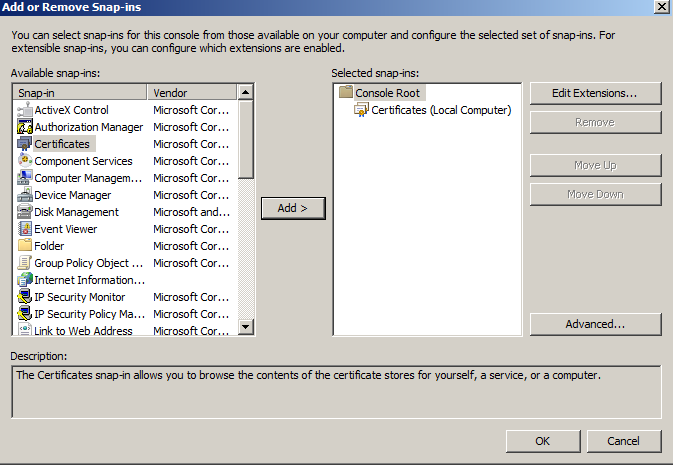
  3. Click on the File menu and click Add/Remove Snap-in...
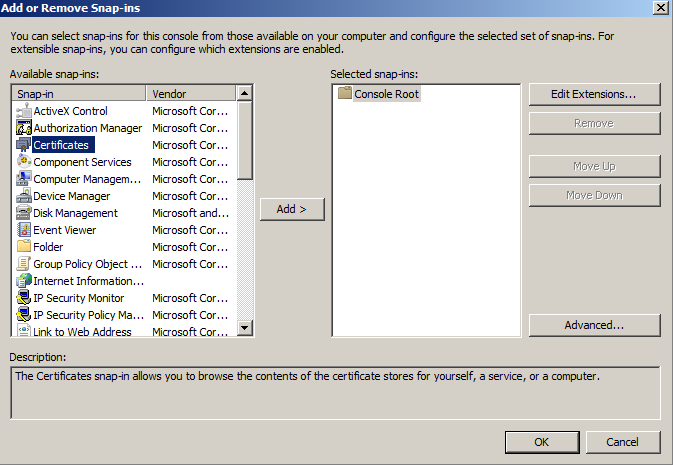
  4. If you are using Windows Server 2003, click on the Add button. Double-click on Certificates.
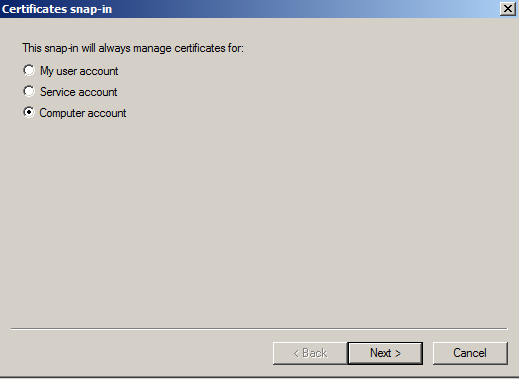
  5. Click on Computer Account and click Next.
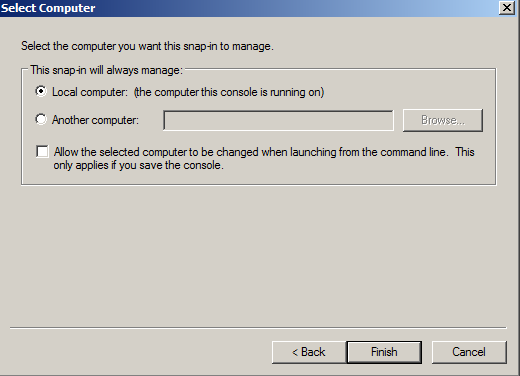
  6. Leave Local Computer selected and click Finish.
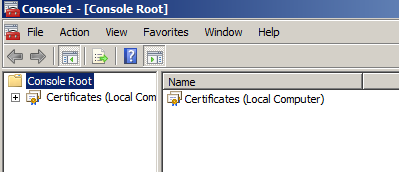
  7. If you are using Windows Server 2003, click the Close button. Click OK.
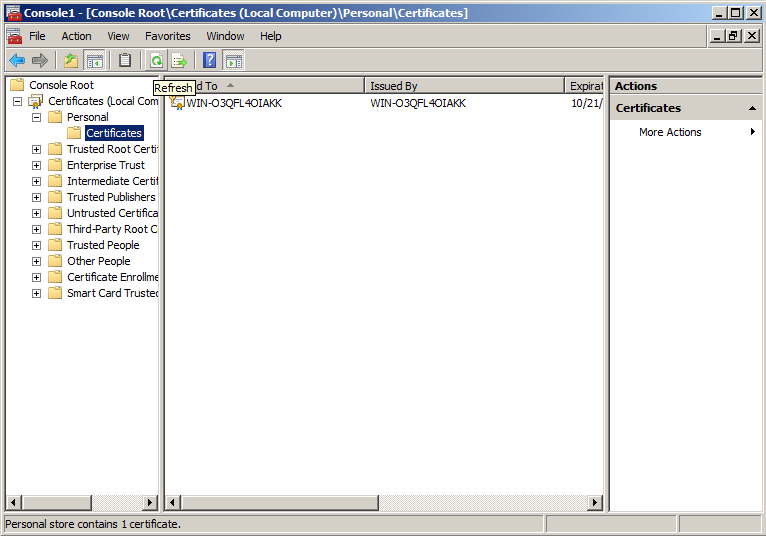
  8. Click the plus sign next to Certificates in the left pane.
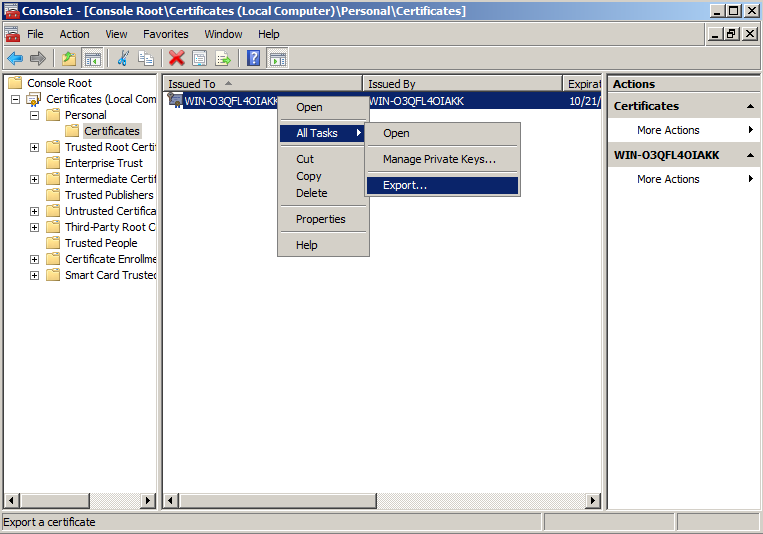
  9. Click the plus sign next to the Personal folder and click on the Certificates folder. Right-click on the certificate you would like to export and select All Tasks and then Export...
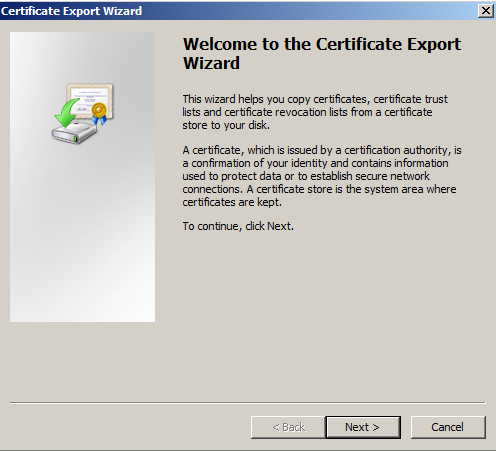
  10. In the Certificate Export Wizard click Next.
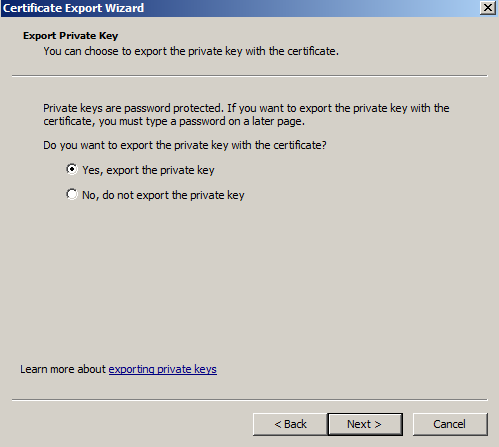
  11. Choose "Yes, export the private key" and click Next.
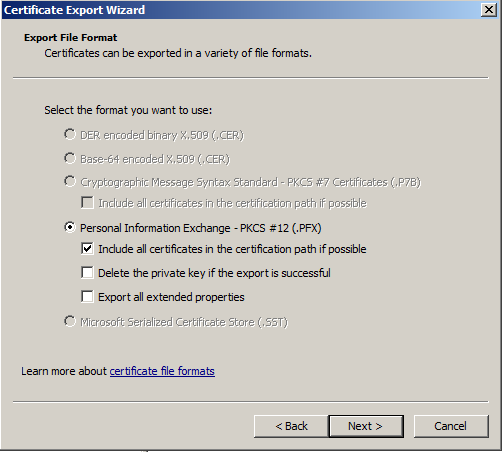
  12. Click the checkbox next to "Include all certificates in the certification path if possible" and click Next.
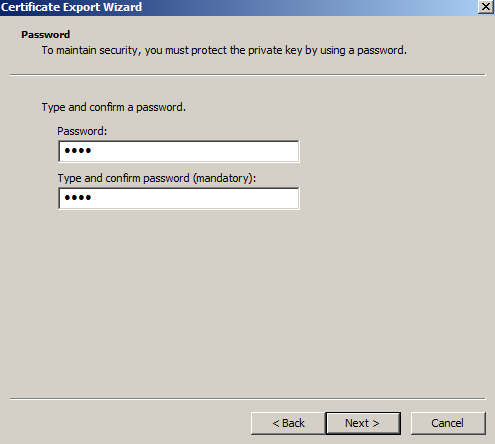
  13. Enter and confirm a password. This password will be needed whenever the certificate is imported to another server.
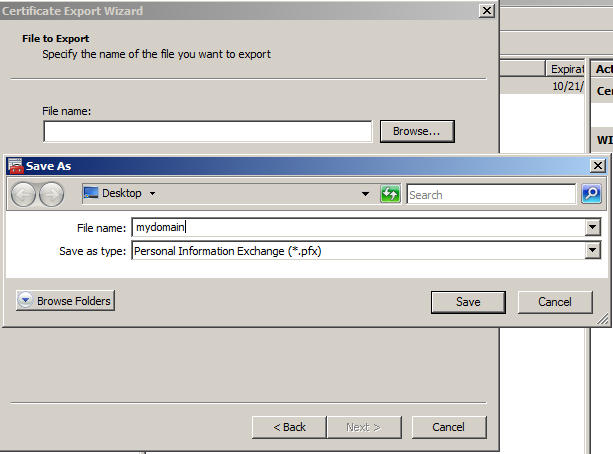
  14. Click Browse and find a location to save the .pfx file to. Type in a name such as "mydomain.pfx" and then click Next.
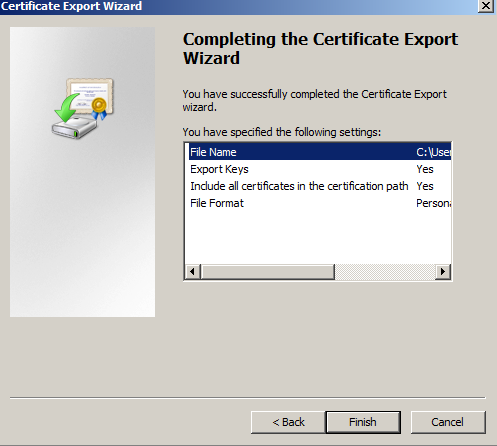
  15. Click Finish. The .pfx file containing the certificates and the private key is now saved to the location you specified.

Import the certificate in the Windows MMC console

After you have exported the certificate from the original server you will need to copy the .pfx file that you created to the new server and follow these import instructions.
  1. Click on the Start menu and click Run.
  2. Type in mmc and click OK.
  3. Click on the File menu and click Add/Remove Snap-in...
  4. If you are using Windows Server 2003, click on the Add button. Double-click on Certificates.
  5. Click on Computer Account and click Next.
  6. Leave Local Computer selected and click Finish.
  7. If you are using Windows Server 2003, click the Close button. Click OK.
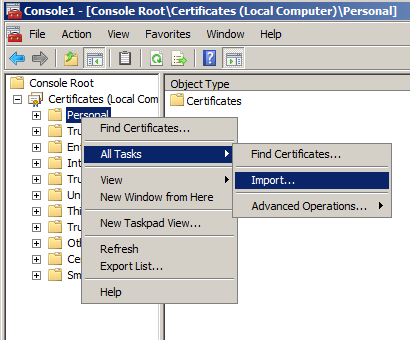
  8. Right-click on the Personal folder and select All Tasks and then Import...
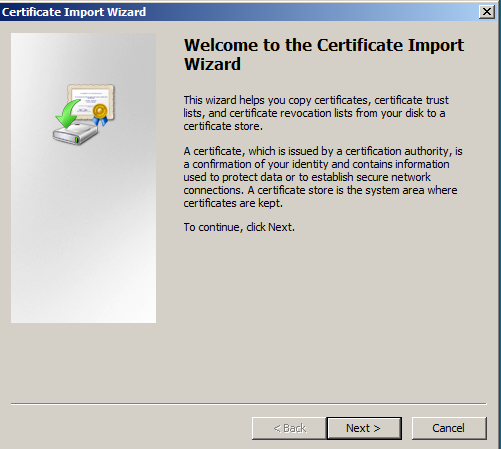
  9. In the Certificate Import Wizard click Next.
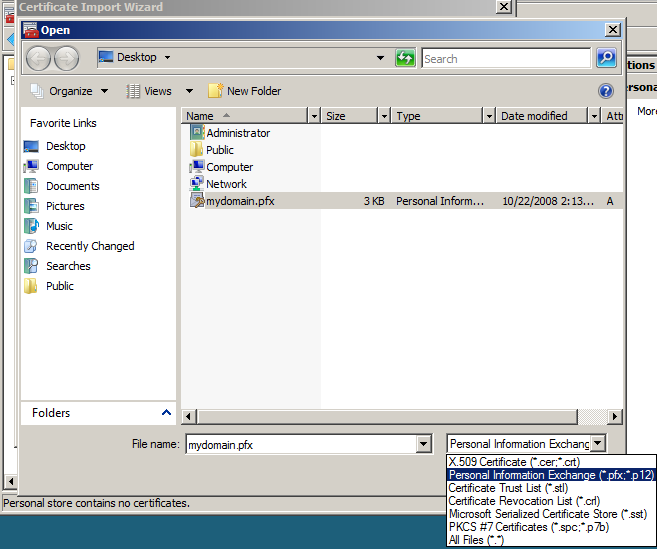
  10. Click the Browse button and change the file type from "X.509..." to "Personal Information Exchange (*.pfx, *.p12)". find the .pfx file that you copied over and click Open and then Next.
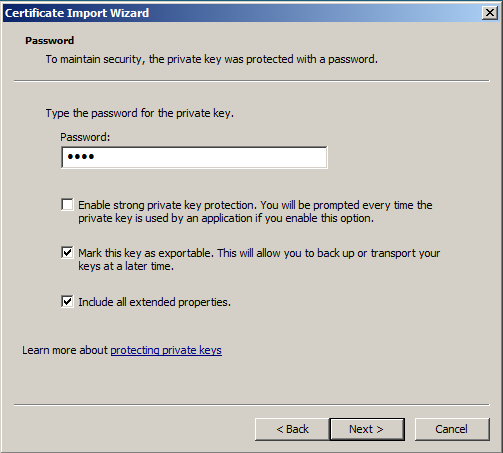
  11. Enter the password that you set when you exported the .pfx file and click "Mark this key as exportable" so you can export the certificate from this machine as well as the original. Click Next.
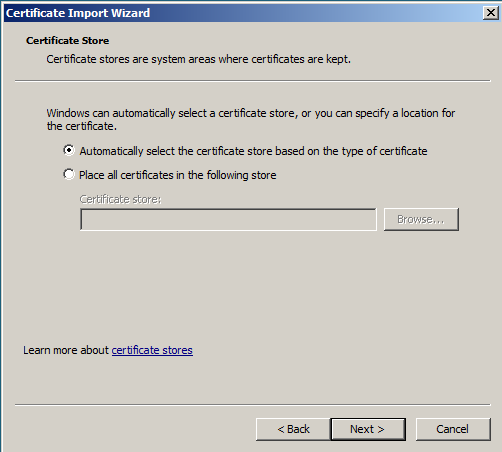
  12. Click "Automatically select the certificate store based on the type of certificate" and click Next.
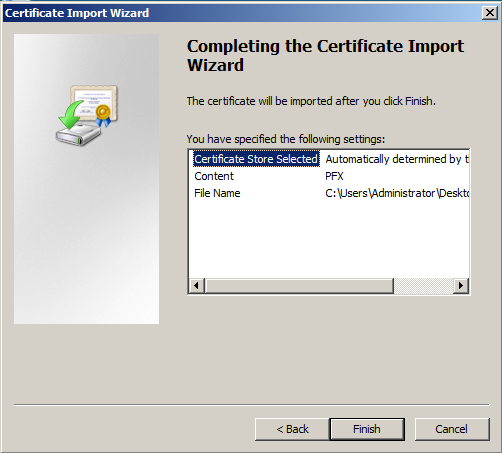
  13. Click Finish to complete the wizard.
  14. You can now click the Refresh button in the toolbar to refresh and find your certificate in the Certificates folder under Personal. You can verify that it was imported correctly by double-clicking it and looking for "You have a private key that corresponds to this certificate" at the bottom of the certificate dialog.
  15. Close the MMC console. You do not need to save any changes.

Assigning the SSL certificate

After you have imported the .pfx file, you will either need to assign the certificate in IIS, enable the certificate for the services you need in Exchange or select the certificate in any other software that you are using. Because IIS is the most common place to use SSL certificates, we have included the instructions for assigning a website to use the new certificate in IIS 6 (Windows Server 2003). If you have Windows Server 2008, just follow the binding part of the IIS 7 SSL Certificate Installation instructions.
  1. In IIS, right-click on the website that needs the certificate and click on Properties.
  2. Click the Directory Security tab and click on the Server Certificate button to run the server certificate wizard.
  3. If you already have a certificate on that website you will need to remove it and then start the wizard again.
  4. Click "Assign an existing certificate" and click Next.
  5. Select the new certificate that you just imported and click Next.
  6. Click Finish. You may need to restart IIS for the certificate to start working with the assigned website.
While there are several steps in the process, moving an SSL certificate from one Windows server to another is an easy task. It involves exporting a working SSL certificate from the MMC console to a .pfx file which contains the certificates and private key and then importing that file in the MMC console of the new or additional server. You will then need to assign or bind the certificate to a website in IIS in order to start using it on a website. If you need to move your SSL certificate to or from a different type of server, select the server type on our main SSL Certificate Import/Export Page


REFERENCES
http://www.sslshopper.com/move-or-copy-an-ssl-certificate-from-a-windows-server-to-another-windows-server.html

create a ISO file from CD/DVD/Directory

SkyHi @ Monday, February 14, 2011
Have a CD or DVD lying around that you are sick of putting in the drive every time you need something on the disc?
How about just making an .iso file that you can mount as you need? Or maybe you just want a “master” copy of the media so you can create another copy at a future date.
At any rate it is rather easy to accomplish in Ubuntu:

sudo umount /dev/cdrom
dd if=/dev/cdrom of=file.iso bs=1024


You can also do the same with folders:
mkisofs -r -o file.iso /location_of_folder/

Don’t forget to make a checksum:
md5sum file.iso > file.iso.md5


====================================================================

This is very helpfull to backup you cd and dvd into iso images:

To make an ISO from your CD/DVD, place the media in your drive but do not mount it. If it automounts, unmount it. (ubuntu automount so you need to unmount, that's quite easy, just choose the option unmount from the shell).

dd if=/dev/dvd of=dvd.iso # for dvd
dd if=/dev/cdrom of=cd.iso # for cdrom
dd if=/dev/scd0 of=cd.iso # if cdrom is scsi

To make an ISO from files on your hard drive, create a directory which holds the files you want. Then use the mkisofs command.

mkisofs -o /tmp/cd.iso /tmp/directory/

This results in a file called cd.iso in folder /tmp which contains all the files and directories in /tmp/directory/.

For more info, see the man pages for mkisofs, losetup, and dd, or see the CD-Writing-HOWTO at http://www.tldp.org.
 
===========================================================


 1. Create ISO Images With K3b
K3b is the KDE default CD/DVD burner and also one of the most popular (if not the most popular) burning application for Linux. The current version comes installed by default in Kubuntu 8.10 and 9.04, but if you are using Ubuntu and want to get install it issue the following command:

sudo apt-get install k3b

A port for KDE4 is in the works too, but until now there is no stable release. (Update: This applies for K3b 2.0+ too)

To create an ISO image just fire up K3b and follow the steps below:

Go to File -> New Project -> New Data CD Project (or New Data DVD Project, depending on what size the image you want to create will have):


Next, drag and drop the files and folders from the file browser to the bottom area:


Now, click the Burn button and, in the window that appears, tick the Only create image option under the Settings widget. The image will be created by default as the /tmp/kde-YOUR_USERNAME/image_name.iso, but you can change this location in the Image tab.


Next, click on Start and wait for the image to be created. This should be all.


Here's what the file /var/kde-embryo/my_iso_image.iso shows:

embryo@kubu:~$ file /tmp/kde-embryo/my_iso_image.iso
/tmp/kde-embryo/my_iso_image.iso: ISO 9660 CD-ROM filesystem data 'my_iso_image '

2. Create ISO images with Brasero
Brasero is the default CD/DVD burning application in Ubuntu. The way Brasero creates images is similar with K3b's. If you don't have Brasero installed for some reason, type:

sudo apt-get install brasero

Start Brasero (or fire it up, as you wish to call it) and click on the Data project button (or go to Project -> New Project -> New Data Project).


Change the name of the disc at the bottom to whatever you like and then click on the green plus sign in the upper left corner in the toolbar to start adding files and directories to your image:


After you finished adding files click on Burn and make sure no empty CD/DVD is in your optical drives:


This should be all. The image will be located in the home directory.

3. Create ISO images using AcetoneISO
AcetoneISO is a GUI (graphical user interface) application built in Qt4 for mounting and unmounting CD/DVD ISO (NRG, MDF and BIN too) images, but it can also be used to create ISO images.

To install AcetoneISO in Ubuntu you can follow the guide I put up a while ago, here. I will use version 2.0.2 for this example. In newer Ubuntu versions, just type in a terminal:

sudo apt-get install acetoneiso

First, put all the files and folders you want included in the image into a new, empty directory. Next, in the menu go to Conversion -> Generate ISO from folder, select the desired folder and enter the name of the image:


That's it.

4. Create ISO images using command-line
What, you thought I was going to leave CLI behind? Here's (probably) the easiest way to create ISO images using command-line interface.

First, install the tool called genisoimage (if you already have Brasero or K3b installed, this package is probably already installed):

sudo apt-get install genisoimage

Use it like this:

genisoimage -o my_image.iso my_directory

Or:

genisoimage -o my_image.iso file01 file02 file03

The first command will create an ISO image from the contents of folder my_directory (and it will include it as the root directory), while the second one will create an image containing file01, file02, file03 (and no root directory).

For Rock Ridge extensions (which provide permissions and ownership support), use:

genisoimage -o my_image.iso -R my_directory

So, these are the four methods I find most accessible for creating CD/DVD images in Ubuntu. Please share other ways of accomplishing this in the comments below.
REFERENCEShttp://www.ubuntu-unleashed.com/2007/12/have-cd-or-dvd-lying-around-that-you.html
http://tuxarena.blogspot.com/2009/03/4-ways-to-create-cddvd-iso-images-in.html
http://ubuntuforums.org/showthread.php?t=6509