Showing posts with label Windows IIS. Show all posts

Tuesday, June 21, 2011

Migrate (move) SSL certificate from Windows to Linux

SkyHi @ Tuesday, June 21, 2011
Often, people who are not familiar with hosting servers, to be enticed by sales agents to buy new SLL certificates, because \"It is not possible to be migrated from Windows to Linux\".
With this tutorial I will show you how to move existing SSL certificate from Windows to Linux server.
Here I have to say that this tutorial will work, only if the certificate was installed without this option checked: ”Mark this key as exportable. This will allow you to back up or transport your keys at a later time.” Check the screen-shoot bellow to see what I mean:


Migrate (move) SSL certificate from Windows to Linux
So, if this option was not checked during the certificate installation I am afraid that the only option is to ask the certificate issuer.
Well, I hope in your case this option was checked, so let’s continue with the SSL certificate migration.
First export the certificate from the Windows server. Depending on the server configuration you can export it from IIS:
Just if you are not aware:
Click Start Buton -> Run… – type: intemgr – then locate the domain, right click then Properties – Directory Security – Server Certificate


Migrate (move) SSL certificate from Windows to Linux
If you have Active Directory setup to export the certificate:
Again just in case you do not know how:
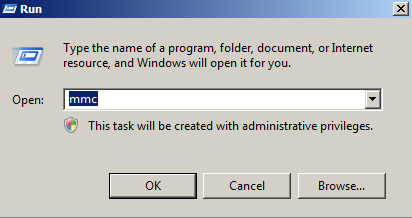
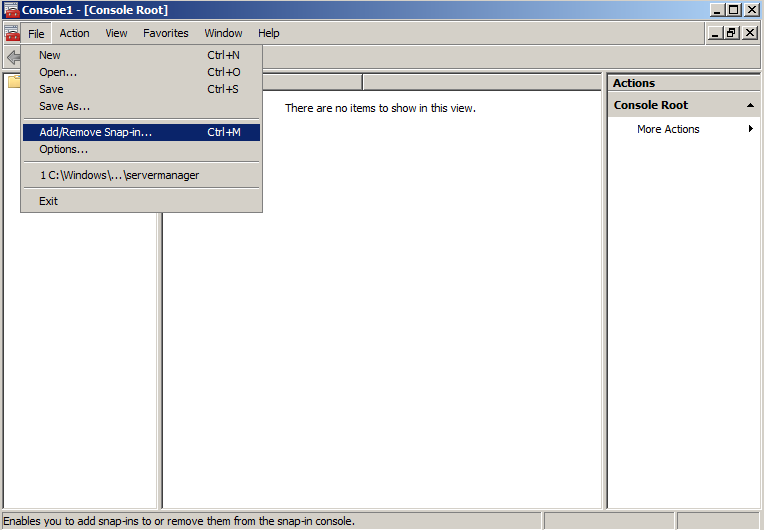
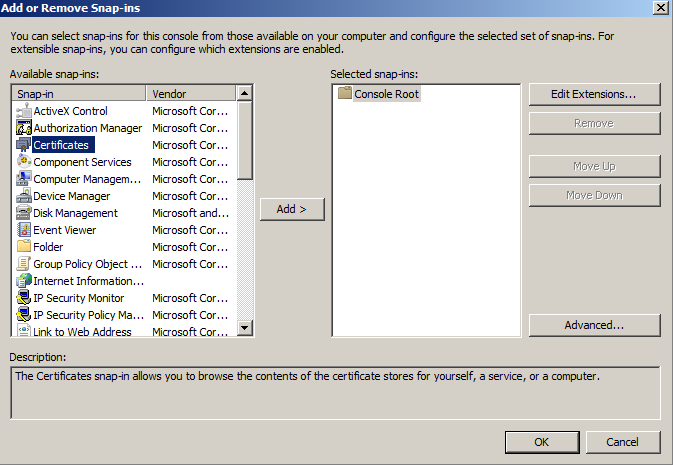
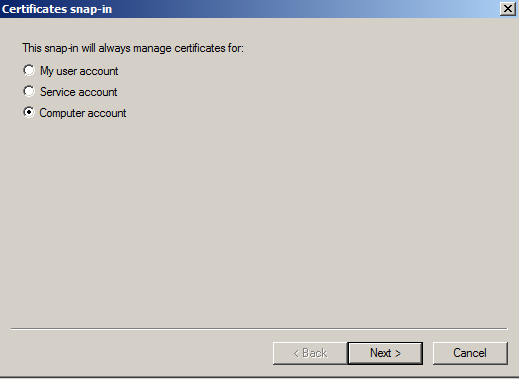
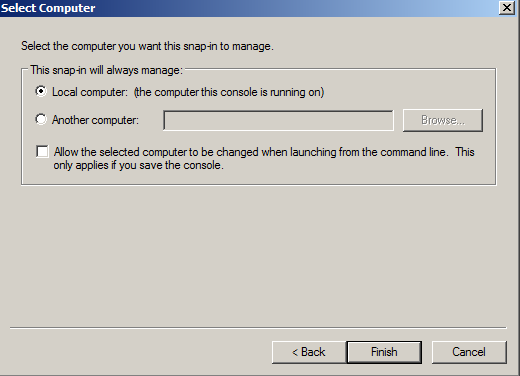
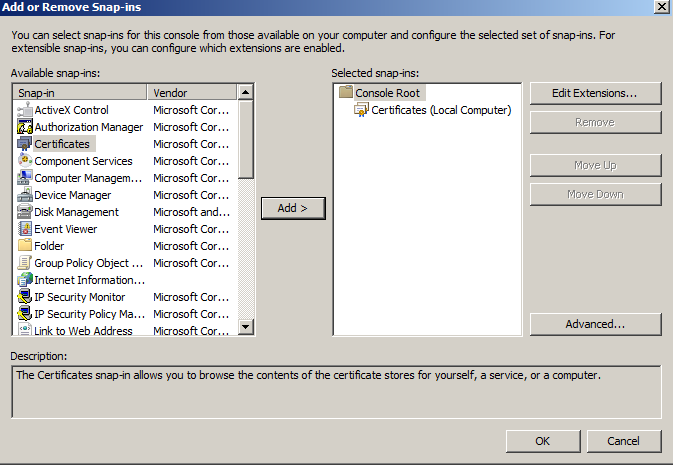
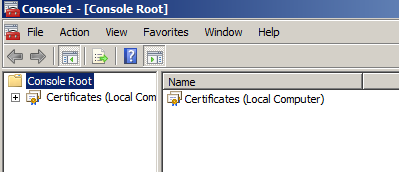
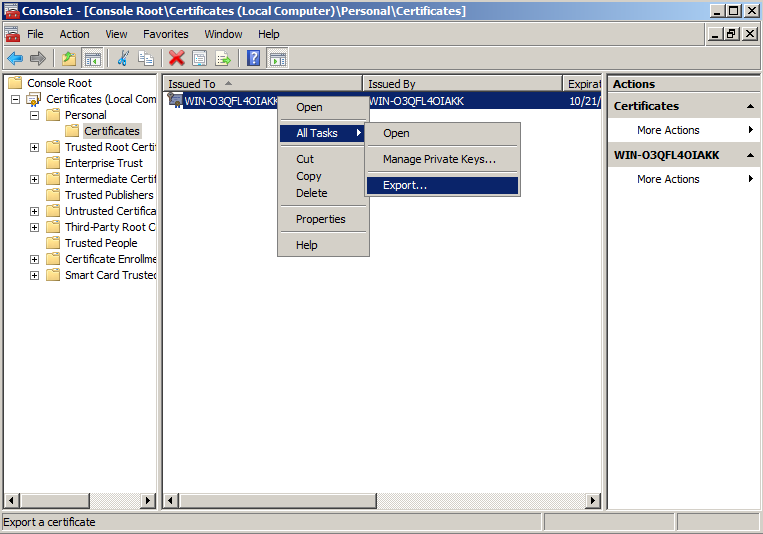
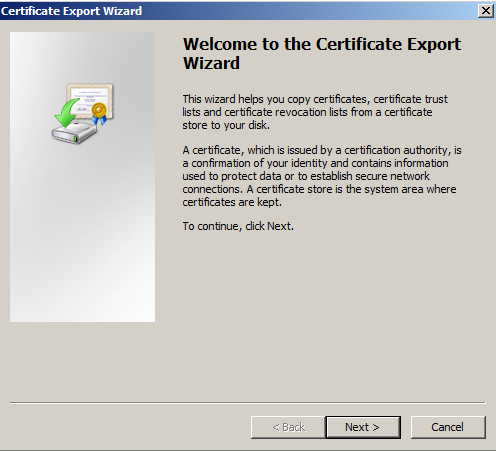
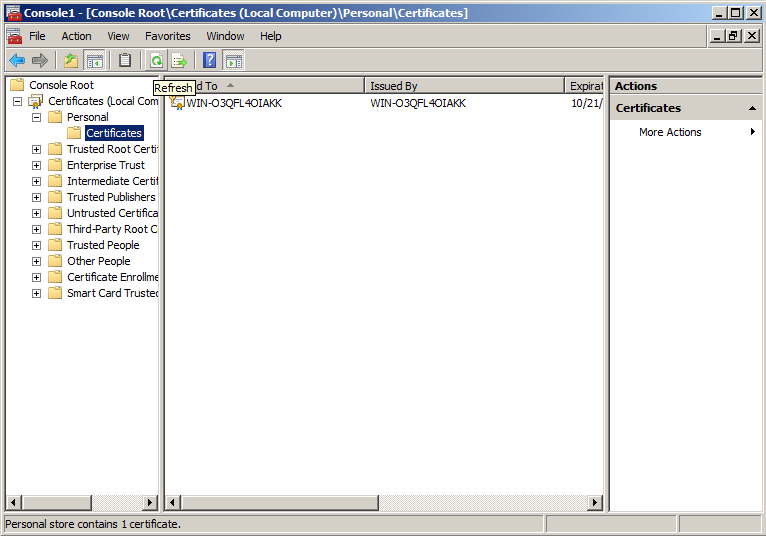
Click Start Buton -> Run… – type: mmc – then Open – Add/Remove Snap-in.. – click ‘Add’, choose certificates, choose computer account, then ‘Local computer’. Then expand ‘Certificatesc – ‘Personal’ -‘Certificated, locate the certificate and right click on it. Click ‘All task’ and ‘Export..’.


Migrate (move) SSL certificate from Windows to Linux
I presume you have successfully managed to export the SSL certificate pfx file.
Now move from the Windows to the Linux server the exported certificate and let’s do the magic, which is called: Extract SSL certificate and key from PFX file

More From onlinehowto


REFERENCES
http://www.onlinehowto.net/migrate-move-ssl-certificate-from-windows-to-linux/1504

Extract SSL certificate and key from PFX file

In this tutorial I will show you how to extract SSL certificate and key from PFX file and also how to remove a password from a private SSL key.
If you have landed on this tutorial and do not have PFX certificate file please visit: Migrate (move) SSL certificate from Windows to Linux.
The certificate extraction can be done with a tool called Open SSL that you may install from the Linux server repository, or take the source from here: OpenSSL. Also you can use the Windows version: OpenSSL for Windows.
Once you have it installed go to the folder where the PFX certificate is located and execute the following commands:


  1. # To export the private key from the pfx file:
  2. openssl pkcs12 -in win_cert.pfx -nocerts -out key.pem
  3. # To export the certificate from the pfx file:
  4. openssl pkcs12 -in win_cert.pfx -clcerts -nokeys -out cert.pem
  5. # And now remove the key password:
  6. openssl rsa -in key.pem -out key_with_no_pw.key
Probably from the comments, you guessed already what line what is doing, but I will explain these lines briefly:
The first line will export the private key from the windows certificate and since PFX key is always exported with a password, you will be prompted to enter one. So you must have it.
The second line will export certificate from the PFX file.
Again, you will need the PFX file password in order to remove it. In fact you can use the certificate with Apache server, but whenever it is restarted you will be prompted for a passphrase. If you choose this case, forget for automated Apache restarts and take in mind that you have to enter the pass after server restart. Like this one:

  1. /etc/init.d/apache2 start
  2. Starting web server (apache2)[Mon Apr 22 23:03:45 2010] [warn] module ssl_module is already loaded, skipping
  3. Apache/2.2.3 mod_ssl/2.2.3 (Pass Phrase Dialog)
  4. Some of your private key files are encrypted for security reasons.
  5. In order to read them you have to provide the pass phrases.
  6. Server 127.0.0.1:443 (RSA)
  7. Enter pass phrase:*******
  8. OK: Pass Phrase Dialog successful.
My advice is to remove the password from the SSL key. If someone manage to access it on the server, this will be you’re the least of your problems.
Well, that is it. Now you can rename the key and the certificate as per your needs and to use them.
I have another tutorial related to the matter is: Renew Windows SSL certificate when no key available.


REFERENCES
http://www.onlinehowto.net/extract-ssl-certificate-and-key-from-pfx-file/1505
http://www.opensourcetutor.com/2007/08/08/convert-iis-ssl-certificate-to-use-in-apache/
http://almamunbd.blogspot.com/2010/11/how-to-move-ssl-from-windows-to-linux.html


IIS: Export Private Key Option is Grayed When Exporting a Server Certificate

REFERENCES:
http://support.microsoft.com/kb/232154
http://www.eggheadcafe.com/microsoft/IIS/31331452/exporting-the-private-key--certificates.aspx

Solution for the above doesn't apply:

    Yes, you would have to reissue the certificate if the private key
    cannot be exported. Generate a new CSR on the Linux box that you want to
    install the certificate to and follow these instructions to replace
    (reissue) your certificate based on that new CSR ...

    The agent is sending you to
    https://search.thawte.com/support/ssl-digital-certificates/index?page=content&id=SO6285&actp=AGENT_REFERAL.

Friday, February 25, 2011

the issuer of this certificate cannot be found Certificate cannot be verified up to a trusted certification authority

SkyHi @ Friday, February 25, 2011
ERROR:
After migrate(export and import http://shebangme.blogspot.com/2011/02/move-or-copy-ssl-certificate-from.html) ssl from Windows Server 2003 IIS to a new IIS server, the following 2 errors appears:
  • the issuer of this certificate cannot be found
  • Certificate cannot be verified up to a trusted certification authority?
   

SOLUTION:      (talk to thawte tech support)
 Install the thawte Intermediate CA file

Step 2 - Download the thawte Intermediate CA file for your SSL product type:
Note: You MUST install correct thawte Intermediate CA file on your server for your SSL certificate to work and be fully supported in all web browsers.
Skip to step 3 If you have already downloaded the CA file otherwise select your SSL product type below to download the thawte Intermediate CA (Right Click on link & Save)

Step 3 - Create a Certificate Snap-in:
Note: Please ensure for step 8 to select 'Computer Account', selecting any other option will result in a failed installation.
  1. From the Web Server, Click Start > Run
  2. Type in MMC and Press Enter
  3. Click OK
  4. From the Microsoft Management Console (MMC) menu bar, Click File (in IIS 6.0) or Console (in IIS5.0) > Add/Remove Snap-in
  5. Click Add
  6. From the list of snap-ins, Select Certificates
  7. Click Add
  8. Select Computer Account
  9. Click Next
  10. Select Local Computer (the computer this console is running on)
  11. Click Finish
  12. In the snap-in list window, Click Close
  13. In the Add/Remove Snap-in Window, Click OK

Step 4 - Install the thawte Intermediate CA file:
  1. From the left pane, Expand the 'Intermediate Certification Authorities' folder
  2. Right-Click on 'Certificates' folder
  3. Click All Tasks > Import
  4. In the Certificate Import Wizard, Click Next
  5. Click on Browse and locate the Intermediate CA Certificate File (The PKCS#7 file you downloaded in step 2)
  6. Click Next
  7. Select option 'Place all certificates in the following store'
  8. Click Browse button and select 'Intermediate Certification Authorities'
  9. Click OK
  10. Click Next
  11. Click Finish
  12. Keep the Certifcate Snap-in open as you will need it to complete step 5.


Please download the Thawte Intermediate CAs for your SSL certificate here:
https://search.thawte.com/support/ssl-digital-certificates/index?page=content&id=AR1371

If you require the CA bundle version of the Intermediate CAs, please download it here:
https://search.thawte.com/support/ssl-digital-certificates/index?page=content&id=AR1372

3. CHECK INSTALLATION:
Ensure you have installed your certificate correctly at:
https://search.thawte.com/support/ssl-digital-certificates/index?page=content&id=SO9555

4. INSTALL THE THAWTE TRUSTED SEAL:
Additionally, as part of your SSL Certificate Service, you are entitled to display the Thawte Trusted Seal - recognised across the Internet and around the world as a symbol of authenticity, security, and trust - to build consumer confidence in your Web site.

Installation instructions for the Thawte Trusted Seal can be found on the following link:
http://www.thawte.com/ssl/secured-seal/installation-agreement/index.html

Visit the Thawte Support Web site, where you will find a range of support tools to help you:
https://search.thawte.com/support/ssl-digital-certificates/index.html


REFERENCES

https://search.thawte.com/support/ssl-digital-certificates/index?page=content&actp=CROSSLINK&id=SO15447

Monday, February 14, 2011

Move or copy an SSL certificate from a Windows server to another Windows server

SkyHi @ Monday, February 14, 2011
If you have multiple Windows servers that need to use the same SSL certificate, such as in a load-balancer environment or using a wildcard or UC SSL certificates, you can export the certificate to .pfx file and import it on a new Windows server. This may also be necessary when you switch hosting companies. We will go over the exact process with step-by-step instructions in this article. If necessary, you can copy the SSL certificate to an Apache or other type of server.
We will assume that you have already successfully installed the SSL certificate on one Windows web server. You will follow these steps to move or copy that working certificate to a new server:
  1. Export the SSL certificate from the server with the private key and any intermediate certificates into a .pfx file.
  2. Import the SSL certificate and private key on the new server.
  3. Configure your web sites to use them in IIS.
On a Windows server you will need to export your certificate from the MMC console to a .pfx file with your private key. You can then copy that .pfx file to the new Windows server and import it. The following screenshots are from a Windows Server 2008 machine but any differences for Windows Server 2003 are noted.

Export the certificate from the Windows MMC console

Note: These instructions will have you export the certificate using the MMC console. If you have Windows Server 2008 (IIS7) you can also import and export certificates directly in the Server Certificates section in IIS. Click here to hide or show the images
  1. Click on the Start menu and click Run.
  2. Type in mmc and click OK.
  3. Click on the File menu and click Add/Remove Snap-in...
  4. If you are using Windows Server 2003, click on the Add button. Double-click on Certificates.
  5. Click on Computer Account and click Next.
  6. Leave Local Computer selected and click Finish.
  7. If you are using Windows Server 2003, click the Close button. Click OK.
  8. Click the plus sign next to Certificates in the left pane.
  9. Click the plus sign next to the Personal folder and click on the Certificates folder. Right-click on the certificate you would like to export and select All Tasks and then Export...
  10. In the Certificate Export Wizard click Next.
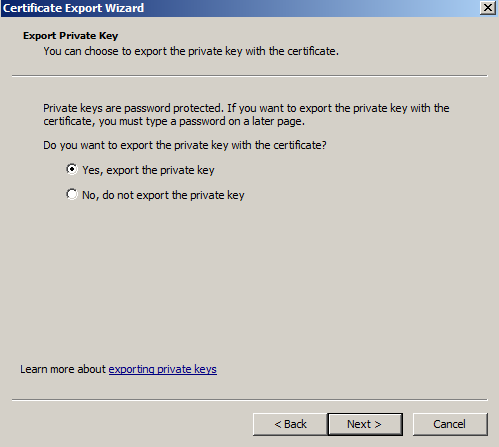
  11. Choose "Yes, export the private key" and click Next.
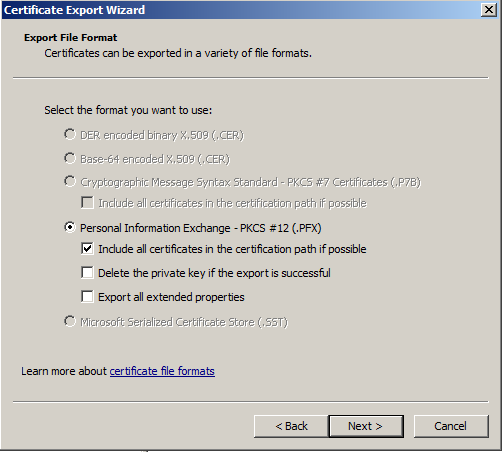
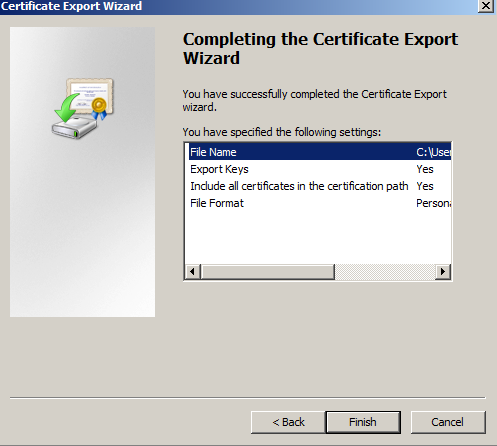
  12. Click the checkbox next to "Include all certificates in the certification path if possible" and click Next.
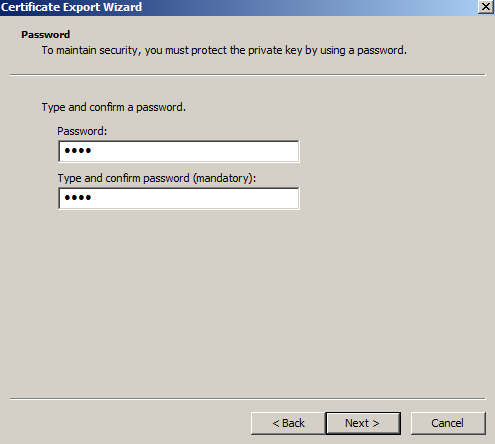
  13. Enter and confirm a password. This password will be needed whenever the certificate is imported to another server.
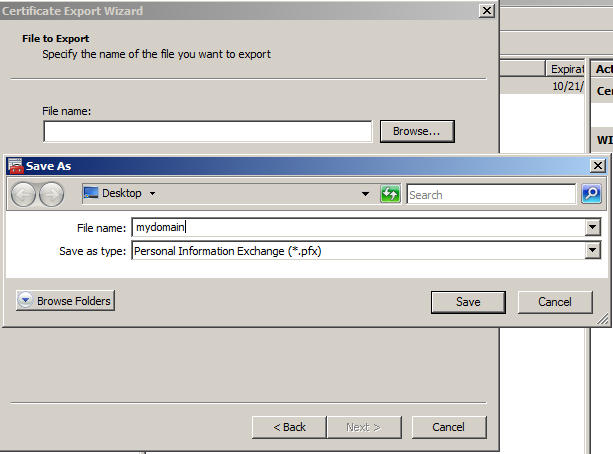
  14. Click Browse and find a location to save the .pfx file to. Type in a name such as "mydomain.pfx" and then click Next.
  15. Click Finish. The .pfx file containing the certificates and the private key is now saved to the location you specified.

Import the certificate in the Windows MMC console

After you have exported the certificate from the original server you will need to copy the .pfx file that you created to the new server and follow these import instructions.
  1. Click on the Start menu and click Run.
  2. Type in mmc and click OK.
  3. Click on the File menu and click Add/Remove Snap-in...
  4. If you are using Windows Server 2003, click on the Add button. Double-click on Certificates.
  5. Click on Computer Account and click Next.
  6. Leave Local Computer selected and click Finish.
  7. If you are using Windows Server 2003, click the Close button. Click OK.
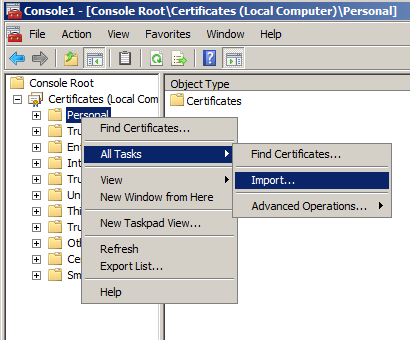
  8. Right-click on the Personal folder and select All Tasks and then Import...
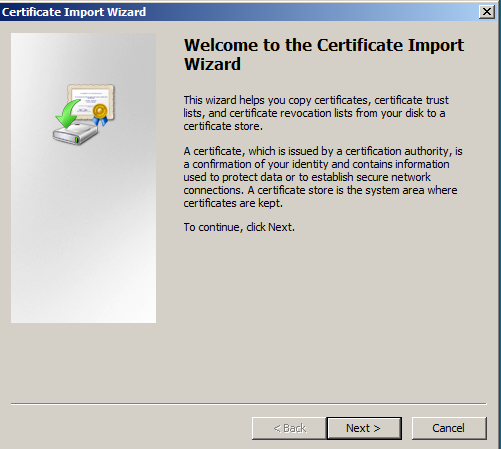
  9. In the Certificate Import Wizard click Next.
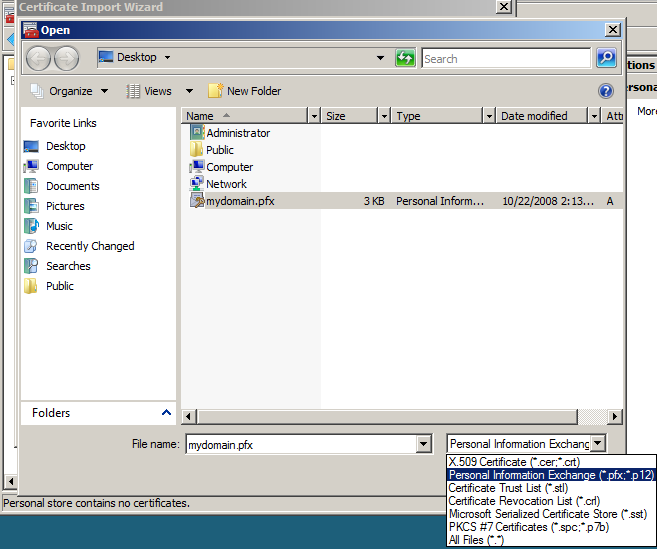
  10. Click the Browse button and change the file type from "X.509..." to "Personal Information Exchange (*.pfx, *.p12)". find the .pfx file that you copied over and click Open and then Next.
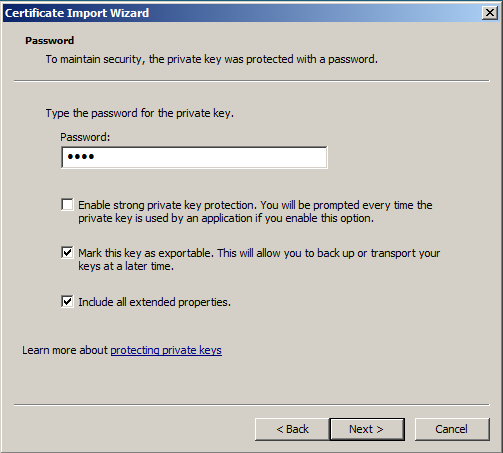
  11. Enter the password that you set when you exported the .pfx file and click "Mark this key as exportable" so you can export the certificate from this machine as well as the original. Click Next.
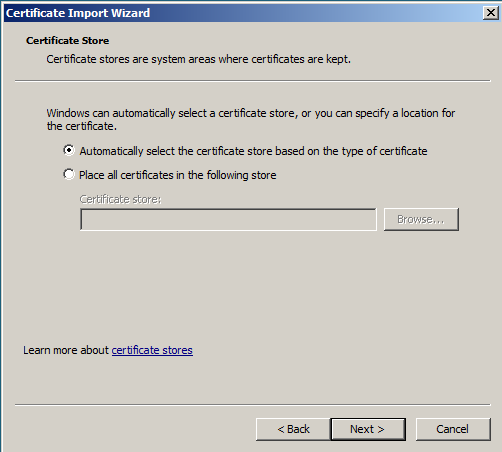
  12. Click "Automatically select the certificate store based on the type of certificate" and click Next.
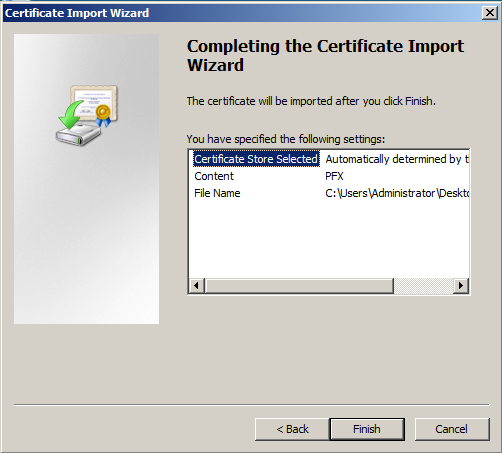
  13. Click Finish to complete the wizard.
  14. You can now click the Refresh button in the toolbar to refresh and find your certificate in the Certificates folder under Personal. You can verify that it was imported correctly by double-clicking it and looking for "You have a private key that corresponds to this certificate" at the bottom of the certificate dialog.
  15. Close the MMC console. You do not need to save any changes.

Assigning the SSL certificate

After you have imported the .pfx file, you will either need to assign the certificate in IIS, enable the certificate for the services you need in Exchange or select the certificate in any other software that you are using. Because IIS is the most common place to use SSL certificates, we have included the instructions for assigning a website to use the new certificate in IIS 6 (Windows Server 2003). If you have Windows Server 2008, just follow the binding part of the IIS 7 SSL Certificate Installation instructions.
  1. In IIS, right-click on the website that needs the certificate and click on Properties.
  2. Click the Directory Security tab and click on the Server Certificate button to run the server certificate wizard.
  3. If you already have a certificate on that website you will need to remove it and then start the wizard again.
  4. Click "Assign an existing certificate" and click Next.
  5. Select the new certificate that you just imported and click Next.
  6. Click Finish. You may need to restart IIS for the certificate to start working with the assigned website.
While there are several steps in the process, moving an SSL certificate from one Windows server to another is an easy task. It involves exporting a working SSL certificate from the MMC console to a .pfx file which contains the certificates and private key and then importing that file in the MMC console of the new or additional server. You will then need to assign or bind the certificate to a website in IIS in order to start using it on a website. If you need to move your SSL certificate to or from a different type of server, select the server type on our main SSL Certificate Import/Export Page


REFERENCES
http://www.sslshopper.com/move-or-copy-an-ssl-certificate-from-a-windows-server-to-another-windows-server.html

Tuesday, January 18, 2011

SSL Certificate Installation Checker

SkyHi @ Tuesday, January 18, 2011
Thawte SSL Certificate Installation Checker
** All other server platforms

Please download the Thawte Intermediate CAs for your SSL certificate here:
https://search.thawte.com/support/ssl-digital-certificates/index?page=content&id=AR1371

If you require the CA bundle version of the Intermediate CAs, please download it here:
https://search.thawte.com/support/ssl-digital-certificates/index?page=content&id=AR1372

3. CHECK INSTALLATION:
Ensure you have installed your certificate correctly at:
https://search.thawte.com/support/ssl-digital-certificates/index?page=content&id=SO9555

4. INSTALL THE THAWTE TRUSTED SEAL:
Additionally, as part of your SSL Certificate Service, you are entitled to display the Thawte Trusted Seal - recognised across the Internet and around the world as a symbol of authenticity, security, and trust - to build consumer confidence in your Web site.

Installation instructions for the Thawte Trusted Seal can be found on the following link:
http://www.thawte.com/ssl/secured-seal/installation-agreement/index.html

Visit the Thawte Support Web site, where you will find a range of support tools to help you:
https://search.thawte.com/support/ssl-digital-certificates/index.html


VeriSign SSL Certificate Installation Checker
IMPORTANT! In order for your SSL Certificate to function properly, you must download and install the VeriSign Intermediate CA Certificate on your Web server. Microsoft Internet Information Services (IIS) 5.0 and above automatically installs the Intermediate CA Certificate when you install the SSL Certificate and does not require separate installation. All other Web servers require you to install the Intermediate CA separately.
===========================

For detailed installation instructions for your SSL Certificate and the Intermediate CA, go to:
https://www.verisign.com/support/ssl-certificates-support/install-ssl-certificate.html

===========================
NEW CERTIFICATE INSTALLATION CHECKER
Ensure you have installed your certificate correctly at: https://knowledge.verisign.com/support/ssl-certificates-support/index?page=certchecker
===========================

Additionally, as part of your Secure Site Service, you are entitled to display the VeriSign Secured Seal - recognized across the Internet and around the world as a symbol of authenticity, security, and trust - to build consumer confidence in your Web site. For installation instructions for your VeriSign Secured Seal, go to:
https://www.verisign.com/ssl/secured-seal/index.html


SSL for IIS 6.0 
D: I just want to confirm if a new csr is needed to renew a SSL123
on IIS6.0?


A: Need to create a new csr via dummy site as there is a bug in IIs
during renew process it create csr which has few fields striped and hence
renew csr do not match original order
A: To resolve the problem you need to create a dummy site in IIS name
it dummy site
Make Sure CN is your Domain Name
Generate a CSR for dummy site CN is your domain name
Apply for a Renew or Reissue Certificate
Install the New SSL Cert on Dummy Site
Replace Production site or Default site with dummy site
Delete Dummy site
The agent is sending you to
https://search.thawte.com/support/ssl-digital-certificates/index?page=content&id=SO3881.

D: got you, that's exactly what I found..thx....that's such as
hassle just to renew a ssl...hehe
A: There is a bug in IIS


ERROR:  The intermediate CA certificate cannot be found for the following certificate chain. 
Solution: if everything is correct, restart Apache instead reload Apache.

Thursday, July 22, 2010

What is mscorsvw.exe and why is it eating up my CPU? What is this new CLR Optimization Service?

SkyHi @ Thursday, July 22, 2010

Short version:


mscorsvw.exe is precompiling .NET assemblies in the background. Once it's done, it will go away. Typically, after you install the .NET Redist, it will be done with the high priority assemblies in 5 to 10 minutes and then will wait until your computer is idle to process the low priority assemblies. Once it does that it will shutdown and you won't see mscorsvw.exe. One important thing is that while you may see 100% CPU usage, the compilation happens in a process with low priority, so it tries not to steal the CPU for other stuff you are doing. Once everything is compiled, assemblies will now be able to share pages across different processes and warm start up will be typically much faster, so we're not throwing away your cycles.


If you are really want to get rid of mscorsvw.exe from your task manager, just do:


ngen.exe executequeueditems


which will drain all the queued up work.


REFERENCES

http://blogs.msdn.com/b/davidnotario/archive/2005/04/27/412838.aspx


Friday, June 11, 2010

How to move a SSL Certificate from Server to Server?

SkyHi @ Friday, June 11, 2010
There may be certain instances in which an SSL certificate must be moved from one server to another. An SSL certificate is bound to the server software and the common name. Therefore, the certificate and its corresponding private key may be exported from the original server and imported into the target server as long as both servers run the same server software (i.e. Apache to Apache) and the target server will be hosting a site that matches the common name. To do this copy the .key and the .crt files to be imported into the new servers certificate
control panel.

Suppose, you have purchased a new Linux server and going to transfer all your domains residing on existing server to new server. In such case, you may require to transfer the shared SSL certificate installed on your domain to new server.

If your domain name and host name remains same for both the servers then you can directly transfer existing SSL certificate for the domain hosted on old server to a new server.

You just need to copy and paste following files from your old server to new server:

* /etc/httpd/conf/ssl.key (private key)
* /etc/httpd/conf/ssl.csr ( CSR key)
* /etc/httpd/conf/ssl.crt (certificate file)

REFERENCES
https://knowledge.verisign.com/support/ssl-certificates-support/index?page=content&id=AR215
http://kb.mediatemple.net/questions/707/Moving+an+SSL+Certificate+from+another+server
http://discussion.accuwebhosting.com/linux-server/1059-how-transfer-ssl-certificate-one-server-other-server.html
http://www.webhostingresourcekit.com/252.html


Moving SSL Certs from IIS to Apache

I found some instructions for converting SSL certificates generated for IIS to private key, and cert files you can use on unix, or Apache for windows.

First Export your IIS certificate into a pfx file (this is something you should do anyways for backup)

* Run mmc.exe
* Click the 'Console' menu and then click 'Add/Remove Snap-in'.
* Click the 'Add' button and then choose the 'certificates' snap-in and click on 'Add'.
* Select 'Computer Account' then click 'Next'.
* Select 'Local Computer' and then click 'OK'.
* Click 'Close' and then click 'OK'.
* Expand the menu for 'Certificates' and click on the 'Personal' folder.
* Right click on the certificate that you want to export and select 'All tasks' -> 'Export'.
* A wizard will appear. Make sure you check the box to include the private key and continue through with this wizard until you have a .PFX file.

Next run openssl to extract the private key, and the cert file.

# Export the private key file from the pfx file
openssl pkcs12 -in filename.pfx -nocerts -out key.pem
# Export the certificate file from the pfx file
openssl pkcs12 -in filename.pfx -clcerts -nokeys -out cert.pem
# This removes the passphrase from the private key so Apache won't
# prompt you for your passphase when it starts
openssl rsa -in key.pem -out server.key

REFERENCES
http://www.sslshopper.com/move-or-copy-an-ssl-certificate-from-a-windows-server-to-another-windows-server.html
http://serverfault.com/questions/92324/moving-ssl-on-another-server


Thursday, April 15, 2010

IIS Redirects - 301 , 302

SkyHi @ Thursday, April 15, 2010

Microsoft's Internet Information Server ( MS IIS ) is very different from
Apache, and you need to handle redirects on it differently.


Although you can use the popular FrontPage web development software with
Apache + FP extensions, most people who use FrontPage prefer to use IIS. Also,
Microsoft's .NET and ASP development platforms usually work best on MS IIS (no
surprise there).


Definitions for Terms used in
this Article


Detailed Information


Overview


What you are trying to accomplish here is to have one resource (either a page
or an entire site) redirect a visitor to a completely different page or site,
and while doing so tell the visitor's browser that the redirect is either
permanent (301) or temporary (302).


Therefore you need to do three things:


  1. Have 2 resources - one source page or website, and one destination page
    or website.
  2. When an attempt to access the source resource is made, IIS transfers the
    visitor to the destination instead.
  3. During the transfer, IIS reports to the visitor that a redirect is
    happening and it's either temporary or permanent.


The good news is that IIS has always supported this, and you can use it's
control panel to make the redirect.


Administrator Mode - Redirecting a Domain


If you can log into the Windows 2000 (or higher) server and access the
desktop, then choose:


Start > Programs > Administrative Tools > Internet Services Manager


Now choose the server running the site you want to forward. Remember you need
2 sites - one to forward FROM and one to forward TO. These can be on the same,
or separate servers.


Right click on the site you want to redirect FROM and choose Properties > Home
Directory


You will see the following:


The default is the first choice, "A directory located on this computer". Change
it to "A redirection to a URL" and type in the new URL.


If you want it to be a 301, then be sure to check ON
the choice for "A permanent redirection for this resource". If you want it to be
a 302, leave the choice checked OFF.


Administrator Mode - Redirecting an Individual Page


If you can log into the Windows 2000 (or higher) server and access the
desktop, then choose:


Start > Programs > Administrative Tools > Internet Services Manager


Now choose the server running the site you want to forward. Choose the site
with the webpage you want to forward in it, then right click on the it and
choose "Properties".


You will see the following:


The default is the first choice, "The designated file". Change it to "A
redirection to a URL" and type in the new URL.


If you want it to be a 301, then be sure to check ON
the choice for "A permanent redirection for this resource". If you want it to be
a 302, leave the choice checked OFF.


If you don't control the IIS server, ask the admin to do the above. Done.


Passing on Variables or a Query String During IIS Redirects


Let's say that you want to pass on some variables, for example, you wanted to
redirect an ASP site that accepted arguments for some pages and pass those same
arguments on to the same pages at the new site.


In this case, in the "Redirect to:" box, enter the domain you wish to move to
(no trailing slash), plus $S$Q .


For example:


http://www.newdomain.com$S$Q


Next, check the options that state the client will be sent to "The exact
URL entered above"
, as well as "A permanent redirection for this resource"
(if you want it to be a 301). Done.


What does this $S$Q do? These are tags that IIS will automatically replace -
$S will be replaced with the subdirectory location (such as /shopping/cart.aspx)
and $Q will be replaced with the querystring (such as ?id=Blue).


Server Variable Function Example
$P Passes parameters that were passed to the URL to the new URL. If the request contains parameters such as
http://www.oldsite.com/cart.asp?id=Blue ,
then $P would represent
all the values after the question mark in the URL, example $P would
equal id=Blue (no question mark).
$Q Passes the parameters including the question mark. This is the same as $P but includes the question mark or query
string. So $P would equal ?id=Blue
$S Passes the matching suffix of the URL to the new URL. If the request is for http://www.oldsite.com/shopping/cart.asp,
then $S represents /cart.asp. If the request was for
http://www.oldsite.com/shopping

then the value of $S would be /shopping
$V Removes the server name from the original request. If the request is for http://www.oldsite.com/shopping/cart.asp
then $V would contain everything after the server name, eg:
/shopping/cart.asp
.
* Wildcard symbol used for replacement. Let's say you want to redirect all requests for html pages to a
single asp page - you could do so in the following way:
*;*.htm;page.asp


This works for both Site Redirects and Individual Page Redirects.


Common Scenarios


I Just Want To Switch Domains!


This is actually pretty straightforward. You can tweak things to get exactly
what you need with the variables above, but the following will work for the most
common setups:


http://www.newdomain.com$V$Q


Do NOT add a trailing slash "/" at the end of the domain name!


Make sure you check:


  • The exact URL entered above
  • A permanent redirection for this resource

Done! This will send everything after the old domain name to the new domain
name, including variables. You need to do is make sure that the new website is
set up exactly the same as the old one and that all you are doing is changing
domain names.


Non-WWW to WWW Redirect for IIS


When you set up a site in IIS, usually you set up the site with a domain name
and add the domain name with both versions, www and non-www, to the host headers
for the account. This creates a potential duplication issue, though.


The better way to do this is to actually create 2 accounts - one with the www
version and one without. Then you put the website in your preferred version and
a single page in the other. Normally, you would then treat this as if you were
switching domains (above), with the 2 domains being the www and the non-www
versions.


Another method, for those that don't have direct access to the
control panel
(common with many ISP's/ hosts), is to put your entire website in the www account and then a
single page in the non-www account. Then you would put the following code in the
default page in the account with the single page (i.e. the one you are redirecting):


< %@ Language=VBScript %>

< %

Response.Status="301 Moved Permanently"

Response.AddHeader "Location",
http://www.example.com


%>


What about Parameters?


If you do a non-www to www redirect for MS Internet Information Services
(IIS) and have parameters that need to be passed on, then do the following
(Thanks to Chris Hirst for testing
this):


  1. Do the above non-WWW to WWW redirect
  2. Make double sure that you do NOT have a trailing slash at the end of the
    domain (http://www.newdomain.com$V$Q, NOT http://www.newdomain.com/$V$Q)
  3. As with all these redirects, make sure that you check "The exact URL
    entered above"

Don't Have Administrator or Desktop Access?


If possible, ask the Administrator for the site to perform the above steps.
If you can't, you need to use ASP or .NET scripting on-page to do redirects.


Conclusion


IIS is a powerful and easy to use web hosting platform. If you have access to
the Admin panel you can accomplish basic tasks (like simple redirection) easily
and quickly. If you don't have access (and don't want to switch hosts) then you
will have to use redirection scripting to accomplish this. You'll learn more
about that in the Redirects Using On-Page
Scripting and Headers
section.


REFERENCE

http://www.mcanerin.com/EN/articles/301-redirect-IIS.asp

Tuesday, April 6, 2010

IIS redirect

SkyHi @ Tuesday, April 06, 2010

I think several of the answers hit around the possible solution to your problem.

I agree the easiest (and best solution for SEO purposes) is the 301 redirect. In IIS this is fairly trivial, you'd create a site for subdomain.hostone.com, after creating the site, right-click on the site and go into properties. Click on the "Home Directory" tab of the site properties window that opens. Select the radio button "A redirection to a URL", enter the url for the new site (http://subdomain.hosttwo.com), and check the checkboxes for "The exact URL entered above", "A permanent redirection for this resource" (this second checkbox causes a 301 redirect, instead of a 302 redirect). Click OK, and you're done.

Or you could create a page on the site of http://subdomain.hostone.com, using one of the following methods (depending on what the hosting platform supports)

PHP Redirect:


ASP Redirect:


<%@ Language=VBScript %>
<% Response.Status="301 Moved Permanently" Response.AddHeader "Location","http://subdomain.hosttwo.com" %>

ASP .NET Redirect:

I think several of the answers hit around the possible solution to your problem.

I agree the easiest (and best solution for SEO purposes) is the 301 redirect. In IIS this is fairly trivial, you'd create a site for subdomain.hostone.com, after creating the site, right-click on the site and go into properties. Click on the "Home Directory" tab of the site properties window that opens. Select the radio button "A redirection to a URL", enter the url for the new site (http://subdomain.hosttwo.com), and check the checkboxes for "The exact URL entered above", "A permanent redirection for this resource" (this second checkbox causes a 301 redirect, instead of a 302 redirect). Click OK, and you're done.

Or you could create a page on the site of http://subdomain.hostone.com, using one of the following methods (depending on what the hosting platform supports)

PHP Redirect:


ASP Redirect:


<%@ Language=VBScript %>
<% Response.Status="301 Moved Permanently" Response.AddHeader "Location","http://subdomain.hosttwo.com" %>

ASP .NET Redirect:


Now assuming your CNAME record is correctly created, then the only problem you are experiencing is that the site created for http://subdomain.hosttwo.com is using a shared IP, and host headers to determine which site should be displayed. To resolve this issue under IIS, in IIS Manager on the web server, you'd right-click on the site for subdomain.hosttwo.com, and click "Properties". On the displayed "Web Site" tab, you should see an "Advanced" button next to the IP address that you'll need to click. On the "Advanced Web Site Identification" window that appears, click "Add". Select the same IP address that is already being used by subdomain.hosttwo.com, enter 80 as the TCP port, and then enter subdomain.hosttwo.com as the Host Header value. Click OK until you are back to the main IIS Manager window, and you should be good to go. Open a browser, and browse to http://subdomain.hostone.com, and you'll see the site at http://subdomain.hosttwo.com appear, even though your URL shows http://subdomain.hostone.com

Hope that helps...


Now assuming your CNAME record is correctly created, then the only problem you are experiencing is that the site created for http://subdomain.hosttwo.com is using a shared IP, and host headers to determine which site should be displayed. To resolve this issue under IIS, in IIS Manager on the web server, you'd right-click on the site for subdomain.hosttwo.com, and click "Properties". On the displayed "Web Site" tab, you should see an "Advanced" button next to the IP address that you'll need to click. On the "Advanced Web Site Identification" window that appears, click "Add". Select the same IP address that is already being used by subdomain.hosttwo.com, enter 80 as the TCP port, and then enter subdomain.hosttwo.com as the Host Header value. Click OK until you are back to the main IIS Manager window, and you should be good to go. Open a browser, and browse to http://subdomain.hostone.com, and you'll see the site at http://subdomain.hosttwo.com appear, even though your URL shows http://subdomain.hostone.com

Hope that helps...


REFERENCE

http://stackoverflow.com/questions/16298/how-to-redirect-sitea-to-siteb-with-a-or-cname-records

Thursday, January 21, 2010

How to Configure IIS SMTP Server to forward emails using a Gmail account

SkyHi @ Thursday, January 21, 2010

This is very useful when you want to test your outgoing email for SharePoint but not have access to an SMTP server.

  1. Create and setup a Gmail account to use POP3.

    Enabling POP3 in Gmail: http://mail.google.com/support/bin/answer.py?answer=13273&cbid=wl8yzeug2lob&src=cb&lev=topic

  2. Install the mail server role (POP3 and SMTP) 
  3. Configure the IIS Server to forward messages using that account:
    1. IIS SMTP Virtual server -> Properties ->
      1. Access Tab

    clip_image001

    1. Relay Button

    clip_image002

    You can specify only the servers that you want to be able to send email here by selecting Only the list below and adding your servers IP addresses.

    1. Delivery Tab

    clip_image003

    1. Outbound Security Button:

    clip_image004 
    Select Basic Authentication and specify your Gmail account  and password. Check the TLS encryption.

    1. Outbound connections button

    clip_image005
    Set TCP port to 587.

    1. Advanced Button

    clip_image006
    specify the smart host as smtp.gmail.com

  4. Now configure the Outbound email in SharePoint to send email to the server where you have installed this SMTP server.
Reference: http://fmuntean.wordpress.com/2008/10/26/how-to-configure-iis-smtp-server-to-forward-emails-using-a-gmail-account/