Wednesday, August 22, 2012

RPM package changelog and what library a file belongs

SkyHi @ Wednesday, August 22, 2012

#rpm -q --changelog

* Wed Jun 06 2012 Johnny Hughes 2.2.3-65.el5.centos
- Roll in CentOS Branding

* Fri May 25 2012 Joe Orton - 2.2.3-65
- mod_cache: fix handling of 304 responses (#825210)

* Wed Feb 08 2012 Joe Orton - 2.2.3-63.1
- add security fixes for CVE-2012-0053, CVE-2012-0031, CVE-2011-3607 (#787596)
- remove patch for CVE-2011-3638, obviated by fix for CVE-2011-3639

* Wed Jan 04 2012 Joe Orton - 2.2.3-63
- revert addition of LDAP nested group support (#546443)

* Wed Dec 21 2011 Joe Orton - 2.2.3-62
- mod_ldap: add support for nested groups (#546443)
- mod_ssl: fix segfault with bad SSLCryptoDevice argument (#767990)

* Wed Dec 07 2011 Jan Kaluza - 2.2.3-61
- rotatelogs: include new manpage (#677279,#677288)


 Find to what library a file belongs?


# rpm -qif /usr/bin/dig
Name        : bind-utils                   Relocations: (not relocatable)
Version     : 9.3.4                             Vendor: CentOS
Release     : 6.0.3.P1.el5_2                Build Date: Thu 08 Jan 2009 06:40:33 PM PST
Install Date: Tue 10 Mar 2009 01:32:49 PM PDT      Build Host: builder16.centos.org
Group       : Applications/System           Source RPM: bind-9.3.4-6.0.3.P1.el5_2.src.rpm
Size        : 285637                           License: BSD-like
Signature   : DSA/SHA1, Fri 09 Jan 2009 03:05:41 PM PST, Key ID a8a447dce8562897
URL         : http://www.isc.org/products/BIND/
Summary     : Utilities for querying DNS name servers.
Description :
Bind-utils contains a collection of utilities for querying DNS (Domain
Name System) name servers to find out information about Internet
hosts. These tools will provide you with the IP addresses for given
host names, as well as other information about registered domains and
network addresses.

You should install bind-utils if you need to get information from DNS name
servers.


Tuesday, August 21, 2012

How to disable DNSMASQ in ubuntu 12.04(Precise)

SkyHi @ Tuesday, August 21, 2012
Dnsmasq is a lightweight server designed to provide DNS (and optionally DHCP and TFTP) services to a small-scale network. It can serve the names of local machines which are not in the global DNS. The DHCP server integrates with the DNS server and allows machines with DHCP-allocated addresses to appear in the DNS with names configured either in each host or in a central configuration file. Dnsmasq supports static and dynamic DHCP leases and BOOTP for network booting of diskless machines.

The developers of dnsmasq targeted home networks using NAT and connected to the internet via a modem, cable-modem or ADSL connection. But the system would function well in any small network where low resource-use and ease of configuration are important.
In ubuntu 12.04 dnsmasq is now running by default due to being hard coded into network manager.
Using dnsmasq as local resolver by default on desktop installations
That’s the second big change of this release. On a desktop install, your DNS server is going to be “127.0.0.1? which points to a NetworkManager-managed dnsmasq server.
This was done to better support split DNS for VPN users and to better handle DNS failures and fallbacks. This dnsmasq server isn’t a caching server for security reason to avoid risks related to local cache poisoning and users eavesdropping on other’s DNS queries on a multi-user system.
The big advantage is that if you connect to a VPN, instead of having all your DNS traffic be routed through the VPN like in the past, you’ll instead only send DNS queries related to the subnet and domains announced by that VPN. This is especially interesting for high latency VPN links where everything would be slowed down in the past.
As for dealing with DNS failures, dnsmasq often sends the DNS queries to more than one DNS servers (if you received multiple when establishing your connection) and will detect bogus/dead ones and simply ignore them until they start returning sensible information again. This is to compare against the libc’s way of doing DNS resolving where the state of the DNS servers can’t be saved (as it’s just a library) and so every single application has to go through the same, trying the first DNS, waiting for it to timeout, using the next one.
If you don’t want a local resolver you can turn it off DNSMASQ using the following procedure
You need to edit /etc/NetworkManager/NetworkManager.conf file
gksudo gedit /etc/NetworkManager/NetworkManager.conf
and comment out the following line from
dns=dnsmasq
to
#dns=dnsmasq
Save and exit the file
Now you need to network-manager using the following command
sudo restart network-manager
Source from here


REFERENCES
http://www.ubuntugeek.com/how-to-disable-dnsmasq-in-ubuntu-12-04precise.html
http://www.stgraber.org/2012/02/24/dns-in-ubuntu-12-04/

Monday, August 20, 2012

ubuntu install amd catalyst

SkyHi @ Monday, August 20, 2012

ATI Radeon™ HD 3450 GPU on Ubuntu 12.04


Manually installing Catalyst 12.6, special case for Intel/ATI hybrid graphics

WARNING: Using a method other than described in the manual instructions section above by creating a .deb file can lead to extreme difficulties. Be sure to take note of the instructions for uninstalling the driver at the end of this section, since the driver must be uninstalled using the amdconfig utility.
This method is NOT RECOMMENDED in general, but has been found by some users to make the chore of getting Intel/ATI hybrid graphics to work less difficult.
This method PROBABLY WILL NOT WORK for HD 5xxx or earlier cards. It has been shown by some users to work only with 6xxx and 7xxx series cards.
1. Save backup copy of xorg.conf in case this doesn't work.
sudo cp /etc/X11/xorg.conf /etc/X11/xorg.conf.BAK

2. Remove/purge current fglrx and fglrx-amdcccle (If you have used a method outside of aptitude, apt, Software Center or Synaptic, follow the other party's instructions for removal.)
sudo apt-get remove --purge fglrx fglrx-amdcccle

For some users, the fglrx-updates and fglrx-amdcccle-updates packages do not work. If you attempted to install them, also do
sudo apt-get remove --purge fglrx-updates fglrx-amdcccle-updates

3. Reboot
4. Download the driver found at the AMD/ATI website
5. Navigate to the directory to which the file was downloaded
cd /path/to/file

6. Make the .run file executable, using the 12.6 driver as an example (modify as needed for future versions. Note that the name of the .run file is for ILLUSTRATION only and you must be sure that you type the name of the actual file correctly.)
sudo chmod +x amd-driver-installer-12-6-x86.x86_64.run

7. Execute the .run file
sudo ./amd-driver-installer-12-6-x86.x86_64.run

Be sure to click "Install Driver" as shown: 
catalyst1.png
8. Create a new xorg.conf
sudo amdconfig --initial

9. Reboot.
10. To confirm the drivers are working open a terminal and type:
fglrxinfo

You should get an output similar to the following:
fglrxinfo 
display: :0  screen: 0
OpenGL vendor string: Advanced Micro Devices, Inc.
OpenGL renderer string: AMD Radeon HD 6300M Series
OpenGL version string: 4.2.11733 Compatibility Profile Context

11. The Catalyst Control Center should now offer a choice between the integrated Intel graphics and the dedicated AMD/ATI graphics. To switch, select the graphics you want to run. Because the change is not dynamic, a reboot is required.
SwitchGraphics.png
12. To uninstall after installing using this method, you MUST use the amdconfig utility:
sudo amdconfig --uninstall


REFERENCES
https://help.ubuntu.com/community/BinaryDriverHowto/ATI

Discovering and Monitoring Hardware in Linux

SkyHi @ Monday, August 20, 2012

Q. How do I find out which graphics card installed in my Linux desktop system? I’m using Ubuntu Linux. I don’t want to open up the computer hardware to just see the make and model of the graphics card in a system.
A. You don’t have to open the hardware to see the make and model of the graphics card in a system. There is direct method provided by using lspcicommand.
This command will usually tell you the vendor and model of your card. Open xterminal or shell prompt and type the command:
$ lspci
$ lspci -v
$ lspci -v | less

Output:
00:01.0 PCI bridge: Broadcom BCM5785 [HT1000] PCI/PCI-X Bridge
00:02.0 Host bridge: Broadcom BCM5785 [HT1000] Legacy South Bridge
00:02.1 IDE interface: Broadcom BCM5785 [HT1000] IDE
00:02.2 ISA bridge: Broadcom BCM5785 [HT1000] LPC
00:03.0 USB Controller: Broadcom BCM5785 [HT1000] USB (rev 01)
00:03.1 USB Controller: Broadcom BCM5785 [HT1000] USB (rev 01)
00:03.2 USB Controller: Broadcom BCM5785 [HT1000] USB (rev 01)
00:05.0 VGA compatible controller: ATI Technologies Inc Rage XL (rev 27)
00:18.0 Host bridge: Advanced Micro Devices [AMD] K8 [Athlon64/Opteron] HyperTransport Technology Configuration
00:18.1 Host bridge: Advanced Micro Devices [AMD] K8 [Athlon64/Opteron] Address Map
00:18.2 Host bridge: Advanced Micro Devices [AMD] K8 [Athlon64/Opteron] DRAM Controller
00:18.3 Host bridge: Advanced Micro Devices [AMD] K8 [Athlon64/Opteron] Miscellaneous Control
01:0d.0 PCI bridge: Broadcom BCM5785 [HT1000] PCI/PCI-X Bridge (rev b2)
01:0e.0 RAID bus controller: Broadcom BCM5785 [HT1000] SATA (Native SATA Mode)
02:03.0 Ethernet controller: Broadcom Corporation NetXtreme BCM5704 Gigabit Ethernet (rev 10)
02:03.1 Ethernet controller: Broadcom Corporation NetXtreme BCM5704 Gigabit Ethernet (rev 10)
Look for video controller / vga keywords in above output listing.
It is a good idea to run update-pciids command to fetches the current version of the pci.ids file from the primary distribution site and installs it. You must run update-pciids command as root user:
$ sudo update-pciids
OR
# update-pciids

Hardware information GUI tool

Under Ubuntu Linux you can open hardware information GUI tool by clicking on:
System > Preferences > Hardware information

Nothing ever need be a mystery on Linux as it has a large number of excellent utilities for discovering hardware and monitoring hardware health. Here are a handful of good tools for spotting possible hard drive failure, displaying hardware information and monitoring temperatures, fans, voltages, email, music players and more. 
gsmartcontrol
GSmartControl provides an excellent graphical interface to smartmontools.

Hard Drive Health

You're probably familiar with the excellent smartmontools for monitoring hard drive health, and getting early warning of possible drive failure. Smartmontools runs tests and reads data on drives that have the Self-Monitoring, Analysis and Reporting Technology (S.M.A.R.T.) system built into them. It's been around seemingly forever, but did you know there is a graphical interface for it? SmartControl puts a nice interface on smartmontools and supports all of its functions.
You can run a short or long self-test with a button click, and GSmartControl is especially valuable for quickly and easily finding log files and reading SMART attributes data, reading test results, and seeing detailed data on your hard drives.

Monitoring and Alerting

It's not fun when your first warning of a failed CPU fan is a melted-down CPU. lm-sensors is still my top choice for monitoring temperatures, fans, and voltages:
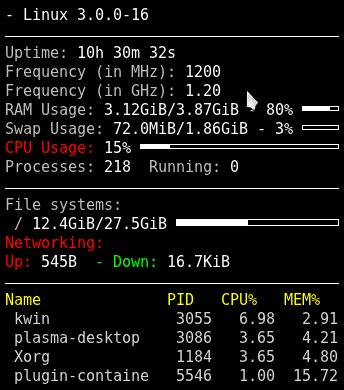
A simple Conky setup.

 $ sensors
atk0110-acpi-0
Adapter: ACPI interface
Vcore Voltage:      +1.23 V  (min =  +0.85 V, max =  +1.60 V)
 +3.3 Voltage:      +3.31 V  (min =  +2.97 V, max =  +3.63 V)
 +5 Voltage:        +4.97 V  (min =  +4.50 V, max =  +5.50 V)
 +12 Voltage:      +12.15 V  (min = +10.20 V, max = +13.80 V)
CPU FAN Speed:     3183 RPM  (min =  600 RPM)
CPU Temperature:    +44.0°C  (high = +60.0°C, crit = +95.0°C)
MB Temperature:     +40.0°C  (high = +45.0°C, crit = +75.0°C)
I wish for a nice graphical front-end and alerter to lm-sensors; GNOME and KDE release nice ones and then they disappear. Xsensors is simple, the xfce4-sensors-plugin looks great in XFCE, and the KDE4 System Monitor widget is all right, but it's not very configurable and does no alerting. psensor is a rather nice, and it can run as a server for remote monitoring. GKrellM is an old favorite cram-full of features, alerting, and configurability.
Conky takes the prize for most objects supported. In addition to the usual system monitors it monitors email, music players, instant messaging, logfiles, weather forecast, and pretty much anything you want. If there isn't a plugin to do what you want you can write one. 

Probing Hardware

It helps to know what is on your system, and you're probably familiar with the lscpi command for getting detailed information on everything connected to the PCI bus. Here are a few options you may not know about:
lspci with no options shows a hardware list with vendor names, chipsets, and device types.
lspci -k displays the kernel driver in use for each device, and available kernel modules, like this example for an Nvidia graphics card:
01:00.0 VGA compatible controller: nVidia Corporation G98 [GeForce 8400 GS] (rev a1)
        Subsystem: Micro-Star International Co., Ltd. Device 1162
        Kernel driver in use: nvidia
        Kernel modules: nvidia_current, nouveau, nvidiafb
lspci -t displays a tree view that shows the relationships between your devices.
The vendor names, chipsets, subsystems, device classes-- all the information displayed by lspci comes from a giant database, the PCI ID Repository. You can update your local copy of this database, /usr/share/misc/pci.ids, by running the update-pciids command as root.

Using dmidecode

dmidecode is a wonderful utility for getting information about everything on your motherboard without opening the case, or booting to the BIOS. If you run dmidecode with no options it spits out pages of data. You can select what you want to see by consulting the DMI types table in man dmidecode. Here are some examples.
How much RAM does your motherboard support?
$ sudo dmidecode -t 16
# dmidecode 2.9
SMBIOS 2.5 present.
Handle 0x0033, DMI type 16, 15 bytes
Physical Memory Array
        Location: System Board Or Motherboard
        Use: System Memory
        Error Correction Type: None
        Maximum Capacity: 16 GB
        Error Information Handle: Not Provided
        Number Of Devices: 4
How much RAM is installed, and in which slots? This example has most of the output snipped:
$ sudo dmidecode -t 17
# dmidecode 2.9
SMBIOS 2.5 present.
Handle 0x0035, DMI type 17, 27 bytes
Memory Device
        Total Width: 64 bits
        Data Width: 64 bits
        Size: 2048 MB
        Form Factor: DIMM
        Set: None
        Locator: DIMM0
        Bank Locator: BANK0
        Type: DDR2
        Type Detail: Synchronous
        Speed: 800 MHz (1.2 ns)
What are the onboard devices, such as video, networking, sound?
$ sudo dmidecode -t 10 
# dmidecode 2.9
SMBIOS 2.5 present.
Handle 0x002C, DMI type 10, 6 bytes
On Board Device Information
        Type: Video
        Status: Enabled
        Description:   ATI
Handle 0x002D, DMI type 10, 6 bytes
On Board Device Information
        Type: Ethernet
        Status: Enabled
        Description: To Be Filled By O.E.M.
lshw command
The graphical lshw viewer.

And much, much more, which is all detailed in the man page.

Using lshw

The lshw command also gives a detailed peek inside your PC, and you can invoke its graphical view with lshw -X (left). It's a little weird to navigate, but everything is there.
I like the way lshw presents information. It includes details like filesystem types and sizes, bus information, and capabilities. It has a couple of nice extras: the -sanitize option scrubs IP addresses, serial numbers, and other identifiers, and the -class option lets you choose categories such as volume and disk for block devices, memory, and display. Run lshw -short to see what the categories are. Here is an abbreviated example:


$ sudo lshw -short
H/W path         Device       Class       Description
=====================================================
/0/33/2                       memory      2GiB DIMM DDR2 Synchronous 800 MHz (1.2 ns
/0/33/3                       memory      DIMM [empty]
/0/100/a/0       eth0         network     RTL8111/8168B PCI Express Gigabit Ethernet
/0/100/11/0      /dev/sda     disk        2TB SAMSUNG HD204UI
/0/100/11/0/1    /dev/sda1    volume      1651GiB EXT4 volume
/0/100/11/0/2    /dev/sda2    volume      211GiB EXT4 volume
/0/100/11/1      /dev/sdb     disk        640GB WDC WD6401AALS-0
/0/100/11/1/1    /dev/sdb1    volume      27GiB EXT4 volume
/0/100/11/1/2    /dev/sdb2    volume      1907MiB Linux swap volume
/0/100/11/0.0.0  /dev/cdrom2  disk        iHAS424   B
/1               wlan0        network     Wireless interface

REFERENCES


vCenter Server tomcat.exe java.exe

SkyHi @ Monday, August 20, 2012

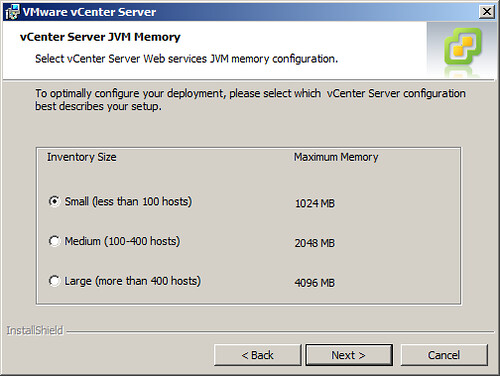
For those of you who have installed VMware vCenter Server 4.1, have you noticed anything new during the installation process?  A new screen was introduced at the end of the installation wizard for specifying the anticipated size of the virtual infrastructure which the respective vCenter Server would be managing.  There are three choices here: SmallMedium, & Large.  Sorry, no Supersize available yet.  If you require this option, I’m sure VMware wants to talk to you.
SnagIt Capture
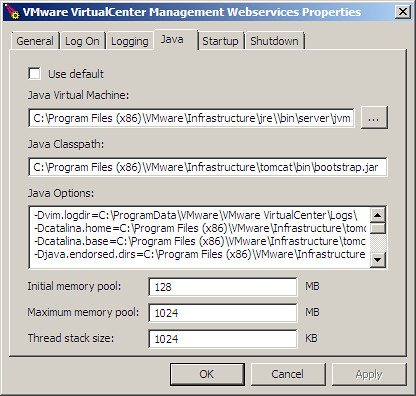
The selection you make from the installation wizard not only defines the Maximum Memory Poolvalue for the Java Virtual Machine, but also the Initial Memory Pool value.  Following is a chart which takes a look at vCenter Server 4.0 & 4.1 JVM Memory Configuration comparisions:
vCenter/JVMInitial Memory PoolMax Memory PoolThread Stack Size
4.0128MB1024MB1024KB
4.1 Small (<100 default="default" hosts="hosts" strong="strong">256MB1024MB1024KB
4.1 Medium (100-400 hosts)256MB2048MB1024KB
4.1 Large (> 400 hosts)512MB4096MB1024KB
As noted by the table above, in vCenter Server 4.0, the JVM Maximum Memory Pool was configured by default at 1024MB.  The vCenter Server 4.1 installation also defaults to 1024MB (Small <100 attention="attention" comparison="comparison" difference="difference" hosts="hosts" if="if" in="in" left="left" one="one" other="other" pay="pay" strong="strong" style="border: 0px; color: #2e2e2e; margin: 0px; outline: 0px; padding: 0px;" the="the" to="to" unchanged.="unchanged.">Initial Memory Pool
. By default, vCenter 4.1 uses twice the amount of RAM out of the gate than previous versions.
Although the installation wizard JVM tuning component is new in 4.1, the ability to tune the JVM for vCenter is not.  The Configure Tomcat application has been available in previous versions of vCenter.  Some organizations with growing infrastructures may have been instructed by VMware support to tune the JVM values to overcome a vCenter issue having to do with scaling or some other issue.
SnagIt Capture
SnagIt Capture
Judging from the table, one can assume that the 1024MB value was appropriate for managing less than 100 hosts in vCenter 4.0.  As a point of reference, the Configuration Maximums document states that 300 hosts can be managed by vCenter 4.0.  This would imply that managing 100 hosts or more with vCenter 4.0 requires an adjustment to the out of box setting for the JVM Maximum Memory Pool (change from 1024MB to 2048MB). 
With vCenter 4.1, VMware has improved scaling in terms of the number of hosts a vCenter Server can manage.  The Configuration Maximums document specifies vCenter 4.1 can manage 400 hosts but the table above implies VMware may be preparing to support more than 400 hosts in the near future.  And that’s awesome because vCenter Server sprawl sucks. Period.
So have fun tuning the JVM but before you go, a few parting tips:
  • The Initial Memory Pool value defines the memory footprint (Commit Size) of the Tomcat process when the service is first started.  The Maximum Memory Pool defines the memory footprint which the Tomcat process is allowed to grow to.  Make sure you have sufficient RAM installed in your server to accommodate both of these values.
  • Setting the Initial Memory Pool to a value greater than the Maximum Memory Pool will prevent the Tomcat VJM from starting.  I thought I’d mention that before you spend too much time pulling your hair out.
  • If you would like to learn more about tuning Tomcat, vast resources exist on the internet.  Thislooks like a good place to start.


REFERENCES
http://www.boche.net/blog/index.php/2010/09/06/vcenter-server-jvm-memory/
http://wiki.bonusbits.com/main/HowTo:Fix_Tomcat6.exe_Using_a_Large_Amount_of_Memory_for_Vmware_vCenter

Windows 8 (RTM) on ESXi 5.0

SkyHi @ Monday, August 20, 2012
on ESXi 5.0 Update 1 Build 623860, and Build 768111


4)  Create Windows 8 Pro x64 Virtual Machinefollow along carefully, verifying you have each checkbox set correctly:
(Update 11:56pm ET Aug 15th, Windows 8 Pro x86 install is nearly identical to the screenshots below, instead choosing Microsoft Windows 8 (32-bit), and leaving the BIOS alone (no UEFI needed)
If you thin provision (pretend you have more storage available than you physically do), be sure to watch your VMFS filesystem available disk space very very carefully!
Get ready to click with your mouse to give the console focus, then press any key to get the virtual UEFI BIOS to boot from the virtual DVD!


REFERENCES
http://tinkertry.com/windows-8-runs-fine-on-esxi-5-0-update-1-build-623860-and-build-768111/