Friday, February 26, 2010
Using NSLOOKUP for DNS Server diagnosis Windows
Go to a command prompt and type "CMD" and press enter
Type "NSLOOKUP" and press enter
Type "set type=mx" press enter
then type the domain name you require the mx records for
See image attached.
I "dumbed" it down for future people looking for the same answer
Michael
P.s. You can set type+ to any of the following:
type=X - set query type (ex. A,ANY,CNAME,MX,NS,PTR,SOA,SRV)
Create a Hot Backup Server
The goal is to create a backup that will provide a server which has been replicated to act as a replacement if the original server goes down. This example is assuming exact same hardware and two servers on the same network.
Step #1: Create a Duplicate Drive
For each drive in the original server you will need to clone a drive so that you can start with the correct users, permissions, etc. Now, one thing to note, if you clone a drive you will have the exact same hostname and IP Address which will need to be modified. Using the dd command you can create a bit-by-bit clone of the drive.
dd if=/dev/sda of=/dev/sdb
You could create an image and then push that image onto another drive if needed.
dd if=/dev/sda of=/bk/disk.img
If you wanted to move the image to a drive you can do this:
dd if=/bk/disk.img of=/dev/sda
This creates an exact clone, beware that large drives may take 6-8 hours. Place the cloned drive into the target machine and change the hostname and IP Address of the target so that it can talk with the original machine.
Step #2: Rsync the Necessary Directories
The rsync command can be run through ssh to provide a secure connection and secure transfer of data. This is the preferred method even on an internal network as it is not much harder to set up and gives you peace of mind.
Synchronize the /var Directory
Since much of what a sever does is placed in the /var directory this is an important directory to synchronize. This is necessary for a database, web server, logs, etc. Note the slash at the end of the /var/ as this will transfer the contents and not create a separate /var/directory.
rsync -avhe ssh /var/ root@192.168.5.49:/var/
Synchronize the /home Directory
You may also need to synchronize the /home directory.
rsync -avhe ssh /home/ root@192.168.5.49:/home/
Create Exceptions
There are some directories that you do not want to synchronize as it will break the connection. The most important in the /etc/ directory is the sysconfig directory which contains your IP Address setups. You can use multiple –exclude options, note the directory to exclude is in single quotes.
rsync -avhe ssh –exclude ’sysconfig’ /etc/ root@192.168.5.49:/etc/
3. Create Passwordless Transfers
It is important that you create an account on the target machine so that you do not need to have a password typed in for each update.
Generate Key Pairs
Key pairs are created by default in the ~/.ssh directory of each user. Note that the ~ symbol is used to represent each user’s home directory. The ssh directory is hidden as indicated by the “.” in front of the directory.
Open a terminal and type: ssh-keygen -t dsa
Accept the default location and type in a passphrase.
You have a public key, which you will share with computers you want to connect to and a private key which you will not share with anyone, ever.
~/.ssh/id_dsa.pub —> public key
~/.ssh/id_dsa —> private key
Share Public Key
Note you do not have to share keys in order to use SSH, you can use passwords just as well.
Move into your ~/.ssh directory
cd ~/.ssh
View Contents of Directory
ls
This should show that you have a public key named id_dsa.pub or id_rsa.pub if you created a rsa key pair.
Copy Public Key
scp id_dsa.pub ip_address_of_remote_machine:my_key
Be sure that you follow the remote machine’s IP address with a colon, or else the command won’t work.
Log into the remote, or virtual, machine via ssh:
ssh ip_address_of_remotel_machine
Copy the contents of the “mykey” file to the “authorized_keys” file as follows:
cat mykey >> ~/.ssh/authorized_keys
The double >> is important as it appends the file, if you used just one > it would create a new file, eliminating your current authorized_keys.
This will add your key to a file of keys that are authorized to access this machine.
Be sure to chmod 644 authorized_keys.
Contact Without Passwords
Now you have both a public key and a private key on your local machine. You can access the remote computer on which you placed your public key with the following command:
ssh 192.168.4.5
This assumes that the IP address of the computer you are making contact with is the IP above, you can also use the domain name, example.com (just for example).
The purpose of the ssh-agent is to save your passphrase so you do not have to enter it each time you start a ssh or scp connection.
At the prompt type:
exec /usr/bin/ssh-agent $SHELL
Then also type
ssh-add
You will need to enter your passphrase and then you are done.
As soon as you log out your passphrase will be dumped by the system. Each time you log in you will need to execute these two commands in the XTerminal to avoid having to enter your password each command.
Now, if you stay logged in, you should be able to run the rsync with ssh command without a password.
REFERENCE
http://beginlinux.com/blog/2009/04/create-a-hot-backup-server/
Getting Started With ModSecurity
Using ModSecurity is not easy. The complexity of your site, your use of PHP, MySQL and other scripting languages will make it more difficult to configure correctly. Basically, the more complex your site, the more time you will need to work out issues with rules. This tutorial will provide you with several important tips to get started with ModSecurity.
Tip #1: Develop A Basic Understanding of ModSecurity
Go to the modsecurity.org website, download and read the documentation. Once that is done you need to know how to find a policy number.
1. Locate a Policy
The rules will be located in the directory you create, probably named modsecurity, and in that directory will be a list of rules. These Core Rules provide generic protection from many unknown vulnerabilities. You will not want to modify the Core Rules, except to turn them on, as when you update you will erase your settings. There are two files that have been created to create custom rules. The first is the modsecurity_crs_15_customrules.conf which lists rules that have been tested for your site and are working effectively. The second is a bailout ruleset, in other words, if you cannot get something to work you can place it in the modsecurity_crs_65_temporary.conf until you can get it fixed. For example, if you need to run ModSecurity but cannot get a specific rule to work you can disable it in this file until you can get it working.
You can see that the file represent different kinds of rules. The 10_config provides the basic configuration and this is the file that you will use to turn on ModSecurity rules. The collection of rules provide protection for your web server, detects and protects against bots, crawlers,scanners, it detects and protects against trojans and limits error messages that will provide too much information to attackers.
modsecurity_crs_10_config.conf
modsecurity_crs_15_customrules.conf
modsecurity_crs_20_protocol_violations.conf
modsecurity_crs_21_protocol_anomalies.conf
modsecurity_crs_23_request_limits.conf
modsecurity_crs_30_http_policy.conf
modsecurity_crs_35_bad_robots.conf
modsecurity_crs_40_generic_attacks.conf
modsecurity_crs_45_trojans.conf
modsecurity_crs_50_outbound.conf
modsecurity_crs_65_temporary.conf
2. Locate Your Logs
The logs for ModSecurity will be located in /var/log/httpd and you will have two of them, modsec_audit.log and modsec_debug.log.
3. Locate Rule Numbers in Logs
You will need to be able to find the rule numbers so you can work with problems that may develop. Here you can see the rule number highlighted after the letters “id”.
[Sun May 17 06:11:34 2009] [error] [client 192.168.5.26] ModSecurity: Access denied with code 501 (phase 2). Pattern match “(?:\\b(?:\\.(?:ht(?:access|passwd|group)|www_?acl)|global\\.asa|httpd\\.conf|boot\\.ini)\\b|\\/etc\\/)” at ARGS:content. [file "/etc/httpd/conf.d/modsecurity/modsecurity_crs_40_generic_attacks.conf"] [line "114"] [id "950005"] [msg "Remote File Access Attempt"] [data "/etc/"] [severity "CRITICAL"] [tag "WEB_ATTACK/FILE_INJECTION"] [hostname "example.com"] [uri "/blog/wp-admin/post.php"] [unique_id "lC3YnH8AAAEAAFoKCK0AAAAL"]
4. Locate IP Address of a Client in the Logs
You can see the IP Address of the client highlighted.
[Sun May 17 06:11:34 2009] [error] [client 192.168.5.26] ModSecurity: Access denied with code 501 (phase 2). Pattern match “(?:\\b(?:\\.(?:ht(?:access|passwd|group)|www_?acl)|global\\.asa|httpd\\.conf|boot\\.ini)\\b|\\/etc\\/)” at ARGS:content. [file "/etc/httpd/conf.d/modsecurity/modsecurity_crs_40_generic_attacks.conf"] [line "114"] [id "950005"] [msg "Remote File Access Attempt"] [data "/etc/"] [severity "CRITICAL"] [tag "WEB_ATTACK/FILE_INJECTION"] [hostname "example.com"] [uri "/blog/wp-admin/post.php"] [unique_id "lC3YnH8AAAEAAFoKCK0AAAAL"]
5. Locate Rule File and Line
You will need to know what rule file that is causing you problems and the line number. These are highlighted.
[Sun May 17 06:11:34 2009] [error] [client 192.168.5.26] ModSecurity: Access denied with code 501 (phase 2). Pattern match “(?:\\b(?:\\.(?:ht(?:access|passwd|group)|www_?acl)|global\\.asa|httpd\\.conf|boot\\.ini)\\b|\\/etc\\/)” at ARGS:content. [file "/etc/httpd/conf.d/modsecurity/modsecurity_crs_40_generic_attacks.conf"] [line "114"] [id "950005"] [msg "Remote File Access Attempt"] [data "/etc/"] [severity "CRITICAL"] [tag "WEB_ATTACK/FILE_INJECTION"] [hostname "example.com"] [uri "/blog/wp-admin/post.php"] [unique_id "lC3YnH8AAAEAAFoKCK0AAAAL"]
After running the default rules on a web site using PHP, Apache 2 and MySQL database with about 1300 visitors a day I received these violations to the ModSecurity rules. That is 1636 violations which you will have to determine are they legitimate or false positives. In other words, to get ModSecurity to work like you want for your site you have to expect to make some custom changes and verify that things are working correctly.
960903 – 55
960015 – 1271
970903 – 84
970902 – 56
960017 – 170
The more you know about ModSecurity the easier it will be but be prepared this is not something to add to your site and walk away, you must keep up with your logs.
Tip #2: Be Prepared to Disable Problem Rules
As much as you will want to install ModSecurity and be done with it, you will probably have issues with several rules that are troubling to solve. What I did was create the file, modsecurity_crs_65_temporary.conf and in the file I listed rules to disable until I could resolve the problems. This should only be a temporary situation but I did this instead of disabling all of ModSecurity. This strategy allows you to protect most elements of your site without shutting the whole thing down. Yes, it is a great idea to set up a test server before you go ahead with ModeSecurity but in reality nothing will prepare you for going live, there are just too many variables in terms of how your site is accessed.
Disable rules
If you need to disable a rule you can do that based on the rule number.
SecRuleRemoveById 960015
Whenever you will disable a rule you need to place it after the actual rule so you will want to put the rules that you will disable in a special list at the end of your configuration that is why the file has the number 65. add them one line at a time.
Tip #3: Create a Custom Rule Set
Regardless of your site you will probably want to create some custom rules. Create your custom rules and place them in modsecurity_crs_15_customrules.conf. Here are some examples of custom rules that you may consider.
Secure Administration Logins
You certainly will want to secure your login areas for your administrators. Here is an example of a Wordpress login (wp-login.php) that does not allow anyone to access accept the two IP Addresses listed. They are chained together so you do not need to rewite the rule several times. The first two lines have the chain option so that it is included with the last line.
SecRule SCRIPT_BASENAME “^wp-login.php$” chain,t:none
SecRule REMOTE_ADDR “!^192\.168\.3\.119$” chain,t:none
SecRule REMOTE_ADDR “!^192\.168\.3\.57$”
LocationMatch
You can also add a LocationMatch for a specific rule or rules so that it only applies to a specific directory or file. This example removes the three rules for this directory so that it will work for Wordpress.
<LocationMatch “/wp-includes/”>
SecRuleRemoveById 960010
SecRuleRemoveById 960012
SecRuleRemoveById 950006
</LocationMatch>
Tip #4: Increase SecResponseBodyLimit
If you are using Wordpress one of the first modifications that you will want to make is to the SecResponseBodyLimit. This is the maximum response body size that will be accepted for buffering. When you go over this limit you will see a 500 Internal Server error. The default is 512 KB but should be increased. Here is the setting that will likely work for most Wordpress sites.
Edit modsecurity_crs_10_config.conf and find the line for SecResponseBodyLimit and make changes.
SecResponseBodyLimit 1572864
Without this update you will see some errors with your plugins.
Tip #5: Modify PHP Memory Limit
When you use output buffering ModSecurity keeps the whole page output in memory and as a result you may run out of memory and get errors with php. Edit your /etc/php.ini and double the memory that you were using in order to allow ModSecurity to keep those pages in memory.
memory_limit = 32M ; Maximum amount of memory a script may consume
Tip #6: Create Whitelists
You may want some IP Addresses to be whitelisted so that those IP Addresses can work without having any restrictions.
SecRule REMOTE_ADDR “!^192\.168\.3\.119$” “nolog,phase:1,allow”
REFERENCE
http://beginlinux.com/blog/2009/05/getting-started-with-modsecurity/
MySQL Basics, MySQL Configuration
The basics for MySQL are important to understand so you can make adjustments. The first in the series showed you how to set up a LAMP Server, the second in the series showed you how MySQL needs to be configured and this now shows some of the basic settings that you need to know.
If you are interested in a Live Course for Ubuntu 9.10 we provide that option as well and the Ubuntu Self-Directed Course is now available. Otherwise, we hope you find this Free mini-course useful which we will roll out over a number of days..
Basic Commands
There are a number of basic commands that you need to have to be able to use MySQL. You have already seen how to log:
mysql -p -u root
Once you are in you can list the databases that have been created with this command:
Now you need to be able to create a database that you can use. Here is the command you would use to create a database called “joomla”.
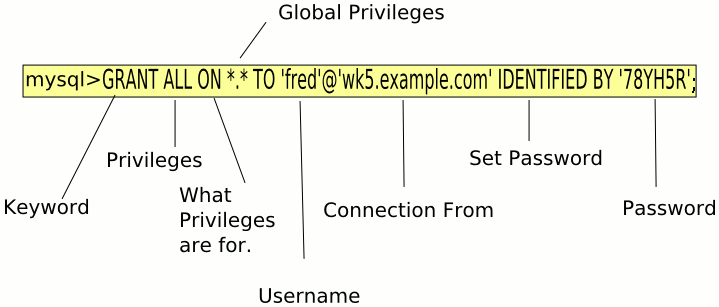
The topic of adding user accounts can be rather complex. There are a lot of options to fit all kinds of different scenarios. To keep things simple for now, we’ll just present you with a couple of examples, and then with a table that will briefly explain the options.
Here is the example of a user who needs to be able to do everything, including creating new databases. The only thing he won’t be able to do is to create new user accounts, since that’s your job. Also, he’ll only be connecting from his own computer, whose hostname is “wk5.example.com”. His password will be “78YH5R”.
Note: In these examples, you’ll be setting up accounts so that the users can log on from different clients. For that to work, you’ll also need to open the /etc/mysql/my.cnf file for editing, and comment out the following line:
bind-address = 127.0.0.1
by placing a # in front of it.
mysql> GRANT ALL ON *.* TO ‘fred’@'wk5.example.com’ IDENTIFIED BY ‘78YH5R’;
Query OK, 0 rows affected (0.00 sec)
Note the semi-colon at the end of the command.
After you’ve created the account, you can verify the privileges that fred has been granted:
mysql> show grants for fred@wk5.example.com;
+—————————————————————————————————————————-+
| Grants for fred@wk5.example.com |
+—————————————————————————————————————————-+
| GRANT ALL PRIVILEGES ON *.* TO ‘fred’@'wk5.example.com’ IDENTIFIED BY PASSWORD ‘*5B5BF4EC5CCCB48FE859214A4B27BA4CB038EE0B’ |
+—————————————————————————————————————————-+
1 row in set (0.00 sec)
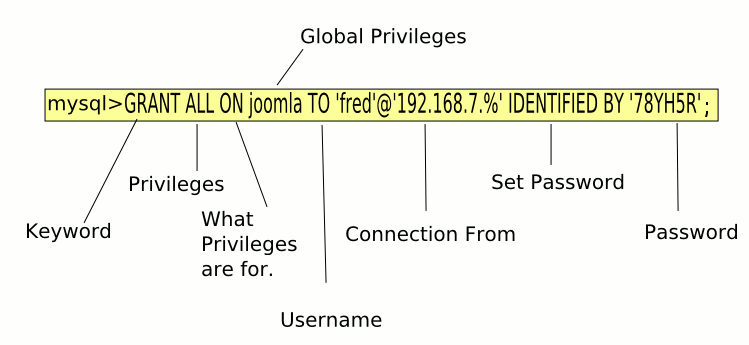
For the second example, here is the command that you would use to create privileges for fred on just one database called “joomla”.
Here fred hasn’t been assigned a permanent computer station, so he’ll be floating around on different computers on the 192.168.7 subnet.
mysql> use joomla;
Database changed
mysql> GRANT ALL ON joomla TO ‘fred’@'192.168.7.%’ IDENTIFIED BY ‘78YH5R’;
Query OK, 0 rows affected (0.00 sec)
Again, you can verify that his privileges were set correctly:
mysql> show grants for ‘fred’@'192.168.7.%’;
+—————————————————————————————————————+
| Grants for fred@192.168.7.% |
+—————————————————————————————————————+
| GRANT USAGE ON *.* TO ‘fred’@'192.168.7.%’ IDENTIFIED BY PASSWORD ‘*5B5BF4EC5CCCB48FE859214A4B27BA4CB038EE0B’ |
| GRANT ALL PRIVILEGES ON `joomla`.`joomla` TO ‘fred’@'192.168.7.%’ |
+—————————————————————————————————————+
2 rows in set (0.00 sec)
If you wanted to temporarily revoke privileges, but leave an account in place for when they return you can use this command:
mysql> REVOKE ALL ON joomla FROM ‘fred’@'192.168.7.%’;
Query OK, 0 rows affected (0.00 sec)
mysql> show grants for ‘fred’@'192.168.7.%’;
+—————————————————————————————————————+
| Grants for fred@192.168.7.% |
+—————————————————————————————————————+
| GRANT USAGE ON *.* TO ‘fred’@'192.168.7.%’ IDENTIFIED BY PASSWORD ‘*5B5BF4EC5CCCB48FE859214A4B27BA4CB038EE0B’ |
+—————————————————————————————————————+
1 row in set (0.00 sec)
There are a lot of different privileges that are available with MySQL, here is a table of most of them.
Name of Privilege What the Privilege Allows
FILE Read and write files on the server host
GRANT OPTION Grant account privileges to other accounts
PROCESS View information about threads that execute within the server
RELOAD Reload grant tables, or flush the logs or caches
REPLICATION CLIENT Inquire about master and slave server locations
SHOW DATABASES See all database names
SHUTDOWN Shut down the MySQL server
SUPER Kill threads, and other supervisory operations
ALTER Alter indexes and tables
ALTER ROUTINE Alter or drop stored functions and procedures
CREATE Create databases and tables
CREATE ROUTINE Create stored functions and procedures
CREATE TEMPORARY TABLES Create temporary tables with the TEMPORARY keyword
CREATE VIEW Create views
DELETE Delete rows from tables
DROP Remove databases and tables
EXECUTE Execute stored functions and procedures
INDEX Create or remove indexes
INSERT Insert new rows into database tables
LOCK TABLES Explicitly lock tables
REFERENCES Unused
SELECT Select rows from tables
SHOW VIEW Show view definitions
UPDATE Make changes to table rows
ALL, ALL PRIVILEGES All operations, except GRANT
USAGE This is a special privilege, that has no privileges
After the “ON” keyword in a command, you can specify whether to apply the privilege globally, just to certain databases, or just to certain database tables.
REFERENCE
http://beginlinux.com/blog/2009/11/mysql-basics/
MySQL Configuration
The previous article on the LAMP Server enables you to get started but you will need to do some configuration with MySQL before you go to far. This article and the next several articles will help you create a database and learn how to monitor it as well as backup and restore.
The MySQL server provides the database that will be connected with PHP and Apache. Installation is easily done with apt-get.
sudo apt-get install mysql-server
During the process you will be asked to create a password for the root user for MySQL. Note this is not the root user for the Linux system and the accounts should have different passwords. Be sure to write down the password. When the installation program completes, you can use the netstat utility to verify that MySQL is running correctly:
sudo netstat -tap | grep mysql
tcp 0 0 localhost:mysql *:* LISTEN 844/mysqld
Here, you can see that MySQL is active, and is listening on port 844.
Note that you don’t have to use the “sudo” command with MySQL server, even though we’re logged on with the user account instead of the root account.
You can add a password to both the server account and the mysql root account at the same time if for some reason your MySQL server did not get a password set.
mysqladmin -h localhost -u root password “the_password_you_want”
Now, if you try to log on to MySQL without the password, you’ll get this:
mysql -u root
ERROR 1045 (28000): Access denied for user ‘root’@'localhost’ (using password: NO)
So, to log on now, you’ll need to add a “-p” in the command-line. (The “-p” just means that you’ll be supplying the MySQL password.)
mysql -p -u root
Enter password:
Welcome to the MySQL monitor. Commands end with ; or \g.
Type ‘help;’ or ‘\h’ for help. Type ‘\c’ to clear the buffer.
mysql> quit
Bye
There may also be some anonymous user accounts installed that don’t have passwords. For best security, you’ll want to get rid of them.
mysql -p -u root
Enter password:
Welcome to the MySQL monitor. Commands end with ; or \g.
Your MySQL connection id is 16 to server version: 5.0.22-Debian_0ubuntu6.06.2-log
Type ‘help;’ or ‘\h’ for help. Type ‘\c’ to clear the buffer.
mysql> use mysql;
Reading table information for completion of table and column names
You can turn off this feature to get a quicker startup with -A
Database changed
mysql> delete from user where User = ”;
Query OK, 0 rows affected (0.03 sec)
mysql> delete from db where User = ”;
Query OK, 0 rows affected (0.00 sec)
mysql> flush privileges;
Query OK, 0 rows affected (0.01 sec)
mysql>quit
Bye
Also for security’s sake, you’ll want MySQL to run with a non-privileged user account, instead of as root. For that, you can use the user and group named “mysql”. As luck would have it, the Ubuntu Server installation of MySQL has already taken care of this for you. (Of course, you would still log on to MySQL as “root” instead of as “mysql”.)
There is one other thing you might want to do, though, to keep the riff-raff out of your data directory. That is, take away the “group” and “other” permissions.
sudo chmod -R go-rwx /var/lib/mysql
If you are interested in a Live Course for Ubuntu 9.10 we provide that option as well. Otherwise, we hope you find this Free mini-course useful which we will roll out over a number of days..
REFERENCEhttp://beginlinux.com/blog/2009/11/mysql-configuration/
MySQL Database Creation for Virtual Accounts
Create a Database for Virtual Users
There are a lot of uses for MySQL. Here are the steps to creating a user database that could be used with a FTP server, mail server or web server.
Login and create the database.
mysql -p -u root
CREATE DATABASE virtual;
Whatever you choose to call the database does not matter except that you need to be consistent in all of the settings.
USE virtual;
This command will select the virtual database, or whatever you called it, so that the rest of the commands are executed on the database of choice.
This next series of commands will set up permissions for the user virtual and set a password for that user so that you can authenticate.
GRANT SELECT, INSERT, UPDATE, DELETE, CREATE, DROP ON virtual.* TO ‘virtual’@'localhost’ IDENTIFIED BY ‘Ut63trg44′;
GRANT SELECT, INSERT, UPDATE, DELETE, CREATE, DROP ON virtual.* TO ‘virtual’@'localhost.localdomain’ IDENTIFIED BY ‘Ut63trg44′;
FLUSH PRIVILEGES;
This next command sets up the accounts table with a username and password, note the command goes all the way to the semi-colon.
CREATE TABLE `accounts` (
`id` INT NOT NULL AUTO_INCREMENT PRIMARY KEY ,
`username` VARCHAR( 30 ) NOT NULL ,
`pass` VARCHAR( 50 ) NOT NULL ,
UNIQUE (
`username`
)
) ENGINE = MYISAM ;
INSERT INTO accounts (username, pass) VALUES(‘tom’, PASSWORD(‘tomspassword’));
The next step will involve use of the Pluggable Authentication Module (PAM).
Now check to see if it created the user and password.
SHOW TABLES;
+——————+
| Tables_in_virtual |
+——————+
| accounts |
+——————+
1 row in set (0.00 sec)
mysql> select * from accounts;
+—-+———-+——————————————-+
| id | username | pass |
+—-+———-+——————————————-+
| 1 | tom | *1B8F8905CDA6675FA316A5D50D1B7EC4FBE838B9 |
+—-+———-+——————————————-+
1row in set (0.00 sec)
This confirms the user has been created.
REFERENCEhttp://beginlinux.com/blog/2009/12/mysql-create-a-database/
Maintaining MySQL Databases
As a MySQL administrator, you’ll probably end up doing some preventive and corrective database maintenance. You can use mysqlcheck for both.
First, consider the “virtual” database. It has one table called ‘accounts”. You can check the whole database with the following command:
mysqlcheck -p -u root virtual
Enter password:
virtual.accounts OK
Now, what if we just want to check one table of the database?
mysqlcheck -p -u root virtual trivia
Enter password:
virtual.accounts OK
As you can see, all you have to do to check just one table is to specify the table name after you specify the database name. Now, what if you have a database with more than two tables, and you want to check more than one, but not all of the tables? That’s easy. Just specify all of the tables that you want to check after you specify the database.
mysqlcheck -p -u root mysql db host proc
Enter password:
mysql.db OK
mysql.host OK
mysql.proc OK
You can also check more than one database at a time. Let’s say that you want to check the “payroll” and the “contact” databases.
mysqlcheck -p -u root –databases payroll contact
Enter password:
payroll.last_name OK
payroll.first_name OK
payroll.SSN OK
payroll.pay_rate OK
contact.last_name OK
contact.first_name OK
contact.phone_number OK
This time, by adding the “–databases” switch, all names that you enter on the command-line will be treated as database names.
It’s also a simple matter to check all databases at once, just by using the “–all-databases” switch:
mysqlcheck -p -u root –all-databases
Enter password:
contacts.names OK
contacts.phone_numbers OK
contacts.trivia OK
mysql.columns_priv OK
mysql.db OK
mysql.func OK
mysql.help_category OK
mysql.help_keyword OK
mysql.help_relation OK
mysql.help_topic OK
mysql.host OK
mysql.proc OK
mysql.procs_priv OK
mysql.tables_priv OK
mysql.time_zone OK
mysql.time_zone_leap_second OK
mysql.time_zone_name OK
mysql.time_zone_transition OK
mysql.time_zone_transition_type OK
mysql.user OK
You can also use mysqlcheck to perform corrective maintenance. There’s only one catch, though. MySQL databases can use two different types of tables–either MyISAM tables or InnoDB tables. While mysqlcheck can perform checks on either type of table, it can only repair MyISAM tables.
mysqlcheck -p -u root –repair virtual
Enter password:
virtual.accounts OK
You can do more extensive repairs by adding another switch:
mysqlcheck -p -u root –repair –extended virtual
Enter password:
virtual.accounts OK
Or, you can also do a quick repair:
mysqlcheck -p -u root –repair –quick virtual
Enter password:
virtual.accounts OK
REFERENCE
http://beginlinux.com/blog/2009/12/maintaining-mysql-databases/
MySQL Backup and Restore
You can use the mysqldump utility to backup your databases. The simplest way is to create the backup file in another directory. Of course, you would want to have the backup directory on another harddrive, in case the main database harddrive were to go bad.
mysqldump -p -u root –opt virtual > /backup/virtual-2010-10-24
Enter password:
cd /backup
ls
virtual-2010-10-24
To restore a database from a backup, invoke the “mysql” command, with the backup file as its input:
mysql -p -u root virtual < /backup/virtual-2010-10-24
Enter password:
Note that the only directory path that you have to specify is the one where you’re storing the backups. The “mysql” and “mysqldump” programs know where the actual databases are stored.
You could also transfer the backup file to another MySQL server with the scp command:
scp virtual-2010-10-24 root@192.168.0.6
Then, on the machine that you just transferred the file to, create an empty database to load the backup file into:
mysql> create database virtual;
Query OK, 1 row affected (0.01 sec)
mysql> quit
Bye
Finally, load the backup file into the empty database:
mysql -p -u root virtual < ~/virtual-2010-10-24
Enter password:
REFERENCE
http://beginlinux.com/blog/2009/12/mysql-backup-and-restore/
Checking for rootkits with rkhunter
Rootkits
A rootkit is software that is installed on your server with the purpose of hiding the fact that your server has been compromised and providing access to your server so that the intruder can easily return. It is important to understand that in order for an intruder to install a rootkit they will have to have gained the rights to do so on your server. This means that the first line of defense is good security that prevents the installation of a rootkit. If you are looking for a self-directed training package that contains documentation, Labs and movies check out the Self-Directed Ubuntu Training or Live Ubuntu Courses.
The intruder could use a rootkit to hide the password cracker program that’s stealing your passwords and sending them back to the intruder. The intruder could also use a rootkit to hide a “back door” program that would give him easy access back into the compromised system.
There are at least six basic categories of rootkits which all serve the same purpose. That is, they prevent the intruder’s malicious software from showing screen output to the unsuspecting user, and they prevent the malicious software from leaving traces in the system logs. They also prevent the malicious software from showing up in a “ps” or “top” process list.
Firmware rootkits
One of the most difficult rootkits to discover is the firmware rootkit that is placed in the code that exists in the ACPI or PCI cards or your system clock. Firmware rootkits can be installed in any flashable code on your motherboard or any cards that you install. The difficulties here will be that you cannot fix this by reinstalling your operating system or wiping your hard drives.
Virtualized rootkits change a computer’s boot-up sequence so that the rootkits get loaded instead of the operating system. Once the rootkits are running in memory, the original operating system loads and then runs in a virtual machine as a guest operating system. The rootkit can then intercept hardware calls from the original operating system in order to conceal the presence of any malicious software or activity.
Kernel rootkits
When Linux boots up, it loads kernel extensions, or modules. Loadable Kernel Module, or LKM rootkits, can modify these modules to make them do the intruder’s bidding. These are also very difficult to detect. They can subvert any attempt to detect them and can prevent removal. On the other hand, they can be prevented. On a known clean system, just recompile the Linux kernel without support for loadable kernel modules.
Boot Loader rootkits
In this rootkit the boot loader is replaced with a modified boot loader which is used to achieve the goals of the intruder.
Library rootkits
These rootkits work by modifying the operating system’s libraries that provide system calls. They will either patch the library files, hook onto them, or outright replace them.
Application level rootkits
These are sometimes referred to as “traditional” rootkits. That’s because they’re the oldest variety. Application level rootkits replace system utility programs with their own trojaned versions. On Linux, the affected system utilities include login, ls, du, netstat, ifconfig, ps and top. When the unsuspecting user invokes one of these counterfeit utilities, it’ll will do what the user wants done, but in the background, it will also do something for the intruder.
One way to check these utilities is to invoke them with the -/ option switch. If the command works with that switch, it’s an sign that its executable file is infected.
Rootkit Hunter
Rootkit Hunter performs a more comprehensive check than chkrootkit, and takes somewhat longer to run. If your distro’s package repository doesn’t have it, you can download it from the author’s website. The site is: http://rootkit.nl/projects or you can download it from sourceforge.net.
To perform a check of your system, enter:
rkhunter -c
Here is a typical summary which is listed at the end of the check.
System checks summary
=====================
File properties checks…
Files checked: 129
Suspect files: 0
Rootkit checks…
Rootkits checked : 115
Possible rootkits: 0
Applications checks…
Applications checked: 7
Suspect applications: 0
The system checks took: 2 minutes and 21 seconds
All results have been written to the logfile (/var/log/rkhunter.log)
One or more warnings have been found while checking the system.
Please check the log file (/var/log/rkhunter.log)
To update Rootkit Hunter, enter:
rkhunter –update
If you do a test and it discovers some programs have changed but you are sure that the changes occurred as the result of an upgrade you will want to upgrade those changes with rkhunter so that it does not continually report those as problems. Note that rkhunter will only be able to tell you that changes have occurred not why they have changed, that is your responsibility to find out.
rkhunter –propupd
Run without User Input
In order to run rkhunter as a cron job, or without user input, you must make a few modifications. Other wise, during the course of its scan, it will stop several times and ask the user to press “Enter”. Use the command:
rkhunter –cronjob
Report only Problems
You can run rkhunter so that it will only report problems that it discovers.
rkunter –cronjob –rwo
Email Your Account
You will need to edit two lines to enter your email and check your mail command header setting. This command will work for Sendmail but not Postfix.
MAIL-ON-WARNING=youremail@example.com root@mydomain
MAIL_CMD=mail -s “[rkhunter] Warnings found for ${HOST_NAME}”
If you are using Postfix as the mail server you will want to modify the default line so it looks like this:
MAIL_CMD=/usr/sbin/sendmail
This is the message you will receive is there is a problem.
”Please inspect this machine, because it may be infected.”
False Positives
You may have to uncomment lines in the rkhunter.conf file to allow for some hidden directories. You may also have to enter the lines and issues that are discovered for your system that are false positives. Of course, you will want to verify either that rkhunter discovered these on a new system or that you are sure they do not represent intrusion.
LOGFILE=/var/log/rkhunter.log
If you allow the root user to login using SSH, change this line.
ALLOW_SSH_ROOT_USER=yes
You may need to allow some directories and files to stop the false positives.
#ALLOWHIDDENDIR=/etc/.java
ALLOWHIDDENDIR=/dev/.udev
#ALLOWHIDDENDIR=/dev/.udevdb
#ALLOWHIDDENDIR=/dev/.udev.tdb
ALLOWHIDDENDIR=/dev/.static
ALLOWHIDDENDIR=/dev/.initramfs
#ALLOWHIDDENDIR=/dev/.SRC-unix
ALLOWHIDDENFILE=/usr/share/man/man1/..1.gz
ALLOWHIDDENFILE=/usr/bin/.fipscheck.hmac
ALLOWHIDDENFILE=/usr/bin/.ssh.hmac
ALLOWHIDDENFILE=/usr/sbin/.sshd.hmac
SCRIPTWHITELIST=/sbin/ifup
SCRIPTWHITELIST=/sbin/ifdown
SCRIPTWHITELIST=/usr/bin/groups
SCRIPTWHITELIST=/usr/bin/ldd
SCRIPTWHITELIST=/usr/bin/whatis
Enter the applications you want to whitelist. This is a possible list for a CentOS system apache on Ubuntu is called apache2 instead of httpd.
APP_WHITELIST=”httpd sshd PHP named”
Here is an example of the output that you need to fix in order to eliminate false positives.
rkhunter –cronjob –rwo
Warning: Hidden directory found: /dev/.udev
Warning: Hidden file found: /usr/share/man/man1/..1.gz: gzip compressed data, from Unix, max compression
Warning: Hidden file found: /usr/bin/.fipscheck.hmac: ASCII text
Warning: Hidden file found: /usr/bin/.ssh.hmac: ASCII text
Warning: Hidden file found: /usr/sbin/.sshd.hmac: ASCII text
One or more warnings have been found while checking the system.
Please check the log file (/var/log/rkhunter.log)
REFERENCE
http://beginlinux.com/blog/2009/12/checking-for-rootkits-with-rkhunter/
Create a Public Share on Samba
The goal of this tutorial is to show you how to set up a public share on your Samba server that can be used by everyone on your network with all rights. This will enable everyone on a Windows machine to access this without a password. Of course, this has security implications but it is a good way to get something working. The next article will show you how to create a share for one user in which that one user is the only one who can access the share.
1. Install Samba
yum install samba samba-client samba-common
chkconfig – -level 35 smb on
service smb start
2. Create a New smb.conf file
First, change the default smb.conf file to a backup copy, and then create a whole new one.
# mv smb.conf smb.conf.backup
# vim smb.conf
Here’s the new smb.conf file:
Note the workgroup should be the workgroup that you are using on your Windows machines.
[global]
netbios name = linuxserver
workgroup = WORKGROUP
server string = Public File Server
security = user
map to guest = bad user
guest account = smbguest
[public]
path = /public
guest ok = yes
read only = no
3. Test with testparm
This will help you determine if you have any major problems with the set up you placed in smb.conf.
# testparm
Load smb config files from /etc/samba/smb.conf
Processing section “[public]”
Loaded services file OK.
Server role: ROLE_STANDALONE
Press enter to see a dump of your service definitions
[global]
server string = Public File Server
map to guest = Bad User
guest account = smbguest
[public]
path = /public
read only = No
guest ok = Yes
4. Create a public user
Since the purpose is to map the users to a special guest account, open the /etc/passwd file for editing, and add the following line to the end of the file.
smbguest:x:525:525:Samba Guest Account:/dev/null:/bin/false
This creates the guest account. Now, create a smbguest group with a group ID, here the GID of 525 was used, it does not matter which number as long as it is not used and over 500.
# groupadd -g 525 smbguest
Now, change to the root of the file system, and create the new directory that to share.
# mkdir public
# chown -R smbguest:smbguest public
# ls -l
drwxr-xr-x 2 smbguest smbguest 184 2007-08-03 15:18 public
5. Access the share from Windows
Once you create public folder it should be visible on the network from an XP machine.
Expand “My Network Places”, and then expand “Workgroup”. You’ll then see all of the members of the workgroup that’s named “Workgroup”. Note also that you can have other workgroups with different names. Even though a Windows computer can only be a member of one workgroup at a time, Windows Explorer will still show all workgroups that are on the network.
REFERENCE
http://beginlinux.com/blog/2010/01/create-a-public-share-on-samba/
Samba Tutorial: Create Private User Shares
If you use Samba you certainly want to create shares which provide users with private shares. This tutorial will show you how to create a share that is accessible to one user to store their information.
Security Mode
The typical security mode that you will use for a simple user share is security = user.
Choosing a Database Type for Passwords
smbpasswd–A text-mode flat database. You can use this on a stand-alone Samba server, but you don’t want to use it in a domain.
tdbsam–This is a regular database file, which can store a richer set of attributes than what the smbpasswd file can. You can use it for either stand-alone Samba servers, or in a domain that’s running a single domain controller.
ldapsam–This type of database is set up with an ldap directory for its backend. You can use this in a domain with multiple domain controllers. You don’t want to use it for either stand-alone Samba servers, or for domains with single domain controllers.
Home Directories
This will create home directories on your Samba server that users can access from their Windows clients. That way, everyone can have one central directory that they can access regardless of which client station they use to log on. As a security precaution for the Linux server, users when created will not have access to login to the Linux server and get a shell, they will only be able to access their shares, typically from Windows.
Edit the /etc/smb.conf file.
[global]
netbios name = linuxserver
workgroup = WORKGROUP
server string = Public File Server
security = user
map to guest = bad user
guest account = smbguest
encrypt passwords = yes
passdb backend = tdbsam
[tom]
comment = Home Directory
path = /home/tom
valid users = tom
browsable = no
guest ok = no
read only = no
[public]
path = /share/public
guest ok = yes
read only = no
In the [global] section, encrypted passwords are used and stored in a “tdbsam”-type file. You could get by with using an “smbpasswd”-type file for this example.
The [tom] share is a simple share for a user on the samba server. In the [tom] section, a comment line was added , which specifies what shows up in the comment column of a Windows Explorer detail display. The “valid users = tom” line is what keeps people out of other people’s home directories. And, you don’t want users’ home directories to show up in a Network Neighborhood display, so the “browsable = no” line is added.
Next, create a Linux-type user account for tom.
# useradd -c “tom” -m -s /bin/false tom
The “-s” option switch, followed by the “/bin/false”, is what prevents tom from logging on to the Linux system. The “-m” switch is what creates tom’s home directory. There’s no need to give tom a password for this account as the password that is used will be with smnpasswd.
Next, create tom’s Samba account and give it a password.
smbpasswd -a tom
New SMB password:
Retype new SMB password:
Added user tom.
This command will add tom’s account information to the “passdb.tdb” file that’s found in the /var/lib/samba directory.
Restart Samba to reload the new configuration.
# service samba restart
* Stopping Samba daemons… [ OK ]
* Starting Samba daemons… [ OK ]
That should do it, tom now should be able to login to a user share just set up for him.
Login From Windows
Right click your My Computer and select “Map Network Drive”. Select a drive letter, like “L” and then enter your Samba server IP and the share name.
\\192.168.5.89\tom
Connect and it should ask for user and password.
REFERENCE
http://beginlinux.com/blog/2010/01/samba-tutorial-create-private-user-shares/
Thursday, February 25, 2010
Ping Monitoring Over a WAN - Adding Perl Mods
root@srv-1 root # <b>perl -MCPAN -e shell</b> |
Let's install the correct module:
<b>install Mail::Sendmail</b><br />Running install for module Mail::Sendmail<br />Running make for M/MI/MIVKOVIC/Mail-Sendmail-0.79.tar.gz<br />LWP not available<br />CPAN: Net::FTP loaded ok<br />Fetching with Net::FTP:<br />ftp://archive.progeny.com/CPAN/authors/id/M/MI/MIVKOVIC/Mail-Sendmail-0.79.tar.gz<br />CPAN: Digest::MD5 loaded ok<br />LWP not available<br />Fetching with Net::FTP:<br />ftp://archive.progeny.com/CPAN/authors/id/M/MI/MIVKOVIC/CHECKSUMS<br />CPAN: Compress::Zlib loaded ok<br />Checksum for /root/.cpan/sources/authors/id/M/MI/MIVKOVIC/Mail-Sendmail-0.79.tar.gz ok<br />Scanning cache /root/.cpan/build for sizes<br />Mail-Sendmail-0.79/<br />Mail-Sendmail-0.79/Todo<br />Mail-Sendmail-0.79/README<br />Mail-Sendmail-0.79/MANIFEST<br />Mail-Sendmail-0.79/test.pl<br />Mail-Sendmail-0.79/Sendmail.pm<br />Mail-Sendmail-0.79/Changes<br />Mail-Sendmail-0.79/Makefile.PL<br />Mail-Sendmail-0.79/Sendmail.html<br />CPAN.pm: Going to build M/MI/MIVKOVIC/Mail-Sendmail-0.79.tar.gz<br />Checking if your kit is complete...<br />Looks good<br />Writing Makefile for Mail::Sendmail<br />**********************************************************************<br />NOTE<br />----<br />The test (test.pl) is a real test for this module: it sends an e-mail.<br />You may want to edit test.pl before running it (directly or through<br />make test), so the mail is sent to you. If you also leave my address,<br />the mail goes into a database from which I can get statistics.<br />Read the docs, and have fun...<br />**********************************************************************<br />cp Sendmail.pm blib/lib/Mail/Sendmail.pm<br />Manifying blib/man3/Mail::Sendmail.3pm<br />/usr/bin/make -- OK<br />Running make test<br />PERL_DL_NONLAZY=1 /usr/bin/perl "-Iblib/lib" "-Iblib/arch" test.pl<br />1..2<br />Test Mail::Sendmail 0.79<br />Trying to send a message to the author (and/or whoever if you edited test.pl)<br />(The test is designed so it can be run by Test::Harness from CPAN.pm.<br />Edit it to send the mail to yourself for more concrete feedback. If you<br />do this, you also need to specify a different mail server, and possibly<br />a different From: address.)<br />Current recipient(s): 'Sendmail Test <sendmail@alma.ch>'<br />ok 1<br />Server set to: mail.alma.ch<br />Sending...<br />content of $Mail::Sendmail::log:<br />Mail::Sendmail v. 0.79 - Sun Jun 8 14:02:50 2003<br />Date: Sun, 8 Jun 2003 14:02:50 -0700<br />Server: mail.alma.ch Port: 25<br />From: sendmail@alma.ch<br />Subject: Mail::Sendmail version 0.79 test<br />To: sendmail@alma.ch<br />Result: 250 Ok: queued as 5F1627FCC<br />ok 2<br />/usr/bin/make test -- OK<br />Running make install<br />Installing /usr/lib/perl5/site_perl/5.8.0/Mail/Sendmail.pm<br />Installing /usr/man/man3pm/Mail::Sendmail.3pm<br />Writing /usr/lib/perl5/site_perl/5.8.0/i686-linux/auto/Mail/Sendmail/.packlist<br />Appending installation info to /usr/lib/perl5/5.8.0/i686-linux/perllocal.pod<br />/usr/bin/make install -- OK<br />cpan> <br /></sendmail@alma.ch> |
The Sendmail module is all happy. Let's grab the Ping test module:
cpan> <b>i /Ping/</b><br />Author PING ("Ping Liang" <ping07642@netscape.net>)<br />Distribution B/BB/BBB/Net-Ping-2.30.tar.gz<br />Distribution C/CO/COLINM/Net-Ping-External-0.11.tar.gz<br />Distribution P/PI/PING/PBJ-JNI-0.1.tar.gz<br />Distribution R/RC/RCAPUTO/POE-Component-Client-Ping-0.98.tar.gz<br />Distribution R/RI/RIIKI/Net-Arping-0.02.tar.gz<br />Distribution T/TE/TEVERETT/Win32-PingICMP-0.02.tar.gz<br />Module Fwctl::Services::ping (F/FR/FRAJULAC/Fwctl-0.28.tar.gz)<br />Module HTML::Bricks::Mappings (P/PE/PETERMCD/HTML-Bricks-0.03.tar.gz)<br />Module Log::Agent::Stamping (M/MR/MROGASKI/Log-Agent-0.304.tar.gz)<br />Module Net::Arping (R/RI/RIIKI/Net-Arping-0.02.tar.gz)<br />Module Net::Gnutella::Packet::Ping (I/IW/IWADE/Net-Gnutella-0.1.tar.gz)<br />Module Net::IDN::Nameprep::Mapping (M/MI/MIYAGAWA/Net-IDN-Nameprep-0.02.tar.gz)<br />Module Net::Lyskom::TextMapping (C/CD/CDYBED/Net-Lyskom-1.0.tar.gz)<br />Module Net::Peep::Client::Pinger (S/ST/STARKY/Net-Peep-0.4.5.1.tar.gz)<br />Module Net::Peep::Client::Pinger::Host (S/ST/STARKY/Net-Peep-0.4.5.1.tar.gz)<br />Module Net::Ping (B/BB/BBB/Net-Ping-2.30.tar.gz)<br />Module Net::Ping::External (C/CO/COLINM/Net-Ping-External-0.11.tar.gz)<br />Module Nmap::Scanner::Util::PingScanner (M/MA/MAXSCHUBE/Nmap-Scanner-0.01.tar.gz)<br />Module POE::Component::Client::Ping (R/RC/RCAPUTO/POE-Component-Client<br />-Ping-0.98.tar.gz)<br />Module VBTK::Wrapper::Ping (B/BS/BSHENRY/VBTK-0.14.tar.gz)<br />Module Win32::PingICMP (T/TE/TEVERETT/Win32-PingICMP-0.02.tar.gz)<br />22 items found<br />cpan> <br />cpan> <b>install Net::Ping::External</b><br />Running install for module Net::Ping::External<br />Running make for C/CO/COLINM/Net-Ping-External-0.11.tar.gz<br />LWP not available<br />Fetching with Net::FTP:<br />ftp://archive.progeny.com/CPAN/authors/id/C/CO/COLINM/Net-Ping-External-0.11.tar.gz<br />LWP not available<br />Fetching with Net::FTP:<br />ftp://archive.progeny.com/CPAN/authors/id/C/CO/COLINM/CHECKSUMS<br />Checksum for /root/.cpan/sources/authors/id/C/CO/COLINM/Net-Ping-External-0.11.tar.gz ok<br />Net-Ping-External-0.11/<br />Net-Ping-External-0.11/Changes<br />Net-Ping-External-0.11/External.pm<br />Net-Ping-External-0.11/MANIFEST<br />Net-Ping-External-0.11/Makefile.PL<br />Net-Ping-External-0.11/test.pl<br />Net-Ping-External-0.11/README<br />CPAN.pm: Going to build C/CO/COLINM/Net-Ping-External-0.11.tar.gz<br />Checking if your kit is complete...<br />Looks good<br />Writing Makefile for Net::Ping::External<br />cp External.pm blib/lib/Net/Ping/External.pm<br />Manifying blib/man3/Net::Ping::External.3pm<br />/usr/bin/make -- OK<br />Running make test<br />PERL_DL_NONLAZY=1 /usr/bin/perl "-Iblib/lib" "-Iblib/arch" test.pl<br />1..6<br />ok 1<br />ok 2<br />ok 3<br />ok 4<br />ok 5<br />ok 6<br />Running a more verbose test suite.<br />-------------------------------------------------<br />Net::Ping::External version: 0.11<br />6/6 tests passed.<br />Successful tests:<br />use Net::Ping::External qw(ping)<br />ping(host => '127.0.0.1')<br />ping(host => '127.0.0.1', timeout => 5)<br />ping(host => 'some.non.existent.host')<br />ping(host => '127.0.0.1', count => 10)<br />ping(host => '127.0.0.1', size => 32)<br />Operating system according to perl: linux<br />Operating system according to `uname -a` (if available):<br />Linux srv-1.signalq.com 2.4.20-gentoo-r5 #1 Thu May 22 05:34:28 PDT 2003 i686 <br />Intel(R) Pentium(R) 4 CPU 1.70GHz GenuineIntel GNU/Linux<br />Perl version: This is perl, v5.8.0 built for i686-linux<br />-------------------------------------------------<br />If any of the above tests failed, please e-mail the bits between the dashed<br />lines to colinm@cpan.org. This will help me in fixing this code for maximum<br />portability to your platform. Thanks!<br />/usr/bin/make test -- OK<br />Running make install<br />Installing /usr/lib/perl5/site_perl/5.8.0/Net/Ping/External.pm<br />Installing /usr/man/man3pm/Net::Ping::External.3pm<br />Writing /usr/lib/perl5/site_perl/5.8.0/i686-linux/auto/Net/Ping/External/.packlist<br />Appending installation info to /usr/lib/perl5/5.8.0/i686-linux/perllocal.pod<br />/usr/bin/make install -- OK<br />cpan> <br /></ping07642@netscape.net> |
We heart the CPAN modules system.
Don't rely on this script for production servers unless you know exactly what you are doing, and are sure that this script fits your needs. Do feel free to encorporate bits of the script as you need, or the whole script if you desire. Credit NetAdminToools, though, if you feel like it. :) Please read our terms of use.
There are five parts to this article:
Introduction
Main Routine
Check/Log Routines
Adding Perl Mods
pf and rf routines
REFERENCE
http://www.netadmintools.com/art274.html
Wednesday, February 24, 2010
securing postfix - smtp auth on port 587 only
I have postfix running on an Ubuntu system, handling the e-mail for a handful of users. Currently I tell people to send e-mail using SMTP with authentication on port 587 with TLS enabled - which is what I want.
However the server also accepts mail on port 25 with authentication and no TLS. I want to change this so port 25 is used only for my server to receive mail from elsewhere (other servers). I want my users to be able to send on port 587 with TLS etc. ONLY.
Solution:
Here is my main.cf as well. I think I can identify more specifically what you need.
myhostname = ws1.node.example.com
mydomain = node.example.com
mynetworks = 127.0.0.1/32
mydestination = ws1.node.example.com localhost
inet_interfaces = ws1.node.example.com 127.0.0.1
virtual_alias_maps = hash:/vhosts/etc/postfix/virtual_alias_maps
virtual_gid_maps = hash:/vhosts/etc/postfix/virtual_gid_maps
virtual_uid_maps = hash:/vhosts/etc/postfix/virtual_uid_maps
virtual_mailbox_domains = hash:/vhosts/etc/postfix/virtual_mailbox_domains
virtual_mailbox_maps = hash:/vhosts/etc/postfix/virtual_mailbox_maps
virtual_mailbox_base = /vhosts/maildirs
smtpd_sender_login_maps = hash:/vhosts/etc/postfix/smtpd_sender_login_maps
smtpd_helo_required = yes
smtpd_recipient_restrictions = reject_invalid_hostname, reject_non_fqdn_hostname, reject_non_fqdn_sender, reject_unauth_pipelining, reject_unauth_destination, reject_unknown_hostname, reject_unknown_sender_domain, reject_unknown_client, permit_auth_destination, check_policy_service unix:postgrey/socket, reject_rbl_client xbl.spamhaus.org, reject
submission inet n - n - - smtpd<br /> -o smtpd_etrn_restrictions=reject<br /> -o smtpd_sasl_type=dovecot<br /> -o smtpd_sasl_path=private/auth<br /> -o smtpd_sasl_auth_enable=yes<br /> -o smtpd_reject_unlisted_sender=yes<br /> -o smtpd_recipient_restrictions=permit_mynetworks,permit_sasl_authenticated,reject
You can see that in main.cf I have 'smtpd_recipient_restrictions' set with things like 'reject_*' to reject messages that fail various checks, and I have 'permit_auth_destination' which allows locally delivered mail. Everything else is rejected. This is the baseline, nothing but locally deliverable mail.
Now we move on to 'master.cf'. Once you have your 'main.cf' right you could almost copy what I have (at your risk obviously). But again here the key is 'smtpd_recipient_restrictions', which is set to 'permit_mynetworks' so that local senders can forward mail (you may not want this), but more importantly 'permit_sasl_authenticated', which allows authenticated users. All other email is rejected. This overrides the setting in main.cf.
All in, this means that the standard SMTP service on port 25 will use the default setting of local delivery only, and the SMTP service on the submission port 587 will override the setting to only allow authenticated senders.
I hope this helps...
REFERENCE:
http://www.howtoforge.com/forums/showthread.php?t=20116
http://dkimproxy.sourceforge.net/postfix-outbound-howto.html
Setting up Postfix for SMTP Auth with the Dovecot SASL backend
This might look a bit long-winded, but it's actually very simple to setup. There's plenty of sample configuration and examples below to refer to.
Contents
1. Setting up Postfix for SMTP Auth with the Dovecot SASL backend
1. Assumptions
2. Procedure
1. Dovecot
2. Postfix - configure SASL auth
3. Testing basic SASL
4. Postfix - Enable TLS for encryption
5. Test that TLS is working as expected
6. Enabling the submission port
3. See also:
4. References/External Links
Assumptions
1. You're familiar with the mail technologies in use
2. We're implementing SMTP Auth on a Redhat Enterprise Linux 5 system, but the steps are easily translated to other distros like Debian
* We're using the stock set of vendor package repositories
3. You have a fully-working Postfix installation that can send/receive mail to/from the internet
4. You're already using Dovecot for authenticated POP/IMAP access. While it's not necessary, this is the easiest way to be sure your authentication backend will Just Work
* By extension, we assume you've got a set of authentication credentials you can use for testing
Procedure
We'll start by enabling Dovecot's SASL service, then hook Postfix into this. Postfix will then offer SMTP Auth to remote clients, provided that they're using TLS for encryption.
Dovecot
Dovecot will create a daemon socket that will listen for SASL requests.
1.
On some distributions, the Postfix daemons run chroot'ed. For this reason, it's preferred to place the socket somewhere that's guaranteed to be accessible. Use the postconf command to find your queue directory - in most cases it'll be /var/spool/postfix
Toggle line numbers
yoshino:~# postconf queue_directory
queue_directory = /var/spool/postfix
2.
Edit /etc/dovecot.conf. You'll need to work around whatever existing authentication you have setup, but it'll look something like this.
auth default {
# We support `login` for Outlook clients that use this obsolete mechanism
mechanisms = plain login
# These are the default username/password backends
passdb pam {
}
userdb passwd {
}
# These should be correct for most systems, adjust the path, user and group as appropriate
socket listen {
client {
path = /var/spool/postfix/private/auth
mode = 0660
user = postfix
group = postfix
}
}
}
3. Restart dovecot to create the auth socket
4.
Check that the socket has been created as expected. Check your mail logs and look for problems if you're unsure.
Toggle line numbers
yoshino:~# ls -lh /var/spool/postfix/private/auth
srw-rw---- 1 postfix postfix 0 2009-09-27 00:36 /var/spool/postfix/private/auth
Postfix - configure SASL auth
Reference documentation: http://wiki.dovecot.org/HowTo/PostfixAndDovecotSASL
1.
As a quick sanity-check, make sure your postfix has been compiled with support for Dovecot's SASL implementation
yoshino:~# postconf -a
cyrus
dovecot <-- this is what we need
2.
Edit your main.cf (/etc/postfix/main.cf) file and add the SASL directives
Toggle line numbers
# Notice that we use a relative path to the auth socket
# This will work regardless of whether the SMTP daemon is running chroot'ed,
# and is specified relative to the queue_directory that we discovered earlier
smtpd_sasl_type = dovecot
smtpd_sasl_path = private/auth
smtpd_sasl_auth_enable = yes
# Adds a header that reports the login name that was used. Good for accountability, bad if you're paranoid
smtpd_sasl_authenticated_header = yes
# Support those broken Microsoft clients that expect "AUTH=<mechanisms>"
broken_sasl_auth_clients = yes
# Finally, give authenticated clients free reign to relay mail
# You'll need to massage this into any existing restrictions you have
# Assuming default settings, it'll look something like this
smtpd_recipient_restrictions =
permit_mynetworks
permit_sasl_authenticated
reject_unauth_destination
3. Restart Postfix so the settings take effect
Testing basic SASL
1.
We need to generate a base64-encoded auth string to send during the SMTP session. Be aware that this gives away your username and password, we'll setup encrytion for this shortly. We're going to use support@anchor.net.au for the username, and securepassword for the password. The "\0" is intentional, they represent null bytes.
*
mimencode is in the metamail package on Debian-type systems
yoshino:~# printf '\0support@anchor.net.au\0securepassword' | mimencode
AHN1cHBvcnRAYW5jaG9yLm5ldC5hdQBzZWN1cmVwYXNzd29yZA==
*
You can use perl on Redhat-type systems, note that you need to escape the @-sign if you're using an email address as the username
yoshino:~# perl -MMIME::Base64 -e 'print encode_base64("\0support\@anchor.net.au\0securepassword")'
AHN1cHBvcnRAYW5jaG9yLm5ldC5hdQBzZWN1cmVwYXNzd29yZA==
2.
Connect to your Postfix, issue an EHLO (Extended HELO) and attempt to AUTH. It should look something like this
rosa@rokkenjima:~% telnet yoshino.meidokon.net 25
Trying 202.4.232.68...
Connected to yoshino.meidokon.net.
Escape character is '^]'.
220 yoshino.meidokon.net ESMTP Postfix
EHLO localhost
250-yoshino.meidokon.net
250-PIPELINING
250-SIZE 20480000
250-ETRN
250-AUTH PLAIN LOGIN
250-AUTH=PLAIN LOGIN
250-ENHANCEDSTATUSCODES
250-8BITMIME
250 DSN
AUTH PLAIN AHN1cHBvcnRAYW5jaG9yLm5ldC5hdQBzZWN1cmVwYXNzd29yZA==
235 2.0.0 Authentication successful
QUIT
221 2.0.0 Bye
Connection closed by foreign host.
3.
If you run into problems you'll need to have a look at your mail logs to get an idea of what's going wrong. Unfortunately it's difficult to enumerate all the possible failure cases here, but the Dovecot wiki has some good advice to start with: http://wiki.dovecot.org/Debugging/Authentication
To finalise the testing, we'll send a quick mail through the system. If you don't get a "Relay access denied" error then everything is in order. Make sure you run these tests from a remote host to ensure you're not getting a free pass from being on the local machine.
...
AUTH PLAIN AHN1cHBvcnRAYW5jaG9yLm5ldC5hdQBzZWN1cmVwYXNzd29yZA==
235 2.0.0 Authentication successful
MAIL FROM: support@anchor.net.au
250 2.1.0 Ok
RCPT TO: support@anchor.net.au
250 2.1.5 Ok
DATA
354 End data with <CR><LF>.<CR><LF>
From: support@anchor.net.au
To: support@anchor.net.au
Subject: This is a test message
Hi, have a friendly test message.
Thanks!
.
250 2.0.0 Ok: queued as A463341E2C77
QUIT
221 2.0.0 Bye
Connection closed by foreign host.
If you inspect the received message, you can trace the path taken and confirm that everything is working as expected.
Return-Path: support@anchor.net.au
Delivered-To: support@anchor.net.au
Received: from gohda.rokkenjima.net (gohda.rokkenjima.net [202.4.224.0])
(Authenticated sender: support@anchor.net.au) <-- the result of "smtpd_sasl_authenticated_header = yes"
by yoshino.meidokon.net (Postfix) with ESMTP id 0745141C09EC
for <support@anchor.net.au>; Mon, 12 Oct 2009 12:51:42 +1100 (EST)
From: support@anchor.net.au
To: support@anchor.net.au
Subject: test mail
Message-Id: <20091012015145.0745141C09EC@yoshino.meidokon.net>
Date: Mon, 12 Oct 2009 12:51:42 +1100 (EST)
Hi, have a friendly test message.
Thanks!
Postfix - Enable TLS for encryption
This is well and good so far, but at the moment our login details are being passed around unencrypted, which leaves them vulnerable to being sniffed by any intermediate hosts. We'll generate an x509 certificate, have Postfix offer it to clients, then disable authentication for clients that aren't using TLS encryption.
1.
Generate an RSA key for the certificate. We keep our key/certificate pairs in /etc/ssl, but you can use anywhere that's convenient for you. We take care to ensure that the key is only readable by root.
cd /etc/ssl
touch smtpd.key
chmod 600 smtpd.key
openssl genrsa 1024 > smtpd.key
2. Now you need a certificate that matches the key. In most cases you can get away with a self-signed certificate, though clients may complain that it's not signed by a recognised CA. The alternative is to generate a Certificate Signing Request and have it signed by a CA - this will cost you money.
1.
Self-signed certificate. Just a few questions to answer here, the most important is the Common Name (CN) - this is the hostname that clients will use to connect to you, often something like mail.mycompany.com.au
openssl req -new -key smtpd.key -x509 -days 3650 -out smtpd.crt
2.
CA-signed, you're about to generate a CSR. Answer all the questions accurately, otherwise most CAs will fail to verify your identity
openssl req -new -key smtpd.key -out smtpd.csr
Once the signed certificate comes back you can drop that in next to the key.
3.
Edit your Postfix main.cf to enable TLS. These lines can be added to the bottom of the file
# Offer TLS encryption to clients
smtpd_tls_security_level = may
# As specified earlier
smtpd_tls_key_file = /etc/ssl/smtpd.key
smtpd_tls_cert_file = /etc/ssl/smtpd.crt
# Only offer SMTP AUTH when talking over an encrypted connection
smtpd_tls_auth_only = yes
# Add some useful logging entries to track the use of TLS, you can omit this if desired
smtpd_tls_loglevel = 1
# Add a header to mail received with TLS, can make debugging easier
smtpd_tls_received_header = yes
4. Restart Postfix and check the mail logs for any errors.
Test that TLS is working as expected
We'll open two connections, one with TLS and one without, to ensure we see what we expect.
*
Firstly without TLS
rosa@rokkenjima:~% telnet yoshino.meidokon.net 25
Trying 202.4.232.68...
Connected to yoshino.meidokon.net.
Escape character is '^]'.
220 yoshino.meidokon.net ESMTP Postfix
EHLO gohda.rokkenjima.net
250-yoshino.meidokon.net
250-PIPELINING
250-SIZE 20480000
250-ETRN
250-AUTH PLAIN LOGIN
250-AUTH=PLAIN LOGIN
250-ENHANCEDSTATUSCODES
250-8BITMIME
250 DSN
QUIT
221 2.0.0 Bye
Connection closed by foreign host.
You'll notice that STARTTLS is now available, but AUTH is not offered.
*
Now with TLS, using openssl's client feature
rosa@rokkenjima:~% openssl s_client -connect yoshino.meidokon.net:25 -starttls smtp
CONNECTED(00000003)
<lots of SSL output>
EHLO gohda.rokkenjima.net
250-yoshino.meidokon.net
250-PIPELINING
250-SIZE 10240000
250-VRFY
250-ETRN
250-AUTH PLAIN LOGIN
250-AUTH=PLAIN LOGIN
250-ENHANCEDSTATUSCODES
250-8BITMIME
250 DSN
QUIT
DONE
openssl handles the TLS for us, and AUTH is now available, as we saw during previous testing.
Enabling the submission port
Many ISPs block access to port 25, meaning that the above setup won't work for a lot of users. For this reason, port 587 is available, and is configured only for "outbound" relay access. You can do this easily in Postfix.
1.Edit /etc/postfix/master.cf and enable the submission port by uncommenting a couple of lines. Make sure not to mess up the whitespace - a logical line is continued by whitespace on the subsequent lines.
# We enforce the use of TLS, and override the client restrictions to only allow authenticated relaying
submission inet n - - - - smtpd
-o smtpd_tls_security_level=encrypt
-o smtpd_sasl_auth_enable=yes
-o smtpd_client_restrictions=permit_sasl_authenticated,reject
2. Restart Postfix and test the submission port
rosa@rokkenjima:~% openssl s_client -connect yoshino.meidokon.net:587 -starttls smtp
See also:
*Using the Postfix LDA for delivery
References/External Links
*http://www.postfix.org/SASL_README.html
*http://wiki.dovecot.org/HowTo/PostfixAndDovecotSASL
* http://wiki.dovecot.org/Debugging/Authentication
* http://www.anchor.com.au/hosting/dedicated/Postfix-SASL-setup
Monday, February 22, 2010
Macbook and Vista Master Browser
Are you trying to network a macbook with your workgroup?
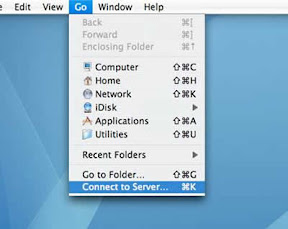
Well luckily enough its relatively easy to do... Most of the time. This Discussion Details all the steps you need to consider if your having trouble and have already tried the nice and easy step by step guide to sharing files on a mac. I unfortunately followed these steps and yes i could use the "cmd-k" connect to server option, type in the name of the server. using smb://computername/sharename works for me so that's what I'm using now. See this website for step by step guide to this proccess. Along my journey to settling for this 'work around' (I know its not really a work around but you will see why after my little story below). My desired results were: "Set all my computers to the same workgroup", (Vista, Windows 7, Windows XP, Mac OSX) and allow them to be visible in each others "network browser windows", so you can just 'browse' and click. Lucky for me this was all working for the XP, Vista and Windows 7 PC's, but I could not get the macbook to 'see' the windows based computers. This is the summary of the problem and some commands I found and used along the way. It should be mentioned here that the problem was as follows:When Vista is the Master Browser the Mac cannot see any computers in the "network". But obviously still can connect using "connect to server" manually. When XP is the Master Browser the Mac can see any computers in the "network".
How to determine which computer is the Master Browser Simple If you can turn all the computers off on your network besides two of them. Mac - XP Mac - Vista In those combinations to see if the Mac can see the network computers. This is what i did, turned off vista machine and XP became the master browser. (Note: if your comfortable you can use the Start->Run->Services.msc and stop the computer browser service to have the same effect, this is what i found and efficient way to cause re-elections.) On the PC
- Bring up a command window. (Start->Run->cmd)
- Type: "net view" (not including "'s)
- You should see a list of computers, \\computername
- Then you can use the command: "nbtstat -a computername" Where computername is one of the machines in the list. on each machine untill you find the one with "..__MSBROWSE__." in the list of results. This is the current master browser.
- Bring up a Terminal Window (Utilities, Terminal)
- Type: "nmblookup -M -- -." (not including "'s)
- This should give you the IP of the Master Browser. xxx.xxx.xxx.xxx
- (Note the -- -. in my understanding is how to get the - symbol. The -- and . must be how to escape the characters otherwise - would be treated like the - in the -M command.)
- Then you can run, nmblookup -A xxx.xxx.xxx.xxx (Where xx's represent the IP you got from the command before.
- This then should list the Netbios names of the Master browser and the workgroups.
- You will also see "..__MSBROWSE__." which indicates its the master browser.
Now What? If you have discovered like me that you cannot see a list of computers when Vista is the master browser, then these are the options i'm aware of.
- a) Stop vista from becoming a master browser. (Registry Edit or diable browser service)
- b) Enable the Mac to become a master browser. (terminal->sudo nano /etc/smb.conf, you are looking for os level = 2 and local master = no, You might want to do some more research of your own before modifying these settings.)
- c) Just use the connect to server option on the mac.
REFERENCE
http://robmulally.blogspot.com/2009/03/macbook-master-browser-and-my-mate.html
I may have found a solution to this issue. After reading your article, I began a rather exhausting searching for Win7 Master Browser issues.
Run services.msc on Windows 7 machine
Browse down to Computer Browser and double-click
To test the fix, stop the service and wait 5-10 minutes to see if the Windows 7 machine appears either in the Shared section of the Mac's sidebar in a window or by pressing command-k and click the browse button on the Mac.
If this test works, go back to services.msc on the Windows 7 machine and disable the Computer Browser service. Restart the Windows 7 machine and after about 5 minutes and check to see if the Windows 7 machine can see the other computers on the network, (you will need to set up PC file sharing on the Mac).
If both scenarios work, problem solved!