Showing posts with label Proftpd. Show all posts

Tuesday, December 7, 2010

Proftpd limit bandwidth to my PROFTPD clients

SkyHi @ Tuesday, December 07, 2010
For the benefit of others here is the solution which I worked out by experimenting.

Its very simple really.

I added the following 2 lines in the proftpd.config file:

TransferRate RETR 15.0

TransferRate STOR 55.0

This limits the download speed FROM my server to 15 Kbytes/sec

and the upload TO my server to 55 Kbytes/sec

Thats it. It works

Stopping and Starting ProFTPD(compiled)

Start
/usr/local/sbin/proftpd

stop
kill -TERM `cat /usr/local/var/proftpd.pid`

To avoid this,
perform a syntax check of the file before sending the signal:

proftpd -t -d5

REFERENCES
http://www.linuxquestions.org/questions/linux-newbie-8/how-do-i-limit-bandwidth-to-my-proftpd-clients-311417/
http://www.proftpd.org/docs/howto/Stopping.html

Saturday, November 13, 2010

Linux / UNIX FTP Commands Tutorial

SkyHi @ Saturday, November 13, 2010
I switched from MS-Windows to Mac computer running OS X UNIX systems. I need to transfer and download file using ftp for my personal website. Can you provide me a list of FTP commands that may be sent to an FTP server, to upload and download files using UNIX / Linux ftp command line client?

File Transfer Protocol (FTP) is a network protocol used to copy a file from one computer to another over the Internet or LAN. FTP follows a client-server architecture which utilizes separate control and data connections between the ftp client and server. The default port for ftp is 21.
WARNING! These examples uses outdated insecure ftp protocol / client and if executed you are open to various attacks including password snooping. I strongly recommend that you use sftp, the secure version of FTP. Just type sftp instead of ftp and all of the following commands should work with sftp client too.

ftp: Internet File Transfer Program

Use the following syntax to connect to transfer files to and from a remote network ftp site:
ftp ftp.example.com
ftp 1.2.3.4
ftp user@ftp.example.com
You must know ftp username and password for user-based password authentication or with anonymous user access use ftp as both username and password. In this example, you are connecting to ftp.freebsd.org with anonymous user access (open the terminal and type the following command):
$ ftp ftp.freebsd.org
Sample session:
Trying 87.51.34.132...
Connected to ftp.freebsd.org.
220 ftp.beastie.tdk.net FTP server (Version 6.00LS) ready.
Name (ftp.freebsd.org:vivek): ftp
331 Guest login ok, send your email address as password.
Password:
230 Guest login ok, access restrictions apply.
Remote system type is UNIX.
Using binary mode to transfer files.
ftp>
When you enter your own loginname and password for the ftp.example.com server, it returns the prompt
ftp>
You need to type all commands in front of the ftp> prompt.

Task: List Current File

Type the ls command at ftp> prompt:
ftp> ls
Sample outputs:
229 Entering Extended Passive Mode (|||60692|)
150 Opening ASCII mode data connection for '/bin/ls'.
total 10
drwxrwxr-x  2 0     5      512 Jul 19  2007 .snap
drwx------  2 0     0     2048 Jul 19  2007 lost+found
drwxr-xr-x  3 1006  1006   512 Sep 21  2009 pub
drwxr-xr-x  3 1006  1006   512 Jun  5  2007 sup
drwxr-xr-x  4 1006  0      512 Sep 18  2009 www
226 Transfer complete.
ftp>
The above will list the names of the files in the current remote directory (the last name is file or dir name).

Task: Change Directory

To change directory on the remote machine use cd command:
ftp> cd dirName
To change to pub directory, enter:
ftp> cd pub
Sample outputs:
250 CWD command successful.

Task: Download / Copy file

To copy one file at a time from the remote ftp server to the local system use get command:
get fileName
get fileName newFileName
In this example, download file resume.pdf in the current remote directory to (or on top of) a file with the same name, resume.pdf, in your current local directory:
ftp> get resume.pdf
Sample outputs:
local: resume.pdf remote: resume.pdf
229 Entering Extended Passive Mode (|||55093|)
150 Opening BINARY mode data connection for 'resume.pdf' (53077 bytes).
100% |*********************************************************************| 53077       12.58 KiB/s    00:00 ETA
226 Transfer complete.
53077 bytes received in 00:04 (12.57 KiB/s)
In this example, copies file data.tar.gz in the current remote directory to (or on top of) a file named backup.tar.gz in your current local directory:
ftp> get data.tar.gz backup.tar.gz

Change Local Directory

To change directory on your local system, enter:
ftp> lcd /path/to/new/dir
ftp> lcd /tmp

Sample outputs:
Local directory now: /tmp
Print local directory:
ftp> lpwd
Sample outputs:
/tmp
The lpwd command prints current download directory for local systems. However, to find out the pathname of the current directory on the remote ftp server, enter:
ftp> pwd
Sample outputs:
Remote directory: /pub/FreeBSD

Task: Download Multiple Files

You need to use mget command as follows to copy multiple files from the remote ftp server to the local system. You may be prompted for a yes/no (Y/N) answer before transferring each file (you can disable prompt by passing the -i option to ftp client). To download all files, enter:
ftp> mget *
To download all perl files (ending with .pl extension), enter:
ftp> mget *.pl

Task: Turn On / Off Interactive Prompting

The ftp command prompt sets interactive prompting; "on" which enables prompting so that you can verify of each step of the multiple commands, "off" allows the commands to act unimpeded:
ftp> prompt on
ftp> mput *.php
ftp> prompt off
ftp> mget *.py

Task: Delete File

To delete a file in the current remote directory use delete command:
ftp> delete fileName
ftp> delete output.jpg

Task: Upload One File

To copy one file at a time from the local systems to the remote ftp server, enter:
ftp> put fileName
In this example, upload logo.jpg, enter:
ftp> put logo.jpg

Task: Upload Multiple Files

To copy multiple files from the local system to the remote ftp server use mput command. Again, you may be prompted for a yes/no (y/n) answer before transferring each file. In this example, upload all files from the current system:
ftp> mput *
ftp> mput *.pl

Task: Create a Directory

To make a new directory, enter:
ftp> mkdir dirName
ftp> mkdir scripts
ftp> cd scripts
ftp> pwd

Task: Delete a Directory

To remove or delete a directory, enter:
ftp> rmdir dirName
ftp> rmdir images
ftp> ls

Task: Set The Mode Of File Transfer

To set the mode of file transfer to ASCII, enter:
ftp> ascii
Please note that ascii is the default and good for text files. To set the mode of file transfer to binary, enter:
ftp> binary
The binary mode is recommended for almost all sort of files including images, zip files and much more. The binary mode provides less chance of a transmission error.

Task: Connect To Another FTP Server

To open a connection with another ftp server, enter:
ftp> open ftp.nixcraft.net.in
The above command opens a new FTP connection with ftp.nixcraft.net.in. You must provide a username and password for a ftp.nixcraft.net.in account. However, a username and password can be skipped for an anonymous FTP connection.

Task: Exit the FTP Session

Type quit or bye, enter:
ftp> quit
OR
ftp> bye
Sample outputs:
221 Goodbye.

How Do I Find Out More Information About The FTP Commands?

Type ? or help to get more information about the FTP commands:
ftp> ?
ftp> help

Sample outputs:
Commands may be abbreviated.  Commands are:

!  delete  idle  mode  pmlsd  reset  system
$  dir  image  modtime  preserve restart  tenex
account  disconnect lcd  more  progress rhelp  throttle
append  edit  less  mput  prompt  rmdir  trace
ascii  epsv4  lpage  mreget  proxy  rstatus  type
bell  exit  lpwd  msend  put  runique  umask
binary  features ls  newer  pwd  send  unset
bye  fget  macdef  nlist  quit  sendport usage
case  form  mdelete  nmap  quote  set  user
cd  ftp  mdir  ntrans  rate  site  verbose
cdup  gate  mget  open  rcvbuf  size  xferbuf
chmod  get  mkdir  page  recv  sndbuf  ?
close  glob  mls  passive  reget  status
cr  hash  mlsd  pdir  remopts  struct
debug  help  mlst  pls  rename  sunique
To get a short description about each command, enter:
ftp> help commandName
ftp> help chmod

Sample outputs:
chmod       change file permissions of remote file
ftp> help ls
Sample outputs:
ls          list contents of remote path

FTP Through A Browser

If you do not want to type the commands, than use a browser such as Safari, Firefox and type the following:
ftp://ftpUserName@ftp.nixcraft.net.in
ftp://ftp.freebsd.org/
ftp://ftp@ftp.freebsd.org/
ftp://userName:Password@ftp.nixcraft.net.in/
ftp://ftp:ftp@ftp.freebsd.org/

Sample outputs:

UNIX / Linux FireFOX - FTP through a browser
Fig.01: FTP through a browser

REFERENCES

Tuesday, August 17, 2010

Proftpd: Make Sure FTP Client Does Not Timeout

SkyHi @ Tuesday, August 17, 2010
Q. I'm using ProFTPD FTP server under CentOS Linux. How do I make sure that my FTP client does not disconnect or timeout connection to FTP server?


A. Most ftp client can ping to FTP server to stay connected but some client cannot do this. However, you can increase timeout on server itself.


TimeoutNoTransfer directive


The TimeoutNoTransfer directive configures the maximum number of seconds a client is allowed to spend connected, after authentication, without issuing a command which results in creating an active or passive data connection (i.e. sending/receiving a file, or receiving a directory listing).

Open your /etc/proftpd.conf file, enter:

# vi /etc/proftpd.conf

Set TimeoutNoTransfer to 1200 from default 300:

TimeoutNoTransfer 1200

Restart proftpd:

# service proftpd restart

See ProFTPD tutorial for more information.


===========================================================
Hint: Set proftpd timeout

nano -w /etc/proftpd.conf


ListOptions "-a"
AllowStoreRestart on
TimeoutNoTransfer 1800
TimeoutIdle 1800


# ListOptions "-a" -- Force directory listings to always show dotfiles
# AllowStoreRestart on -- Allow clients to resume uploads


/etc/init.d/proftpd restart


REFERENCES
http://www.cyberciti.biz/faq/howto-ensure-ftp-client-does-not-disconnect/
http://forums.cpanel.net/f5/hint-set-proftpd-timeout-79501.html

Wednesday, March 3, 2010

sudo: sorry, you must have a tty to run sudo

SkyHi @ Wednesday, March 03, 2010

Per customer request, we recently wrote a script to restart their application server around 3AM via crontab every night. We were alerted that their server did not come back up this morning. After investigating, we found the following output in the log file:

sudo: sorry, you must have a tty to run sudo

If you ever encounter this error, you need to use the ‘visudo’ command and locate the following line:

Defaults    requiretty<br />

Just comment out the line, and you will resolve the issue.

If this option is set, sudo will only run when the user is logged in to a real tty. When this flag is set, sudo can only be run from a login session and not via other means such as cron or cgi-bin scripts.


REFERENCE

http://www.adminmyserver.com/articles/sorry-you-must-have-a-tty-to-run-sudo


HOWTO CentOS 5.x Virtual Web Hosting With Apache MYSQL and ProFTPD

SkyHi @ Wednesday, March 03, 2010

Introduction

There are many ways to do virtual websites under linux. The technique I am going to use is multiple domains on one ip address. I also didn't want to use system users for the virtual hosts. So I decided to use a mysql database to store the virtual user information.

Setting Up The Base Server

For a dedicated server start with the base server setup for CentOS 5.x.

Install Softwre

We need to install is proftpd with mysql support. Type:
> yum -y remove vsftpd
> yum -y install proftpd proftpd-mysql

Now lets download and install proftpd admin.
> wget http://downloads.sourceforge.net/proftpd-adm/proftpd_admin_v1.2.tar.gz
> tar -xzvf proftpd_admin_v1.2.tar.gz
> mv proftpd_admin_v1.2 /usr/share/proftpd_admin

Configuring Apache

  1. First we need to create a user called virtwww. We will also make the directory world writable.
    > adduser -m virtwww
    > passwd virtwww
    > chmod a+rwx /home/virtwww
  2. Create the virtual host config file. We will use the name the brouser passes to us to determin the website to load. Type
    > echo "UseCanonicalName Off" > /etc/httpd/conf.d/virtual.conf
    > echo "VirtualDocumentRoot /home/virtwww/%0" >> /etc/httpd/conf.d/virtual.conf
  3. restart apache
    > service httpd restart
  4. Make a directory with your server's ipaddress as its name. Example
    > mkdir /home/virtwww/192.168.1.100
  5. create a test index.html page in your new directory.

Configuring ProFTPD

  1. Create the following proftpd config file
    > mv proftpd.conf proftpd.conf.old
    > nano -w /etc/proftpd.conf
 
# This is the ProFTPD configuration file

# Load modules for sql support
LoadModule mod_sql.c
LoadModule mod_sql_mysql.c

ServerName "Servername"
ServerType standalone
ServerIdent on "Servers identifying string"
DeferWelcome off
DefaultServer on
DefaultRoot ~ !adm
AllowOverwrite on
UseReverseDNS off
IdentLookups off

Port 21
Umask 022
MaxInstances 15
MaxClientsPerHost 3 "Only %m connections per host allowed"
MaxClients 10 "Only %m total simultanious logins allowed"
MaxHostsPerUser 1

User ftp
Group ftp

ScoreboardFile /var/run/proftpd.score

# Some logging formats
LogFormat default "%h %l %u %t \"%r\" %s %b"
LogFormat auth "%v [%P] %h %t \"%r\" %s"
LogFormat write "%h %l %u %t \"%r\" %s %b"

# Define log-files to use
TransferLog /var/log/proftpd/xferlog
ExtendedLog /var/log/proftpd/access_log WRITE,READ write
ExtendedLog /var/log/proftpd/auth_log AUTH auth
ExtendedLog /var/log/proftpd/paranoid_log ALL default
SQLLogFile /var/log/proftpd/mysql

# Set up authentication via SQL
# ===========
AuthOrder mod_sql.c
SQLAuthTypes Backend
SQLConnectInfo proftpd_admin@localhost proftpd password
SQLUserInfo usertable userid passwd uid gid homedir shell
SQLGroupInfo grouptable groupname gid members
SQLUserWhereClause "disabled=0 and (NOW()<=expiration or expiration=-1 or expiration=0)"
SQLHomedirOnDemand on

# Log the user logging in
SQLLog PASS counter
SQLNamedQuery counter UPDATE "lastlogin=now(), count=count+1 WHERE userid='%u'" usertable

# logout log
SQLLog EXIT time_logout
SQLNamedQuery time_logout UPDATE "lastlogout=now() WHERE userid='%u'" usertable

# display last login time when PASS command is given
SQLNamedQuery login_time SELECT "lastlogin from usertable where userid='%u'"
SQLShowInfo PASS "230" "Last login was: %{login_time}"

# xfer Log in mysql
SQLLog RETR,STOR transfer1
SQLNamedQuery transfer1 INSERT "'%u', '%f', '%b', '%h', '%a', '%m', '%T', now(), 'c', NULL" xfer_stat
SQLLOG ERR_RETR,ERR_STOR transfer2
SQLNamedQuery transfer2 INSERT "'%u', '%f', '%b', '%h', '%a', '%m', '%T', now(), 'i', NULL" xfer_stat

AllowStoreRestart on
AllowRetrieveRestart on
RequireValidShell off
#RootLogin off

# Normally, we want users to do a few things.
<Global>
AllowOverwrite yes
<Limit ALL SITE_CHMOD>
AllowAll
</Limit>
</Global>

Configuring ProFTPD Administrator

First lets create the apache config file and restart apache. The file has been set to only allow access from the local host. Change the access to meet your needs.

/etc/httpd/conf.d/proftpd_admin.conf

 <br />alias /ftpadmin /usr/share/proftpd_admin<br /><br /><Location /ftpadmin><br />    Order deny,allow<br />    Deny from all<br />    Allow from 127.0.0.1<br />    Allow from ::1<br />    # Allow from .example.com<br /></Location><br /><br />

> service httpd restart

Edit the file /usr/share/proftpd_admin/misc/database_structure_mysql/db_structure.sql
Skip to the last three lines. Enter the desired password in these three lines.

Lets create the database and tables. Type the following.
> mysql -u root -p < /usr/share/proftpd_admin/misc/database_structure_mysql/db_structure.sql

Now type the following to do a little housekeeping for php5.
> chmod o+w /usr/share/proftpd_admin/configuration.xml

Now start proftpd. Be sure to also have it start at boot time.
> service proftpd start

Now go to the web interface configuration screen http://yourserver.tld/ftpadmin/configure.php
You will need to configure database access and some other settings.

Conclusion

That's the complete setup. Proftpd Admin dose almost everything we need. You will need to create links for multiple host names pointing to the same directory. For example if your directory is '/home/virtwww/yourdomain.com' and you want www.yourdomain.com to work then you'll have to create a link called '/home/virtwww/www.yourdomain.com/' which points to '/home/virtwww/yourdomain.com'.


REFERENCE

http://www.campworld.net/thewiki/pmwiki.php/LinuxServersCentOS/Cent5VirtWebServer


Setting Up ProFtpd with MySQL

SkyHi @ Wednesday, March 03, 2010
Prerequisites : MySQL 5 & PHP 5
Download proftpd source
wget ftp://ftp-stud.fht-esslingen.de/pub/Mirrors/ftp.proftpd.net/distrib/source/proftpd-1.3.1.tar.gz
tar xzvf proftpd-1.3.1.tar.gz
cd proftpd-1.3.1

Configure using:
install_user=root install_group=wheel ./configure --with-modules=mod_sql:mod_sql_mysql:mod_quotatab:mod_quotatab_sql --with-includes=/usr/include/mysql/ --with-libraries=/usr/lib/mysql/ --enable-timeout-linger --enable-timeout-stalled --sysconfdir=/etc --localstatedir=/var --prefix=/usr

make & make install Create the /etc/init.d/proftpd as
#!/bin/sh
# $Id: proftpd.init,v 1.1 2004/02/26 17:54:30 thias Exp $
#
# proftpd This shell script takes care of starting and stopping
# proftpd.
#
# chkconfig: - 80 30
# description: ProFTPD is an enhanced FTP server with a focus towards \
# simplicity, security, and ease of configuration. \
# It features a very Apache-like configuration syntax, \
# and a highly customizable server infrastructure, \
# including support for multiple 'virtual' FTP servers, \
# anonymous FTP, and permission-based directory visibility.
# processname: proftpd
# config: /etc/proftp.conf
# pidfile: /var/run/proftpd.pid

# Source function library.
. /etc/rc.d/init.d/functions

# Source networking configuration.
. /etc/sysconfig/network

# Check that networking is up.
[ ${NETWORKING} = "no" ] && exit 0

[ -x /usr/sbin/proftpd ] || exit 0

RETVAL=0

prog="proftpd"

start() {
echo -n $"Starting $prog: "
daemon proftpd
RETVAL=$?
echo
[ $RETVAL -eq 0 ] && touch /var/lock/subsys/proftpd
}

stop() {
echo -n $"Shutting down $prog: "
killproc proftpd
RETVAL=$?
echo
[ $RETVAL -eq 0 ] && rm -f /var/lock/subsys/proftpd
}

# See how we were called.
case "$1" in
start)
start
;;
stop)
stop
;;
status)
status proftpd
RETVAL=$?
;;
restart)
stop
start
;;
condrestart)
if [ -f /var/lock/subsys/proftpd ]; then
stop
start
fi
;;
reload)
echo -n $"Re-reading $prog configuration: "
killproc proftpd -HUP
RETVAL=$?
echo
;;
*)
echo "Usage: $prog {start|stop|restart|reload|condrestart|status}"
exit 1
esac

exit $RETVAL

chmod 755 /etc/init.d/proftpd

Create /etc/proftpd.conf file as

ServerName "FTP Server"
ServerType standalone
ServerIdent on "Servers identifying string"
DeferWelcome on
DefaultServer on

DisplayLogin .welcome # Textfile to display on login
DisplayConnect .connect # Textfile to display on connection
DisplayChdir .firstchdir # Textfile to display on first changedir

UseReverseDNS off
IdentLookups off

Port 21
Umask 002
MaxInstances 15
MaxClientsPerHost 3 "Only %m connections per host allowed"
MaxClients 30 "Only %m total simultanious logins allowed"
MaxHostsPerUser 1

User nobody
Group nobody

ScoreboardFile /var/proftpd/proftpd.scoreboard

AllowStoreRestart on
AllowRetrieveRestart on
RequireValidShell off
PathDenyFilter "\\.ftp)|\\.ht)[a-z]+$"
DefaultRoot ~
DenyFilter \*.*/

# Some logging formats
LogFormat default "%h %l %u %t \"%r\" %s %b"
LogFormat auth "%v [%P] %h %t \"%r\" %s"
LogFormat write "%h %l %u %t \"%r\" %s %b"

# Define log-files to use
TransferLog /var/log/proftpd/proftpd.xferlog
ExtendedLog /var/log/proftpd/proftpd.access_log WRITE,READ write
ExtendedLog /var/log/proftpd/proftpd.auth_log AUTH auth
ExtendedLog /var/log/proftpd/proftpd.paranoid_log ALL default
SQLLogFile /var/log/proftpd/proftpd.mysql

# Set up authentication via SQL
# ===========
AuthOrder mod_sql.c
SQLAuthTypes Backend
#===========================
# CHANGE THE FOLLOWING LINE TO REFLECT YOUR INSTALLATION
#===========================
SQLConnectInfo proftpd_admin@localhost proftpd proftpd
#===========================
SQLUserInfo usertable userid passwd uid gid homedir shell
SQLGroupInfo grouptable groupname gid members
SQLUserWhereClause "disabled=0 and (NOW()<=expiration or expiration=-1 or expiration=0)"

# Log the user logging in
SQLLog PASS counter
SQLNamedQuery counter UPDATE "lastlogin=now(), count=count+1 WHERE userid='%u'" usertable

# logout log
SQLLog EXIT time_logout
SQLNamedQuery time_logout UPDATE "lastlogout=now() WHERE userid='%u'" usertable

# display last login time when PASS command is given
SQLNamedQuery login_time SELECT "lastlogin from usertable where userid='%u'"
SQLShowInfo PASS "230" "Last login was: %{login_time}"

# xfer Log in mysql
SQLLog RETR,STOR transfer1
SQLNamedQuery transfer1 INSERT "'%u', '%f', '%b', '%h', '%a', '%m', '%T', now(), 'c', NULL" xfer_stat
SQLLOG ERR_RETR,ERR_STOR transfer2
SQLNamedQuery transfer2 INSERT "'%u', '%f', '%b', '%h', '%a', '%m', '%T', now(), 'i', NULL" xfer_stat

# Normally, we want users to do a few things.
<Global>
AllowOverwrite yes
<Limit ALL SITE_CHMOD>
AllowAll
</Limit>
</Global>

mkdir /var/log/proftpd/
Create /etc/logrotate.d/proftpd as
/var/log/proftpd/*log {
compress
missingok
postrotate
test -f /var/lock/subsys/proftpd && /usr/bin/killall -HUP proftpd
endscript
}
/var/log/proftpd/proftpd.mysql {
compress
missingok
postrotate
test -f /var/lock/subsys/proftpd && /usr/bin/killall -HUP proftpd
endscript
}

Dowload proFTPd Administrator (http://proftpd-adm.sourceforge.net/)

cd /var/www/html
tar xzvf proftpd_admin_v1.2.tar.gz
rm proftpd_admin_v1.2.tar.gz
mv proftpd_admin_v1.2/ proftpd_admin/

cd proftpd_admin

edit misc/database_structure_mysql
and change the last 3 lines according to the credentials you have set in /etc/proftpd.conf and then :
mysql -u root -p < misc/database_structure_mysql/db_structure.sql
chmod o+w /var/www/html/configuration.xml
Edit misc/user_script/create_user.sh to
#!/bin/bash
USER=$1
USER_ID=$2
GROUP_ID=$3

mkdir -p --mode=775 /ftp/$USER
chown $USER_ID.$GROUP_ID /ftp/$USER

Then :

chown -R root.root /var/www/html/proftpd_admin/misc/user_script
chmod 700 -R /var/www/html/proftpd_admin/misc/user_script

edit /etc/sudoers files and add the following 2 lines at the end

# Cmnd alias specification
Cmnd_Alias CREATE_USER = /var/www/html/proftpd_admin/misc/user_script/create_user.sh

# User privilege specification
apache ALL=(ALL) NOPASSWD: CREATE_USER

Also make sure that Defaults requiretty is commented out

Securing Installation of Proftpd Admin

vi /etc/httpd/conf.d/dirSecurity.conf

# Secure proftpd_directory both by ip and password
<Directory "/var/www/html/proftpd_admin">
deny from all
Order deny,allow
Allow from <any safe IP>
AuthType Basic
AuthUserFile /etc/httpd/conf/proftpd.htpasswd
AuthName Administration
require valid-user
satisfy All

</Directory>

Then execute

htpasswd -b -c /etc/httpd/conf/proftpd.htpasswd proftp <password>

/etc/init.d/httpd restart
/etc/init.d/mysqld restart
/etc/init.d/proftpd start

And point your browser to http://<server-ip>/proftpd-admin and supply the username & password you created.
Go to the Configure Tab and then the ProFTPd tab and set

Create user command: sudo /var/www/html/proftpd_admin/misc/user_script/create_user.sh


REFERENCE

http://www.thanosk.net/node/5


Wednesday, February 17, 2010

ProFTPD

SkyHi @ Wednesday, February 17, 2010

Introduction

There are many ways to do virtual websites under linux. The technique I am going to use is multiple domains on one ip address. I also didn't want to use system users for the virtual hosts. So I decided to use a mysql database to store the virtual user information.

Setting Up The Base Server

For a dedicated server start with the base server setup for CentOS 5.x.

Install Softwre

We need to install is proftpd with mysql support. Type:
> yum -y remove vsftpd
> yum -y install proftpd proftpd-mysql

Now lets download and install proftpd admin.
> wget http://downloads.sourceforge.net/proftpd-adm/proftpd_admin_v1.2.tar.gz
> tar -xzvf proftpd_admin_v1.2.tar.gz
> mv proftpd_admin_v1.2 /usr/share/proftpd_admin

Configuring Apache

  1. First we need to create a user called virtwww. We will also make the directory world writable.
    > adduser -m virtwww
    > passwd virtwww
    > chmod a+rwx /home/virtwww
  2. Create the virtual host config file. We will use the name the brouser passes to us to determin the website to load. Type
    > echo "UseCanonicalName Off" > /etc/httpd/conf.d/virtual.conf
    > echo "VirtualDocumentRoot /home/virtwww/%0" >> /etc/httpd/conf.d/virtual.conf
  3. restart apache
    > service httpd restart
  4. Make a directory with your server's ipaddress as its name. Example
    > mkdir /home/virtwww/192.168.1.100
  5. create a test index.html page in your new directory.

Configuring ProFTPD

  1. Create the following proftpd config file
    > mv proftpd.conf proftpd.conf.old
    > nano -w /etc/proftpd.conf
 
# This is the ProFTPD configuration file

# Load modules for sql support
LoadModule mod_sql.c
LoadModule mod_sql_mysql.c

ServerName "Servername"
ServerType standalone
ServerIdent on "Servers identifying string"
DeferWelcome off
DefaultServer on
DefaultRoot ~ !adm
AllowOverwrite on
UseReverseDNS off
IdentLookups off

Port 21
Umask 022
MaxInstances 15
MaxClientsPerHost 3 "Only %m connections per host allowed"
MaxClients 10 "Only %m total simultanious logins allowed"
MaxHostsPerUser 1

User ftp
Group ftp

ScoreboardFile /var/run/proftpd.score

# Some logging formats
LogFormat default "%h %l %u %t \"%r\" %s %b"
LogFormat auth "%v [%P] %h %t \"%r\" %s"
LogFormat write "%h %l %u %t \"%r\" %s %b"

# Define log-files to use
TransferLog /var/log/proftpd/xferlog
ExtendedLog /var/log/proftpd/access_log WRITE,READ write
ExtendedLog /var/log/proftpd/auth_log AUTH auth
ExtendedLog /var/log/proftpd/paranoid_log ALL default
SQLLogFile /var/log/proftpd/mysql

# Set up authentication via SQL
# ===========
AuthOrder mod_sql.c
SQLAuthTypes Backend
SQLConnectInfo proftpd_admin@localhost proftpd password
SQLUserInfo usertable userid passwd uid gid homedir shell
SQLGroupInfo grouptable groupname gid members
SQLUserWhereClause "disabled=0 and (NOW()<=expiration or expiration=-1 or expiration=0)"
SQLHomedirOnDemand on

# Log the user logging in
SQLLog PASS counter
SQLNamedQuery counter UPDATE "lastlogin=now(), count=count+1 WHERE userid='%u'" usertable

# logout log
SQLLog EXIT time_logout
SQLNamedQuery time_logout UPDATE "lastlogout=now() WHERE userid='%u'" usertable

# display last login time when PASS command is given
SQLNamedQuery login_time SELECT "lastlogin from usertable where userid='%u'"
SQLShowInfo PASS "230" "Last login was: %{login_time}"

# xfer Log in mysql
SQLLog RETR,STOR transfer1
SQLNamedQuery transfer1 INSERT "'%u', '%f', '%b', '%h', '%a', '%m', '%T', now(), 'c', NULL" xfer_stat
SQLLOG ERR_RETR,ERR_STOR transfer2
SQLNamedQuery transfer2 INSERT "'%u', '%f', '%b', '%h', '%a', '%m', '%T', now(), 'i', NULL" xfer_stat

AllowStoreRestart on
AllowRetrieveRestart on
RequireValidShell off
#RootLogin off

# Normally, we want users to do a few things.
<Global>
AllowOverwrite yes
<Limit ALL SITE_CHMOD>
AllowAll
</Limit>
</Global>

Configuring ProFTPD Administrator

First lets create the apache config file and restart apache. The file has been set to only allow access from the local host. Change the access to meet your needs.

/etc/httpd/conf.d/proftpd_admin.conf

 <br />alias /ftpadmin /usr/share/proftpd_admin<br /><br /><Location /ftpadmin><br />    Order deny,allow<br />    Deny from all<br />    Allow from 127.0.0.1<br />    Allow from ::1<br />    # Allow from .example.com<br /></Location><br /><br />

> service httpd restart

Edit the file /usr/share/proftpd_admin/misc/database_structure_mysql/db_structure.sql
Skip to the last three lines. Enter the desired password in these three lines.

Lets create the database and tables. Type the following.
> mysql -u root -p < /usr/share/proftpd_admin/misc/database_structure_mysql/db_structure.sql

Now type the following to do a little housekeeping for php5.
> chmod o+w /usr/share/proftpd_admin/configuration.xml

Now start proftpd. Be sure to also have it start at boot time.
> service proftpd start

Now go to the web interface configuration screen http://yourserver.tld/ftpadmin/configure.php
You will need to configure database access and some other settings.

Conclusion

That's the complete setup. Proftpd Admin dose almost everything we need. You will need to create links for multiple host names pointing to the same directory. For example if your directory is '/home/virtwww/yourdomain.com' and you want www.yourdomain.com to work then you'll have to create a link called '/home/virtwww/www.yourdomain.com/' which points to '/home/virtwww/yourdomain.com'.


REFERENCE

http://www.campworld.net/thewiki/pmwiki.php/LinuxServersCentOS/Cent5VirtWebServer


Sunday, February 7, 2010

Deactivating service ftp due to excessive incoming connections

SkyHi @ Sunday, February 07, 2010
ERROR:
Feb  7 12:44:18 web xinetd[28330]: Deactivating service ftp due to excessive incoming connections.  Restarting in 30 seconds.
Feb  7 12:44:18 web proftpd[21228]: web.example.com (23.4.3.5[23.4.3.5]) - FTP session closed.
Feb  7 12:44:18 web proftpd[21232]: web.example.com (23.4.3.5[23.4.3.5]) - FTP session closed.
Feb  7 12:44:18 web proftpd[21230]: web.example.com (23.4.3.5[23.4.3.5]) - FTP session closed.
Feb  7 12:44:18 web proftpd[21231]: web.example.com(23.4.3.5[23.4.3.5]) - FTP session closed.
Feb  7 12:44:28 web proftpd[21229]: logs.example.com (23.4.3.5[23.4.3.5]) - FTP session opened.
Feb  7 12:44:28 web proftpd[21229]: logs.example.com(23.4.3.5[23.4.3.5]) - FTP session closed.
Feb  7 12:44:48 web xinetd[28330]: Activating service ftp

Answer:
Exact Error Message
xinetd[1225]: Deactivating service bpcd due to excessive incoming connections. Restarting in 30 seconds.

Details:
Overview:
By default, RedHat servers are configured to accept 25 incoming connections per second.   If the number of incoming connections exceed 25 per second, the service will be temporarily disabled.  The cps directive in the /etc/xinetd.conf file dictates how many connections per second are allowed and the number of seconds to elapse before re-enabling the service.

Troubleshooting:
Check the /var/log/messages for any error messages and check the cps setting in the /etc/xinetd.conf file.

Log Files:
The /var/log/messages file will show the error:
xinetd[1225]: Deactivating service bpcd due to excessive incoming connections. Restarting in 30 seconds.

Resolution:
Increase the number of connections per second allowed by xinetd.  

To increase the number of connections per second allowed by xinetd, edit the /etc/xinetd.conf file.  In the following example, the number of incoming connections per second has been increased from the default of 25 to 35.  (bold added for clarity)

#
# Simple configuration file for xinetd
#
# Some defaults, and include /etc/xinetd.d/

defaults
{
       instances       = 60
       log_type        = SYSLOG authpriv
       log_on_success  = HOST PID
       log_on_failure  = HOST
       cps             = 35 30
}

includedir /etc/xinetd.d

It will be necessary to restart xinetd for the changes to take effect.
# /etc/rc.d/init.d/xinetd restart


=====================================================================
=====================================================================

cps
This sets yet a third limitation on the connection rate: if xinetd receives too many connections from one source within a one-second period, it considers something wrong (such as an attack) and will disable the service for a short period with a message in the logfile:

Jan 9 14:20:15 evolinux xinetd[2622]: Deactivating service gds_db due to excessive incoming connections. Restarting in 30 seconds.
We set the value 200 5, which disabled the service for 5 seconds if 200 connections arrive per second.

REFERENCE
http://seer.entsupport.symantec.com/docs/275357.htm
http://unixwiz.net/evo/evo-linuxdb-setup.html

Wednesday, February 3, 2010

ProFTPD shows incorrect GMT time

SkyHi @ Wednesday, February 03, 2010

A really really strange issue randomly appears with ProFTPD and Plesk occasionally. On the filesystem, a file will have a correct creation/modification date, but then when you view it over FTP, it’s always off by the amount of hours you differ from GMT.

For example, if the server is on Central Time, all of the files will seem to be created 6 hours after they were really created. The filesystem will show something like 10AM, but the FTP client will say 4PM. Luckily, there is a fix!

Add the following to your /etc/proftpd.conf file and you should be good to go:

TimesGMT off
SetEnv TZ :/etc/localtime


REFERENCE

http://rackerhacker.com/2007/02/21/gmt-ftp-timestamps-in-plesk/


Proftpd error setting IPV6_V6ONLY: Protocol not available

SkyHi @ Wednesday, February 03, 2010
error:
After updating Proftpd to version 1.3.0

we're getting the error signal:

error setting IPV6_V6ONLY: Protocol not available in our proftpd logs.

Solution:

You can use
Code:
UseIPv6 off
in proftpd.conf to disable IPv6.


Tuesday, January 26, 2010

a FTP account with permission to access multliple folders

SkyHi @ Tuesday, January 26, 2010
FTP itself does not set specific file access restrictions. When a virtual FTP user is created, they are jailed into a specific directory and its subdirectories. To provide access to different directories, you'll need to manually make links for them (as noted above).

To add an FTP account with access to public_html/folder1 public_html/folder2 and /public_html/index.html, first create a folder to use as the root for the FTP account. I'd suggest something like /home/{username}/{ftpusername} (replace {username} and {ftpusername} with the name of the cPanel account user and ftp account user, respectively).

Now to make your links. You'll need to use the 'ln -s' command from the command line as either the account user or as root to set up these links:

ln -s /home/{username}/public_html/index.html /home/{username}/{ftpusername}/index.html

ln -s /home/{username}/public_html/folder1 / /home/{username}/{ftpusername}/folder1

ln -s /home/{username}/public_html/folder2 /home/{username}/{ftpusername}/folder2


Now, when the FTP user logs in, they'll see:

index.html
/folder1
/folder2

Those will appear to be files but will actually be symbolic links to the real files.

REFERENCE
http://www.webhostingtalk.com/showthread.php?t=681872

Tuesday, January 12, 2010

Active FTP vs. Passive FTP, a Definitive Explanation

SkyHi @ Tuesday, January 12, 2010

Contents:


Introduction

One of the most commonly seen questions when dealing with firewalls and other Internet connectivity issues is the difference between active and passive FTP and how best to support either or both of them. Hopefully the following text will help to clear up some of the confusion over how to support FTP in a firewalled environment.
This may not be the definitive explanation, as the title claims, however, I've heard enough good feedback and seen this document linked in enough places to know that quite a few people have found it to be useful. I am always looking for ways to improve things though, and if you find something that is not quite clear or needs more explanation, please let me know! Recent additions to this document include the examples of both active and passive command line FTP sessions. These session examples should help make things a bit clearer. They also provide a nice picture into what goes on behind the scenes during an FTP session. Now, on to the information...

The Basics

FTP is a TCP based service exclusively. There is no UDP component to FTP. FTP is an unusual service in that it utilizes two ports, a 'data' port and a 'command' port (also known as the control port). Traditionally these are port 21 for the command port and port 20 for the data port. The confusion begins however, when we find that depending on the mode, the data port is not always on port 20.

Active FTP

In active mode FTP the client connects from a random unprivileged port (N > 1023) to the FTP server's command port, port 21. Then, the client starts listening to port N+1 and sends the FTP command PORT N+1 to the FTP server. The server will then connect back to the client's specified data port from its local data port, which is port 20.
From the server-side firewall's standpoint, to support active mode FTP the following communication channels need to be opened:
  • FTP server's port 21 from anywhere (Client initiates connection)
  • FTP server's port 21 to ports > 1023 (Server responds to client's control port)
  • FTP server's port 20 to ports > 1023 (Server initiates data connection to client's data port)
  • FTP server's port 20 from ports > 1023 (Client sends ACKs to server's data port)
When drawn out, the connection appears as follows:
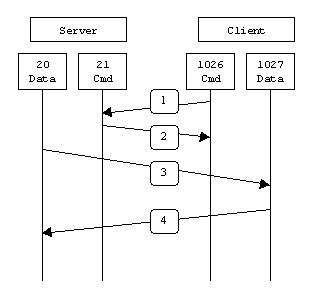
In step 1, the client's command port contacts the server's command port and sends the command PORT 1027. The server then sends an ACK back to the client's command port in step 2. In step 3 the server initiates a connection on its local data port to the data port the client specified earlier. Finally, the client sends an ACK back as shown in step 4. The main problem with active mode FTP actually falls on the client side. The FTP client doesn't make the actual connection to the data port of the server--it simply tells the server what port it is listening on and the server connects back to the specified port on the client. From the client side firewall this appears to be an outside system initiating a connection to an internal client--something that is usually blocked.

Active FTP Example

Below is an actual example of an active FTP session. The only things that have been changed are the server names, IP addresses, and user names. In this example an FTP session is initiated from testbox1.slacksite.com (192.168.150.80), a linux box running the standard FTP command line client, to testbox2.slacksite.com (192.168.150.90), a linux box running ProFTPd 1.2.2RC2. The debugging (-d) flag is used with the FTP client to show what is going on behind the scenes. Everything in red is the debugging output which shows the actual FTP commands being sent to the server and the responses generated from those commands. Normal server output is shown in black, and user input is in bold.
There are a few interesting things to consider about this dialog. Notice that when the PORT command is issued, it specifies a port on the client (192.168.150.80) system, rather than the server. We will see the opposite behavior when we use passive FTP. While we are on the subject, a quick note about the format of the PORT command. As you can see in the example below it is formatted as a series of six numbers separated by commas. The first four octets are the IP address while the last two octets comprise the port that will be used for the data connection. To find the actual port multiply the fifth octet by 256 and then add the sixth octet to the total. Thus in the example below the port number is ( (14*256) + 178), or 3762. A quick check with netstat should confirm this information.
testbox1: {/home/p-t/slacker/public_html} % ftp -d testbox2
Connected to testbox2.slacksite.com.
220 testbox2.slacksite.com FTP server ready.
Name (testbox2:slacker): slacker
---> USER slacker
331 Password required for slacker.
Password: TmpPass
---> PASS XXXX
230 User slacker logged in.
---> SYST
215 UNIX Type: L8
Remote system type is UNIX.
Using binary mode to transfer files.
ftp> ls
ftp: setsockopt (ignored): Permission denied
---> PORT 192,168,150,80,14,178
200 PORT command successful.
---> LIST
150 Opening ASCII mode data connection for file list.
drwx------   3 slacker    users         104 Jul 27 01:45 public_html
226 Transfer complete.
ftp> quit
---> QUIT
221 Goodbye.

Passive FTP

In order to resolve the issue of the server initiating the connection to the client a different method for FTP connections was developed. This was known as passive mode, or PASV, after the command used by the client to tell the server it is in passive mode.
In passive mode FTP the client initiates both connections to the server, solving the problem of firewalls filtering the incoming data port connection to the client from the server. When opening an FTP connection, the client opens two random unprivileged ports locally (N > 1023 and N+1). The first port contacts the server on port 21, but instead of then issuing a PORT command and allowing the server to connect back to its data port, the client will issue the PASV command. The result of this is that the server then opens a random unprivileged port (P > 1023) and sends the PORT P command back to the client. The client then initiates the connection from port N+1 to port P on the server to transfer data.
From the server-side firewall's standpoint, to support passive mode FTP the following communication channels need to be opened:
  • FTP server's port 21 from anywhere (Client initiates connection)
  • FTP server's port 21 to ports > 1023 (Server responds to client's control port)
  • FTP server's ports > 1023 from anywhere (Client initiates data connection to random port specified by server)
  • FTP server's ports > 1023 to remote ports > 1023 (Server sends ACKs (and data) to client's data port)
When drawn, a passive mode FTP connection looks like this:
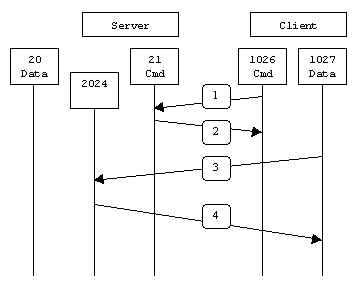
In step 1, the client contacts the server on the command port and issues the PASV command. The server then replies in step 2 with PORT 2024, telling the client which port it is listening to for the data connection. In step 3 the client then initiates the data connection from its data port to the specified server data port. Finally, the server sends back an ACK in step 4 to the client's data port. While passive mode FTP solves many of the problems from the client side, it opens up a whole range of problems on the server side. The biggest issue is the need to allow any remote connection to high numbered ports on the server. Fortunately, many FTP daemons, including the popular WU-FTPD allow the administrator to specify a range of ports which the FTP server will use. See Appendix 1 for more information.
The second issue involves supporting and troubleshooting clients which do (or do not) support passive mode. As an example, the command line FTP utility provided with Solaris does not support passive mode, necessitating a third-party FTP client, such as ncftp.
With the massive popularity of the World Wide Web, many people prefer to use their web browser as an FTP client. Most browsers only support passive mode when accessing ftp:// URLs. This can either be good or bad depending on what the servers and firewalls are configured to support.

Passive FTP Example

Below is an actual example of a passive FTP session. The only things that have been changed are the server names, IP addresses, and user names. In this example an FTP session is initiated from testbox1.slacksite.com (192.168.150.80), a linux box running the standard FTP command line client, to testbox2.slacksite.com (192.168.150.90), a linux box running ProFTPd 1.2.2RC2. The debugging (-d) flag is used with the FTP client to show what is going on behind the scenes. Everything in red is the debugging output which shows the actual FTP commands being sent to the server and the responses generated from those commands. Normal server output is shown in black, and user input is in bold.
Notice the difference in the PORT command in this example as opposed to the active FTP example. Here, we see a port being opened on the server (192.168.150.90) system, rather than the client. See the discussion about the format of the PORT command above, in the Active FTP Example section.
testbox1: {/home/p-t/slacker/public_html} % ftp -d testbox2
Connected to testbox2.slacksite.com.
220 testbox2.slacksite.com FTP server ready.
Name (testbox2:slacker): slacker
---> USER slacker
331 Password required for slacker.
Password: TmpPass
---> PASS XXXX
230 User slacker logged in.
---> SYST
215 UNIX Type: L8
Remote system type is UNIX.
Using binary mode to transfer files.
ftp> passive
Passive mode on.
ftp> ls
ftp: setsockopt (ignored): Permission denied
---> PASV
227 Entering Passive Mode (192,168,150,90,195,149).
---> LIST
150 Opening ASCII mode data connection for file list
drwx------   3 slacker    users         104 Jul 27 01:45 public_html
226 Transfer complete.
ftp> quit
---> QUIT
221 Goodbye.

Other Notes

A reader, Maarten Sjouw, pointed out that active FTP will not function when used in conjunction with a client-side NAT (Network Address Translation) device which is not smart enough to alter the IP address info in FTP packets.

Summary

The following chart should help admins remember how each FTP mode works:
Active FTP :
     command : client >1023 -> server 21
     data    : client >1023 <- server 20

 Passive FTP :
     command : client >1023 -> server 21
     data    : client >1023 -> server >1023
A quick summary of the pros and cons of active vs. passive FTP is also in order:
Active FTP is beneficial to the FTP server admin, but detrimental to the client side admin. The FTP server attempts to make connections to random high ports on the client, which would almost certainly be blocked by a firewall on the client side. Passive FTP is beneficial to the client, but detrimental to the FTP server admin. The client will make both connections to the server, but one of them will be to a random high port, which would almost certainly be blocked by a firewall on the server side.
Luckily, there is somewhat of a compromise. Since admins running FTP servers will need to make their servers accessible to the greatest number of clients, they will almost certainly need to support passive FTP. The exposure of high level ports on the server can be minimized by specifying a limited port range for the FTP server to use. Thus, everything except for this range of ports can be firewalled on the server side. While this doesn't eliminate all risk to the server, it decreases it tremendously. See Appendix 1 for more information.

References

An excellent reference on how various internet protocols work and the issues involved in firewalling them can be found in the O'Reilly and Associates book, Building Internet Firewalls, 2nd Ed, by Brent Chapman and Elizabeth Zwicky.
Finally, the definitive reference on FTP would be RFC 959, which sets forth the official specifications of the FTP protocol. RFCs can be downloaded from numerous locations, including http://www.faqs.org/rfcs/rfc959.html.


Reference: http://slacksite.com/other/ftp.html

Wednesday, December 9, 2009

Secure existing ProFTPd server installation

SkyHi @ Wednesday, December 09, 2009

secure-proftpd

ProFTPd is a high-performant, extremely configurable and most of all secure FTP server written for use on Unix and Unix-like operating systems. The FTP daemon has Apache-like configuration syntax and supports virtual servers – a parallel FTP environments that are physically located on the same system but that answer to different IP addresses or ports.

ProFTPD generally uses a single configuration file, found at /etc/proftpd.conf or at /etc/proftpd/proftpd.conf. This small cheatsheet describes directives in config file that helps to harden currently running ProFTPd instance.

To quickly secure ProFTPd server – open config file and make the following changes:

<code>ServerType standalone
ServerName "SysAdmin.MD secured FTP server"
ServerIdent on "FTP server"
DeferWelcome on

UseIPv6 off
IdentLookups off

MaxInstances 30
MaxClients 10
MaxLoginAttempts 10 "Maximum number of allowed users are already connected (%m)"

DefaultRoot ~
AllowFilter "^[a-zA-Z0-9 ,]*$"
</code>

Below is a short explanation for each directive:

ServerType
Set the mode ProFTPd runs in. In standalone mode, a new connections to the server results in spawned child process for each new-connected client.

ServerIdent
Sets the default message displayed when a new client connects. You can check this message by connecting with telnet to ftp port. Example:

<code>srv:~# telnet 127.0.0.1 21<br />Trying 127.0.0.1...<br />Connected to 127.0.0.1.<br />Escape character is '^]'.<br />220 <strong>FTP server</strong></code>

DeferWelcome
Enabling this directive makes initial welcome message to be exceedingly generic and do not give any type of information about the host.

UseIPv6
Set to off to disable IPv6 protocol support which is annoying on IPv4 only boxes.

IdentLookups
Tells ProFTPd to disable attempts to identify the remote username when a client initially connects to the server.

MaxInstances
The directive configures the maximum number of child processes that may be spawned by a parent proftpd process in standalone mode. This directive is used to prevent undesirable denial-of-service attacks.

MaxClients
Configures the maximum number of authenticated clients which may be logged into a server. Once this limit is reached, additional clients attempting to authenticate will be disconnected with message:
Maximum number of allowed users are already connected.

DefaultRoot
The DefaultRoot directive controls the default root directory assigned to a user upon login.
Symbol ~ means that the client is chroot-jailed into their home directory

AllowFilter
AllowFilter controls what characters may be sent in a command to ProFTPD to prevent some possible types of attacks against FTP daemon.
Symbols "^[a-zA-Z0-9 ,]*$" tells to daemon to only accept commands containing alphanumeric characters and white-space.


Reference: http://www.sysadmin.md/secure-existing-proftpd-server-installation.html


Thursday, November 5, 2009

proftpd configuration

SkyHi @ Thursday, November 05, 2009
[root@home ~]# cat /etc/proftpd.conf
# This is a basic ProFTPD configuration file (rename it to
# 'proftpd.conf' for actual use. It establishes a single server
# and a single anonymous login. It assumes that you have a user/group
# "nobody" and "ftp" for normal operation and anon.
#ServerIdent on " Home server"
ServerName "Home ftp server"
ServerType standalone
DefaultServer on
AllowForeignAddress on
#RequireValidShell off
#TimeoutIdle 3600
#TimeoutStalled 3600
TimeoutLogin 900
TimeoutNoTransfer 3600
UseReverseDNS off
IdentLookups off
PassivePorts 51000 51999
#TimesGMT off
#MasqueradeAddress 192.168.218.48

#UseReverseDNS off
#IdentLookups off
# Port 21 is the standard FTP port.
Port 21

# Umask 022 is a good standard umask to prevent new dirs and files
# from being group and world writable.
Umask 022

# To prevent DoS attacks, set the maximum number of child processes
# to 30. If you need to allow more than 30 concurrent connections
# at once, simply increase this value. Note that this ONLY works
# in standalone mode, in inetd mode you should use an inetd server
# that allows you to limit maximum number of processes per service
# (such as xinetd).
MaxInstances 30

# Set the user and group under which the server will run.
User ftp
Group ftp

# To cause every FTP user to be "jailed" (chrooted) into their home
# directory, uncomment this line.
DefaultRoot ~

# Normally, we want files to be overwriteable.
AllowOverwrite on

# Bar use of SITE CHMOD by default

DenyAll


# A basic anonymous configuration, no upload directories. If you do not
# want anonymous users, simply delete this entire section.
#Anonymous ~ftp>
#User ftp
#Group ftp

# We want clients to be able to login with "anonymous" as well as "ftp"
# UserAlias anonymous ftp

# Limit the maximum number of anonymous logins
#MaxClients 10

# We want 'welcome.msg' displayed at login, and '.message' displayed
# in each newly chdired directory.
# DisplayLogin welcome.msg
#DisplayFirstChdir .message

# Limit WRITE everywhere in the anonymous chroot
#
# DenyAll
#/Limit>
#/Anonymous>


SQLConnectInfo database@192.168.0.16 user password
SQLAuthTypes Plaintext Crypt
SQLAuthenticate users groups
SQLUserInfo ftpuser userid passwd uid gid homedir shell
SQLGroupInfo ftpgroup groupname gid members
SQLMinID 500
LogFormat default "%h %l %u %t \"%r\" %s %b %D \"%f\""
ExtendedLog /var/www/html/ftp.log ALL default
# create a user's home directory on demand if it doesn't exist
SQLHomedirOnDemand on

# Update count every time user logs in
SQLLog PASS updatecount
SQLNamedQuery updatecount UPDATE "count=count+1, accessed=now() WHERE userid='%u '" ftpuser
# Update modified everytime user uploads or deletes a file
SQLLog STOR,DELE modified
SQLNamedQuery modified UPDATE "modified=now() WHERE userid='%u'" ftpuser

Thursday, August 27, 2009

Proftpd

SkyHi @ Thursday, August 27, 2009
DefaultRoot
Name
DefaultRoot -- Sets default chroot directory
Synopsis

DefaultRoot [ directory [group-expression]]

Default

DefaultRoot /

Context

server config, ,

Module

mod_auth

Compatibility

0.99.0pl7 and later

Description

The DefaultRoot directive controls the default root directory assigned to a user upon login. If DefaultRoot is set to a directory other than "/", a chroot operation is performed immediately after a client authenticates. This can be used to effectively isolate the client from a portion of the host system filespace. The specified root directory must begin with a / or can be the magic character '~'; meaning that the client is chroot jailed into their home directory.

When the specified chroot directory is a symlink this will be resolved to it's parent first before setting up the chroot. This can have unwanted side effects. For example if a user has write access to the symlink he could modify it so that it points to '/'. Thus the chroot would be the root directory of the server, resulting in insufficient or no restrictions.

If the DefaultRoot directive specifies a directory which disallows access to the logged-in user's home directory, the user's current working directory after login is set to the DefaultRoot instead of their normal home directory. DefaultRoot cannot be used in configuration blocks, as the directive explicitly contains a root directory used for Anonymous logins. The special character '~' is replaced with the authenticating user's home directory immediately after login. Note that the default root may be a subdirectory of the home directory, such as "~/anon-ftp".

The optional group-expression argument can be used to restrict the DefaultRoot directive to a unix group, groups or subset of groups. The expression takes the format: [!]group-name1[,[!]group-name2[,...]]. The expression is parsed in a logical boolean AND fashion, such that each member of the expression must evaluate to logically TRUE in order for the DefaultRoot directive to apply. The special character '!' is used to negate group membership.

Care should be taken when using DefaultRoot. Chroot "jails" should not be used as methods for implementing general system security as there are potentially ways that a user can "escape" the jail.
See also

Examples

Example of a DefaultRoot configuration:

ServerName "A test ProFTPD Server"
ServerType inetd
User ftp
Group ftp
#
# This causes proftpd to perform a chroot into the authenticating user's directory
# immediately after login.
# Once this happens, the user is unable to "see" higher level directories.
# Because a group-expression is included, only users who are a member of
# the group 'users' and NOT a member of 'staff' will have their default
# root directory set to '~'.
DefaultRoot ~ users,!staff
...


Reference: http://www.proftpd.org/docs/directives/linked/config_ref_DefaultRoot.html