Thursday, July 22, 2010

Iperf measure the bandwidth

SkyHi @ Thursday, July 22, 2010


Iperf is a
tool to measure the bandwidth and the quality of a network link.
Jperf can be associated
with Iperf to provide a graphical frontend written in Java.


The network link is delimited by two hosts running Iperf.


The quality of a link can be tested as follows:

- Latency (response time or RTT): can be measured with the Ping command.

- Jitter (latency variation): can be measured with an Iperf UDP test.

- Datagram loss: can be measured with an Iperf UDP test.


The bandwidth is measured through TCP tests.


To be clear, the difference between TCP (Transmission Control Protocol) and UDP (User Datagram Protocol)
is that TCP use processes to check that the packets are correctly sent to the receiver whereas with
UDP the packets are sent without any checks but with the advantage of being quicker than TCP.

Iperf uses the different capacities of TCP and UDP to provide statistics about network links.


Finally, Iperf can be installed very easily on any UNIX/Linux or Microsoft Windows system. One host must be set as
client, the other one as server.


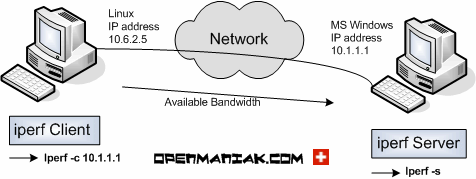
Here is a diagram where Iperf is installed on a Linux and Microsoft Windows machine.

Linux is used as the Iperf client and Windows as the Iperf server. Of course, it is also possible to use two Linux boxes.


screenshot Iperf bandwidth measure client server


Iperf tests:


no arg.

-b

-r

-d

-w


Default settings

Data format

Bi-directional bandwidth

Simultaneous bi-directional bandwidth

TCP Window size


-p, -t, -i

-u, -b

-m

-M

-P

-h

Port, timing and interval

UDP tests, bandwidth settings

Maximum Segment Size display

Maximum Segment Size settings

Parallel tests

help


Jperf:


no arg.

-d

-u, -b


Default settings

Simultaneous bi-directional bandwidth

UDP tests, bandwidth settings


Default Iperf settings:

Also check "
Jperf section.


By default, the Iperf client connects to the Iperf server on the TCP port 5001 and

the bandwidth displayed by Iperf is the bandwidth from the client to the server.

If you want to use UDP tests, use the -u argument.

The -d and -r Iperf client arguments measure the bi-directional bandwidths. (See further
on this tutorial)


Client side:


#iperf -c 10.1.1.1


------------------------------------------------------------

Client connecting to 10.1.1.1, TCP port 5001

TCP window size: 16384 Byte (default)

------------------------------------------------------------

[ 3] local 10.6.2.5 port 33453 connected with 10.1.1.1 port 5001

[ 3] 0.0-10.2 sec 1.26 MBytes 1.05 Mbits/sec


Server side:


#iperf -s


------------------------------------------------------------

Server listening on TCP port 5001

TCP window size: 8.00 KByte (default)

------------------------------------------------------------

[852] local 10.1.1.1 port 5001 connected with 10.6.2.5 port 33453

[ ID] Interval Transfer Bandwidth

[852] 0.0-10.6 sec 1.26 MBytes 1.03 Mbits/sec


Data formatting: (-f argument)


The -f argument can display the results in the desired format:
bits(b), bytes(B), kilobits(k), kilobytes(K), megabits(m),
megabytes(M), gigabits(g) or gigabytes(G).

Generally the bandwidth measures are displayed in bits (or Kilobits, etc ...) and an amount of data
is displayed in bytes (or Kilobytes, etc ...).

As a reminder, 1 byte is equal to 8 bits and, in the computer science world, 1 kilo is equal to 1024 (2^10).

For example: 100'000'000 bytes is not equal to 100 Mbytes but to 100'000'000/1024/1024 = 95.37 Mbytes.


Client side:


#iperf -c 10.1.1.1 -f b


------------------------------------------------------------

Client connecting to 10.1.1.1, TCP port 5001

TCP window size: 16384 Byte (default)

------------------------------------------------------------

[ 3] local 10.6.2.5 port 54953 connected with 10.1.1.1 port 5001

[ 3] 0.0-10.2 sec 1359872 Bytes 1064272 bits/sec


Server side:


#iperf -s


------------------------------------------------------------

Server listening on TCP port 5001

TCP window size: 8.00 KByte (default)

------------------------------------------------------------

[852] local 10.1.1.1 port 5001 connected with 10.6.2.5 port 33453

[ ID] Interval Transfer Bandwidth

[852] 0.0-10.6 sec 920 KBytes 711 Kbits/sec


Top of the page


Bi-directional bandwidth measurement: (-r argument)


The Iperf server connects back to the client allowing the bi-directional bandwidth measurement.
By default, only the bandwidth from the client to the server is measured.

If you want to measure the bi-directional bandwidth simultaneously, use the -d keyword. (See next test.)


Client side:


#iperf -c 10.1.1.1 -r


------------------------------------------------------------

Server listening on TCP port 5001

TCP window size: 85.3 KByte (default)

------------------------------------------------------------

------------------------------------------------------------

Client connecting to 10.1.1.1, TCP port 5001

TCP window size: 16.0 KByte (default)

------------------------------------------------------------

[ 5] local 10.6.2.5 port 35726 connected with 10.1.1.1 port 5001

[ 5] 0.0-10.0 sec 1.12 MBytes 936 Kbits/sec

[ 4] local 10.6.2.5 port 5001 connected with 10.1.1.1 port 1640

[ 4] 0.0-10.1 sec 74.2 MBytes 61.7 Mbits/sec


Server side:


#iperf -s


------------------------------------------------------------

Server listening on TCP port 5001

TCP window size: 8.00 KByte (default)

------------------------------------------------------------

[852] local 10.1.1.1 port 5001 connected with 10.6.2.5 port 54355

[ ID] Interval Transfer Bandwidth

[852] 0.0-10.1 sec 1.15 MBytes 956 Kbits/sec

------------------------------------------------------------

Client connecting to 10.6.2.5, TCP port 5001

TCP window size: 8.00 KByte (default)

------------------------------------------------------------

[824] local 10.1.1.1 port 1646 connected with 10.6.2.5 port 5001

[ ID] Interval Transfer Bandwidth

[824] 0.0-10.0 sec 73.3 MBytes 61.4 Mbits/sec


Top of the page


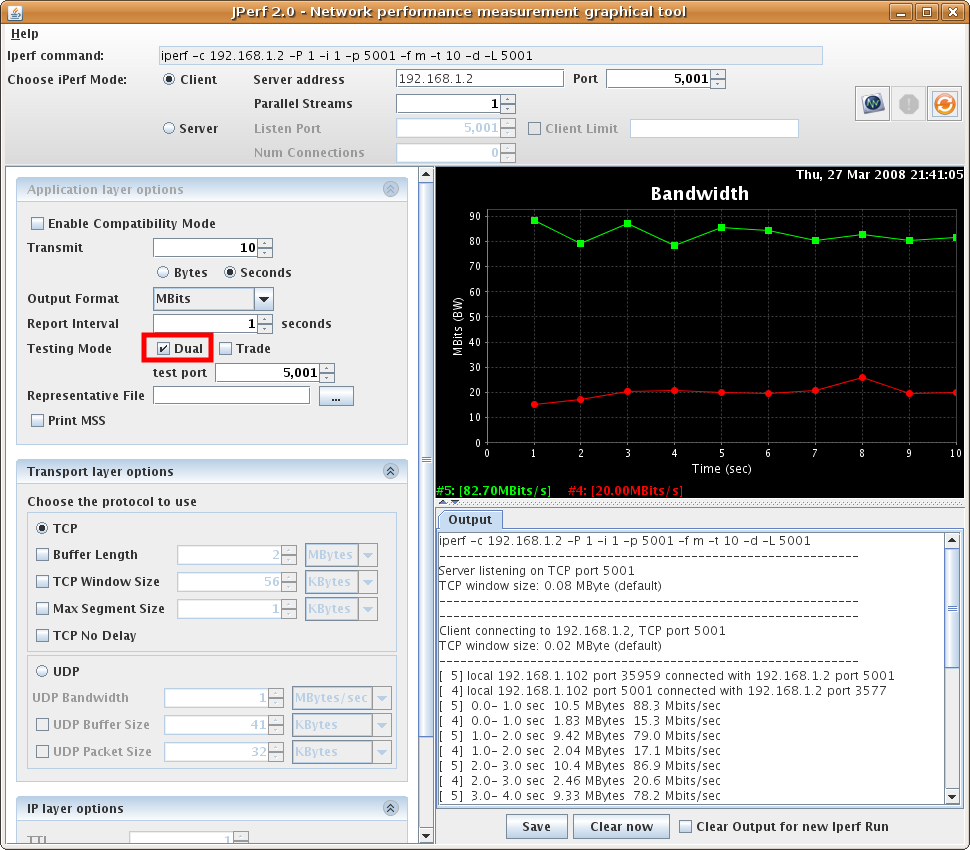
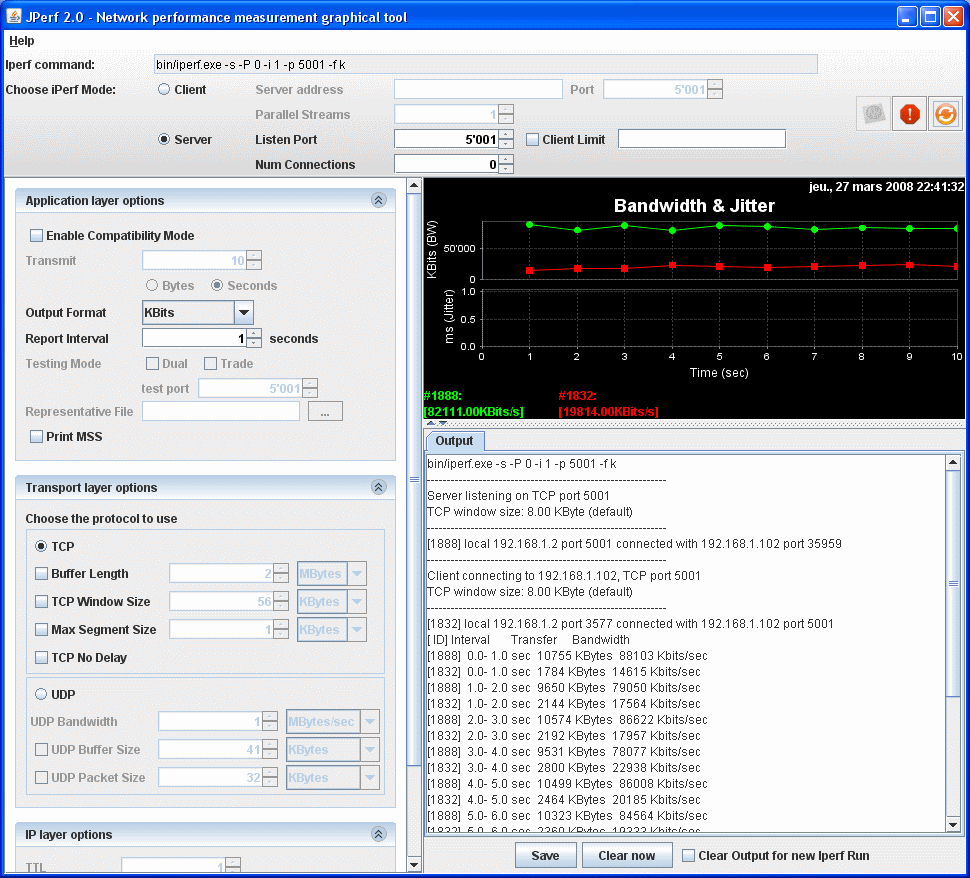
Simultaneous bi-directional bandwidth measurement: (-d argument)


Also check the "
Jperf" section.


To measure the bi-directional bandwidths simultaneousely, use the -d argument.
If you want to test the bandwidths sequentially, use the -r argument (see previous test).

By default (ie: without the -r or -d arguments), only the bandwidth from the client to the server is measured.


Client side:


#iperf -c 10.1.1.1 -d


------------------------------------------------------------

Server listening on TCP port 5001

TCP window size: 85.3 KByte (default)

------------------------------------------------------------

------------------------------------------------------------

Client connecting to 10.1.1.1, TCP port 5001

TCP window size: 16.0 KByte (default)

------------------------------------------------------------

[ 5] local 10.6.2.5 port 60270 connected with 10.1.1.1 port 5001

[ 4] local 10.6.2.5 port 5001 connected with 10.1.1.1 port 2643

[ 4] 0.0-10.0 sec 76.3 MBytes 63.9 Mbits/sec

[ 5] 0.0-10.1 sec 1.55 MBytes 1.29 Mbits/sec


Server side:


#iperf -s


------------------------------------------------------------

Server listening on TCP port 5001

TCP window size: 8.00 KByte (default)

------------------------------------------------------------

[852] local 10.1.1.1 port 5001 connected with 10.6.2.5 port 60270

------------------------------------------------------------

Client connecting to 10.6.2.5, TCP port 5001

TCP window size: 8.00 KByte (default)

------------------------------------------------------------

[800] local 10.1.1.1 port 2643 connected with 10.6.2.5 port 5001

[ ID] Interval Transfer Bandwidth

[800] 0.0-10.0 sec 76.3 MBytes 63.9 Mbits/sec

[852] 0.0-10.1 sec 1.55 MBytes 1.29 Mbits/sec


Top of the page


TCP Window size: (-w argument)


The TCP window size is the amount of data that
can be buffered during a connection without a validation from the receiver.

It can be between 2 and 65,535 bytes.

On Linux systems, when specifying a TCP buffer size with the -w argument,
the kernel allocates double as much as indicated.


Client side:


#iperf -c 10.1.1.1 -w 2000


WARNING: TCP window size set to 2000 bytes. A small window size

will give poor performance. See the Iperf documentation.

------------------------------------------------------------

Client connecting to 10.1.1.1, TCP port 5001

TCP window size: 3.91 KByte (WARNING: requested 1.95 KByte)

------------------------------------------------------------

[ 3] local 10.6.2.5 port 51400 connected with 10.1.1.1 port 5001

[ 3] 0.0-10.1 sec 704 KBytes 572 Kbits/sec


Server side:


#iperf -s -w 4000

------------------------------------------------------------

Server listening on TCP port 5001

TCP window size: 3.91 KByte

------------------------------------------------------------

[852] local 10.1.1.1 port 5001 connected with 10.6.2.5 port 51400

[ ID] Interval Transfer Bandwidth

[852] 0.0-10.1 sec 704 KBytes 570 Kbits/sec


Top of the page


Communication port (-p), timing (-t) and interval (-i):


The Iperf server communication port can be changed with the -p argument. It must be configured
on the client and the server with the same value, default is TCP port 5001.


The -t argument specifies the test duration time in seconds, default is 10 secs.


The -i argument indicates the interval in seconds between periodic bandwidth reports.


Client side:


#iperf -c 10.1.1.1 -p 12000 -t 20 -i 2


------------------------------------------------------------

Client connecting to 10.1.1.1, TCP port 12000

TCP window size: 16.0 KByte (default)

------------------------------------------------------------

[ 3] local 10.6.2.5 port 58316 connected with 10.1.1.1 port 12000

[ 3] 0.0- 2.0 sec 224 KBytes 918 Kbits/sec

[ 3] 2.0- 4.0 sec 368 KBytes 1.51 Mbits/sec

[ 3] 4.0- 6.0 sec 704 KBytes 2.88 Mbits/sec

[ 3] 6.0- 8.0 sec 280 KBytes 1.15 Mbits/sec

[ 3] 8.0-10.0 sec 208 KBytes 852 Kbits/sec

[ 3] 10.0-12.0 sec 344 KBytes 1.41 Mbits/sec

[ 3] 12.0-14.0 sec 208 KBytes 852 Kbits/sec

[ 3] 14.0-16.0 sec 232 KBytes 950 Kbits/sec

[ 3] 16.0-18.0 sec 232 KBytes 950 Kbits/sec

[ 3] 18.0-20.0 sec 264 KBytes 1.08 Mbits/sec

[ 3] 0.0-20.1 sec 3.00 MBytes 1.25 Mbits/sec


Server side:


#iperf -s -p 12000


------------------------------------------------------------

Server listening on TCP port 12000

TCP window size: 8.00 KByte (default)

------------------------------------------------------------

[852] local 10.1.1.1 port 12000 connected with 10.6.2.5 port 58316

[ ID] Interval Transfer Bandwidth

[852] 0.0-20.1 sec 3.00 MBytes 1.25 Mbits/sec


Top of the page


UDP tests: (-u), bandwidth settings (-b)

Also check the "
Jperf" section.


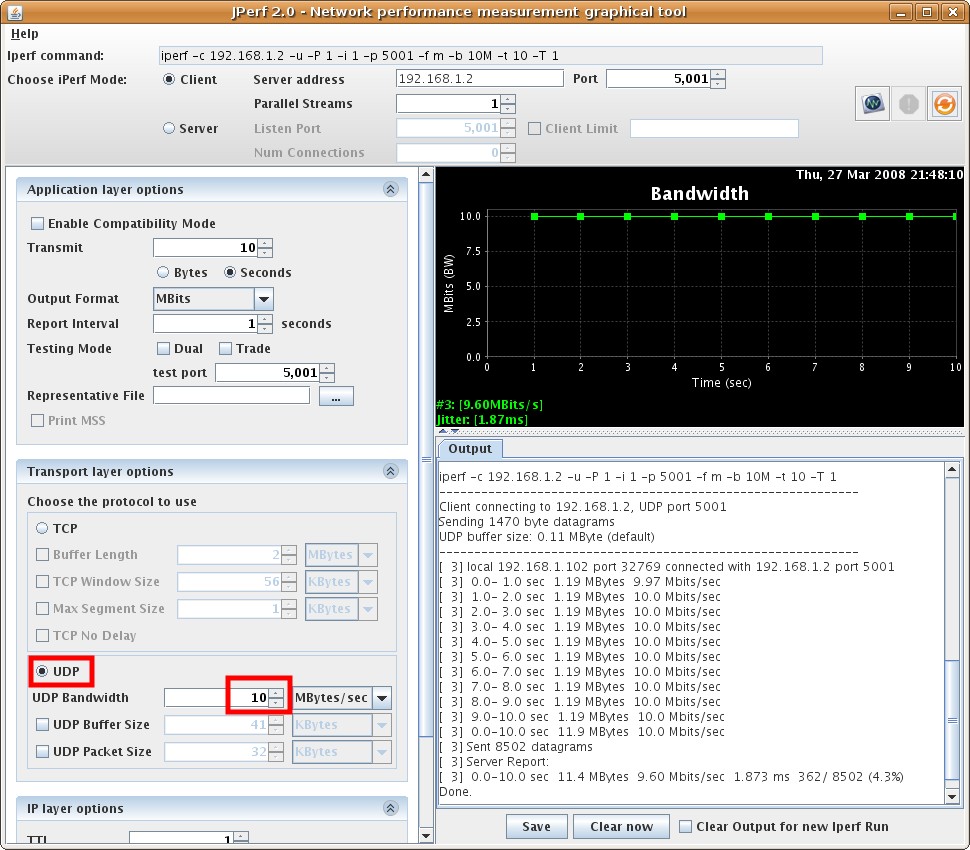
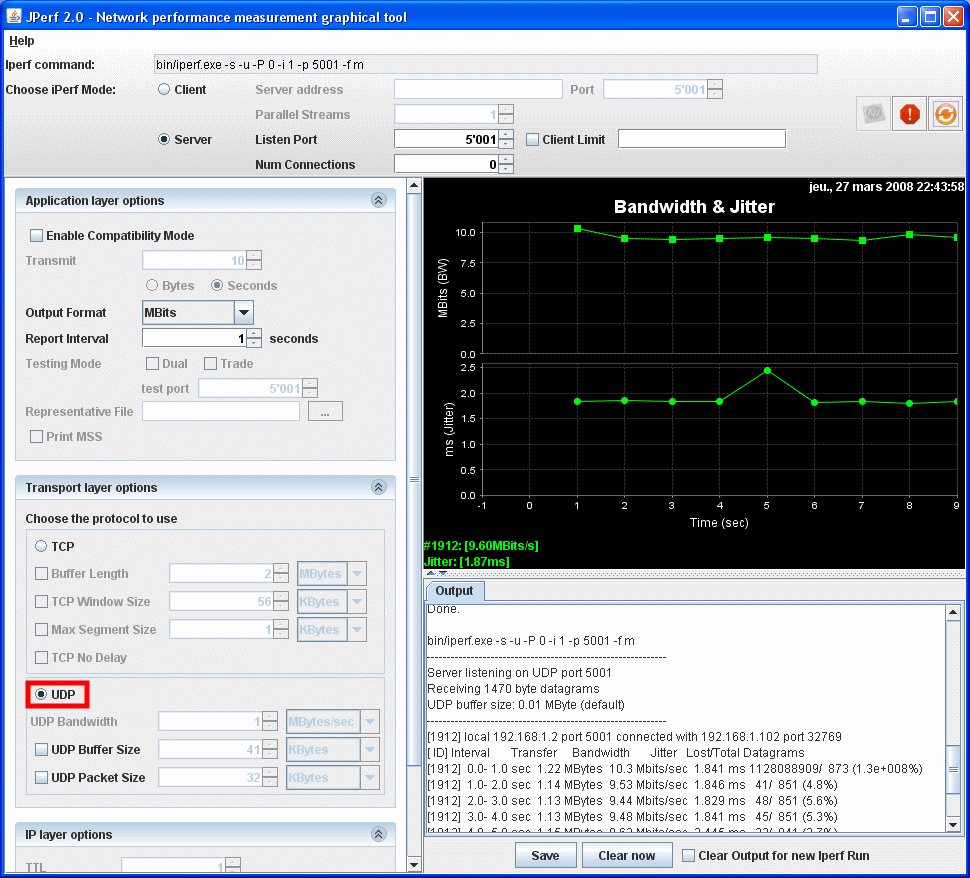
The UDP tests with the -u argument will give invaluable information about the
jitter and the packet loss.
If you don't specify the -u argument, Iperf uses TCP.


To keep a good link quality, the packet loss should not go over 1 %. A high packet
loss rate will generate a lot of
TCP segment retransmissions which will affect the bandwidth.


The jitter is basically the latency variation and does not
depend on the latency. You can have high response
times and a very low jitter. The jitter value is particularly important
on network links supporting voice over IP (VoIP) because a high jitter can break a call.

The -b argument allows the allocation if the desired bandwidth.


Client side:


#iperf -c 10.1.1.1 -u -b 10m


------------------------------------------------------------

Client connecting to 10.1.1.1, UDP port 5001

Sending 1470 byte datagrams

UDP buffer size: 108 KByte (default)

------------------------------------------------------------

[ 3] local 10.6.2.5 port 32781 connected with 10.1.1.1 port 5001

[ 3] 0.0-10.0 sec 11.8 MBytes 9.89 Mbits/sec

[ 3] Sent 8409 datagrams

[ 3] Server Report:

[ 3] 0.0-10.0 sec 11.8 MBytes 9.86 Mbits/sec 2.617 ms 9/ 8409 (0.11%)


Server side:


#iperf -s -u -i 1


------------------------------------------------------------

Server listening on UDP port 5001

Receiving 1470 byte datagrams

UDP buffer size: 8.00 KByte (default)

------------------------------------------------------------

[904] local 10.1.1.1 port 5001 connected with 10.6.2.5 port 32781

[ ID] Interval Transfer Bandwidth Jitter Lost/Total Datagrams

[904] 0.0- 1.0 sec 1.17 MBytes 9.84 Mbits/sec 1.830 ms 0/ 837 (0%)

[904] 1.0- 2.0 sec 1.18 MBytes 9.94 Mbits/sec 1.846 ms 5/ 850 (0.59%)

[904] 2.0- 3.0 sec 1.19 MBytes 9.98 Mbits/sec 1.802 ms 2/ 851 (0.24%)

[904] 3.0- 4.0 sec 1.19 MBytes 10.0 Mbits/sec 1.830 ms 0/ 850 (0%)

[904] 4.0- 5.0 sec 1.19 MBytes 9.98 Mbits/sec 1.846 ms 1/ 850 (0.12%)

[904] 5.0- 6.0 sec 1.19 MBytes 10.0 Mbits/sec 1.806 ms 0/ 851 (0%)

[904] 6.0- 7.0 sec 1.06 MBytes 8.87 Mbits/sec 1.803 ms 1/ 755 (0.13%)

[904] 7.0- 8.0 sec 1.19 MBytes 10.0 Mbits/sec 1.831 ms 0/ 850 (0%)

[904] 8.0- 9.0 sec 1.19 MBytes 10.0 Mbits/sec 1.841 ms 0/ 850 (0%)

[904] 9.0-10.0 sec 1.19 MBytes 10.0 Mbits/sec 1.801 ms 0/ 851 (0%)

[904] 0.0-10.0 sec 11.8 MBytes 9.86 Mbits/sec 2.618 ms 9/ 8409 (0.11%)


Top of the page


Maximum Segment Size (-m argument) display:


The Maximum Segment Size (MSS) is the largest
amount of data, in bytes, that a computer can support in a single, unfragmented TCP segment.

It can be calculated as follows:

MSS = MTU - TCP & IP headers

The TCP & IP headers are equal to 40 bytes.

The MTU or Maximum Transmission Unit is the greatest amount of data that can
be transferred in a frame.

Here are some default MTU size for different network topology:

Ethernet - 1500 bytes: used in a LAN.

PPPoE - 1492 bytes: used on ADSL links.

Token Ring (16Mb/sec) - 17914 bytes: old technology developed by IBM.

Dial-up - 576 bytes


Generally, a higher MTU (and MSS) brings higher bandwidth efficiency


Client side:


#iperf -c 10.1.1.1 -m


------------------------------------------------------------

Client connecting to 10.1.1.1, TCP port 5001

TCP window size: 16.0 KByte (default)

------------------------------------------------------------

[ 3] local 10.6.2.5 port 41532 connected with 10.1.1.1 port 5001

[ 3] 0.0-10.2 sec 1.27 MBytes 1.04 Mbits/sec

[ 3] MSS size 1448 bytes (MTU 1500 bytes, ethernet)


Here the MSS is not equal to 1500 - 40 but to 1500 - 40 - 12 (Timestamps option) = 1448


Server side:


#iperf -s

Top of the page


Maximum Segment Size (-M argument) settings:


Use the -M argument to change the MSS. (See the previous test for more explanations about the MSS)


#iperf -c 10.1.1.1 -M 1300 -m


WARNING: attempt to set TCP maximum segment size to 1300, but got 536

------------------------------------------------------------

Client connecting to 10.1.1.1, TCP port 5001

TCP window size: 16.0 KByte (default)

------------------------------------------------------------

[ 3] local 10.6.2.5 port 41533 connected with 10.1.1.1 port 5001

[ 3] 0.0-10.1 sec 4.29 MBytes 3.58 Mbits/sec

[ 3] MSS size 1288 bytes (MTU 1328 bytes, unknown interface)


Server side:


#iperf -s

Top of the page


Parallel tests (-P argument):


Use the -P argument to run parallel tests.


Client side:


#iperf -c 10.1.1.1 -P 2


------------------------------------------------------------

Client connecting to 10.1.1.1, TCP port 5001

TCP window size: 16.0 KByte (default)

------------------------------------------------------------

[ 3] local 10.6.2.5 port 41534 connected with 10.1.1.1 port 5001

[ 4] local 10.6.2.5 port 41535 connected with 10.1.1.1 port 5001

[ 4] 0.0-10.1 sec 1.35 MBytes 1.12 Mbits/sec

[ 3] 0.0-10.1 sec 1.35 MBytes 1.12 Mbits/sec

[SUM] 0.0-10.1 sec 2.70 MBytes 2.24 Mbits/sec


Server side:


#iperf -s

Top of the page


Iperf help:


#iperf -h


Usage: iperf [-s|-c host] [options]

iperf [-h|--help] [-v|--version]


Client/Server:


-f
-i
-l
-m
-p
-u
-w
-B
-C
-M
-N
-V


--format

--interval

--len

--print_mss

--port

--udp

--window

--bind

--compatibility

--mss

--nodelay

--IPv6Version
[kmKM]


#

#[KM]


#


#[KM]

"host"


#


format to report: Kbits, Mbits, KBytes, MBytes

seconds between periodic bandwidth reports

length of buffer to read or write (default 8 KB)

print TCP maximum segment size (MTU - TCP/IP header)

server port to listen on/connect to

use UDP rather than TCP

TCP window size (socket buffer size)

bind to "host", an interface or multicast address

for use with older versions does not sent extra msgs

set TCP maximum segment size (MTU - 40 bytes)

set TCP no delay, disabling Nagle's Algorithm

Set the domain to IPv6


Server specific:


-s
-U
-D


--server

--single_udp

--daemon


run in server mode

run in single threaded UDP mode

run the server as a daemon


Client specific:


-b
-c
-d
-n
-r
-t
-F
-I
-L
-P
-T


--bandwidth

--client

--dualtest

--num

--tradeoff

--time

--fileinput

--stdin

--listenport

--parallel

--ttl


#[KM]

"host"


#[KM]


#

"name"


#

#

#


for UDP, bandwidth to send at in bits/sec (default 1 Mbit/sec, implies -u)

run in client mode, connecting to "host"

Do a bidirectional test simultaneously

number of bytes to transmit (instead of -t)

Do a bidirectional test individually

time in seconds to transmit for (default 10 secs)

input the data to be transmitted from a file

input the data to be transmitted from stdin

port to recieve bidirectional tests back on

number of parallel client threads to run

time-to-live, for multicast (default 1)


Miscellaneous:


-h
-v


--help

--version


print this message and quit

print version information and quit


Top of the page


JPERF


Jperf is a graphical frontend for Iperf written in Java.


1. Installation:


Download Jperf.


Linux


Uncompress the downloaded file:


#tar -xvf jperf2.0.0.zip

Launch Jperf.


#cd jperf2.0.0

#./jperf.sh


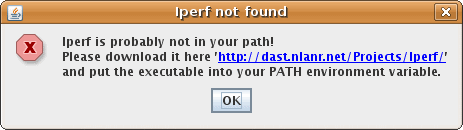
If you have the following message, it means that you need to install Iperf with:
"apt-get install iperf"


Iperf is probably not in your Path!

Please download it here 'http://dast.nlanr.net/Projects/Iperf/'

and put the executable in your PATH environment variable.


jperf default settings


Microsoft Windows


Uncompress the downloaded file with your favorite program.


Access the uncompressed folder called by default "jperf2.0.0"
and double-click on "jperf.bat".


Note that the iperf utility is already present in the /bin folder.


2. Examples:


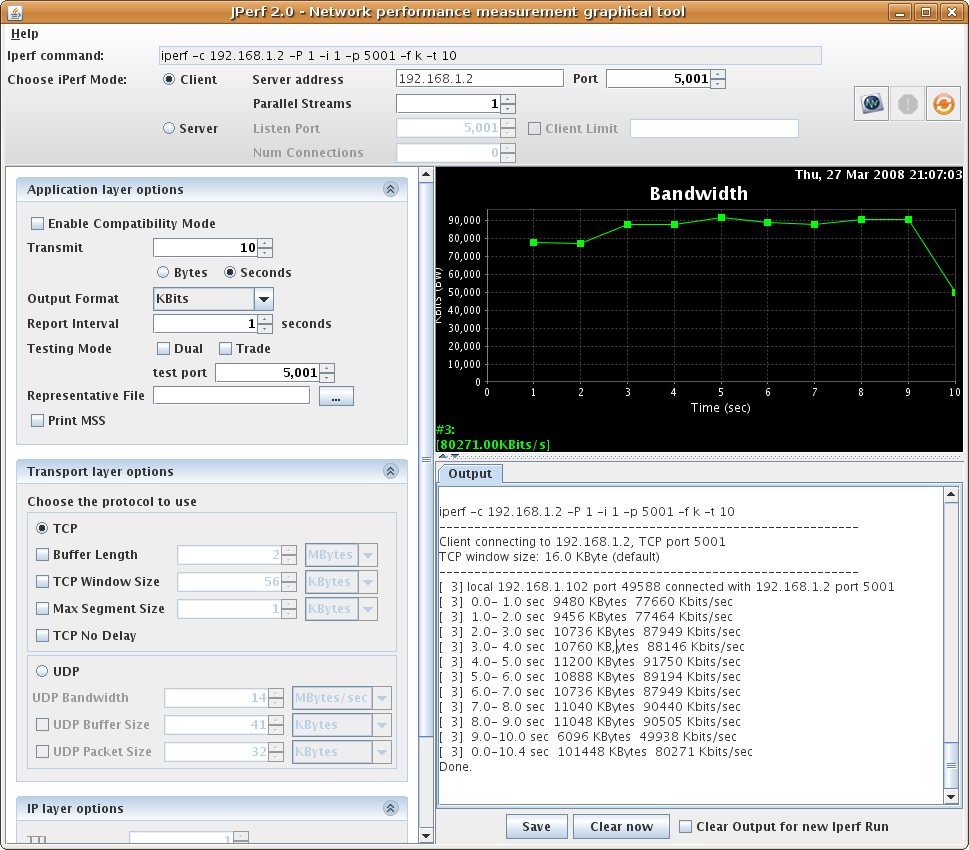
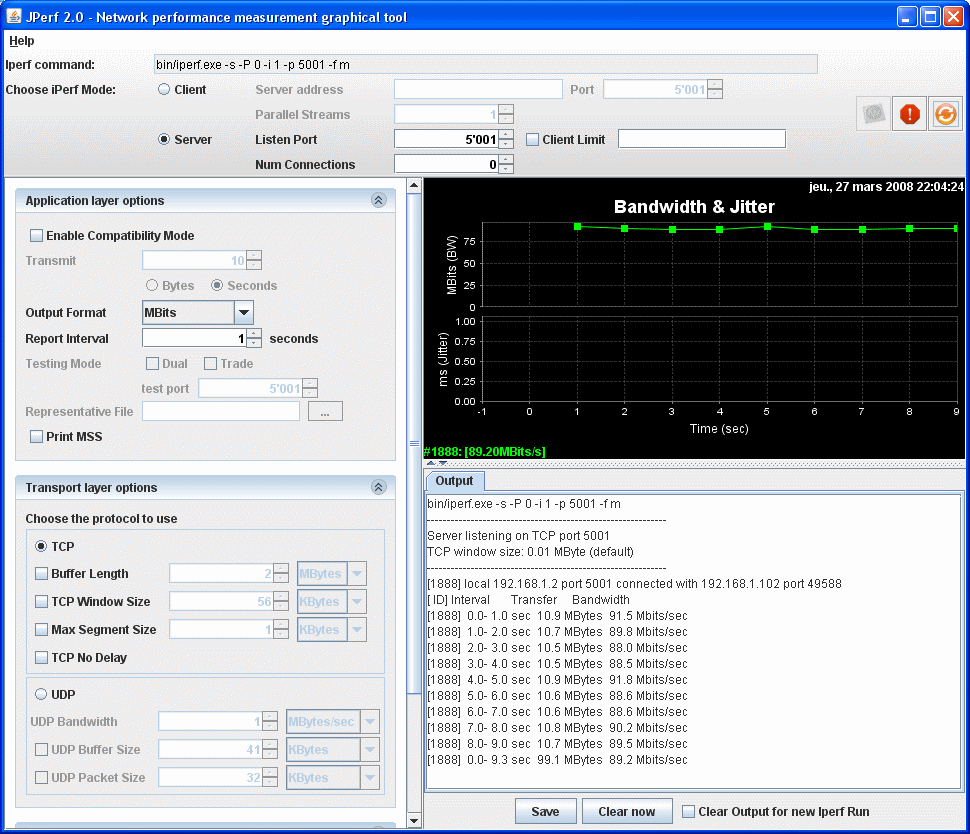
Default settings, bandwidth measurement:

Also check "Iperf" section for more details.


- Linux client:


jperf default settings


- Windows server:


jperf default settings


Top of the page
Jperf


Simultaneous bi-directional bandwidth measurement:

Also check "Iperf" section for more details.


- Linux client:


jperf bidirectionnal bandwidth measurement


- Windows server:


jperf bidirectionnal bandwidth measurement


Top of the page
Jperf


Jitter measurement:

Also check "Iperf" section for more details.


- Linux client:


jperf jitter measurement


- Windows server:


jperf jitter measurement


REFERENCES
http://openmaniak.com/iperf.php
http://www.soopertutorials.com/technology/networks/397-397.html
http://trepullins.net/05-17-2008/testing-network-throughput-with-iperf

What is mscorsvw.exe and why is it eating up my CPU? What is this new CLR Optimization Service?

SkyHi @ Thursday, July 22, 2010

Short version:


mscorsvw.exe is precompiling .NET assemblies in the background. Once it's done, it will go away. Typically, after you install the .NET Redist, it will be done with the high priority assemblies in 5 to 10 minutes and then will wait until your computer is idle to process the low priority assemblies. Once it does that it will shutdown and you won't see mscorsvw.exe. One important thing is that while you may see 100% CPU usage, the compilation happens in a process with low priority, so it tries not to steal the CPU for other stuff you are doing. Once everything is compiled, assemblies will now be able to share pages across different processes and warm start up will be typically much faster, so we're not throwing away your cycles.


If you are really want to get rid of mscorsvw.exe from your task manager, just do:


ngen.exe executequeueditems


which will drain all the queued up work.


REFERENCES

http://blogs.msdn.com/b/davidnotario/archive/2005/04/27/412838.aspx


Wednesday, July 21, 2010

Apache Web Server Speed Configuration HacksApache Web Server Speed Configuration Hacks

SkyHi @ Wednesday, July 21, 2010

Apache server performance can be improved by adding additional hardware resources such as RAM, faster CPU, etc. But most of the time, the same result can be achieved by custom configuration of the server. This article looks into getting maximum performance out of Apache with the existing hardware resources, specifically on Linux systems.


Of course, it is assumed that there is enough hardware resources – especially enough RAM that the server isn’t swapping frequently. First two sections look into various Compile-Time and Run-Time configuration options. The Run-Time section assumes that Apache is compiled with prefork MPM. HTTP compression and caching is discussed next. Finally, using separate servers for serving static and dynamic contents is covered. Basic knowledge of compiling and configuring Apache and Linux are assumed.

Load only the required modules:

The Apache HTTP Server is a modular program where the administrator can choose the functions to be included in the server by selecting a set of modules [2]. The modules can be compiled either statically as part of the ‘httpd’ binary, or as Dynamic Shared Objects (DSOs). DSO modules can either be compiled when the server is built, or added later via the apxs utility, which allows compilation at a later date. The mod_so module must be statically compiled into the Apache core to enable DSO support.

Run Apache with only the required modules. This reduces the memory footprint, which improves the server performance. Statically compiling modules will save RAM that’s used for supporting dynamically loaded modules, but you would have to recompile Apache to add or remove a module. This is where the DSO mechanism comes handy. Once the mod_so module is statically compiled, any other module can be added or dropped using the ‘LoadModule’ command in the ‘httpd.conf’ file. Of course, you will have to compile the modules using ‘apxs’ if they weren’t compiled when the server was built.

Choose appropriate MPM:

The Apache server ships with a selection of Multi-Processing Modules (MPMs) which are responsible for binding to network ports on the machine, accepting requests, and dispatching children to handle the requests [3]. Only one MPM can be loaded into the server at any time.

Choosing an MPM depends on various factors, such as whether the OS supports threads, how much memory is available, scalability versus stability, whether non-thread-safe third-party modules are used, etc.

Linux systems can choose to use a threaded MPM like worker or a non-threaded MPM like prefork:

The worker MPM uses multiple child processes. It’s multi-threaded within each child, and each thread handles a single connection. Worker is fast and highly scalable and the memory footprint is comparatively low. It’s well suited for multiple processors. On the other hand, worker is less tolerant of faulty modules, and a faulty thread can affect all the threads in a child process.

The prefork MPM uses multiple child processes, each child handles one connection at a time. Prefork is well suited for single or double CPU systems, speed is comparable to that of worker, and it’s highly tolerant of faulty modules and crashing children – but the memory usage is high, and more traffic leads to greater memory usage.

DNS lookup:

The HostnameLookups directive enables DNS lookup so that hostnames can be logged instead of the IP address. This adds latency to every request since the DNS lookup has to be completed before the request is finished. HostnameLookups is Off by default in Apache 1.3 and above. Leave it Off and use post-processing program such as logresolve to resolve IP addresses in Apache’s access logfiles. Logresolve ships with Apache.

When using ‘Allow from’ or ‘Deny from’ directives, use an IP address instead of a domain name or a hostname. Otherwise, a double DNS lookup is performed to make sure that the domain name or the hostname is not being spoofed.

AllowOverride:

If AllowOverride is not set to ‘None’, then Apache will attempt to open the .htaccess file (as specified by AccessFileName directive) in each directory that it visits. For example:

DocumentRoot /var/www/html

AllowOverride all

If a request is made for URI /index.html, then Apache will attempt to open /.htaccess, /var/.htaccess, /var/www/.htaccess, and /var/www/html/.htaccess. These additional file system lookups add to the latency. If .htaccess is required for a particular directory, then enable it for that directory alone.

FollowSymLinks and SymLinksIfOwnerMatch:

If FollowSymLinks option is set, then the server will follow symbolic links in this directory. If SymLinksIfOwnerMatch is set, then the server will follow symbolic links only if the target file or directory is owned by the same user as the link.

If SymLinksIfOwnerMatch is set, then Apache will have to issue additional system calls to verify whether the ownership of the link and the target file match. Additional system calls are also needed when FollowSymLinks is NOT set.
For example:

DocumentRoot /var/www/html

Options SymLinksIfOwnerMatch

For a request made for URI /index.html, Apache will perform lstat() on /var, /var/www, /var/www/html, and /var/www/html/index.html. These additional system calls will add to the latency. The lstat results are not cached, so they will occur on every request.

For maximum performance, set FollowSymLinks everywhere and never set SymLinksIfOwnerMatch. Or else, if SymLinksIfOwnerMatch is required for a directory, then set it for that directory alone.

Content Negotiation:

Avoid content negotiation for fast response. If content negotiation is required for the site, use type-map files rather than Options MultiViews directive. With MultiViews, Apache has to scan the directory for files, which adds to the latency.

MaxClients:

The MaxClients sets the limit on maximum simultaneous requests that can be supported by the server; no more than this number of child processes are spawned. It shouldn’t be set too low; otherwise, an ever-increasing number of connections are deferred to the queue and eventually time-out while the server resources are left unused. Setting this too high, on the other hand, will cause the server to start swapping which will cause the response time to degrade drastically. The appropriate value for MaxClients can be calculated as:

[4] MaxClients = Total RAM dedicated to the web server / Max child process size

The child process size for serving static file is about 2-3M. For dynamic content such as PHP, it may be around 15M. The RSS column
in “ps -ylC httpd –sort:rss” shows non-swapped physical memory usage by Apache processes in kiloBytes.

If there are more concurrent users than MaxClients, the requests will be queued up to a number based on ListenBacklog directive. Increase ServerLimit to set MaxClients above 256.

MinSpareServers, MaxSpareServers, and StartServers:

MaxSpareServers and MinSpareServers determine how many child processes to keep active while waiting for requests. If the MinSpareServers is too low and a bunch of requests come in, Apache will have to spawn additional child processes to serve the requests. Creating child processes is relatively expensive. If the server is busy creating child processes, it won’t be able to serve the client requests immediately. MaxSpareServers shouldn’t be set too high: too many child processes will consume resources unnecessarily.

Tune MinSpareServers and MaxSpareServers so that Apache need not spawn more than 4 child processes per second (Apache can spawn a maximum of 32 child processes per second). When more than 4 children are spawned per second, a message will be logged in the ErrorLog.

The StartServers directive sets the number of child server processes created on startup. Apache will continue creating child processes until the MinSpareServers setting is reached. This doesn’t have much effect on performance if the server isn’t restarted frequently. If there are lot of requests and Apache is restarted frequently, set this to a relatively high value.

MaxRequestsPerChild:

The MaxRequestsPerChild directive sets the limit on the number of requests that an individual child server process will handle. After MaxRequestsPerChild requests, the child process will die. It’s set to 0 by default, the child process will never expire. It is appropriate to set this to a value of few thousands. This can help prevent memory leakage, since the process dies after serving a certain number of requests. Don’t set this too low, since creating new processes does have overhead.

KeepAlive and KeepAliveTimeout:

The KeepAlive directive allows multiple requests to be sent over the same TCP connection. This is particularly useful while serving HTML pages with lot of images. If KeepAlive is set to Off, then for each images, a separate TCP connection has to be made. Overhead due to establishing TCP connection can be eliminated by turning On KeepAlive.

KeepAliveTimeout determines how long to wait for the next request. Set this to a low value, perhaps between two to five seconds. If it is set too high, child processed are tied up waiting for the client when they could be used for serving new clients.

HTTP compression is completely specified in HTTP/1.1. The server uses either the gzip or the deflate encoding method to the response payload before it is sent to the client. Client then decompresses the payload. There is no need to install any additional software on the client side since all major browsers support these methods. Using compression will save bandwidth and improve response time; studies have found a mean gain of %75.2 when using compression [5].

HTTP Compression can be enabled in Apache using the mod_deflate module. Payload is compressed only if the browser requests compression, otherwise uncompressed content is served. A compression-aware browser inform the server that it prefer compressed content through the HTTP request header – “Accept-Encoding: gzip,deflate”. Then the server responds with compressed payload and the response header set to “Content-Encoding: gzip”.

The following example uses telnet to view request and response headers:

bash-3.00$ telnet www.webperformance.org 80
Trying 24.60.234.27...
Connected to www.webperformance.org (24.60.234.27).
Escape character is '^]'.
HEAD / HTTP/1.1
Host: www.webperformance.org
Accept-Encoding: gzip,deflate

HTTP/1.1 200 OK
Date: Sat, 31 Dec 2005 02:29:22 GMT
Server: Apache/2.0
X-Powered-By: PHP/5.1.1
Cache-Control: max-age=0
Expires: Sat, 31 Dec 2005 02:29:22 GMT
Vary: Accept-Encoding
Content-Encoding: gzip
Content-Length: 20
Content-Type: text/html; charset=ISO-8859-1

In caching, a copy of the data is stored at the client or in a proxy server so that it need not be retrieved frequently from the server. This will save bandwidth, decrease load on the server, and reduce latency. Cache control is done through HTTP headers. In Apache, this can be accomplished through mod_expires and mod_headers modules. There is also server side caching, in which the most frequently-accessed content is stored in memory so that it can be served fast. The module mod_cache can be used for server side caching; it is production stable in Apache version 2.2.

Apache processes serving dynamic content take from 3MB to 20MB of RAM. The size grows to accommodate the content being served and never decreases until the process dies. As an example, let’s say an Apache process grows to 20MB while serving some dynamic content. After completing the request, it is free to serve any other request. If a request for an image comes in, then this 20MB process is serving static content – which could be served just as well by a 1MB process. As a result, memory is used inefficiently.

Use a tiny Apache (with minimum modules statically compiled) as the front-end server to serve static contents. Requests for dynamic content should be forwarded to the heavy-duty Apache (compiled with all required modules). Using a light front-end server has the advantage that the static contents are served fast without much memory usage and only the dynamic contents are passed over to the big server.

Request forwarding can be achieved by using mod_proxy and mod_rewrite modules. Suppose there is a lightweight Apache server listening to port 80 and a heavyweight Apache listening on port 8088. Then the following configuration in the lightweight Apache can be used to forward all requests (except requests for images) to the heavyweight server:
[9]

ProxyPassReverse / http://%{HTTP_HOST}:8088/
RewriteEngine on
RewriteCond %{REQUEST_URI} !.*\.(gif|png|jpg)$
RewriteRule ^/(.*) http://%{HTTP_HOST}:8088/$1 [P]

All requests, except for images, will be proxied to the backend server. The response is received by the frontend server and supplied to the client. As far as client is concerned, all the responses seem to come from a single server.

Configuring Apache for maximum performance is tricky; there are no hard and fast rules. Much depends on understanding the web server requirements and experimenting with various available options. Use tools like ab and httperf to measure the web server performance. Lightweight servers such as tux or thttpd can also be used as the front-end server. If a database server is used, make sure it is optimized so that it won’t create any bottlenecks. In case of MySQL, mtop can be used to monitor slow queries. Performance of PHP scripts can be improved by using a PHP caching product such as Turck MMCache. It eliminates overhead due to compiling by caching the PHP scripts in a compiled state.

  1. http://news.netcraft.com/archives/web_server_survey.html
  2. http://httpd.apache.org/docs/2.2/dso.html
  3. http://httpd.apache.org/docs/2.2/mpm.html
  4. http://modperlbook.org/html/ch11_01.html
  5. http://www.speedupyoursite.com/18/18-2t.html
  6. http://www.xs4all.nl/~thomas/apachecon/PerformanceTuning.html
  7. http://www.onlamp.com/pub/a/onlamp/2004/02/05/lamp_tuning.html
  8. http://httpd.apache.org/docs/2.2/misc/perf-tuning.html
  9. Linux Server Hacks by Rob Flickenger
  10. http://www.askapache.com/htaccess/apache-web-server-speed-configuration-hacks.html

Tuesday, July 20, 2010

Apache: favicon.ico does not exist

SkyHi @ Tuesday, July 20, 2010

If you run an Apache server then you have no doubt seen the following error message a thousand times in your error.log file.


File does not exist: /var/www/favicon.ico


The reason? You have not created a favicon, also known as a website icon, for your website. It’s the icon that displays in the address bar of your web browser when you connect to a website. A web browser will request this icon file from every website.


You have two choices. You can create a website icon for each of your websites, or you tell Apache not to log that event as an error message.


If you choose to create one. Use a program such as Gimp and create a 16×16 pixel image and save it as a .ico filetype. Then upload that file to the DocumentRoot of your website. You will need one for each VirtualHost. If you don’t have Gimp, there are online resources such as favicon.cc where you can create a .ico file and download it for your own use.


As you know by now, not having a favicon.ico file, won’t stop web browsers from requesting it each time. But you can tell Apache not to log the event as an error message. You will still see the request in the access.log, but at least you will have a cleaner error.log file.


Add the following block of code to each VirtualHost, or at least the ones which don’t have a favicon file.


Redirect 404 /favicon.ico
<Location /favicon.ico>
ErrorDocument 404 "No favicon"
</Location>

Don’t forget to restart apache after making the change. If you want make a “global” change, which would apply to any and all VirtualHosts, you can create a file in Apache’s conf.d folder with a name such as nofavicon.conf and then add that block of code to the file. That would disable favicon across the board and save you from having to edit each VirtualHost.


=============================================================

Most of my sites don't have favicons. I think it's nice to have one, but designing an icon that looks good and matches a site theme takes time and effort better spent elsewhere. My pixel-pushing powers are not at a level where making one is easy and I'd rather have the default icon than an ugly one, thank you very much.When Internet Explorer introduced favicons, it regrettably used fixed location probing to detect the presence of page icons. Other browsers have since adopted the feature, and if my server logs are any indication Firefox is even more obsessive-compulsive about them than IE. Nearly every browser visit will be associated with requests for favicon.ico, which translates into a lot of requests on a busy site.What does this mean for sites without favicons? For each and every one of those requests Apache will look for the file favicon.ico, find that it still does not exist, and return a 404 Not Found error page. If you use custom error documents (a user-friendly thing to do), that page could very well be several kilobytes in size and will not be seen by the visitor. A further annoyance is that the aforementioned failed file-finding attempt will clutter up the error log with reams of "File does not exist" errors.You can get rid of the unnecessary processing and traffic as well as the error log entries by using the following Apache configuration incantations: # Don't bother looking for favicon.ico Redirect 404 /favicon.ico # Don't bother sending the custom error page for favicon.ico ErrorDocument 404 "No favicon The Redirect directive causes Apache to immediately generate a 404 error when /favicon.ico is requested, thereby avoiding the stat calls and the error log entries caused by their inevitable failure. Whatever error document would normally be used for these 404 error response is overridden with a brief text message in the Location block. Unlike the commonly suggested workaround of creating a dummy favicon.ico file, this technique will return the appropriate HTTP status code rather than pretending to send an icon. I don't know of any browsers that will choke on a 0-byte favicon.ico, but lying to the client is bad form – at least when there's no good reason to do so.Requests for favicon.ico will still be logged in your access log; you could filter them out with conditional logging if so desired (I prefer to keep them in the log). These Apache directives will work fine in VirtualHost blocks, so the Redirect can be applied only for those sites that lack favicons without affecting the functionality of other sites.


REFERENCES

http://www.trilithium.com/johan/2005/02/no-favicon/

http://nfolamp.wordpress.com/2010/06/28/apache-favicon-ico-does-not-exist-yes-its-truly-annoying/


File Corruption in Outlook Express

SkyHi @ Tuesday, July 20, 2010

It is a rare day on the Internet that we do not see some scary warning about the latest e-mail threat from viruses, worms, and Trojan Horses. But there is another e-mail threat that can be just as damaging as a virus and yet is rarely discussed in computer media. That threat is file corruption, a somewhat nerdy term for damage to a file that prevents a computer program from being able to use it. For Outlook Express users, file corruption can often mean the disappearance of entire folders of saved e-mail. In this article we'll look at the common causes of corruption, how to avoid it, and how to recover messages if it occurs.

On This Page
Understanding Outlook Express FilesUnderstanding Outlook Express Files
Signs and Symptoms of DBX CorruptionSigns and Symptoms of DBX Corruption
When Special Folders Stop Being SpecialWhen Special Folders Stop Being Special
The Show-Stopper: Folders.dbxThe Show-Stopper: Folders.dbx
Viral Irony: The Most Common Cause of CorruptionViral Irony: The Most Common Cause of Corruption
When the Cure Kills: Compacting and CorruptionWhen the Cure Kills: Compacting and Corruption
Minimizing the Risk Is Also Minimizing the LossMinimizing the Risk Is Also Minimizing the Loss
Recovering from CorruptionRecovering from Corruption
Ten Steps of PreventionTen Steps of Prevention

Understanding Outlook Express Files

Sound prevention begins with sound understanding, so let's begin with a look at the Outlook Express user files. Each folder that you see in the Outlook Express Folder list is stored on your hard disk as a single file with the same name as the folder but with the extension DBX added at the end, such as "Inbox.dbx" and "Sent Items.dbx". All these DBX files are stored in a single Windows folder called, not surprisingly, the Store Folder. The Store Folder is usually located deep within the Documents and Settings folder in Windows 2000 and Windows XP, and is by default marked as a hidden folder. This makes it tricky to find your Store Folder in Windows Explorer, but there is a very good reason for this. One source of DBX corruption is trying to open and edit a DBX file yourself.

TipTip: Avoid the temptation of clicking on a DBX file to see what it contains.

It is enough to know that a message inside a DBX is not simply a string of text that you can read, but rather is broken up into parts which are not assembled into a legible message until you access the corresponding folder in Outlook Express. Also know that altering even a single byte in a DBX file might render the file completely unusable by Outlook Express.

Finding Your Store Folder

Here is a quick and easy way to display your Store Folder with just a few clicks and keystrokes.

1.

In Outlook Express, click Options on the Tools menu.

2.

Click the Maintenance tab.

3.

Click the Store folder button.

4.

Press the TAB key to highlight the Store Folder path.

5.

Press CTRL+C to copy the path to the clipboard.

6.

Click OK, then again OK to close the Options panel.

7.

Click Start, and then click Run.

8.

Press CTRL+V to paste the path into the command line.

9.

Click OK.

10.

If you do not see any files in the folder that opens, click Folder Options on the Tools menu, click the View tab, and then click "Show hidden files and folders" and click OK.

Click the Store Folder button to see the path to your Outlook Express DBX files


Click the Store Folder button to see the path to your Outlook Express DBX files.

Signs and Symptoms of DBX Corruption

The first symptoms of DBX corruption usually begin innocently enough. You might notice that Outlook Express feels sluggish when starting, or when switching folders. Simple tasks like marking a message as read might take several seconds. Such performance issues usually mean that some minor corruption has occurred but has not yet reached a critical level. If the corruption is more extensive but involves a single e-mail or news folder, Outlook Express might crash with this error when you try to open the damaged folder:

Msimn caused an exception C0000006h in module Directdb.dll. The message could not be sent. There is not enough Disk space.

In these cases the corruption can usually be repaired by compacting all your Outlook Express folders. To minimize the chance of errors during the compaction process, I recommend this simple procedure:

1.

On the File menu, click Work Offline so that no new messages will be arriving.

2.

In the Folder list, click on Outlook Express so that no e-mail or news folder is open.

3.

Close the Folder list by clicking the X in the upper right-hand corner of the list panel. Alternatively you can click Layout on the View menu, and then clear the checkbox for "Folder List".

4.

On the File menu, point to Folder, and then click Compact All Folders. Do not use your computer until the process is complete, which might take several minutes.

5.

If an error occurs, close Outlook Express, re-open it, and begin the process again from the top. If the same error occurs again, close Outlook Express, restart your computer (or log off and then log on again), open Outlook Express and then begin the whole process again.

If compacting does not correct the corruption, you will need to move all messages out of the damaged folder (if possible), close Outlook Express, and then delete the associated DBX file for that folder. If you cannot open the folder, move the damaged DBX file out of the Store Folder into a new folder you create. I will explain later how you can recover most messages from the corrupt file.

In cases of severe corruption Outlook Express will no longer recognize that the DBX file exits, and so the corresponding folder will disappear from the Folder list. If however the corrupt file is Inbox.dbx, Outlook Express will sometimes create a new one and append a number to its name, such as Inbox(1).dbx. If this happens when you open the Inbox, you will see your Inbox messages disappear right before your very eyes!

When Special Folders Stop Being Special

When a special folder becomes corrupt, the first sign is usually just that the folder stops working. For example, you might find that messages you send are no longer being saved in the Sent Items folder or that you are suddenly unable to delete messages, or you cannot open messages in the Drafts folder. If the Inbox is corrupt you will usually see just an empty folder, although sometimes new e-mail will not be downloaded. In the case of the Sent Items or Outbox folders, Outlook Express might crash when you attempt to send a message, presenting this error:

Unknown error has occurred. Protocol: SMTP Port: 0 Secure: No [SSL] Error: 0x800c0131

If the Inbox is corrupt, Outlook Express might not start, but in most cases it will do so by creating a new DBX file named Inbox(1).dbx.

In all these cases compacting all folders often fixes the damage. If it fails to do so, you will need a new DBX file for the damaged folder.

1.

If possible, drag all messages in the non-working folder into another folder you create just for this purpose. You can create a folder by pointing to Folder on the File menu, and then clicking New folder (or by pressing Ctrl+Shift- E).

2.

Close Outlook Express.

3.

Open your Store Folder in Windows Explorer.

4.

Delete (or rename) the DBX file associated with the non-working folder. For example, "Sent Items.dbx" or "Deleted Items.dbx" or "Drafts.dbx". Since these are default folders, new DBX files will be created automatically for the special folders when you restart Outlook Express.

The Show-Stopper: Folders.dbx

In the case of one important file, corruption can cause Outlook Express not only to crash but also to be completely unable to start, presenting just the "working" hour-glass cursor or one or more of the following error messages:

MSIMN caused an invalid page fault in module Msoe.dll

MSIMN caused an invalid page fault in module Msoe.dll at address

Outlook Express could not be started. It may not be installed correctly. Make sure that your disk is not full or that you are not out of memory. Contact Microsoft support for further assistance. (0x800c012e)

Outlook Express could not be started because Msoe.dll could not be initialized. Outlook Express may not be installed correctly.

In these cases the corruption is probably in the file "Folders.dbx". This is the master index of the entire Store Folder and without it, Outlook Express cannot do anything. Should you find yourself in this situation, the only solution is to delete the corrupt file from the Store Folder. That will allow Outlook Express to start and to build a new "Folders.dbx" by re-indexing all DBX files it finds in the Store Folder. This is not without consequences however, and so is not something to do unless absolutely necessary. You will have to do some work to replace the information lost, namely:

Re-create your mail folder hierarchy by dragging folders into place in the Folder list. Note that any folder you have created to group sub-folders but that does not itself contain messages will not appear in the Folder list and so must be created again.

Re-download the list of newsgroups from each news account.

Reset your subscribed newsgroups and download messages again.

Reset synchronization options on IMAP and newsgroup folders.

Edit any message rule that moves or copies messages to folders other than the Inbox.

Removing a single byte from a single DBX file can have dire results


Removing a single byte from a single DBX file can have dire results.

Compact All Folders vs. Compact Folder

You can always compact a single folder by pointing to Folder on the File menu, and then clicking Compact. This is recommended every time you make large changes to any folder. But in order to compact "Folders.dbx", the crucial index of the Store Folder, you must instead click Compact All Folders. Outlook Express will first compact all your e-mail and news folders, and will finish by compacting "Folders.dbx".

Viral Irony: The Most Common Cause of Corruption

When encountering the symptoms of DBX corruption, many people immediately fear that their computer is infected with a virus. As surprising and ironic as it may seem though, the most common cause of DBX corruption is not a virus, but rather anti-virus programs that are configured to scan incoming or outgoing e-mail. Even the most well-known anti-virus programs have exhibited this problem from time to time. To lessen the risk of such corruption you should disable the e-mail scanning module in your anti-virus program. This is usually easy to do by looking at the user-configurable options in the anti-virus program. It is not at all necessary to scan e-mail for viruses to protect your computer.

Now before you dismiss me as mad, let me explain why e-mail scanning is unnecessary. Almost every anti-virus program for Windows installs by default a system scan that runs in the background every time Windows starts. This scan is necessary to protect your computer. If you receive a virus in an e-mail attachment, the virus cannot do anything at all until you actually open the attachment. At that time Outlook Express extracts the attachment from the message and saves it to the Temporary Internet Files folder on your hard disk and attempts to open the file. And it is precisely at that moment that a background system scan will detect the virus, provided it is able to do so, and stop the virus from executing. The system scan will usually delete the infected file from the Temporary Internet Files folder, or else move it to quarantine. To remove the infected e-mail message in Outlook Express, simply hold the Shift key while you press the Delete key. That's all it takes to keep your computer safe, both from e-mail viruses and e-mail anti-virus scanners. Scanning e-mail as it arrives therefore adds nothing to your level of protection. It might indeed make you feel more protected, but that feeling is an illusion. If the system scan is unable to detect the virus, the e-mail scan will fail to do so also.

When the Cure Kills: Compacting and Corruption

As stated earlier, compacting all folders in Outlook Express frequently repairs mild corruption. But surprisingly enough, and again as ironic as it seems, the compaction process itself has also been implicated in causing corruption. Before Windows XP Service Pack 2 (SP2), Outlook Express was configured by default to compact files automatically after Outlook Express had been inactive for some minutes. However, although Outlook Express might have been inactive, the same could not always be said for other programs being used when compaction began. On some systems, particularly those with limited amounts of RAM or slow processors, the sudden drain on computer resources sometimes caused the compaction process to hiccough, and all too often a damaged DBX was the result.

It is largely for this reason that the background compaction feature has been removed in Windows XP SP2. Now Outlook Express will compact automatically only after you have opened and closed Outlook Express 100 times. It will do so not in the background, when you might be busy doing other things on the computer, but rather when you close Outlook Express for that 100th time. Do not cancel this compaction, nor use your computer until it is finished. For best results however, you should still compact all folders on a regular basis, such as weekly or bi-weekly.

If you have not installed Windows XP SP2, you should disable the background compaction to lessen the chance of it damaging your files. To do so:

1.

Click Options on the Outlook Express Tools menu.

2.

Click the Maintenance tab.

3.

Clear the checkbox for "Compact messages automatically in the background".

4.

Click OK.

Minimizing the Risk Is Also Minimizing the Loss

"Don't put all your eggs in one basket," goes the old saying. In Outlook Express this translates into "don't save all your messages in one folder, especially not the Inbox." By keeping your DBX files small, you minimize the risk of corruption while at the same time minimizing the loss should corruption occur. This is especially true for the Inbox since it is the folder that changes the most. So keep your Inbox lean and healthy by using it for what it is, a box for incoming messages waiting to be stored or deleted, and not as a place to store all the e-mail you've ever received. Not only will Outlook Express be less likely to lose your e-mail, it will also perform more efficiently.

Don't Forget Sent Items

Most of us don't look in this folder very regularly, yet it grows every time you send a message. It is therefore very easy for the "Sent Items.dbx" file to grow very large. Be sure to move messages out of Sent Items and into sub-folders from time to time to lessen the risk of corruption. A good rule of thumb is to keep no more than 2,000 or so messages in Sent Items.

Recovering from Corruption

In the event one of your mail folder's DBX file suffers from corruption that is not cured by compacting all folders, there is hope for recovering the messages it contains.

Close Outlook Express immediately.

In Windows Explorer, navigate to your Store Folder and move the damaged DBX file into a new folder you create.

Copy the latest backup of the DBX file from your backup media into the Store Folder. If you are copying from a CD-ROM, verify the copy is not set as 'read-only' by right-clicking on the DBX file and clicking Properties.

Restart Outlook Express.

Compact all folders as described earlier.

In the unfortunate event you do not have a backup that contains the messages you need, it is possible to recover messages from a corrupt DBX file. Unfortunately there is no built-in recovery tool in Outlook Express to do this. There is, however, a very inexpensive third-party tool called DBXtract that could possibly recover these messages.. It was written by Steve Cochran, a Microsoft MVP for Outlook Express for many years. You can purchase and download DBXtract at Steve's OEHelp website.1

Ten Steps of Prevention

If you follow the ten stops outlined here, you will greatly reduce the chances that your DBX files will become corrupt.

1.

Disable the e-mail scan in your anti-virus program.

2.

If you have not installed Windows XP SP2, disable automatic background compaction.

3.

Keep the Inbox as empty as possible by moving messages to other folders you create.

4.

Be careful that the Sent Items folder does not grow to an unmanageable size (2,000 or so messages seems a good target).

5.

Compact all folders on a regular basis, such as bi-weekly, or more often if you make extensive use of e-mail or newsgroups.

6.

When compacting, do not use your computer until the process is finished.

7.

Purchase a copy of DBXtract for emergency use.

8.

Keep your computer and anti-virus products up to date with the latest patches.

9.

Backup your entire Store Folder on a regular basis.

10.

Remember that you can store important messages, or messages with large attachments, outside of Outlook Express simply by dragging them from the message list and dropping them on your desktop. Then delete the original message in the message list to keep the DBX file smaller.

These simple steps will help keep your Outlook Express working in tiptop shape so that hopefully you will never need that emergency copy of DBXtract.


REFERENCE

http://www.microsoft.com/windows/IE/community/columns/filecorruption.mspx

Warning: headers already sent

SkyHi @ Tuesday, July 20, 2010

When I was learning PHP their were few things that had stumped me, I would usually take it hours to solve them if not days. Now I have grown up, and I realize that those were the basic things that should have been mentioned in the PHP manual, but they were not.


Today I am going to write about one such annoying problem that almost always comes in the way of PHP developers at least once.


Warning: Cannot modify header information – headers already sent by (output started at C:\wamp\www\aktest\error.php:2) in C:\wamp\www\aktest\error.php on line 4


Warning: session_start() [function.session-start]: Cannot send session cookie – headers already sent by (output started at C:\wamp\www\aktest\error.php:2) in C:\wamp\www\aktest\error.php on line 3


This is “header already sent” warning message, that we get whenever we try to redirect a user to some other page or location, when we try to set a cookie or if we try to start a session. Once we get this warning we know that page won’t redirect, session won’t start or cookie’s sent to user, So we can’t even ignore them.


Before we see the solutions to resolve this warning let’s see the source code of the error.php file that I used to generate this error.


<?php
session_start();
header("location:http://localhost/");
?>

Please notice an empty line before “<?php”, this is the cause of errors in his page.


Why This Occurs


This is requirement of the http protocol that header related information must be sent by the server before it can sent the content. When we try to send a header information after we have already sent some output to client, PHP responds by giving this warning.


The most common reasons are


  1. An output is sent, either by normal HTML tags, blank lines in a file, or from PHP file itself(in my case this is the reason).
  2. We read a file using include()/require() function, and that file may have empty spaces or he lines at the end, that will be sent as output.

Important thing to note is that output is sent before header information that you wanted to sent, and hence the warning.


How To Resolve


This is really simple, just make sure their is no output sent before your call to header function. This might be a correct advice but this still does not help much.


What really needed is that we need to know where is the exact problem, that we can resolve.


So let’s take a look at the warning message again, now look at the part where in parenthesees it says “output started at <path of the file>: line number“, you see the source of our problem is already mentioned in this warning. This is where the problem lies.


Now we know from where output is coming we can depending on your situation we can remove the output that is being sent, or if we can’t do that we move the call to header function above that line.


Basically we have to make sure that no output is sent before call to any header related functions.


Some guideline that might help


  1. Always start “<?php” at the first line and first column, in you php file.
  2. Keep all you your session related function like session_start() at the start of file, just after “<?php”
  3. If all you are writing is a php file then do not use “?>”, this can prevent empty space or lines from being included in the other files.

It would be interesting to know what you did when you first saw this problem, what was your reactions.


If you have any doubts or you did not understand something leave a comment below, I will try to help you as time permits.


REFERENCES

http://amiworks.co.in/talk/warning-headers-already-sent/

Monday, July 19, 2010

Wildcard DNS Redirect

SkyHi @ Monday, July 19, 2010
If you try going to any of the pages on this site, and change the "www" to a domain of your liking, you'll end up back on the same page. That is because I've done the following steps for this site. In fact, I'm writing this article more so I'll remember how I did it, and making it available to you in case you want to know too.
I am running WHM/cPanel and Apache, so I'm going to tell you how to do it using these. You can do it with other control panels, but the paths and way you edit your dns may be different. Please also note that this site has a dedicate IP. It may be slightly different if you don't, but you should be able to get the idea behind it and implement it yourself.
Step 1 - Wildcard DNS Entry
You'll need to login to WHM (or your control panel), and find the "Edit a DNS Zone" link under "DNS Functions". Select the domain you are making the wildcard for, and click Edit.
If you want to redirect to "www.yoursite.com", edit the CNAME entry for www to be: (change 192.168.0.1 to your site's IP)
"www.yoursite.com." "A" "192.168.0.1"
Next you'll want to create a new "A" entry, same as above only it will be "*.yoursite.com." -- Notice there is a period after the .com -- Not having it there can lead to some problems.
If you aren't using WHM, remember to restart bind. WHM does it automatically when you click save.
Step 2 - Telling Apache
Now you are going to have to tell Apache that something new is going on. You'll need to edit your httpd.conf file. The location can differ, but here is a common path:
/etc/httpd/conf/httpd.conf
I edit it using pico with the -w attribute (no wrap). If you have a different preference thats fine. Once you are in there, find the Virtual Host entry for your site. In pico you can hit CTRL W and type your domain (include www if you have subdomains to find it faster). Before that VirtualHost entry, make a new one like so:

ServerAlias *.theclixnetwork.com
RedirectMatch 301 (.*) http://www.clixnetwork.com$1
Remember to change the IP and domain to yours. This will do the actuall redirecting. The 301 tells the browsers and search engines it is a permanent redirect. You can use "permanent/301" (the resource has moved permanently), "temp/302" (the resource moved temporarily), "seeother/303" (the resource has been replaced).
If you've noticed Google can have a different Page Rank for www.yoursite.com and yoursite.com - Thats because to Google its a different site, and some people link to one or the other. Using the permanent redirect, Google essentially combines the PR because it sees the site as one.
Ok now you'll want to make sure that the original virtual host entry only has "ServerAlias www.theclixnetwork.com", and that it comes after the above entry. Otherwise you'll find like me that it just keeps redirecting endlessly.
So there you go, you can now redirect all your subdomains to your main site. I would like to find out if it is possible to do so without editing the httpd.conf file, and using .htaccess instead. I'm sure you can, but thats another article.


REFERENCES
http://www.timlinden.com/blog/website-development/wildcard-dns-redirect/