
This guide is for installing an IDE drive. If you're opening up something an OEM machine you could be voiding your warranty so check first.
When you try to install a really big hard drive into a lot of older systems, you'll find that the BIOS is only capable of seeing 137 GB. On even older mainboards you'll find a 32 GB limit. To get around this you'll want to use that install disk that came with the hard drive or if you're a relatively advanced user a BIOS update should be available. The install disk comes on a floppy so if you don't have one then you'd better be able to do a BIOS update.
Let's Begin
Unpack everything. Drives come defaulted to be ready to be installed in a single drive environment.
First of all Master, Slave? What is this? They had to be called something. The master can also be referred to as the "primary" drive with the slave being the "secondary". A lot of people like to use what is called Cable Select.(use cable to determine drives) If you want to do that you'll just have to make sure that it's plugged into the right part of the cable.
Wonder what connects to where on the cable?

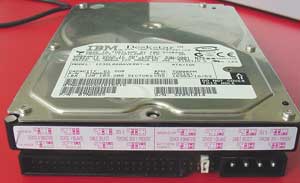
If you want to make it the master or the slave, you will have to look around the drive to find where the instructions are. You'll see some kind of diagram that looks like this:

It's not currently set, but you can fairly easily tell from the diagram what you'll need to set it for. There is a sample about Seagate hard drvie jumper setting.
Setting the Jumpers

Install hard drive
Before you install the new drive make sure you unplug the power connector from the computer. Anytime you mess with anything inside your computer it is a good idea to unplug it. It's also a good idea to touch the power supply before you go sticking your hands in there! Static discharge can jump and do some bad things. Just touch the power supply for a precaution OK?
Open up your computer case.


Now you should be able to find an open 3.5" slot somewhere.
Slide the drive into an available slot and find 2 or 4 case screws. Two if you're lazy and only screw things in on the side. Four if you never touch anything in your system. For that you will have to pull off both side panels to your case. The case screws are bigger than the ones used to screw in your CD drives.


After the drive is secured then go ahead and connect the power and IDE cables. On the edge of one of the cables you will see a line. Normally it's red on the grey cables and white on black cables etc there will be some kind of colored line to indicate pin 1. This pin always goes on the same side as the power connector.

To connect the IDE cable to the motherboard you'll have to find something that looks like this:

Each connector represents 1 IDE channel. Most boards have 2 channels while 4 is becoming more and more common at least on the higher end boards.
Each channel can have 2 devices on it.
When you first start your machine enter into the BIOS and make sure the drive was identified properly. Generally it's the [del] button that gets you into the BIOS but sometimes it's F1 or F2. You should be able to see some kind of message on the screen when it first posts indicating what you need to push.
Once you're in the BIOS you'll want to go into standard CMOS where you should see something like this:

Run the system setup program.
Enable LBA mode and UDMA mode, if applicable.
Select the auto-detect option.
Save and exit the system setup program.
If your drives are showing up properly then you did it right. If they aren't then you've got some troubleshooting to do. First of all look go back to the front page in your BIOS and select integrated peripherals. Make sure that both IDE channels are enabled. Most likely you set your jumper wrong.
And there are some ways to partition the hard drive actually, say, partition the hard drive under Disk Management or use the third party partition manager tool like EASEUS artition Master to manage the hard disk directly, etc.
EASEUS Partition Master, comprehensive hard disk partition tool and system optimization software for Windows-based administration, enables you to easily partition the hard disk or change/extend partition without data loss under Windows 2000/XP/Vista/Windows 7 and Windows server 2000/2003/2008. It also offers some basic and advanced features like create, delete, resize/move, format, copy partition for better Windows hard disk management. More features…
Certainly, retail packaged hard drives will have an install disk for you. You also can partition hard disk with it. If this new drive is going to be your main drive then use the partition application that is built into Windows 2000/XP/Vista/Windows 7 and Windows server 2000/2003/2008. If your using Windows 9x (why?) then you'll want to check out bootdisk.com and find something that'll cover your needs. You'll need to fdisk this. Since most of people are using Windows 2000 or XP, so overleap all the steps in fdisk. The basal step is:
Look on the bottom right and you'll see something that looks like this picture. The disk with all of the unallocated space is what you're after. Right click on it. Select New Partition.

A wizard will pop up and walk you through this process. Choose a partition size. If this is a secondary drive then you're obviously after pure storage space so just make it a primary partition and allocate 100% of your space to it.

The followed screen looks like this. Just clicking next until you get here.

If you're only using Windows 2000/XP/Vista/Windows 7 and Windows server 2000/2003/2008, we would suggest using NTFS. If you're dual booting then Fat32 would probably be a good idea if the other OS can't read NTFS.
For NTFS the default cluster size is 4K which is pretty much the best tradeoff between speed and storage space.
Volume label is nothing other than the name you want it to be called.
Make sure you select quick format or else it'll be a while before you can use the disk.
Click next it's just a summary of what you told it to do.
Click next and soon the new drive is available.
Troubleshooting
No hard drives show up:
Do you have two drives on the cable? Make sure both of the drives aren't set for the same setting (master or slave).
Make sure the power is plugged in and everything is connected securely.
Verify the drive is enabled in system BIOS. If not, select the auto-detect option.
Is the full capacity of the hard drive being seen:
Verify the BIOS has auto-detected and LBA mode is enabled.
My hard drive is slow:
Make sure you have your CD/DVD drives plugged into a different channel/cable. Most modern CD drives are ATA33 while the modern hard drives are ATA133. A drive can only transfer as fast as the slowest device on the channel.
My hard drive doesn't have the jumper settings on the label:
Find the model number and visit the manufacturers website. The should have some instructions posted. If not, email their support.
My 40 GB hard drive only show up as 38.2 GB:
The formatted space will always be a bit less than the advertised storage capacity. This is supposed to happen, don't worry. It is a difference in the way the OS and the manufacturers measure drive size. Hard drive manufacturers use round figures for sizing (1000MB = 1GB instead of 2^40 bytes = 1GB) whereas operating systems show the exact version.
See More: Install IDE Hard Drive | Install SATA Hard Drive | Install SCSI Hard Drive
REFERENCE
http://www.easeus.com/resource/install-ide-hard-drive.htm

When you try to install a really big hard drive into a lot of older systems, you'll find that the BIOS is only capable of seeing 137 GB. On even older mainboards you'll find a 32 GB limit. To get around this you'll want to use that install disk that came with the hard drive or if you're a relatively advanced user a BIOS update should be available. The install disk comes on a floppy so if you don't have one then you'd better be able to do a BIOS update.
Before you start
- Do not drop or bump the drive.
- Keep the drive in the protective anti-static container until ready to install.
- Protect the drive from static discharge by wearing a grounded wrist strap. Attach the wrist strap to the metal chassis of your computer.
- Handle the drive by the edges of the frame.
- Do not apply pressure or attach labels to the circuit board or the top cover of the drive.
- Turn off the power to the host system before installation.
What you need
- Phillips screwdriver and four 6-32 UNC drive mounting screws.
- Standard 40-pin ATA interface cable, or an 80-conductor cable if running UATA66/100 (max length: 18 inches).
- An unused drive power cable for your new drive.
- Needle-nose pliers for removing or adding jumpers.
Let's Begin
Unpack everything. Drives come defaulted to be ready to be installed in a single drive environment.
First of all Master, Slave? What is this? They had to be called something. The master can also be referred to as the "primary" drive with the slave being the "secondary". A lot of people like to use what is called Cable Select.(use cable to determine drives) If you want to do that you'll just have to make sure that it's plugged into the right part of the cable.
Wonder what connects to where on the cable?
If you want to make it the master or the slave, you will have to look around the drive to find where the instructions are. You'll see some kind of diagram that looks like this:
It's not currently set, but you can fairly easily tell from the diagram what you'll need to set it for. There is a sample about Seagate hard drvie jumper setting.
Setting the Jumpers
- Master or Single Drive - Use this setting if the drive is the only drive on the ATA interface cable.
- Drive is Slave - Use this setting if the drive is an additional drive on the cable and the original drive is set as Master.
- Master with non-ATA compatible drive - Use this if the drive is Master to a CD-ROM, tape drive or other non-ATA drive.Note: It is preferred to have the CD-ROM and other non-hard drive products on the secondary ATA channel.
- Cable-Select Option (Default) - Use with Ultra ATA cables. This allow the cable to select if the drive is master or slave based on the position on the cable. The Master drive goes on the black connector at the end of the cable, the slave drive connects to the gray connector in the middle and the host adapter connects to the blue connector at the other end of the cable.
- Limit Capacity Option - This option may be required if the system the drive is being installing into does not support the full capacity of the drive. If the limit capacity jumper is installed you will need to use a drive overlay program such as the one installed by Disc Wizard Starter Edition.
Install hard drive
Before you install the new drive make sure you unplug the power connector from the computer. Anytime you mess with anything inside your computer it is a good idea to unplug it. It's also a good idea to touch the power supply before you go sticking your hands in there! Static discharge can jump and do some bad things. Just touch the power supply for a precaution OK?
Open up your computer case.
Now you should be able to find an open 3.5" slot somewhere.
Slide the drive into an available slot and find 2 or 4 case screws. Two if you're lazy and only screw things in on the side. Four if you never touch anything in your system. For that you will have to pull off both side panels to your case. The case screws are bigger than the ones used to screw in your CD drives.
After the drive is secured then go ahead and connect the power and IDE cables. On the edge of one of the cables you will see a line. Normally it's red on the grey cables and white on black cables etc there will be some kind of colored line to indicate pin 1. This pin always goes on the same side as the power connector.
To connect the IDE cable to the motherboard you'll have to find something that looks like this:
Each connector represents 1 IDE channel. Most boards have 2 channels while 4 is becoming more and more common at least on the higher end boards.
Each channel can have 2 devices on it.
When you first start your machine enter into the BIOS and make sure the drive was identified properly. Generally it's the [del] button that gets you into the BIOS but sometimes it's F1 or F2. You should be able to see some kind of message on the screen when it first posts indicating what you need to push.
Once you're in the BIOS you'll want to go into standard CMOS where you should see something like this:
Run the system setup program.
Enable LBA mode and UDMA mode, if applicable.
Select the auto-detect option.
Save and exit the system setup program.
If your drives are showing up properly then you did it right. If they aren't then you've got some troubleshooting to do. First of all look go back to the front page in your BIOS and select integrated peripherals. Make sure that both IDE channels are enabled. Most likely you set your jumper wrong.
Partitioning the drive in Windows 2000/XP/Vista/Windows 7 and Windows server 2000/2003/2008
If you install a new drive and want to use it in Windows, you must partition the hard drive first! Note: If you want to recover data from the "OLD" drive, Don't do this!And there are some ways to partition the hard drive actually, say, partition the hard drive under Disk Management or use the third party partition manager tool like EASEUS artition Master to manage the hard disk directly, etc.
EASEUS Partition Master, comprehensive hard disk partition tool and system optimization software for Windows-based administration, enables you to easily partition the hard disk or change/extend partition without data loss under Windows 2000/XP/Vista/Windows 7 and Windows server 2000/2003/2008. It also offers some basic and advanced features like create, delete, resize/move, format, copy partition for better Windows hard disk management. More features…
Certainly, retail packaged hard drives will have an install disk for you. You also can partition hard disk with it. If this new drive is going to be your main drive then use the partition application that is built into Windows 2000/XP/Vista/Windows 7 and Windows server 2000/2003/2008. If your using Windows 9x (why?) then you'll want to check out bootdisk.com and find something that'll cover your needs. You'll need to fdisk this. Since most of people are using Windows 2000 or XP, so overleap all the steps in fdisk. The basal step is:
- Boot into Windows 2000/XP/Vista/Windows 7 and Windows server 2000/2003/2008.
- Open Computer Management and select Disk Management.
- Initialize the drive.
- Partition the drive.
- Format the drive.
- Assign the drive letter.
- Initiate changes.
Look on the bottom right and you'll see something that looks like this picture. The disk with all of the unallocated space is what you're after. Right click on it. Select New Partition.
A wizard will pop up and walk you through this process. Choose a partition size. If this is a secondary drive then you're obviously after pure storage space so just make it a primary partition and allocate 100% of your space to it.
The followed screen looks like this. Just clicking next until you get here.
If you're only using Windows 2000/XP/Vista/Windows 7 and Windows server 2000/2003/2008, we would suggest using NTFS. If you're dual booting then Fat32 would probably be a good idea if the other OS can't read NTFS.
For NTFS the default cluster size is 4K which is pretty much the best tradeoff between speed and storage space.
Volume label is nothing other than the name you want it to be called.
Make sure you select quick format or else it'll be a while before you can use the disk.
Click next it's just a summary of what you told it to do.
Click next and soon the new drive is available.
Troubleshooting
No hard drives show up:
Do you have two drives on the cable? Make sure both of the drives aren't set for the same setting (master or slave).
Make sure the power is plugged in and everything is connected securely.
Verify the drive is enabled in system BIOS. If not, select the auto-detect option.
The hard drive doesn't even power up:
Check to make sure the IDE cable is connected correctly. You will see some kind of stripe running down the side of the cable that will indicate pin 1. Pin 1 is almost always the closest to the power connector. If you have this backwards the drive will normally either be silent or fail to power up.Is the full capacity of the hard drive being seen:
Verify the BIOS has auto-detected and LBA mode is enabled.
My hard drive is slow:
Make sure you have your CD/DVD drives plugged into a different channel/cable. Most modern CD drives are ATA33 while the modern hard drives are ATA133. A drive can only transfer as fast as the slowest device on the channel.
My hard drive doesn't have the jumper settings on the label:
Find the model number and visit the manufacturers website. The should have some instructions posted. If not, email their support.
My 40 GB hard drive only show up as 38.2 GB:
The formatted space will always be a bit less than the advertised storage capacity. This is supposed to happen, don't worry. It is a difference in the way the OS and the manufacturers measure drive size. Hard drive manufacturers use round figures for sizing (1000MB = 1GB instead of 2^40 bytes = 1GB) whereas operating systems show the exact version.
See More: Install IDE Hard Drive | Install SATA Hard Drive | Install SCSI Hard Drive
REFERENCE
http://www.easeus.com/resource/install-ide-hard-drive.htm