
It's 2 AM Saturday and the phone rings. You thought you were going to have a long holiday weekend. You've been informed by the NOC that there's no connection to the database server, and could you come down to see what's wrong with it. Remote access won't save you, there's no response at all from the server. We've all been there during our careers, and there's technology freely available to save your sanity, and allow you to take that long holiday weekend. Creating a MySQL high availability cluster using Distributed Replicated Block Device, DRBD and Heartbeat will save you from heading back to work at 2 AM.
During MySQL Conference 2007, I attended Storage Replication with DRBD: The Next Big Thing in Cluster Storage Management, which was very informative, but it left me asking how do I implement such a system?
In this article, we're going to go through the entire process of installing, configuring and testing DRBD, Heartbeat and MySQL running in a 2 node cluster environment. This will be a bare bones configuration, best practices and security will take a back seat while we learn how all the different pieces work together.
Lets get started.
Requirements
You should be very comfortable with VMware Server, installing and configuring CentOS or Redhat, and MySQL before starting this project.
Create Test Servers
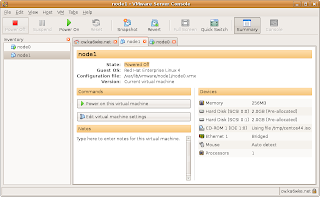
Using VMware server, create a minimal virtual machine with 256MB RAM, 2GB OS drive, and 2GB drive for DRBD use. Call it node0. Install CentOS 4.5 with the following installation options:
Configure eth0 with fixed IP, node0 system is 192.168.12.21 and node1 will be 192.168.12.22.
No firewall
SELinux disabled
Minimal package group selection.
Once the OS is up and running, be sure to yum update. You'll have to enable centosplus, and the contrib repos. These test systems are running kernel 2.6.9-55.0.2.EL. I used heartbeat-2.0.7-1, and drbd-8.0.4 for this article.
Note: At the time of this article, a DRBD v8 RPM didn't exist in the repos, so we'll create our own. I used a different CentOS 4.5 machine that had all the development tools already installed. Before creating your RPMs, you'll need to install the development tools, if you haven't already done so with:
Building drbd-8.0.4 RPM
Download the latest DRBD source from http://oss.linbit.com/drbd/. Just follow these steps, and you should have an RPM ready to go.
Copy drbd-8.0.4-3.i386.rpm and drbd-km-2.6.9_55.0.2-8.0.4-3.i386.rpm to both nodes.
Installation
This will install mysql 5.0.42, which will work just fine for learning DRBD and Heartbeat.
Now that we have all our software installed, we'll make node1 and this is the easy part. Since we're working with VMware virtual server, all we need to do is copy the node0 directory to node1! Follow these steps:
Configuring DRBD
We're ready to start configuring DRBD on our virtual two node system. Before we do, take a snapshot of each node as a backup. In Vmware Server Console, right click on node0, pick take snapshot. If we run into problems configuring DRBD, we can revert this VM back to the snapshot and start over. We've spent some time creating and configuring these virtual machines, lets not have to duplicate all our efforts if we blow something up.
Node0 will become our primary node, making node1 our secondary node. These are our steps for configuring DRBD:
drbd.conf
The config file for DRBD is below. I've commented on the options needed to configure our resources.
Once you have drbd.conf finished, copy it to node1:/etc.
Bringing up DRBD
All software, drbd.conf, and devices have been created, make sure only node0 is running. Login as root, then:
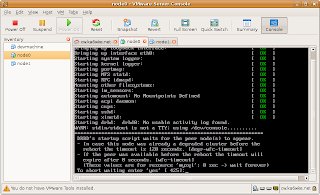
Reboot node0, you should see a boot screen that looks like this:
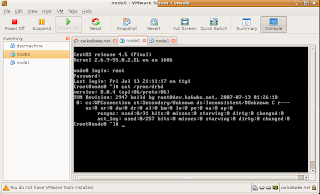
Type 'yes', login to node0, then:
Your screen should look like this:
Note that node0 is in a secondary state, in a minute, we'll fix this by promoting it to the primary node. Start up node1 then you'll have to:
Should look like this:
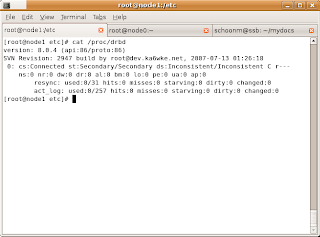
You'll see we now have two Secondaries. Now, we need to promote node0 to Primary with this:
You should see this output, updated every 2 seconds:
Look to the left of “sync'ed” – you'll see that node0 is synchronizing with node1! When it's finished synchronizing, you'll see this:

You've now created a two node cluster. It's very basic, failover is not automatic. We need to take care of that with Heartbeat. First, we need to test DRBD.
Testing DRBD
To have a working system, we need to create a filesystem on node0. We do that just like normal, the difference is we use /dev/drbd0 device instead of /dev/sdb1:
You're on node1, which is secondary and /dev/drbd0 is read only! Switch to node0.
Once that's done, we'll do some simple tests. On node0, mount /dev/drbd0 on /mnt/mysql. Change to that directory, then touch a few test files, create a directory. In order to check to see if our files have been replicated, we need to unmount /mnt/mysql, make node0 secondary, promote node1 to primary, remount /mnt/mysql then check to see if your files are on node1. These steps are:
Switch to node1, then:
Check /mnt/mysql and see what's in there. You should see your files and directories you created on node0! You'll probably notice we didn't make a filesystem on node1 for /dev/drbd0. That's because /dev/drbd0 is replicated, so when we created the filesystem on node0, it was also created on node1. Matter of fact, anything we do in node0:/dev/drbd0 will automatically get replicated to node1:/dev/drdb0.
Next, we'll configure MySQL to use our DRBD device. We'll practice manually failing MySQL over between nodes before automating it with Heartbeat. You want to make sure you understand how the entire system works before automation. That way, if there was a problem with our test files not showing up on node1, then we know there's a problem with DRBD. If we tried to test the entire system as one large piece, it would be much more difficult to figure out which piece of the puzzle was giving us our problem. For practice, return node0 to primary node, and double check your files.
Configuring MySQL to use DRBD
MySQL is installed, but we need to configure it to use the DRBD device. We do that by simply putting all the databases and logs in /mnt/mysql/data. In a production environment, you'd probably break out logs, database and index files onto different devices. Since this is an experimental system, we'll just put everything into one resource.
Edit my.cnf so datadir=/mnt/mysql/data. After that, run mysql_install_db. Check /mnt/mysql/data to see if the mysql database directory has been created, and all the files are there. Start mysql:
Make sure you see that mysqld is using databases from /mnt/mysql/data. For this experimental system, we'll use the world database as our example database to test. You can download the world database at http://dev.mysql.com/doc/. The installation directions can be found on this page as well. Once installed, verify you can access the world database. Our last step before switching nodes is to copy my.cnf over to node1. With all these config files, I'm sure you can see why it's best to have two identical machines to run DRBD.
Lets do a manual switch to node1, we have to add shutting down mysqld first before unmounting /mnt/mysql, and starting mysqld on node1 as the last step. MySQL should start up on node1 without any errors. Login to MySQL, change to world, run a select. Your data is all on node1. Now we know DRBD is working, and MySQL will work over DRBD. Next is to configure Heartbeat to make this all automatic.
Configuring Heartbeat to Manage DRBD & MySQL
Heartbeat is the brains used to automate all the steps needed to determine if a node is down, and run all the steps needed to bring the spare node up as primary. We'll be using heartbeat v2.x for this experimental cluster. Heartbeat uses three config files, all found in /etc/ha.d:
ha.cf – the main heartbeat config file.
haresources – resources that are managed by heartbeat.
authkeys – used for node authenitacation.
Node0 will be our primary node. The first configuration file is ha.cf, and this file is what configures all the nodes, communication, and which features are enabled. Our basic ha.cf file will look like this:
Now that ha.cf has been configured, we need to configure the haresources file. This one is pretty easy. Haresources is where we list our primary node, the virtual IP that's used by the cluster, and what DRBD resource to manage. The virtual IP needs to be different than either node, and be unique on the subnet. You'll treat it just like any other IP address on your network. We'll pick 192.168.12.30 as our virtual IP. The haresources file looks like this:
Here's a breakdown of our haresources file:
These are the directions Heartbeat needs to manage our resources. On startup, it's read from left to right. On node0, first thing Heartbeat will do is create the virtual IP, then it'll bring up our DRBD resource. Once that's finished, it'll mount /dev/drbd0 on /mnt/mysql, then finally startup mysqld. When shutting down, Heartbeat reads this file from right to left. It'll stop mysqld, unmount /mnt/mysql, and demote node0 to secondary. The last thing Heartbeat will do is stop the virtual IP from working on node0. Heartbeat on node1 will notice node0 is missing, and take over all the resources in the same fashion as node0 does upon startup.
Our last file is authkeys. Since our virtual machines are running on a private network for experimental purposes, we'll dispose of any network security. We'll use the unsecure crc directive, our authkeys file:
The permissions on the authkeys file must be 0600, if you don't heartbeat won't start, and in the system log, you see: node0 heartbeat:
One last edit to make is MySQL configuration file, my.cnf so mysqld will bind to the virtual IP address. Add bind-address=192.168.12.30 in my.cnf, and copy it over to node1.
We're ready to start heartbeat up on both nodes.
Once startup is complete, you should see this at the end of the log:
You'll need to login to mysql on node0 because we haven't granted the rights to access mysql over the network:
Testing MySQL High Availability
We now have our 2 node cluster running MySQL. Node0 is the primary node running mysqld. You can login to MySQL, and check the world database using the cluster IP address:
You can see, we can access the world database, with Heartbeat managing MySQL and DRBD. Lets test automatic failover to node1:
Logs will look like this:
On node1, DRBD has mounted the MySQL datadir, and started mysqld You can also see Heartbeat running too:
Take a look at Country table:
Automatic failover of our experimental cluster works!
Conclusion
In a production system, you'd probably want multiple DRBD resources for logfiles, tables and indexes. You could also have DRBD sync its data using a crossover cable between a pair of dedicated NICs. That would greatly help in handling large amounts of data, and not impact the user network. For heartbeats, you could use a serial cable, and I think it would be cool if heartbeats could be sent over a USB connection. There's also security in Heartbeat that would need to be used too. We've really got started with DRBD and Heartbeat. There's plenty more to learn.
Even the most complex systems can be broken down into smaller pieces that can stand alone. I've demonstrated in this article how to install, configure and test each part of a highly available system to reach our final goal of MySQL running on a cluster. You have a solid understanding how each piece works in the system, which will help you greatly when you run into problems. Plus, it'll give you confidence that MySQL running over DRBD and managed by Heartbeat is a solid solution to use in your environment.
MySQL high availability can save your sanity, and a good nights rest. Your users may never notice the MySQL database not being available.
Resources
MySQL: http://www.mysql.com
Linux-HA: http://linux-ha.org/
DRBD: http://wiki.linux-ha.org/DRBD
Heartbeat: http://linux-ha.org/Heartbeat
Reference: http://marksitblog.blogspot.com/2007/07/mysql-5-high-availability-with-drbd-8.html

During MySQL Conference 2007, I attended Storage Replication with DRBD: The Next Big Thing in Cluster Storage Management, which was very informative, but it left me asking how do I implement such a system?
In this article, we're going to go through the entire process of installing, configuring and testing DRBD, Heartbeat and MySQL running in a 2 node cluster environment. This will be a bare bones configuration, best practices and security will take a back seat while we learn how all the different pieces work together.
Lets get started.
Requirements
You should be very comfortable with VMware Server, installing and configuring CentOS or Redhat, and MySQL before starting this project.
Create Test Servers
Using VMware server, create a minimal virtual machine with 256MB RAM, 2GB OS drive, and 2GB drive for DRBD use. Call it node0. Install CentOS 4.5 with the following installation options:

Configure eth0 with fixed IP, node0 system is 192.168.12.21 and node1 will be 192.168.12.22.
No firewall
SELinux disabled
Minimal package group selection.
Once the OS is up and running, be sure to yum update. You'll have to enable centosplus, and the contrib repos. These test systems are running kernel 2.6.9-55.0.2.EL. I used heartbeat-2.0.7-1, and drbd-8.0.4 for this article.
Note: At the time of this article, a DRBD v8 RPM didn't exist in the repos, so we'll create our own. I used a different CentOS 4.5 machine that had all the development tools already installed. Before creating your RPMs, you'll need to install the development tools, if you haven't already done so with:
<code>[root@dev ~] yum groupinstall 'Development Tools'
</code>
Building drbd-8.0.4 RPM
Download the latest DRBD source from http://oss.linbit.com/drbd/. Just follow these steps, and you should have an RPM ready to go.
<code>[root@dev ~] tar -xvzf drbd-8.0.4.tar.gz<br />[root@dev ~] cd drbd-8.0.4 && make && make rpm<br />[root@dev ~] cd dist/RPMS/i386 <br />[root@dev ~] ls<br /><br />drbd-8.0.4-3.i386.rpm <br />drbd-debuginfo-8.0.4-3.i386.rpm<br />drbd-km-2.6.9_55.0.2-8.0.4-3.i386.rpm<br /></code>
Copy drbd-8.0.4-3.i386.rpm and drbd-km-2.6.9_55.0.2-8.0.4-3.i386.rpm to both nodes.
Installation
<code>[root@node0 ~]# rpm -Uvh drbd-8.0.4-3.i386.rpm<br />[root@node0 ~]# rpm -Uvh drbd-km-2.6.9_55.0.2-8.0.4-3.i386.rpm<br />[root@node0 ~]# yum install heartbeat<br />[root@node0 ~]# yum install mysql-server.i386<br /></code>
This will install mysql 5.0.42, which will work just fine for learning DRBD and Heartbeat.
Now that we have all our software installed, we'll make node1 and this is the easy part. Since we're working with VMware virtual server, all we need to do is copy the node0 directory to node1! Follow these steps:
- Shutdown node0.
- Copy node0 to node1. (My VMs are saved in /var/lib/vmware).
- Using VMware Server Console, open the vmx file that's in node1 directory.
- Start node1. VMware will tell you the config file has changed. You need to create a new identifier, click always create.
- Node1 is going to detect that hardware has changed, one of those will be the network card. Remove the NIC, then kudzu will find it again, allowing you to change the IP address. Node1 IP address is 192.168.12.22/255.255.255.0, same gateway/DNS as node0.
- Edit /etc/hosts and /etc/sysconfig/networking files and replace node0 with node1. In hosts file, also add the IP addresses for all nodes, and 192.168.12.30 virtual IP. Call that virtual host cluster.
Configuring DRBD
We're ready to start configuring DRBD on our virtual two node system. Before we do, take a snapshot of each node as a backup. In Vmware Server Console, right click on node0, pick take snapshot. If we run into problems configuring DRBD, we can revert this VM back to the snapshot and start over. We've spent some time creating and configuring these virtual machines, lets not have to duplicate all our efforts if we blow something up.
Node0 will become our primary node, making node1 our secondary node. These are our steps for configuring DRBD:
- Create partitions on both nodes.
- Create drbd.conf
- Configure global drbd options.
- Configure resource which consists of:
- Disk partitions on node0 and node1.
- Network connection between nodes.
- Error handling
- Synchronization
drbd.conf
The config file for DRBD is below. I've commented on the options needed to configure our resources.
<code>global {<br />minor-count 1;<br />}<br /><br />resource mysql {<br />protocol C; # There are A, B and C protocols. Stick with C.<br /># incon-degr-cmd "echo 'DRBD Degraded!' | wall; sleep 60 ; halt -f";<br /># If a cluster starts up in degraded mode, it will echo a message to all<br /># users. It'll wait 60 seconds then halt the system.<br /> <br />on node0.ka6wke.net {<br />device /dev/drbd0; # The name of our drbd device.<br />disk /dev/sdb1; # Partition we wish drbd to use.<br />address 192.168.12.21:7788; # node0 IP address and port number.<br />meta-disk internal; # Stores meta-data in lower portion of sdb1.<br />}<br /><br />on node1.ka6wke.net {<br />device /dev/drbd0; # Our drbd device, must match node0.<br />disk /dev/sdb1; # Partition drbd should use.<br />address 192.168.12.22:7788; # IP address of node1, and port number.<br />meta-disk internal; #Stores meta-data in lower portion of sdb1.<br />}<br /><br />disk {<br />on-io-error detach; # What to do when the lower level device errors.<br />}<br /><br />net {<br />max-buffers 2048; #datablock buffers used before writing to disk.<br />ko-count 4; # Peer is dead if this count is exceeded.<br />#on-disconnect reconnect; # Peer disconnected, try to reconnect.<br />}<br /><br />syncer {<br />rate 10M; # Synchronization rate, in megebytes. Good for 100Mb network.<br />#group 1; # Used for grouping resources, parallel sync.<br />al-extents 257; # Must be prime, number of active sets.<br />}<br /><br />startup {<br />wfc-timeout 0; # drbd init script will wait infinitely on resources.<br />degr-wfc-timeout 120; # 2 minutes.<br />}<br />} # End of resource mysql<br /></code>Once you have drbd.conf finished, copy it to node1:/etc.
Bringing up DRBD
All software, drbd.conf, and devices have been created, make sure only node0 is running. Login as root, then:
<code>[root@node0 ~]# drbdadm create-md mysql<br /></code>
Reboot node0, you should see a boot screen that looks like this:

Type 'yes', login to node0, then:
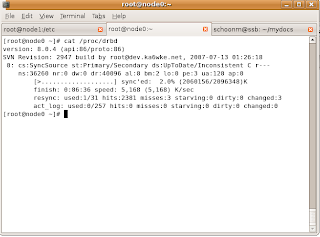
<code>[root@node0 ~]# cat /proc/drbd<br /></code>
Your screen should look like this:

Note that node0 is in a secondary state, in a minute, we'll fix this by promoting it to the primary node. Start up node1 then you'll have to:
<code>[root@node1 ~]# drbdadm create-md mysql<br /></code>
Should look like this:

You'll see we now have two Secondaries. Now, we need to promote node0 to Primary with this:
<code>[root@node0 ~]# drbdadm -- --overwrite-data-of-peer primary mysql<br />[root@node0 ~]# watch cat /proc/drbd<br /></code>
You should see this output, updated every 2 seconds:

Look to the left of “sync'ed” – you'll see that node0 is synchronizing with node1! When it's finished synchronizing, you'll see this:

You've now created a two node cluster. It's very basic, failover is not automatic. We need to take care of that with Heartbeat. First, we need to test DRBD.
Testing DRBD
To have a working system, we need to create a filesystem on node0. We do that just like normal, the difference is we use /dev/drbd0 device instead of /dev/sdb1:
<code>[root@node0 ~]# mkfs.ext3 -L mysql /dev/drbd0<br /></code>
<code>[root@node1 ~]# mkfs.ext3 /dev/drbd0<br /><br />mke2fs 1.35 (28-Feb-2004)<br />mkfs.ext3: Wrong medium type while trying to determine filesystem size<br /></code>
You're on node1, which is secondary and /dev/drbd0 is read only! Switch to node0.
Once that's done, we'll do some simple tests. On node0, mount /dev/drbd0 on /mnt/mysql. Change to that directory, then touch a few test files, create a directory. In order to check to see if our files have been replicated, we need to unmount /mnt/mysql, make node0 secondary, promote node1 to primary, remount /mnt/mysql then check to see if your files are on node1. These steps are:
<code>[root@node0 ~]# umount /mnt/mysql<br />[root@node0 ~]# drbdadm secondary mysql<br /></code>
Switch to node1, then:
<code>[root@node1 ~]# drbdadm primary mysql<br />[root@node1 ~]# mount /dev/drbd0 /mnt/mysql<br /></code>
Check /mnt/mysql and see what's in there. You should see your files and directories you created on node0! You'll probably notice we didn't make a filesystem on node1 for /dev/drbd0. That's because /dev/drbd0 is replicated, so when we created the filesystem on node0, it was also created on node1. Matter of fact, anything we do in node0:/dev/drbd0 will automatically get replicated to node1:/dev/drdb0.
Next, we'll configure MySQL to use our DRBD device. We'll practice manually failing MySQL over between nodes before automating it with Heartbeat. You want to make sure you understand how the entire system works before automation. That way, if there was a problem with our test files not showing up on node1, then we know there's a problem with DRBD. If we tried to test the entire system as one large piece, it would be much more difficult to figure out which piece of the puzzle was giving us our problem. For practice, return node0 to primary node, and double check your files.
Configuring MySQL to use DRBD
MySQL is installed, but we need to configure it to use the DRBD device. We do that by simply putting all the databases and logs in /mnt/mysql/data. In a production environment, you'd probably break out logs, database and index files onto different devices. Since this is an experimental system, we'll just put everything into one resource.
Edit my.cnf so datadir=/mnt/mysql/data. After that, run mysql_install_db. Check /mnt/mysql/data to see if the mysql database directory has been created, and all the files are there. Start mysql:
<code>[root@node0 mysql]# mysqld_safe &<br />[1] 4013<br />[root@node0 mysql]# Starting mysqld daemon with databases from /mnt/mysql/data<br /></code>
Make sure you see that mysqld is using databases from /mnt/mysql/data. For this experimental system, we'll use the world database as our example database to test. You can download the world database at http://dev.mysql.com/doc/. The installation directions can be found on this page as well. Once installed, verify you can access the world database. Our last step before switching nodes is to copy my.cnf over to node1. With all these config files, I'm sure you can see why it's best to have two identical machines to run DRBD.
Lets do a manual switch to node1, we have to add shutting down mysqld first before unmounting /mnt/mysql, and starting mysqld on node1 as the last step. MySQL should start up on node1 without any errors. Login to MySQL, change to world, run a select. Your data is all on node1. Now we know DRBD is working, and MySQL will work over DRBD. Next is to configure Heartbeat to make this all automatic.
Configuring Heartbeat to Manage DRBD & MySQL
Heartbeat is the brains used to automate all the steps needed to determine if a node is down, and run all the steps needed to bring the spare node up as primary. We'll be using heartbeat v2.x for this experimental cluster. Heartbeat uses three config files, all found in /etc/ha.d:
ha.cf – the main heartbeat config file.
haresources – resources that are managed by heartbeat.
authkeys – used for node authenitacation.
Node0 will be our primary node. The first configuration file is ha.cf, and this file is what configures all the nodes, communication, and which features are enabled. Our basic ha.cf file will look like this:
<code>logfacility daemon # This is deprecated<br />keepalive 1 # Interval between heartbeat (HB) packets.<br />deadtime 10 # How quickly HB determines a dead node.<br />warntime 5 # Time HB will issue a late HB.<br />initdead 120 # Time delay needed by HB to report a dead node.<br />udpport 694 # UDP port HB uses to communicate between nodes.<br />ping 192.168.12.10 # Ping VMware Server host to simulate network resource.<br />bcast eth0 # Which interface to use for HB packets.<br />auto_failback off # Auto promotion of primary node upon return to cluster.<br />node node0.ka6wke.net # Node name must be same as uname -r.<br />node node1.ka6wke.net # Node name must be same as uname -r.<br /><br />respawn hacluster /usr/lib/heartbeat/ipfail<br /># Specifies which programs to run at startup<br /><br />use_logd yes # Use system logging.<br />logfile /var/log/hb.log # Heartbeat logfile.<br />debugfile /var/log/heartbeat-debug.log # Debugging logfile.<br /></code>
Now that ha.cf has been configured, we need to configure the haresources file. This one is pretty easy. Haresources is where we list our primary node, the virtual IP that's used by the cluster, and what DRBD resource to manage. The virtual IP needs to be different than either node, and be unique on the subnet. You'll treat it just like any other IP address on your network. We'll pick 192.168.12.30 as our virtual IP. The haresources file looks like this:
<code>node0.ka6wke.net IPaddr::192.168.12.30/24 drbddisk::mysql \<br />Filesystem::/dev/drbd0::/mnt/mysql::ext3::defaults mysqld<br /></code>
Here's a breakdown of our haresources file:
<code>IPaddress::192.168.12.30/24 - Runs /etc/ha.d/resources.d/IPaddress 192.168.12.30/24 {start,stop}<br />drbddsk::mysql - Runs /etc/ha.d/resources.d/drbddsk mysql {start,stop}<br />Filesystem::/dev/drbd0::/mnt/mysql::ext3::defaults - Runs /etc/ha.d/resources.d/Filesystem /dev/drbd0 /mnt/mysql ext3 defaults {start,stop}<br />mysqld - Runs mysqld {start,stop}<br /></code>These are the directions Heartbeat needs to manage our resources. On startup, it's read from left to right. On node0, first thing Heartbeat will do is create the virtual IP, then it'll bring up our DRBD resource. Once that's finished, it'll mount /dev/drbd0 on /mnt/mysql, then finally startup mysqld. When shutting down, Heartbeat reads this file from right to left. It'll stop mysqld, unmount /mnt/mysql, and demote node0 to secondary. The last thing Heartbeat will do is stop the virtual IP from working on node0. Heartbeat on node1 will notice node0 is missing, and take over all the resources in the same fashion as node0 does upon startup.
Our last file is authkeys. Since our virtual machines are running on a private network for experimental purposes, we'll dispose of any network security. We'll use the unsecure crc directive, our authkeys file:
<code>auth 2<br />2 crc<br /></code>
The permissions on the authkeys file must be 0600, if you don't heartbeat won't start, and in the system log, you see: node0 heartbeat:
<code>[8116]: ERROR: Bad permissions on keyfile /etc/ha.d/authkeys], 600 recommended. Chmod 0600 authkeys will fix this problem.<br /></code>
One last edit to make is MySQL configuration file, my.cnf so mysqld will bind to the virtual IP address. Add bind-address=192.168.12.30 in my.cnf, and copy it over to node1.
We're ready to start heartbeat up on both nodes.
<code>[root@node0 ~] service heartbeat start<br />[root@node1 ~] service heartbeat start<br /><br /></code>
Once startup is complete, you should see this at the end of the log:
<code>IPaddr[18287]: 2007/07/14_21:13:37 INFO: IPaddr Running OK<br />Filesystem[18468]: 2007/07/14_21:13:38 INFO: Running status for /dev/drbd0 on /mnt/mysql<br />Filesystem[18404]: 2007/07/14_21:13:39 INFO: Filesystem Running OK<br />heartbeat[18253]: 2007/07/14_21:13:39 info: local HA resource acquisition completed (standby).<br />heartbeat[17329]: 2007/07/14_21:13:39 info: Standby resource acquisition done [foreign].<br />heartbeat[17329]: 2007/07/14_21:13:40 info: remote resource transition completed.<br /></code>
You'll need to login to mysql on node0 because we haven't granted the rights to access mysql over the network:
<code>mysql> GRANT ALL PRIVILEGES ON *.* TO 'root'@'192.168.12.%'<br /></code>
Testing MySQL High Availability
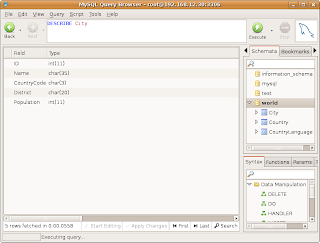
We now have our 2 node cluster running MySQL. Node0 is the primary node running mysqld. You can login to MySQL, and check the world database using the cluster IP address:

You can see, we can access the world database, with Heartbeat managing MySQL and DRBD. Lets test automatic failover to node1:
<code>[root@node0 ~] service heartbeat stop<br /></code>
Logs will look like this:
<code>ResourceManager[18742]: 2007/07/14_21:46:19 debug: /etc/ha.d/resource.d/drbddisk mysql stop done. RC=0<br />ResourceManager[18742]: 2007/07/14_21:46:19 info: Running /etc/ha.d/resource.d/IPaddr 192.168.12.30/24 stop<br />ResourceManager[18742]: 2007/07/14_21:46:19 debug: Starting<br />/etc/ha.d/resource.d/IPaddr 192.168.12.30/24 stop<br />IPaddr[19066]: 2007/07/14_21:46:21 INFO: /sbin/route -n del -host 192.168.12.30<br />IPaddr[19066]: 2007/07/14_21:46:21 INFO: /sbin/ifconfig eth0: 192.168.12.30 down<br />IPaddr[19066]: 2007/07/14_21:46:21 INFO: IP Address 192.168.12.30 released<br />IPaddr[18987]: 2007/07/14_21:46:21 INFO: IPaddr Success<br />ResourceManager[18742]: 2007/07/14_21:46:21 debug: /etc/ha.d/resource.d/IPaddr 192.168.12.30/24 stop done. RC=0<br />heartbeat[18732]: 2007/07/14_21:46:21 info: All HA resources relinquished.<br />heartbeat[17329]: 2007/07/14_21:46:22 info: killing /usr/lib/heartbeat/ipfail process group 17340 with signal 15<br />heartbeat[17329]: 2007/07/14_21:46:23 info: killing HBREAD process 17336 with signal 15<br />heartbeat[17329]: 2007/07/14_21:46:23 info: killing HBFIFO process 17332 with signal 15<br />heartbeat[17329]: 2007/07/14_21:46:23 info: killing HBWRITE process 17333 with signal 15<br />heartbeat[17329]: 2007/07/14_21:46:23 info: killing HBREAD process 17334 with signal 15<br />heartbeat[17329]: 2007/07/14_21:46:23 info: killing HBWRITE process 17335 with signal 15<br />heartbeat[17329]: 2007/07/14_21:46:24 info: Core process 17332 exited. 5 remaining<br />heartbeat[17329]: 2007/07/14_21:46:24 info: Core process 17333 exited. 4 remaining<br />heartbeat[17329]: 2007/07/14_21:46:24 info: Core process 17334 exited. 3 remaining<br />heartbeat[17329]: 2007/07/14_21:46:24 info: Core process 17335 exited. 2 remaining<br />heartbeat[17329]: 2007/07/14_21:46:24 info: Core process 17336 exited. 1 remaining<br />heartbeat[17329]: 2007/07/14_21:46:24 info: node0.ka6wke.net Heartbeat shutdown complete<br /></code>
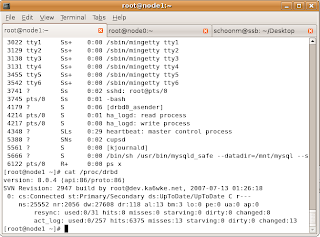
On node1, DRBD has mounted the MySQL datadir, and started mysqld You can also see Heartbeat running too:

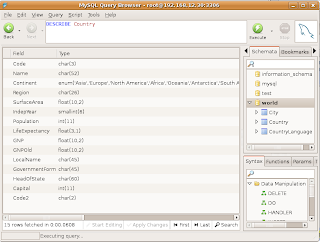
Take a look at Country table:

Automatic failover of our experimental cluster works!
Conclusion
In a production system, you'd probably want multiple DRBD resources for logfiles, tables and indexes. You could also have DRBD sync its data using a crossover cable between a pair of dedicated NICs. That would greatly help in handling large amounts of data, and not impact the user network. For heartbeats, you could use a serial cable, and I think it would be cool if heartbeats could be sent over a USB connection. There's also security in Heartbeat that would need to be used too. We've really got started with DRBD and Heartbeat. There's plenty more to learn.
Even the most complex systems can be broken down into smaller pieces that can stand alone. I've demonstrated in this article how to install, configure and test each part of a highly available system to reach our final goal of MySQL running on a cluster. You have a solid understanding how each piece works in the system, which will help you greatly when you run into problems. Plus, it'll give you confidence that MySQL running over DRBD and managed by Heartbeat is a solid solution to use in your environment.
MySQL high availability can save your sanity, and a good nights rest. Your users may never notice the MySQL database not being available.
Resources
MySQL: http://www.mysql.com
Linux-HA: http://linux-ha.org/
DRBD: http://wiki.linux-ha.org/DRBD
Heartbeat: http://linux-ha.org/Heartbeat
Reference: http://marksitblog.blogspot.com/2007/07/mysql-5-high-availability-with-drbd-8.html